
Popular categories
Looking for a yarn?


|
||||||||||||||||||||||
Warm Apricot |
||||||||||||||||||||||
|
|
||||||||||||||||||||||
Crochet DROPS top with lace pattern and raglan in ”Safran”. The piece is worked top down. Size: S - XXXL.
DROPS Extra 0-1287 |
||||||||||||||||||||||
|
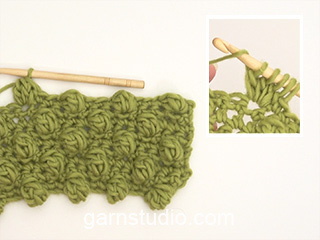
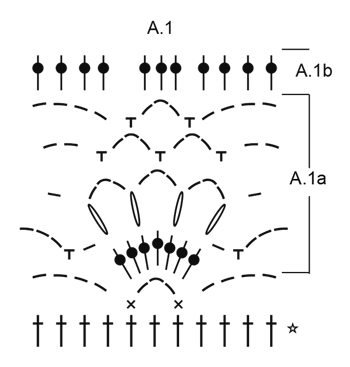
PATTERN: See diagrams A.1. CROCHET INFO: Replace first dc at on every dc round with ch 3, finish the round with 1 sl st in 3rd ch from beg of round. On every sc round, replace first sc with 1 ch and finish round with 1 sl st in 1st ch from beg of round. INCREASE TIP-1: Inc 1 dc by working 2 dc in same dc. INCREASE TIP-2 (applies to sides of body): Work until 3 dc remain before marker thread, work 2 dc in next dc (= 1 dc inc), work 1 dc in each of the next 4 dc (marker thread is in the middle of these sts), work 2 dc in next dc (= 1 dc inc). RAGLAN: Inc for raglan on each side of A.1. Inc 2 sts BEFORE A.1 as follows: Work until 2 dc remain before A.1, work 2 dc in each of the next 2 dc (= 2 dc inc). Inc 2 sts AFTER A.1 as follows: Work 2 dc in each of the first 2 dc after A.1 (= 2 dc inc). Inc 1 sts BEFORE A.1 as follows: Work until 1 dc remains before A.1, work 2 dc in next dc (= 1 dc inc). Inc 1 sts AFTER A.1 as follows: Work 2 dc in first dc after A.1 (= 1 dc inc). The inc on body and sleeves are uneven as explained in pattern. DECREASE TIP: Work until 4 dc remain before marker thread, work the next 2 dc tog as follows: Work 1 dc in next dc but wait with last pull through (= 2 sts on hook), work 1 dc in next dc, but on last pull through pull yarn through all sts on hook - 1 dc have been dec, work 1 dc in each of the next 4 dc (marker thread is between these sts), work the next 2 dc tog (= 1 dc dec). ---------------------------------------------------------- YOKE: The piece is worked top down. Work 161-166-171-176-181-186 ch on hook size 3.5 mm/E/4 with Safran. Work next round as follows: Work 1 dc in 4th ch from hook (= 2 dc) - READ CROCHET INFO, 1 dc in each of the next ch 2, * skip ch 1, 1 dc in each of the next 4 ch *, repeat from *-* the entire row = 128-132-136-140-144-148 dc. Then work next round as follows: Work 1 dc in each of the first 18-19-20-21-22-23 dc AT THE SAME TIME inc 4-5-5-6-7-8 dc evenly – READ INCREASE TIP-1 – (= half back piece), A.1 over the next 11 dc, 2 dc in next dc, 1 dc in each of the next 4 dc, 2 dc in next dc, A.1 over the next 11 dc (= sleeve), 1 dc in each of the next 36-38-40-42-44-46 dc AT THE SAME TIME inc 8-10-10-12-14-16 dc evenly (= front piece), A.1 over the next 11 dc, 2 dc in next dc, 1 dc in each of the next 4 dc, 2 dc in next dc, A.1 over the next 11 dc (= sleeve), 1 dc in each of the last 18-19-20-21-22-23 dc AT THE SAME TIME inc 4-5-5-6-7-8 dc evenly. On front and back piece there are now 44-48-50-54-58-62 dc and on sleeve there are A.1, 8 dc and A.1. On next round inc for RAGLAN – see explanation above! INC AS FOLLOWS ON FRONT AND BACK PIECE: Inc 2 dc every round 3-4-7-9-13-16 times in total, then 1 dc every round 12-12-10-9-6-5 times in total. INC AS FOLLOWS ON SLEEVES: Inc 2 dc every round 0-0-1-3-4-4 times in total, then 1 dc every round 15-16-16-15-15-17 times in total. REMEMBER THE CROCHET GAUGE! When A.1 have been worked 1 time vertically, repeat A.1a over A.1. After all inc there are 80-88-98-108-122-136 dc on front piece and back piece, on sleeve there are A.1, 38-40-44-50-54-58 dc and A.1. Piece measures approx. 14-15-16-17-18-19 cm / 5½''-6''-6¼''-6¾''-7''-7½''. Work next round as follows: Work 1 dc in each of the first 40-44-49-54-61-68 dc, work 8 ch (= under sleeve), insert 1 marker thread in the middle between the new ch, skip: A.1a, 38-40-44-50-54-58 dc and A.1a (= sleeve), work 1 dc in each of the next 80-88-98-108-122-136 dc, 8 ch (= under sleeve), insert 1 marker thread in the middle of the new sts, skip: A.1a and 38-40-44-50-54-58 dc and A.1a (= sleeve), work 1 dc in each of the next 40-44-49-54-61-68 dc = 160-176-196-216-244-272 dc and 16 ch. Insert 1 marker in piece, NOW MEASURE PIECE FROM HERE. Move marker threads when working, leave the marker in piece. BODY: Work 1 dc in every dc, 1 dc in every ch. There are 88-96-106-116-130-144 dc between marker threads on back piece and front piece. When piece measures 3 cm / 1'' (measured from marker), dec 1 st on each side of each marker thread in the side (= 4 sts dec) - READ DECREASE TIP! Repeat dec every 4-4-3½-4½-4½-4½ cm / 1½"-1½"-1 1/4"-1 3/4"-1 3/4"-1 3/4" 3-3-4-3-3-4 more times = 160-176-192-216-244-268 dc in total. When piece measures 17-18-19-20-21-22 cm / 6¾''-7''-7½''-8''-8¼''-8¾'' (measured from marker), inc 1 st on each side of each marker thread (= 4 dc inc) – see INCREASE TIP-2. Repeat inc every 1½ cm / ½'' 6-6-7-6-6-7 more times = 188-204-224-244-272-300 dc. Continue with 1 dc in every dc until piece measures 32-33-34-35-36-37 cm / 12½''-13½''-13 3/8''-13¾''-14¼''-14½'' (measured from marker). Piece measures approx. 46-48-50-52-54-56 cm / 18''-19''-19¾''-20½''-21¼''-22'' in total from neck edge. Work 1 edge around the top as follows: Work * 1 sc in first/next dc, ch 4, skip approx. 1 cm / 3/8'' *, repeat from *-* around the entire top. Fasten off. SLEEVE EDGE: Sleeve is worked in the round, top down. Beg by working mid under sleeve as follows: Work 1 sc in 5th ch of the 8 ch worked in armhole on body. Work 3 ch (= 1 dc). Then work with 1 dc in each of the next ch 3, A.1a as before, 1 dc in each of the next 38-40-44-50-54-58 dc, A.1a as before, 1 dc in each of the last 4 ch under sleeve, finish with 1 sl st in 3rd ch at beg of round. Work 1 dc in every dc and A.1a until 1 whole repetition of A.1a has been worked. Then work 1 dc in every dc, work A.1b over A.1a = 68-70-74-80-84-88 dc. On next round work 1 dc in every dc AT THE SAME TIME dec 12 dc evenly = 56-58-62-68-72-76 dc. Work 1 dc in every dc until sleeve edge measures approx. 4 cm / 1½''. Work * 1 sc in first/next dc, ch 4, skip approx. 1 cm / 3/8'' *, repeat from *-* around the entire sleeve. Fasten off. Work a sleeve edge around the other sleeve. NECK EDGE: Beg mid back. Work ch 1, * 1 sc in first/next dc, ch 4, skip approx. 1 cm / 3/8'' *, repeat from *-* around the entire neck, finish with 1 sl st in first ch, make sure to avoid a tight neck edge. |
||||||||||||||||||||||
Diagram explanations |
||||||||||||||||||||||
|
||||||||||||||||||||||
|
||||||||||||||||||||||

|
||||||||||||||||||||||
|
Have you made this or any other of our designs? Tag your pictures in social media with #dropsdesign so we can see them! Do you need help with this pattern?You'll find tutorial videos, a Comments/Questions area and more by visiting the pattern on garnstudio.com. © 1982-2024 DROPS Design A/S. We reserve all rights. This document, including all its sub-sections, has copyrights. Read more about what you can do with our patterns at the bottom of each pattern on our site. |
||||||||||||||||||||||


With over 40 years in knitting and crochet design, DROPS Design offers one of the most extensive collections of free patterns on the internet - translated to 17 languages. As of today we count 304 catalogs and 11422 patterns - 11417 of which are translated into English (US/in).
We work hard to bring you the best knitting and crochet have to offer, inspiration and advice as well as great quality yarns at incredible prices! Would you like to use our patterns for other than personal use? You can read what you are allowed to do in the Copyright text at the bottom of all our patterns. Happy crafting!
Comments / Questions (70)
Bonsoir J'ai une petite incompréhension pour le raglan. vous ne dites pas combien de fois doit on augmenter de mailles de chaque coté du point A1 et si il faut alterner des doubles augmentations avec des simples. Merci d'avance de votre réponse
16.02.2019 - 21:35DROPS Design answered:
Bonjour Mme Lainsack, on va augmenter différemment en fonction de la taille et des manches ainsi: devant et dos: 3-16 x 2 brides tous les tours puis 12-5 x 1 b tous les tours et sur les manches: 0-2 x 2 b tous les tours et 15-17x 1 b tous les tours. Bon crochet!
18.02.2019 - 09:53Wat ik niet begrijp: gezien van patroon XL voor de mouw A1-11-A! is 20 steken. Dan meerderen: 3x 2st en 15x 1 st. Is totaal 41 st. Volgens de beschrijving heeft de mouw nu 50 steken. Ik pieker me suf waar die andere 9 st dan vandaan komen. Kunt u me uit de nood helpen? Dank en groet, RMB
14.02.2019 - 12:33DROPS Design answered:
Dag Renske,
Op het voor- en achterpand zijn er 50 steken (niet de mouw) en op elke mouw A.1(11 st), 8 steken en A.1(11 st.). 2 keer A.1 plus 8 steken is 30 steken ipv 20 steken.
07.03.2019 - 22:35Hallo, ich bin bei der 3. Runde und häkel Gr. M. Ich häkel die 3. Runde nach der Anleitung die unter "RAGLANZUNAHMEN" steht 2x um die Runde zu schließen. Wenn ich dann die 4. Runde nach Anleitung häkel (Absatz "WIE FOLGT AM VORDER-...") komme ich nicht auf je 88 Stb. bzw. 40 Stb. an den Ärmeln, sondern auf insgesamt 12 Stb mehr. Warum? Muss ich beide Runden zu einer kombinieren? Viele Grüße, Emma
29.10.2018 - 15:37DROPS Design answered:
Liebe Emma, nach der 1. Zunahme haben Sie 12 Maschen zugenommen und wenn alle Zunahmen fertig sind, dann bekommen Sie 88 Stb für Vorder- & Rückenteil und 40 M für jeden Ärmel. Viel Spaß beim häkeln!
29.10.2018 - 16:15Anna Ludlow wrote:
I'm struggling with the increases in the yoke. I'm making the XXL size, but if I do the increases as written I end up with 136 stitches instead of 122. I'm not sure where the extra 14 stitches are coming from. Do the increases before A1 count as the inc on the front and back pieces?
09.08.2018 - 20:24DROPS Design answered:
Dear Mrs Ludlow, before inc for raglan, there are 58 sts on front and back piece, you increase 2 sts at the beg/end of piece x 13 (= 4 stsx13=52 sts inc) + 1 st at the beg/end of piece x 6 (=2 stsx6=12 sts inc): 58+52+16= 122 sts. Happy crocheting!
10.08.2018 - 08:23Jeg har svært ved at se på arbejdet. Om hvad der høre til forstykket, bagstykket og ærmer. Er det sådan at når man hækler efter bærestykket, at de yderste led høre til bastykket. Og det der er mellem de 2 A1 stykker høre til ærmet, og midten er forstykket? Og skal det sys sammen bagefter? Det er første gang at jeg har haft svært ved at forstå jeres opskrifter. Ellers en sød bluse. Håber i kan hjælpe mig.
27.06.2018 - 22:29DROPS Design answered:
Hej Janni, Hele arbejdet strikkes rundt ovenfra og ned (og skal ikke syes sammen bagefter). Du vælger en størrelse og starter hvor der står BÆRESTYKKE: Arb hækles rundt ovenfra og ned. Hækl ....... og så er det bare at følge opskriften stykke efter stykke. God fornøjelse!
29.06.2018 - 09:20Je désirerais savoir si c'est un modèle difficile pour une débutante car j'ai déjà fait beaucoup de petites choses et j'aimerais me lancer dans de plus grand projet.
08.05.2018 - 19:09DROPS Design answered:
Bonjour Lorraine, lisez attentivement les explications et n'hésitez pas à poser votre question ici. Pour toute assistance individuelle, vous pouvez également contacter le magasin où vous avez acheté votre fil et/ou le forum DROPS. Bon crochet!
09.05.2018 - 08:12Na de Pas staat er: Meerder als volgt op het voorpand en achterpand 2 stk elke toer 7 keer in totaal enz. Hier kom ik totaal niet uit, hoe ik het ook bereken, want ik moet op totaal 98 stokjes uitkomen zoals verderop in de beschrijving wordt aangegeven. In de 3e toer kom ik zelf uit op 53 stokjes op voorpand en achterpand, als ik dus doorga zoals ik denk dat het aangegeven is dan kom ik ver boven de 98 uit. Alles super onduidelijk. Groetjes Anneke
09.03.2018 - 15:41DROPS Design answered:
Hallo Anneke, Als er staat dat je 2 steken moet meerderen bijvoorbeeld op de panden, betekent dat dat je naast A.1 2 steken meerdert (zie bij RAGLAN bovenin het patroon hoe je dit doet). Daardoor heb je in totaal op het voorpand 4 steken erbij en op het achterpand ook 4 steken erbij. Verder staat erbij hoe vaak je deze 2 steken meerdert en om de hoeveel naalden. Daarna meerder je nog eens een aantal keren 1 stokje aan elke kant van A.1 op de panden. TEGELIJKERTIJD meerder je ook op dezelfde manier bij de mouwen, volgens omschrijving.
09.03.2018 - 16:23Jeg har veldig vanskelig med å forstå økningene i denne oppskriften. Har heklet en del runder nå, og det har blitt aaaalt for mange masker i fht hva som står i oppskriften. Jeg skjønner ikke hva jeg gjør feil. Mamma har også sett på oppskriften, og hun skjønner heller ikke hva jeg skal gjøre annerledes.
04.03.2018 - 20:50In der deutschen Anleitung wird auf A.2 und A.2a verwiesen, die in dieser Anleitung aber keine Rolle spielen.
17.02.2018 - 23:47Hallo, Het meerderen thv de raglan verloopt over 17 rijen. tegelijkertijd: A.1 + A.1a = 11 rijen Wat doe ik de overige 6 rijen? Of doe ik A.1 + A.1+ A.1a? Dit zijn dan wel 17 rijen... Grts Nancy
10.11.2017 - 17:17DROPS Design answered:
Hallo Nancy, Als A.1 helemaal gehaakt is in de hoogte kun je A.1a in de hoogte herhalen tot de gewenste lengte.
13.11.2017 - 22:15