
Popular categories
Looking for a yarn?


Comments / Questions (73)
![]() SandraB wrote:
SandraB wrote:
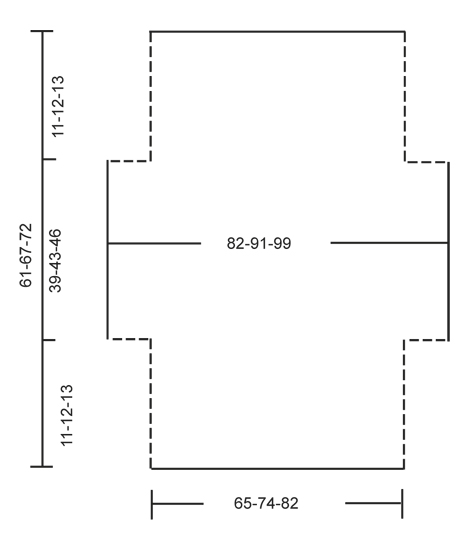
Hallo! Ik wil graag dit patroon maken. Heb nog niet zovaak kleren gehaakt. Daarom begrijp ik de tweede tekening met de maten niet zo goed. Hoe moet ik die zien?
01.07.2017 - 08:37DROPS Design answered:
Hoi Sandra, In de tweede tekening zie je het werk wanneer je klaar bent met haken, maar nog niet in elkaar genaaid hebt. Het kledingstuk wordt op de horizontale lijn dubbel gevouwen en op op de stippellijnen aan elkaar gehaakt.
01.07.2017 - 12:01
![]() Elizabeth Baker wrote:
Elizabeth Baker wrote:
I have finished my 21 1/2 inches and pattern says to not work 12 stitches on either side how then do I start my next row
21.05.2017 - 19:07DROPS Design answered:
Dear Mrs Baker, work next row until 12 sts remain, turn and work next row until 12 sts remain, turn and work next row. You will have now 12 sts unworked on each side. Happy crocheting!
22.05.2017 - 09:54
![]() Elizabeth Baker wrote:
Elizabeth Baker wrote:
I have finished my 21 1/2 inches and pattern says to not work 12 stitches on either side, how do I start next row?
20.05.2017 - 19:02
![]() Elizabeth Baker wrote:
Elizabeth Baker wrote:
After I have finished row 8 to continue do I start with A1 or A2 to repeat
01.05.2017 - 16:43DROPS Design answered:
Dear Mrs Baker, after you have worked A.2 1 time in height, repeat A.2 from row 1. Happy croccheting!
02.05.2017 - 11:48
![]() Elizabeth Baker wrote:
Elizabeth Baker wrote:
After I have finished row 8 do I start with row A1 or A2
01.05.2017 - 16:20DROPS Design answered:
Dear Elizabeth, after row 8, you should continue and repeat pattern A.2. I hope this helps. Happy crocheting!
06.05.2017 - 11:06
![]() GB wrote:
GB wrote:
Hi, in the pattern directions it says the picot has a DC in the first of the chain 3s, but the video shows a sc instead. Could you clarify please? Thanks!
15.04.2017 - 17:14DROPS Design answered:
Dear GB, you should work 1 dc in 1st of the 3 ch as explained in the pattern and not 1 sc as worked in the video, thanks for noticing. Happy crocheting!
19.04.2017 - 15:24
![]() Mary Ancira wrote:
Mary Ancira wrote:
The letter sizes, (example- S, M, L,) are not showing what size the bust is like it normally does. Should I assume the sizes are the same on all the patterns?
03.04.2017 - 10:24DROPS Design answered:
Dear Mrs Ancira, you will find at the bottom of the pattern a measurement chart with measurements for each size in cm, taken flat from side to side. Compare these to a similar garment you have and like the shape to find out the matching size. Read more about sizing and convert into inches here. Happy crocheting!
03.04.2017 - 11:25
![]() Stephanie wrote:
Stephanie wrote:
Bonjour je ne comprends pas l'augmentation, au rang 6 avec l'ajout de maille en l'air que l'on crochete apres avec une bride un ml une bride et ensuite crochete le reste comment ? c'est la que je saisis pas , parce que logiquement on serait sur le rang 7 mais ensuite encore au rang 7 ,pouvez vous m'expliquer merci
14.02.2017 - 00:10DROPS Design answered:
Bonjour Stéphanie, la 1ère augmentation sur le côté se fait à la fin du rang 5 (= le rang suivant sera le rang 6), on crochète 14 ml à la fin de ce rang, on tourne, on crochète 11B, puis le rang 6 de A.2 et on crochète 15 ml à la fin du rang 6, on tourne, on crochète 1B, 1 ml sur les nouvelles ml et on continue le rang 7 comme A.2. Puis on continue A.2 sur toutes les mailles. Bon crochet!
14.02.2017 - 09:32
![]() Jasmine wrote:
Jasmine wrote:
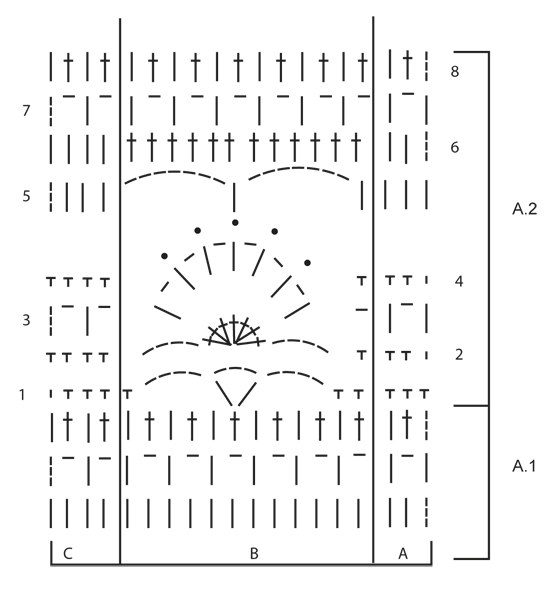
Dear Jasmine, "on row 1 in A.1 work 1 dc in each st," So since I have 92 stitches in A.1 I need to do 92 DC stitches all the way across?
21.01.2017 - 03:45DROPS Design answered:
Dear Jasmine, you should have 92 dc on first row, then work: A.1A (= 4 sts), repeat A.1B a total of 7 times (= 7 x 12 sts), and finish with A.1C (= 4 sts), ie: 3 + (x12=84) + 4= 91 sts. Happy crocheting!
23.01.2017 - 09:29Leonore wrote:
This pattern doesnt make any sence. Row one is clear to work. From there on i dont understand anything! Please write out the pattern. I dont work with diagrams or whatever this confusuon is called. Please help!
17.12.2016 - 18:45DROPS Design answered:
Dear Leonore, there is only diagram to this pattern, start reading diagram from the bottom corner on the right side and read towards the left from RS and from left to right from WS. Each symbol represents 1 st/group of sts. work A.1A (= 3 sts), then repeat A.1B (= 12 sts) and finish with A.1C (= 4 sts). You are welcome to contact your DROPS store for any further individual assistance. Happy crocheting!
19.12.2016 - 09:17
|
||||||||||||||||
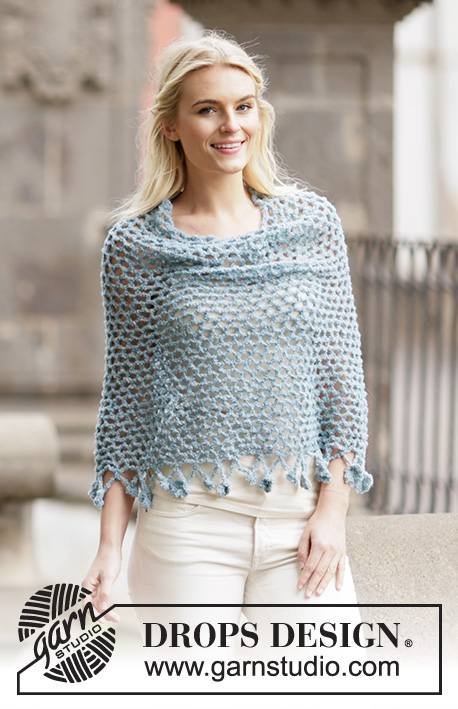
Blue Wonder#bluewondershoulderpiece |
||||||||||||||||
 |
 |
|||||||||||||||
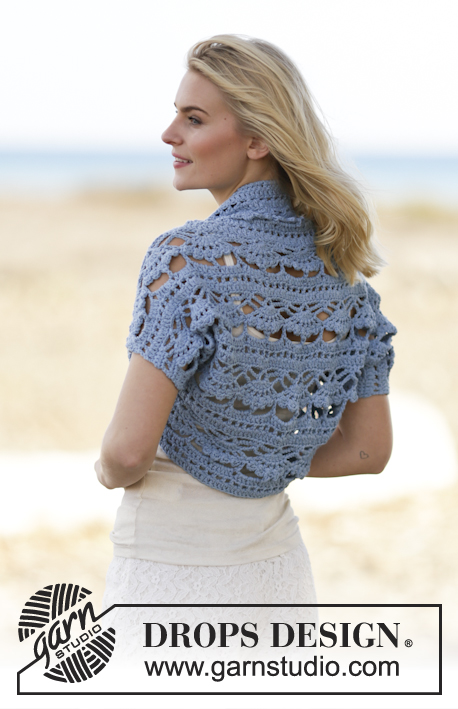
Crochet DROPS shoulder piece in "Paris". Size. S-XXXL
DROPS 162-34 |
||||||||||||||||
|
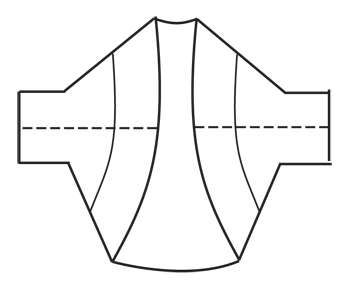
PATTERN: Se diagram A.1 and A.2. ---------------------------------------------------------- SHOULDER PIECE: Work 110-125-139 ch on hook size 5 mm / H/8 with Paris. ROW 1 Turn and work 1 dc in fourth ch from hook (= 2 dc), work 1 dc in each of the next 4-1-3 ch, * skip ch 1, 1 dc in each of the next 5 ch *, repeat from *-* = 91-103-115 dc. ROW 2 Then work according to diagram A.1 as follows: A.1 A, A.1 B 7-8-9 times in total, finish with A.1 C. When A.1 has been worked 1 time vertically, repeat A.2 upwards. AT THE SAME TIME when piece measures approx. 11-12-13 cm / 4½"-4¾"-5" (adjust so that next row is 6th row in A.2), work 14 ch at the end of row (= row 5). Turn and work 1 dc in fourth ch from hook, then work 1 dc in each of the next 10 new ch. Continue with 6th row in A.2, at the end of row work 15 new ch. Turn and work 1 dc in the sixth ch from hook, * work ch 1, skip ch 1, 1 dc in next ch *, repeat from *-* over the next 9 new ch, finish with 1 ch. Work the rest of row according to A.2. On next row work as before until the new sts at the end of row, work 1 dc in each ch-space and 1 dc in each dc. 12 dc have been inc in each side = 115-127-139 dc. Then continue on row 8 as follows: A.2 A, A.2 B 9-10-11 times in total, finish with A.2 C. When piece measures approx. 50-55-59 cm / 19¾"-21½"-23¼" (adjust so that next row is 7th row), do not work over 12 dc in each side = 91-103-115 dc. Continue to work as follows: A.2 A, A.2 B 7-8-9 times in total, finish with A.2 C. Continue until piece measures approx. 61-67-72 cm / 24"-26½"-28½" - adjust after a whole repetition of A.2. Fasten off. ASSEMBLY: Sew side and underarm seams in one inside 1 edge st. |
||||||||||||||||
Diagram explanations |
||||||||||||||||
|
||||||||||||||||
 |
||||||||||||||||
 |
||||||||||||||||
 |
||||||||||||||||
Have you finished this pattern?Tag your pictures with #dropspattern #bluewondershoulderpiece or submit them to the #dropsfan gallery. Do you need help with this pattern?You'll find 7 tutorial videos, a Comments/Questions area and more by visiting the pattern on garnstudio.com. © 1982-2026 DROPS Design A/S. We reserve all rights. This document, including all its sub-sections, has copyrights. Read more about what you can do with our patterns at the bottom of each pattern on our site. |
||||||||||||||||


With over 40 years in knitting and crochet design, DROPS Design offers one of the most extensive collections of free patterns on the internet - translated to 17 languages. As of today we count 324 catalogs and 12290 patterns - 12280 of which are translated into English (US/in).
We work hard to bring you the best knitting and crochet have to offer, inspiration and advice as well as great quality yarns at incredible prices! Would you like to use our patterns for other than personal use? You can read what you are allowed to do in the Copyright text at the bottom of all our patterns. Happy crafting!
Post a comment to pattern DROPS 162-34
We would love to hear what you have to say about this pattern!
If you want to leave a question, please make sure you select the correct category in the form below, to speed up the answering process. Required fields are marked *.