
Popular categories
Looking for a yarn?


Comments / Questions (260)
Rozz wrote:
I have completed row 12: ROUND 12: Work 1 ch, * in next ch-space work 2 tr, 2 dtr, 1 picot, 2 dtr, 2 tr, 1 dc in next ch *, repeat from *-* 24 times in total, finish with 1 sl st in first ch = 24 leaves. And now I'm stuck at row 13 the ch6, 1dc in dc and ch (from 12th and 11th round)... causes the piece to pucker and curl-up, it does not lay flat. What am I doing wrong?
24.02.2016 - 18:13DROPS Design answered:
Dear Mrs Rozz, that's correct, each leave will been brought out (like relief) as it can be seen on the picture. Happy crocheting!
25.02.2016 - 10:00
![]() Dumont Beatrice wrote:
Dumont Beatrice wrote:
Bonjour je suis coincée au rang 24 , j'ai bien les 273 brides du rang 23 , mais je n'arrive pas aux 13 motifs du A2, je commence mon rang par 2 b dans la premiere b , et ensuite les 11 b, et le motif A2 , mais je n'ai pas les 13 motifs , il m'en manque 1 , dois je commencer par le motif A2 et ensuite les 2 b suivies des 11 b ? merci de votre réponse
17.02.2016 - 00:34DROPS Design answered:
Bonjour Mme Dumont, crochetez ainsi: *2B dans la 1ère B, 1 B dans chacune des 11 B suivantes (= 12 B crochetées au-dessus de 11B), A.2 au-dessus des 9 B suivantes (= sautez 4 B, 2B,2ml,2B dans la B suivante, sautez 4 B)*, répétez de *-* 13 fois au total: 13 B x 13 fois tout le tour = 169B + 13 A.2. Bon crochet!
17.02.2016 - 09:11
![]() Bianca Koeling wrote:
Bianca Koeling wrote:
Hallo, Ik ben vest 162-11 aan het haken maar snap toer 24 niet. hoe moet je A2 haken? alles in 1 keer en dan verder met de stokjes rij of met de toeren mee? ik hoop dat jullie me kunnen helpen. alvast bedankt, Bianca
27.12.2015 - 11:53DROPS Design answered:
Hoi Bianca. Je herhaalt hier 2 stk in volgend stk en 1 stk in elke van de volgende 11 stk (dwz, 13 stk over 12 stk), dan A.2: (loopt over 9 stk) dus eerste toer 2 l, 2 stk, 3 l, 2 stk in de 5e stk van de herhaling, 2 l = of 2 l, sla 4 stk over, haak de stk/l, sla 4 stk over, 2 l en herhaal *-*. Dus verder met stokjes en weer A.2 herhalen op de hele toer.
06.01.2016 - 17:02
![]() Gina wrote:
Gina wrote:
Schade, dass die tolle Idee mit der Online-Anfrage bei mir so eine langwierige Angelegenheit ist. Ich wollte sicher sein, dass ich keinen Fehler mache und viel auftrennen muss - das schadet ja auch dem Garn. Seit zwei Wochen kann ich nicht weiterarbeiten, weil meine Frage nicht beantwortet wird.
05.12.2015 - 20:50DROPS Design answered:
Ich hoffe, Sie kommen mit der unten stehenden Antwort nun weiter.
13.12.2015 - 15:54
![]() Laura Van Mulken wrote:
Laura Van Mulken wrote:
Ik ben aangekomen bij toer 2 maar kom maar niet verder. Ik begrijp A2 niet. Bestaat A2 in totaal uit 6 toeren/rijen. Wat moet ik bijvoorbeeld in toer 24 haken 2stokjes in een stokje, 11 stokjes en wat moet ik dan haken? 2 losse,2 stokjes,3losse, 2stokjes,2losse?? En toer 25 2stokjes in een stokje, 11 stokjes en wat moet ik dan haken? 2 stokjes, 6 dubbele stokjes 2 stokjes?? Alvast heel erg bedankt :)
28.11.2015 - 20:24DROPS Design answered:
Beste Laura. Je haakt in toer 24: 2 stk in volgend stk, 1 stk in elke van de volgende 11 stk = Dus 2 stk in één stk en 1 stk in 11 stk (= 13 stk gehaakt over 12 stk), haak A.2. 1 herhaling van A.2 loopt over 9 stk en het eerste toer (de stk) wordt uitgelegd in het patroon. Vervolgens herhaal je steeds de 4 volgende toeren van het patroon in de hoogte (de stk wordt alleen de eerste keer gehaakt).
30.11.2015 - 16:38
![]() Gina wrote:
Gina wrote:
Hallo, in der 28.Reihe werden die Armlöcher mit Luftmaschenreihen begonnen. Das Muster A2 endet mit 2 Luftmaschen. Muss ich gleich anschließend die Luftmaschen für das Armloch häkeln (Text: A.2, 54-62-62 lockere Lm (= rechter Armausschnitt), oder mit 1 oder 2 Stäbchen erst das Muster A2 abschließen? Sonst wäre der Mustersatz nicht vollständig. Wie muss ich diesen Schritt am zweiten Armloch ausführen?
22.11.2015 - 19:01DROPS Design answered:
A.2 wird ja wie zuvor weitergehäkelt und statt der Maschen, die übersprungen werden, häkeln Sie die Luftmaschen. In der 28. Rd beginnt und endet A.2 mit 2 Lm (1. Rd des A.1-Rapports), also häkeln Sie diese auch entsprechend - d.h. A.2 beenden Sie mit 2 Lm und häkeln direkt die Armausschnitt-Lm. In der nächsten Rd häkeln Sie dann wie zuvor bei A.2 die Stb und D-Stb um die 3 Lm. Somit bleibt der Mustersatz komplett erhalten.
13.12.2015 - 15:53
![]() Caroline Rabenius wrote:
Caroline Rabenius wrote:
Hej! Jag är nu på varv 30 och förstår inte vad som menas när jag ska virka första A2 över armhålet. Det står i mönstret att jag ska anpassa v efter de andra rapporterna, innebär det att jag ska virka A2 över armhålorna som jag gör med de andra A2 som ligger utanför armhålorna, dvs varv 3 i A2 (vilket ju egentligen inte går då jag inte har de två första varven på A2), eller ska jag börja på varv 1 på A2 här? Tack på förhand! Vänligen Caroline
11.11.2015 - 10:32DROPS Design answered:
Hej Caroline, du fortsætter som tidligere og sørger for at rapporterne stadigvæk passer over hinanden. God fornøjelse!
26.11.2015 - 09:21
![]() Christine Chasse wrote:
Christine Chasse wrote:
Suite car vous dite un moment donner dans le numéro 28 repeter 5 fois pour moi l'excpliquation de l'emmenchure n'es pas clair du tout et rendu la je voudrais bien le finir c'est pour un cadeaux de noel vous seriez tres gentille de me donner un truc car la je suis tout mêler merci bien a vous
11.11.2015 - 01:58DROPS Design answered:
Bonjour Mme Chasse, pour former les emmanchures, on saute des mailles du tour 27 que l'on remplace par des chaînettes, mais le reste du tour (début, entre les emmanchures et fin) se fait en continuant le motif comme avant, A.2 et les augmentations dans les sections en B. Bon crochet!
11.11.2015 - 09:35
![]() Christine Chasse wrote:
Christine Chasse wrote:
Rang 28 avec les 54 mailles en lair qu'est que je fais je les joints ou et ensuite pour la deuxieme emmanchue je commence ou a faire les motifs au fait es-ce que je dois travailler le reste du tour du motif premier ou je n'es pas travailler
11.11.2015 - 01:58DROPS Design answered:
Bonjour Mme Chasse, la 1ère emmanchure se fait en sautant 16B + A.2 + 16B + A.2 - que l'on remplace par 54ml. Quand ces 54 ml sont faites continuez après la partie des mailles sautées (= emmanchure) ainsi: * 2B dans la B suivante, 1B dans chacune des 15B suivantes, A.2*, répéter de *-* 5 fois au total, puis 2 B dans la 1ère B, 1 B dans chacune des 15B suivantes (= bas du dos de la veste) et crochetez ensuite la 2ème emmanchure: sautez A.2 + 16B + A.2 + 16B et remplacez ces mailles par 54 ml, et continuez le tour, après cette section de mailles sautées: A.2, 2B dans la B suivante, 1 B dans chacune des 15 B suivantes, A.2. Bon crochet!
11.11.2015 - 09:34
![]() Gina wrote:
Gina wrote:
Hallo, eine Frage zur Reihe 24: In der Erklärung vom 05.05.15 steht, dass nach dem Muster A2 11 Stb zu häkeln sind. Die Anleitung gibt an, dass der Mustersatz immer mit 2 Stb im nächsten Stb der vorherigen Reihe beginnt und 11 Stb noch folgen. Was soll ich jetzt machen? Passt das Muster A2 nur beim 1. Mal in der Mitte des Bogens aus der 23.Reihe? Die folgenden A2-Muster landen in verschiedenen Maschen der Bögen. Ist das so gewollt oder habe ich etwas falsch verstanden?.
08.11.2015 - 17:48DROPS Design answered:
Sie müssen den Mustersatz in den Sternchen wiederholen, also nach A.2 wieder 2 Stb in das nächste Stb häkeln, das wurde wohl bei der Antwort, die Sie genannt haben, übersehen. Sie arbeiten also weiterhin Zunahmen. Wichtig ist, dass Sie am Ende der R genau hinkommen, d.h. mit A.2 enden. A.2 landet tatsächlich nicht immer in den gleichen Maschen, das ist auf dem Detailfoto auch sichtbar, wenn Sie genau hinschauen. Weiterhin gutes Gelingen!
12.11.2015 - 19:59
|
||||||||||||||||||||||||||||||||||||||||
Ros#roscardigan |
||||||||||||||||||||||||||||||||||||||||
 |
 |
|||||||||||||||||||||||||||||||||||||||
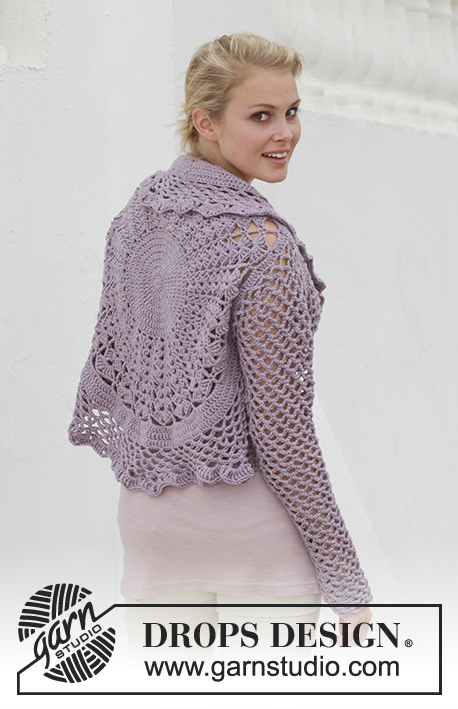
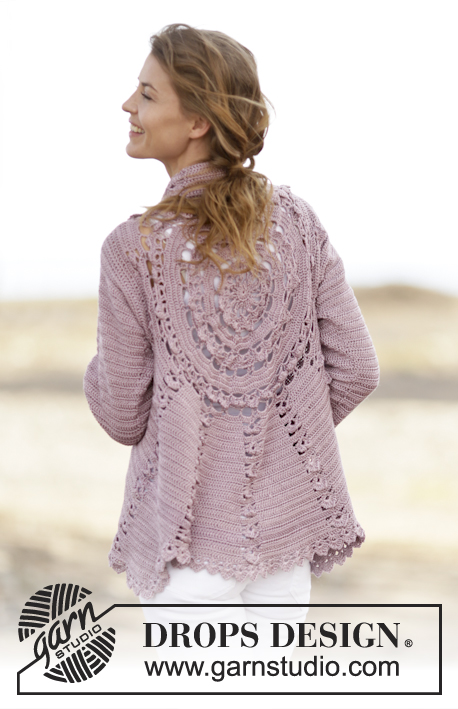
Crochet DROPS jacket worked in a circle with lace pattern in ”Cotton Viscose”. Size: S - XXXL.
DROPS 162-11 |
||||||||||||||||||||||||||||||||||||||||
|
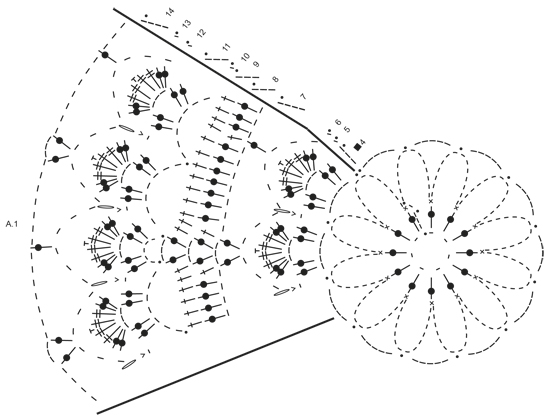
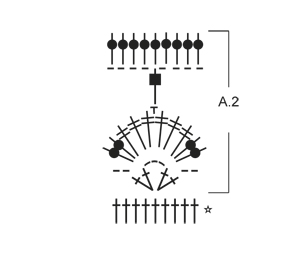
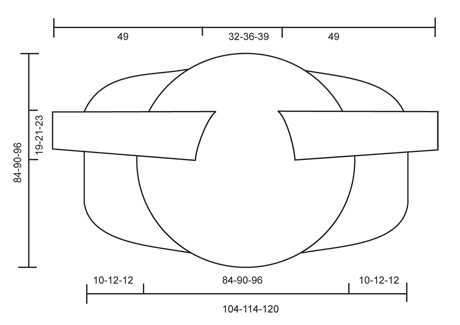
PICOT: Work ch 2, 1 sc in the 2nd ch from hook. CROCHET INFO: Beg every dc round/row with 3 ch that replace first dc and finish every round/row with 1 sl st in 3rd ch from beg of round/row. PATTERN: See diagrams A.1-A.2. After 3rd round, repeat A.1 6 times in total on round. CROCHET 3 dc TOG: Work 3 dc into 1 dc at beg of row as follows: Work 3 ch (= replace 1 dc), work 1 dc, but wait with last pull through (= 2 strands on hook), then work next dc but on last pull through, pull yarn through all sts on hook. DECREASE TIP (applies to sleeves): Dec at beg of row by working 1 sl st over the dc to be dec. Dec at end of row by working until 1 dc to be dec remains, turn piece. ---------------------------------------------------------- CIRCLE: Work 7 ch on hook size 3.5 mm/E/4 with Cotton Viscose and form a ring with 1 sl st in first ch. Then work A.1 as follows: ROUND 1: Work ch 3, 12 dc in ch-ring, finish with 1 sl st in 3rd ch from beg of round. ROUND 2: Work ch 1, * 1 sc in first dc, 14 ch *, repeat from *-* 12 times in total, finish with 1 sl st in first sc. Fasten off. ROUND 3: Work 1 sl st in first ch-space, ch 5, * 1 sl st in next ch-space, 5 ch *, repeat from *-* 11 times in total, finish with 1 sl st in first ch-space. A.1 is repeated 6 times in total on round. ROUND 4: Work ch 3, in first ch-space work: * 2 dc, ch 3, 2 dc in same ch-space, 1 ch *, repeat from *-* 12 times in total, finish with 1 sl st in 3rd ch from beg of round. ROUND 5: Work ch 1, in first ch-space work 2 dc, 2 tr, 1 PICOT – see explanation above, 2 tr, 2 dc, 1 sc in next ch, * in next ch-space work 2 dc, 2 tr, 1 picot, 2 tr, 2 dc, 1 sc in next ch *, repeat from *-* 11 times in total, finish with 1 sl st in first ch = 12 leaves. ROUND 6: Work ch 1, * ch 6, 1 sc in sc and ch (from 5th and 4th round) *, repeat from *-* 12 times in total, finish with 1 sl st in first ch. ROUND 7: Work ch 4, * ch 3, 1 dc in next ch-space, ch 7, 1 dc in next ch-space, ch 3, 1 dc in same ch-space, 4 ch *, repeat from *-* 6 times in total, finish with 1 sl st in 4th ch. ROUND 8: Work ch 3, 3 dc in next ch-space, * 1 dc in next dc, 7 dc in next ch-space, 1 dc in next dc, 1 dc in next ch-space, ch 3, 1 dc in same ch-space, 1 dc in next dc, 7 dc in next ch-space *, repeat from *-* 5 times in total, 1 dc in next dc, 7 dc in next ch-space, 1 dc in next dc, 1 dc in next ch-space, ch 3, 1 dc in same ch-space, 1 dc in next dc, 4 dc in first ch-space, finish with 1 sl st in 3rd ch = 114 dc. REMEMBER THE CROCHET GAUGE! ROUND 9: Work ch 3, * 1 dc in every dc until ch-space, in ch-space as follows: 1 dc, ch 3, 1 dc *, repeat from *-* the entire round, finish with 1 sl st in 3rd ch = 126 dc. ROUND 10: Work ch 1, * ch 7, skip 6 dc, 1 sl st in next dc, ch 7, skip 6 dc, 1 sl st in next dc, ch 5, 1 sl st in next dc, ch 7, skip 6 dc, 1 sl st in next dc *, repeat from *-* 5 times in total, ch 7, skip 6 dc, 1 sl st in next dc, ch 7, skip 6 dc, 1 sl st in next dc, ch 5, 1 sl st in next dc, ch 7, skip 6 dc, 1 sl st in first ch. ROUND 11: Work ch 3, in every ch-space work 2 dc, ch 3, 2 dc, ch 1, finish with 1 sl st in 3rd ch. ROUND 12: Work ch 1, * in next ch-space work 2 dc, 2 tr, 1 picot, 2 tr, 2 dc, 1 sc in next ch *, repeat from *-* 24 times in total, finish with 1 sl st in first ch = 24 leaves. ROUND 13: Work ch 1, * ch 6, 1 sc in sc and ch (from 12th and 11th round) *, repeat from *-* 24 times in total, finish with 1 sl st in first ch. ROUND 14: Work ch 4, * ch 3, 1 dc in next ch-space, ch 7, 1 dc in next ch-space, ch 3, 1 dc in same ch-space, 4 ch *, repeat from *-* 12 times in total, finish with 1 sl st in 4th ch. ROUND 15: Work 3 ch - READ CROCHET INFO, work 4 dc in first ch-space (i.e. ch-space with 3 ch), now work dc in all ch-space with 7 ch from previous round, do not work in ch-space with 3 ch from previous round. Work * 8 dc in each of the next 7 ch-spaces, 9 dc in next ch-space *, repeat from *-* 2 times in total, 8 dc in each of the next 7 ch-spaces, 5 dc in last ch-space (i.e. ch-space with 4 ch) = 195 dc. ROUND 16: Work * 1 dc in each of the first 14 dc, 2 dc in next dc *, repeat from *-* 13 times in total = 208 dc. ROUND 17: Work * 2 dc in first dc, 1 dc in each of the next 15 dc *, repeat from *-* 13 times in total AT THE SAME TIME inc 1 dc extra on round = 222 dc. ROUND 18: Work ch 1, * ch 6, skip 5 dc, 1 sl st in next dc *, repeat from *-* 37 times in total, finish with 1 sl st in first ch. ROUND 19:Work as round 11 in A.1: Work ch 3, in every ch-space work 2 dc, ch 3, 2 dc, ch 1, finish with 1 sl st in 3rd ch. ROUND 20: Work as round 12 in A.1: Work ch 1, * in next ch-space work 2 dc, 2 tr, 1 picot, 2 tr, 2 dc, 1 ch *, repeat from *-* 37 times in total, finish with 1 sl st in first ch = 37 leaves. ROUND 21: Work as round 13 in A.1: Work ch 1, * ch 6, 1 sc in sc and ch (from 20th and 19th round) *, repeat from *-* 37 times in total, finish with 1 sl st in first ch. ROUND 22: Work as round 14 in A.1: Work ch 4, * ch 3, 1 dc in next ch-space, ch 7, 1 dc in next ch-space, ch 3, 1 dc in same ch-space, 4 ch *, repeat from *-* 18 times in total, work ch 3, 1 dc in last ch-space, ch 4, finish with 1 sl st in 4th ch. ROUND 23: Work 4 dc in first ch-space (i.e. ch-space with 3 ch), now work dc in all ch-space with 7 ch from previous round, do not work in ch-space with 3 ch from previous round. Work * 7 dc in next ch-space, 8 dc in next ch-space, 7 dc in next ch-space *, repeat from *-* 11 times in total, 8 dc in next ch-space, 8 dc in next ch-space, 7 dc in next ch-space, 4 dc in last ch-space (i.e. ch-space with 4 ch) = 273 dc. Then work piece back and forth. Work every row tog at the end of row with 1 sl st in 3rd ch from beg of row. Turn piece. ROW 24 (= WS): Work * 2 dc in next dc, 1 dc in each of the next 11 dc (= dc-group), A.2 *, repeat from *-* 13 times in total = 169 dc and 13 A.2. Turn piece. A.2 is repeated vertically until finished measurements. ROW 25 (= RS): Work A.2, 2 dc in first dc, 1 dc in each of the next dc in dc-group, * A.2, 2 dc in first dc in dc-group, 1 dc in each of the next dc *, repeat from *-* until 1 dc-group remains, 2 dc in first dc, 1 dc in each of the next dc = 182 dc. Turn piece. ROW 26: Work as row 24 = 195 dc (15 dc between every A.2). ROW 27: Work as row 25 = 208 dc (16 dc between every A.2). Repeat row 24-27 0-1-1 more time = 208-260-260 dc (= 16-20-20 dc between every A.2). Piece measures approx. 20-23-23 cm / 8"-9"-9" from middle and outwards. Now work arm holes as follows: ROW 28 (= from WS): Work 2 dc in first dc, 1 dc in each of the next 15-19-19 dc, A.2 as before, 2 dc in next dc, 1 dc in each of the next 15-19-19 dc, A.2, 54-62-62 loose ch (= right armhole), skip: 16-20-20 dc + A.2 + 16-20-20 dc + A.2, work * 2 dc in next dc, 1 dc in each of the next 15-19-19 dc, A.2 *, repeat from *-* 5 times in total, 2 dc in first dc, 1 dc in each of the next 15-19-19 dc, 54-62-62 loose ch (= left armhole), skip: A.2 + 16-20-20 dc + A.2 + 16-20-20 dc, work A.2, 2 dc in next dc, 1 dc in each of the next 15-19-19 dc, A.2 = 153-189-189 dc, 9 A.2 and 108-124-124 ch. ROW 29 (from RS): Work A.2, 2 dc in next dc, 1 dc in each of the next 16-20-20 dc, A.2, in ch-row (= left armhole) work as follows: 1 dc in each of the 54-62-62 ch, * 2 dc in next dc, 1 dc in each of the next 16-20-20 dc, A.2 *, repeat from *-* 5 times in total, 2 dc in next dc, 1 dc in each of the next 16-20-20 dc, in next ch-row (= right armhole) work as follows: 1 dc in each of the 54-62-62 ch, then work A.2, 2 dc in next dc, 1 dc in each of the next 16-20-20 dc, A.2, 2 dc in next dc, 1 dc in each of the next 16-20-20 dc = 270-322-322 dc and 9 A.2. ROW 30 (= from WS): Work 1 dc in each of the next 18-22-22 dc, A.2 as before, 1 dc in each of the next 18-22-22 dc, A.2, 1 dc in each of the next 18-22-22 dc, A.2 (adjust row according to the other repetitions), 1 dc in each of the next 18-22-22 dc, A.2, * 1 dc in each of the next 18-22-22 dc, A.2 *, repeat from *-* 5 times in total, 1 dc in each of the next 18-22-22 dc, A.2, 1 dc in each of the next 18-22-22 dc, A.2, 1 dc in each of the next 18-22-22 dc, A.2, 1 dc in each of the next 18-22-22 dc, A.2 = 234-286-286 dc and 13 A.2. Work pattern as before but now inc only on every row from RS until 52-52-60 rows have been worked in total = 377-429-481 dc (29-33-37 dc in every dc-group). Insert 4 markers in the piece as follows from WS: Work 29-33-37 dc, A.2, 14-16-18 dc, insert 1st marker, work 15-17-19 dc, * A.2, 29-33-37 dc *, repeat from *-* 4 times in total, insert 2nd marker here (1st-2nd marker = right front piece). Work A.2, 29-33-37 dc, A.2, 29-33-37 dc and A.2, insert 3rd marker here. * Work 29-33-37 dc, A.2 *, repeat from *-* 4 times in total, 15-17-19 dc, insert 4th marker. (3rd-4th marker = left front piece), 14-16-18 dc, A.2. dc between 1st and 4th marker are up towards neck. Fasten off. RIGHT FRONT PIECE: Now work right front piece between 1st and 2nd marker, beg from 2nd marker (i.e. from RS) = 131-149-167 dc and 4 A.2. Continue inc in dc-groups as before BUT do not inc in dc-groups in each side of front piece - AT THE SAME TIME dec 2 dc at beg of every row by CROCHET 3 dc TOG - see explanation above. Work until 10-12-12 cm / 4"-4¾"-4¾" over front piece have been worked, adjust to finish with 1 whole repetition of A.2. Fasten off. LEFT FRONT PIECE: Work left front piece between 3rd and 4th marker the same way as right front piece, beg from 4th marker (i.e. from RS). EDGE: Work an edge around the entire jacket as follows: Work the first 2 rounds of A.2, when working first round of A.2 over dc-rows, skip 2 dc-rows on each side of dc-group. Beg every round with 3 ch and finish with 1 sl st in 3rd ch. SLEEVES: Work back and forth from armhole and down, work every row tog with 1 sl st at the end of row. Insert 1 marker in piece, NOW MEASURE PIECE FROM HERE. Beg by working 86-94-102 dc evenly around the opening for sleeve, beg of row should be under sleeve. Then work 3 rows with 1 dc in every dc. Continue with 1 dc in every dc - AT THE SAME TIME dec differently in the different sizes as follows: READ DECREASE TIP! SIZE S/M: Dec 1 st in each side of piece alternately every 3rd and 2nd row 16 times in total = 54 dc. SIZE L/XL: Dec 1 st in each side of piece every other row 20 times in total = 54 dc. SIZE XXL/XXXL: Dec 1 st in each side of piece every other row 24 times = 54 dc. ALL SIZES: Work 1 dc in every dc until sleeve measures approx. 47 cm / 18½", adjust so that next row is from WS. Then work the first 2 rounds of A.2 (= 6 repetitions in width). Fasten off. Work the other sleeve the same way. |
||||||||||||||||||||||||||||||||||||||||
Diagram explanations |
||||||||||||||||||||||||||||||||||||||||
|
||||||||||||||||||||||||||||||||||||||||
 |
||||||||||||||||||||||||||||||||||||||||
 |
||||||||||||||||||||||||||||||||||||||||
 |
||||||||||||||||||||||||||||||||||||||||
Have you finished this pattern?Tag your pictures with #dropspattern #roscardigan or submit them to the #dropsfan gallery. Do you need help with this pattern?You'll find 11 tutorial videos, a Comments/Questions area and more by visiting the pattern on garnstudio.com. © 1982-2026 DROPS Design A/S. We reserve all rights. This document, including all its sub-sections, has copyrights. Read more about what you can do with our patterns at the bottom of each pattern on our site. |
||||||||||||||||||||||||||||||||||||||||


With over 40 years in knitting and crochet design, DROPS Design offers one of the most extensive collections of free patterns on the internet - translated to 17 languages. As of today we count 325 catalogs and 12298 patterns - 12288 of which are translated into English (US/in).
We work hard to bring you the best knitting and crochet have to offer, inspiration and advice as well as great quality yarns at incredible prices! Would you like to use our patterns for other than personal use? You can read what you are allowed to do in the Copyright text at the bottom of all our patterns. Happy crafting!
Post a comment to pattern DROPS 162-11
We would love to hear what you have to say about this pattern!
If you want to leave a question, please make sure you select the correct category in the form below, to speed up the answering process. Required fields are marked *.