
Popular categories
Looking for a yarn?


Comments / Questions (317)
![]() Annelies Klos wrote:
Annelies Klos wrote:
Ik heb de 50 lossen voor de armsgaten gehaakt en als ik dan het patroon verder volg (toer 26). hou ik losse over...... wat doe ik fout??????
06.12.2014 - 15:04DROPS Design answered:
Hoi Annelies. Je haakt om de lossen van de armsgaten en niet in elke l van de armsgaten.
10.12.2014 - 14:20
![]() Anneke Biesheuvel wrote:
Anneke Biesheuvel wrote:
Ik ben bij het plaatsen van de markeerders. Als ik bovenaan begin, waar ik de laatste toer geëindigd ben en ik zet de markers uit dan komt het aan de onderkant schuin uit. Hoeveel stokjesgroepen moeten er onderaan en bovenaan tussen de voorpanden komen?
04.12.2014 - 12:50DROPS Design answered:
Hoi Anneke. Als je haakt en plaatst zoals beschreven, dan kom je goed uit. Je begint eerst met haken van 16-17-18 stk voor de tweede patroongroep op de toer, plaats M1, haak voorpand 1 (tot M2). Haak dan Haak 1 patroongroep, 33-35-37 stk, 1 patroongroep, 33-35-37 stk en 1 patroongroep (onderkant) plaats M3 en haak voorpand 2, plaats de laatste markeerder (M4) en het stukje tussen M4 en M1 is de bovenkant.
05.12.2014 - 15:30
![]() Ines Caby wrote:
Ines Caby wrote:
Hallo, ik heb een vraagje over het plaatsen van de markeerders. Als ik die plaats zoals aangegeven, komt het niet symetrisch uit.
02.12.2014 - 22:55DROPS Design answered:
Hoi Ines. Het patroon is correct. Er zijn een gelijk aantal st voor beide voorpanden en de onderkant (tussen de voorpanden) is breder dan de bovenkant (bij de hals).
03.12.2014 - 16:17
![]() Karin wrote:
Karin wrote:
Hej! Jag har kommit till varv 25 och 26 i stl s/m. Jag får inte mönstergrupperna över varandra vid ärmhålen när jag virkar varv 26. Det ska de väl vara?? Nu förstår jag inte vilket av varven som i så fall blivit fel. Har själva ärmhålen en mönstergrupp eller en stolpgrupp överst? Är det tvärtom längst ner i resp. ärmhål? Tack så mycket från Karin
02.12.2014 - 22:36DROPS Design answered:
Hej Karin, Det är mönstergrupperna på varje sida om ärmhålen som skall stämma över varandra. Lycka till!
01.12.2015 - 11:43
![]() Jacqueline Veerbeek wrote:
Jacqueline Veerbeek wrote:
Ik ben bij het laatste stuk van de mouwen,dat bestaat uit alleen patroongroepen. Als je twee patroongroepen na elkaar haakt zitten er twee lossen tussen de groepen,klopt dat? De gaten lijken dan zo groot
23.11.2014 - 19:10DROPS Design answered:
Hoi Jacqueline. Je herhaalt toer 3 aan het eind van de mouw. Dus steeds 2 stk, 1 patroongroep haken. 1 patroongroep is 1 l, 2 stk samengehaakt, 2 l, 2 stk samengehaakt en 1 l. Je hebt 2 l tussen elke samengehaakte stk en 2 stk tussen elke patroongroep.
27.11.2014 - 15:28
![]() Judith wrote:
Judith wrote:
Bij mij komen onder de patroongroepen gaten. Ik vraag mij dus af of ik het goed doe, omdat op de foto er niet echt gaatjes onder de patroongroepen zichtbaar zijn. Dus een patroongroep en daar weer een patroongroep op. En daar tussen zit dus een gat. Wat doe ik dan verkeerd? Ik twijfel nog steeds over de patroongroep.
21.11.2014 - 20:06DROPS Design answered:
Hoi Judith. Er zijn 2 l tussen de samengehaakte stk in de patroongroep. Dat maakt wel een gaatje - de patroongroepen op het lijf zijn de "strepen" vanuit het midden - en de uiteinden van de mouwen, hier zijn wel gaatjes tussen. Je haakt 1 patroongroep als volgt: 1 l, 2stk samengehaakt, 2 l, 2 stk samengehaakt en 1 l
27.11.2014 - 16:10
![]() Pia Reis wrote:
Pia Reis wrote:
Hallo liebes Drops-Team, Ich habe ein Problem in Reihe 27 (GR. S/M). Und zwar soll bei den Armausschnitten wie in der Reihe zuvor gehäkelt werden, da in Reihe 26 jedoch Lm übersprungen werden ist das gar nicht möglich. Entweder müsste die Anzahl der Stb reduziert werden oder man kann nichts überspringen. Ich hoffe meine Frage ist verständlich. Tolle Jacke! Vielen Dank! Pia
21.11.2014 - 16:54DROPS Design answered:
Liebe Pia, Sie setzen das Muster nun einfach wieder folgerichtig fort, das ist mit "wie zuvor" gemeint - Sie häkeln R 27 also nicht ganz genau wie R 26, sondern wie die R vor den Armausschnitten. Die Armausschnitte sind ja eine Unterbrechung des Musters, das dann wieder wie vor den Armausschnitten weitergearbeitet werden soll, mit dem Unterschied, dass Sie nun nur noch in jeder 2. R zunehmen.
23.11.2014 - 20:46
![]() Judith wrote:
Judith wrote:
Of moet ik juist 2 stokjes in 1 stokje maken? met tussenin nog een losse? Ik wil graag meer aanvulling op het patroon, want ik heb het stukje wel 10x gelezen en ik snap het nog steeds niet. Super bedankt.
19.11.2014 - 14:22DROPS Design answered:
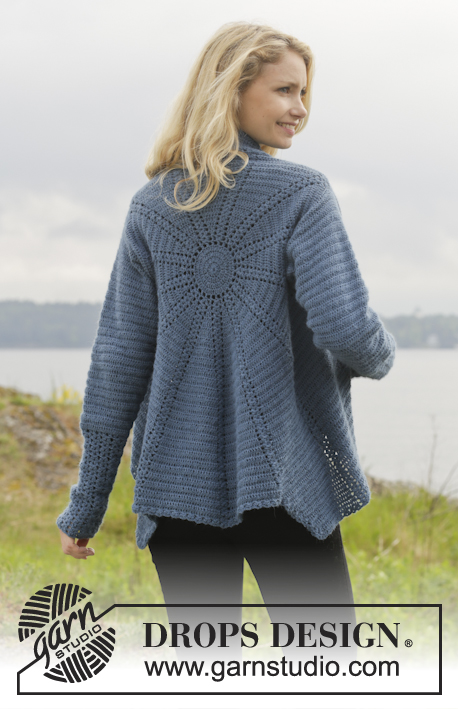
Hoi Judith. Je haakt dus 1 patroongroep in 1 stk. Deze patroongroepen zullen het motief vormen zoals je ziet op de foto van het achterpand. Toer 5 met de lussen + stokjes is duidelijk te zien als de eerste toer met lussen om de cirkel in het midden. Vervolgens begin je met de patroongroepen met steeds meer stk tussen en vormt dus de "lijnen"
19.11.2014 - 14:34
![]() Judith wrote:
Judith wrote:
Hoe werkt de patroongroep. Ik ben bij toer 6, maar ik snap niet hoe ik die toer moet maken. Moet ik van twee stokjes naar 1 stokje? Dan gaat hij bij mij omhoog staan.
19.11.2014 - 14:07DROPS Design answered:
Hoi Judith. 1 Patroongroep is: 1 l, 2 STK SAMENGEHAAKT (zoals beschreven bovenaan het patroon) 2 stk samengehaakt zijn 2 stokjes in één gehaakt.
19.11.2014 - 14:31
![]() Janneke Kimstra wrote:
Janneke Kimstra wrote:
Dag, ik snap niet waar ik moet beginnen met tellen voor het plaatsen van de markeerders bij ronde 55 (xxl/xxxl). Wat is de 1e steek...
16.11.2014 - 19:24DROPS Design answered:
Hoi Janneke. Je begint aan de toer (dus eerste steek van een nieuwe toer) en haakt tot 18 stk voor de tweede patroongroep op de toer, plaats hier de 1e markeerder enzovoort.
21.11.2014 - 16:20
|
|
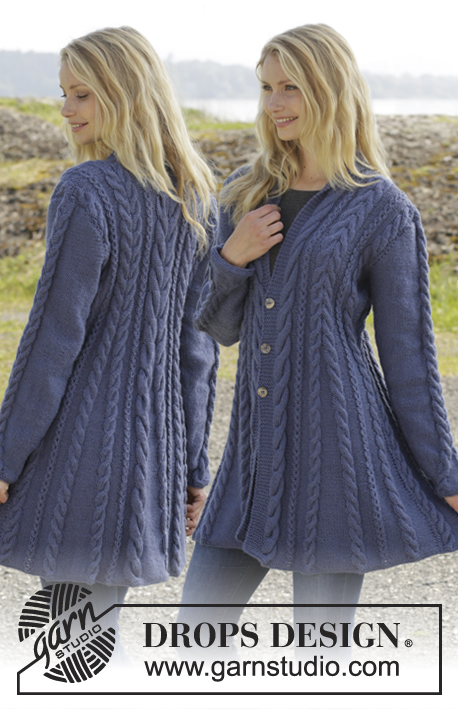
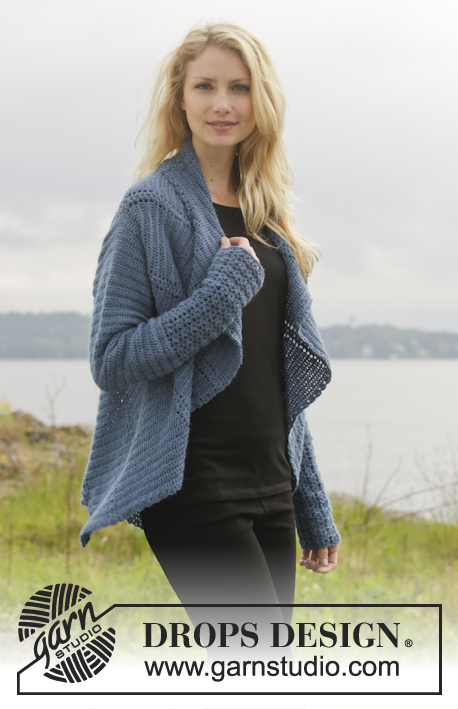
Winter Solstice#wintersolsticecardigan |
|
 |
 |
Crochet DROPS jacket worked in a circle in "Alpaca". Size: S - XXXL.
DROPS 158-10 |
|
|
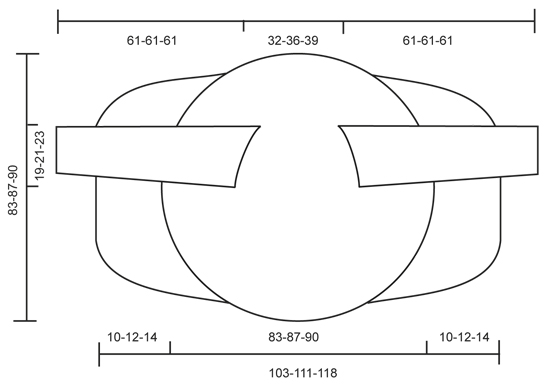
CROCHET INFO: Beg every round/row with 3 ch that replace 1st dc and finish every round/row with 1 sl st in 3rd ch from beg of round/row. PATTERN GROUP: Each pattern group consists of: ch 1, 2 dc WORKED TOG - see explanation below, ch 2, 2 dc worked tog and 1 ch. DC WORKED TOG: * Make 1 YO, insert hook in ch-space, get yarn, make a YO, pull through 2 of the sts on hook *, repeat from *-* one more time, make 1 YO and pull yarn through all 3 sts on hook. CROCHET 3 dc TOG: Work 3 dc into 1 dc at beg of row as follows: Work 2 ch (= replace 1 dc), work 1 dc, but wait with last pull through (= 2 strands on hook), then work next dc but on last pull through, pull yarn through all sts on hook. DECREASE TIP (applies to sleeves): Dec at beg of row by working 1 sl st over the dc to be dec. Dec at end of row by working until 1 dc to be dec remains, turn piece. -------------------------------------------------------- CIRCLE: Work 5 ch on hook size 3.5 mm/E with Alpaca and form a ring with 1 sl st in first ch. READ CROCHET INFO. ROUND 1: Work 13 dc in ch-ring. ROUND 2: Work * 2 dc in every dc*, repeat from *-* the entire round = 26 dc. ROUND 3: Work * 2 dc in first dc, then 1 dc in next dc *, repeat from *-* the entire round = 39 dc. ROUND 4: Work * 2 dc in first dc, then 1 dc in each of the next 2 dc *, repeat from *-* the entire round = 52 dc. ROUND 5: Work * 1 dc in next dc, then ch 2, skip 1 dc *, repeat from *-* the entire round = 26 ch-spaces and 26 dc. REMEMBER THE CROCHET GAUGE! ROUND 6: In first dc work PATTERN GROUP - see explanation above, * 1 dc in next dc, 1 pattern group in next dc *, repeat from *-* until 1 dc remains, 1 dc in last dc = 13 pattern groups with 1 dc between each. Then work piece back and forth. Work every row tog at the end of row with 1 sl st in first st on row. Turn piece. ROW 7 (= from WS): 2 dc in first dc, * 1 pattern group in next pattern group, 2 dc in next dc (= dc-group) *, repeat from *-* until 1 pattern group from previous row remains, 1 pattern group = 13 pattern groups with 13 dc-groups between each. Turn piece. ROW 8: 1 pattern groups in first pattern group, * 2 dc in first dc, 1 dc in each of the next dc in dc-group, 1 pattern group in next pattern group *, repeat from *-* until 1 dc-group remains, 2 dc in first dc, 1 dc in each of the next dc in dc-group = 13 groups with 3 dc between each. Turn piece. ROW 9: 2 dc in first dc, 1 dc in each of the next dc in dc-group, * 1 pattern group in pattern group, 2 dc in first dc of dc-group, 1 dc in each of the next dc *, repeat from *-* until 1 pattern group from previous row remains, 1 pattern group = 13 groups with 4 dc between each. Turn piece. Then repeat 8th and 9th row until 6 rounds + 18-20-22 rows have been worked (= 19-21-23 dc between every pattern group) = 247-273-299 dc and 13 pattern group. Piece measures approx. 20-22-23 cm / 8"-8¾"-9" from middle and outwards. Now work armholes as follows in the different sizes: SIZE S/M: ROW 25 (= from WS): Inc in every groups with dc as before. Work 20 dc, 1 pattern group, 20 dc, work 50 loose ch (= right armhole), skip 2 dc-groups and 2 pattern groups. Then work dc-groups and pattern groups as before over the next 114 dc, work 50 loose ch (= left armhole), skip 2 dc-groups and 2 pattern groups, work as before the rest of row, finish with 1 sl st in first dc on row = 180 dc and 100 ch. Turn piece. ROW 26: Continue with pattern and inc as before but work first ch-row (= left armhole) as follows: 10 dc, skip ch 1, 11 dc, skip ch 1, 1 pattern group, skip ch 1, 11 dc, skip ch 1, 10 dc, skip ch 1, 1 pattern group and skip 1 ch. I next ch-row (= right armhole) work the same way but in opposite order, i.e. beg by skipping ch 1, 1 pattern group and finish with dc = 273 dc. ROW 27-50: Work pattern as before but now inc only on even numbered rows until 50 rows have been worked in total = 429 dc (33 dc in every dc-group). Piece measures approx. 42 cm / 16½" from middle and outwards. Fasten off. SIZE L/XL: ROW 27 (= from WS): Inc in every groups with dc as before. Work 22 dc, 1 pattern group, 22 dc, work 54 loose ch (= right armhole), skip 2 dc-groups and 2 pattern groups. Then work pattern as before over the next 126 dc, work 54 loose ch (= left armhole), skip 2 dc-groups and 2 pattern groups, work as before the rest of row, finish with 1 sl st in first dc on row = 198 dc and 108 ch. Turn piece. ROW 28: Continue with pattern and inc as before but work first ch-row (= left armhole) as follows: 11 dc, skip ch 1, 12 dc, skip ch 1, 1 pattern group, skip ch 1, 12 dc, skip ch 1, 11 dc, skip ch 1, 1 pattern group and skip 1 ch. I second ch-row (= right armhole) work the same way but in opposite order, i.e. beg by skipping ch 1, 1 pattern group and finish with dc = 299 dc. ROW 29-52: Work pattern as before but now inc only on even numbered rows until 52 rows have been worked in total = 455 dc (35 dc in every dc-group). Piece measures approx. 43 cm / 17" from middle and outwards. Fasten off. SIZE XXL/XXXL: ROW 29 (= from WS): Inc in every groups with dc as before. Work 24 dc, 1 pattern group, 24 dc, work 58 loose ch (= right armhole), skip 2 dc-groups and 2 pattern groups. Then work pattern as before over the next 138 dc, work 58 loose ch (= left armhole), skip 2 dc-groups and 2 pattern groups, work as before the rest of row, finish with 1 sl st in first pattern group on row = 216 dc and 116 ch. Turn piece. ROW 30: Continue with pattern and inc as before but work first ch-row (= left armhole) as follows: 12 dc, skip ch 1, 13 dc, skip ch 1, 1 pattern group, skip ch 1, 13 dc, skip ch 1, 12 dc, skip ch 1, 1 pattern group and skip 1 ch. I second ch-row (= right armhole) work the same way but in opposite order, i.e. beg by skipping ch 1, 1 pattern group and finish with dc = 325 dc. ROW 31-54: Work pattern as before but now inc only on even numbered rows until 54 rows have been worked in total = 481 dc and 37 dc in every dc-group. Piece measures approx. 45 cm / 17¾" from middle and outwards. Fasten off. ALL SIZES: Insert 4 markers in the piece as follows from WS: Work 16-17-18, insert 1st marker here, work 17-18-19 dc, * 1 pattern group, 33-35-37 dc *, repeat from *-* 3 more times, insert 2nd marker here (1st-2nd marker = right front piece). Work 1 pattern group, 33-35-37 dc, 1 pattern group, 33-35-37 dc and 1 pattern group, insert 3rd marker here. * Work 33-35-37 dc, 1 pattern group *, repeat from *-* 3 more times, 17-18-19 dc, insert 4th marker. (3rd-4th marker = left front piece). Work the rest of row. Sts between 1st and 4th marker are up towards neck. Cut the yarn and fasten. RIGHT FRONT PIECE: Now work right front piece between 1st and 2nd marker, beg from 2nd marker (i.e. from RS) = 149-158-167 dc and 4 pattern groups. Continue inc on every row in dc-groups as before BUT do not inc in dc-groups in each side of front piece - AT THE SAME TIME dec 2 dc at beg of every row by CROCHET 3 dc TOG - see explanation above. Continue to work until 12-14-16 rows have been worked over front piece. Cut the yarn and fasten. LEFT FRONT PIECE: Work left front piece between 3rd and 4th marker the same way as right front piece, beg from 4th marker (i.e. from RS). SLEEVES: Work back and forth from armhole and down, work every row tog with 1 sl st at the end of row. Use hook size 3.5 mm and Alpaca. Beg by working 86-94-102 dc around the opening for sleeve, beg of row should be under sleeve. Then work 3 rows with 1 dc in every dc. Continue with 1 dc in every dc - AT THE SAME TIME dec in the different sizes as follows: READ DECREASE TIP! SIZE S/M: Dec 1 st in each side of piece every other row 4 times and then every 3rd row 12 times (= 16 times in total) = 54 dc. SIZE L/XL: Dec 1 st in each side of piece alternately every 3rd and 2nd row 18 times in total = 58 dc. SIZE XXL/XXXL: Dec 1 st in each side of piece every other row 17 times and then every 3rd row 4 times (= 21 times in total) = 60 dc. Then work pattern groups as follows: ROW 1: 2 dc, 1 ch * work the next 2 dc tog, 1 ch *, repeat from *-* and finish with 2 dc. ROW 2: Work 2 dc, * in next ch work 1 pattern group, skip 1 ch *, repeat from *-*, and finish with 1 dc in each of the last 2 dc. Turn piece. ROW 3: Work 2 dc, 1 pattern group in each of the next pattern groups until 2 dc remain, work 1 dc in each of these. Turn piece. Repeat 3rd row until piece measures approx. 61 cm / 24" in all sizes. Fasten off. CROCHET EDGE: Work 1 round with around the entire jacket as follows: * 1 pattern group, skip 2 dc/1 row *, repeat from *-* the entire round. |
|
 |
|
Have you finished this pattern?Tag your pictures with #dropspattern #wintersolsticecardigan or submit them to the #dropsfan gallery. Do you need help with this pattern?You'll find 8 tutorial videos, a Comments/Questions area and more by visiting the pattern on garnstudio.com. © 1982-2026 DROPS Design A/S. We reserve all rights. This document, including all its sub-sections, has copyrights. Read more about what you can do with our patterns at the bottom of each pattern on our site. |
|


With over 40 years in knitting and crochet design, DROPS Design offers one of the most extensive collections of free patterns on the internet - translated to 17 languages. As of today we count 325 catalogs and 12291 patterns - 12281 of which are translated into English (US/in).
We work hard to bring you the best knitting and crochet have to offer, inspiration and advice as well as great quality yarns at incredible prices! Would you like to use our patterns for other than personal use? You can read what you are allowed to do in the Copyright text at the bottom of all our patterns. Happy crafting!
Post a comment to pattern DROPS 158-10
We would love to hear what you have to say about this pattern!
If you want to leave a question, please make sure you select the correct category in the form below, to speed up the answering process. Required fields are marked *.