
Popular categories
Looking for a yarn?


Comments / Questions (93)
![]() Causse Pascale wrote:
Causse Pascale wrote:
Je ne comprends pas le déroulement des explications on monte toutes mailles puis on fait séparément les côtés et le dos?? \\r\\nExplications incomplètes et incompréhensibles
29.04.2026 - 15:59DROPS Design answered:
Bonjour Mme Causse, les explications sont possiblement différentes de celles que vous avez l'habitude mais si vous suivez bien pas à pas les indications pour votre taille, vous obtiendrez le résultat escompté, et si besoin, n'hésitez pas à poser vos questions ici en indiquant ce que vous ne comprenez pas, nous ferons notre possible pour vous aider. Bon crochet!
29.04.2026 - 16:46
![]() Causse Pascale wrote:
Causse Pascale wrote:
Je ne comprends pas le déroulement des explications on monte toutes mailles puis on fait séparément les côtés et le dos?? \\r\\nExplications incomplètes et incompréhensibles
29.04.2026 - 15:59DROPS Design answered:
Bonjour Mme Causse, vous avez bien compris: on monte les mailles des devants et du dos en une seule fois et on crochète le point fantaisie comme indiqué jusqu'aux emmanchures. On va ensuite terminer chaque partie séparément en commençant par le dos: on saute les mailles indiquées de chaque côté pour termine le dos jusqu'à l'encolure puis on termine chaque épaule séparément; on crochète ensuite le devant droit en sautant des mailles pour l'emmanchure et en diminuant pour l'encolure comme indiqué. On assemble les épaules puis on crochète une bordure autour des emmanchures et autour du gilet. Bon crochet!
29.04.2026 - 16:45
![]() Debra wrote:
Debra wrote:
This would have to be one of the worst patterns I've ever tried to follow in my 50 years of crocheting! Is there an actual written version of it, with stitches instead of A this and A that anywhere?
17.01.2026 - 01:55
![]() Ellen wrote:
Ellen wrote:
Beim Rückenteil beginnt und endet man in Größe L mit 3 Stäbchen. Was bedeutet „Im Muster weiterhäkeln, bis nur noch 1 Stäbchen übrig ist, …“ Sind das beidseitige Abnahmen? Von 3 auf 1 Stäbchen. Und der Satz kommt 5x hintereinander!
30.09.2025 - 21:06DROPS Design answered:
Liebe Ellen, ja genau, es sind Abnahmen. Sie wenden also bereits, wenn noch 1 Stäbchen übrig ist - in dieses Stäbchen wird nicht mehr gehäkelt, sondern die Reihe wird vorher beendet. Beachten Sie, dass Sie nur das jeweils letzte Stäbchen weglassen. Am Ende haben Sie dann je 1 Stäbchen beidseitig neben dem Muster. Gutes Gelingen weiterhin - und entschuldigen Sie bitte die späte Antwort!
24.10.2025 - 10:45
![]() Ingrid wrote:
Ingrid wrote:
Beste, wat bedoel je met de Zijkant bij dit model ? Is dat hetzelfde als linker/ rechter voorpand? Alvast bedankt!
27.11.2024 - 11:58DROPS Design answered:
Dag Ingrid,
De zijkant zit bij de zijnaad, dus van de oksel naar de onderkant.
28.11.2024 - 19:53
![]() Mariejeanne McCarthy wrote:
Mariejeanne McCarthy wrote:
Please explain how many times in total to increase the piece before armhole. Also is the increasing every row, or second row, or Is it to be done just once in each pattern?
27.11.2024 - 03:54DROPS Design answered:
Dear Mrs McCarthy, you increase only one time on each side. Happy crocheting!
27.11.2024 - 07:35
![]() Synnøve Nielsen wrote:
Synnøve Nielsen wrote:
DROPS 153-27 DROPS design: Pattern no r-646 Jeg forstår ikke hvordan jeg kommer fra række 4 til 5 i rk. 4 har jeg 8 stangmasker og en fastmaske men på rækken efter skal jeg lave skiftevis lave 4 pilot og 4 fastmasker hvilket fylder 12 masker 12.10.2024 - 14:46 DROPS Design answered: Hei Synnøve. Vi skal hjelpe deg så godt vi kan, men hvilket diagram tenker du på? mvh DROPS Design 22.10.2024 - 11:02
22.10.2024 - 12:03DROPS Design answered:
Hej Synnøve, du skal have samme antal masker som på første række hvor du også hæklede skiftevis 1 picot og 1 fastmaske. Du hopper op til række 5 med 1 luftmaske :)
11.02.2025 - 14:40
![]() Synnøve Nielsen wrote:
Synnøve Nielsen wrote:
Jeg forstår ikke hvordan jeg kommer fra række 4 til 5 i rk. 4 har jeg 8 stangmasker og en fastmaske men på rækken efter skal jeg lave skiftevis lave 4 pilot og 4 fastmasker hvilket fylder 12 masker
12.10.2024 - 14:46DROPS Design answered:
Hei Synnøve. Vi skal hjelpe deg så godt vi kan, men hvilket diagram tenker du på? mvh DROPS Design
22.10.2024 - 11:02
![]() Moa wrote:
Moa wrote:
Hej! Vilken storlek är det på knapparna som är rekommenderade i mönstret? Tack på förhand /Moa
22.04.2024 - 19:27DROPS Design answered:
Hej Moa, knap 522 som står i opskriften er 20 mm :)
23.04.2024 - 14:28
![]() Anne Bonafede wrote:
Anne Bonafede wrote:
Love the free patterns, but find it too difficult to read diagrams. Please provide patterns, such as this one, with fully written out rows of crochet instructions. Thank you. -Anne
03.10.2023 - 08:56
|
|||||||||||||
Delphine#delphinevest |
|||||||||||||
|
|
|||||||||||||
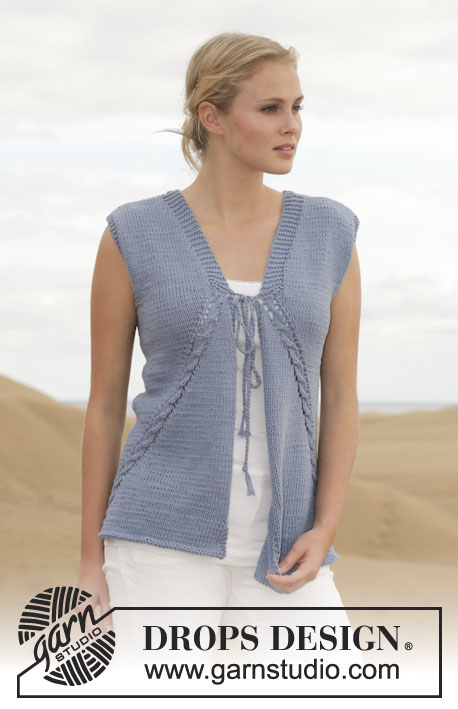
Crochet DROPS vest with fan pattern in ”Muskat”. Size: S - XXXL.
DROPS 153-27 |
|||||||||||||
|
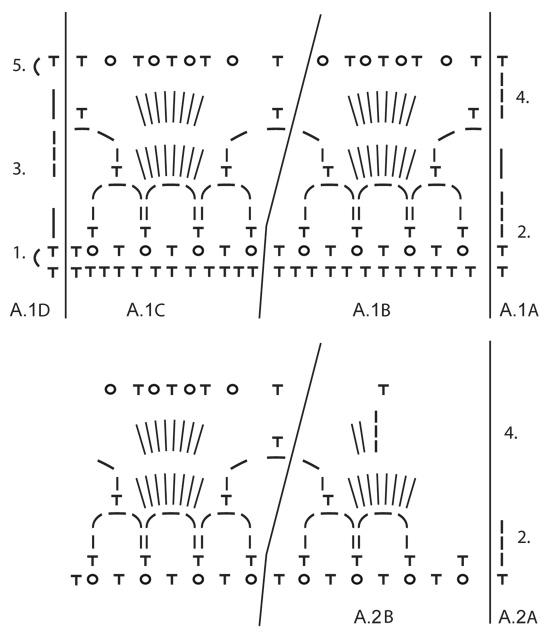
PATTERN: See diagrams A.1 and A.2. In A.1 start to work on the row marked with 1st in the diagram. Repeat rows 2 to 5. In A.2 start to work on the row marked with 2nd in the diagram. SIDE: In the side work dc/sc as shown in diagrams A.1A and A.1D. I.e. Work sc on row 1 and 5 in diagram, work row 2, 3 and 4 with dc. Marker is in the middle of st in each side. -------------------------------------------------------- VEST: Work 155-167-183-199-227-247 LOOSE ch on hook size 4 mm / G/6 with Muskat. Turn piece. Skip 1st ch, then work 1 sc in every ch the entire row = 154-166-182-198-226-246 sc. Insert 1 marker after 39-42-46-50-57-62 sc in from each side (back piece = 76-82-90-98-112-122 sc). Then work as follows (beg on 1st row in diagram): A.1A, repeat A.1B 2-2-2-2-3-3 times, A.1C, 4-10-18-26-16-26 sc/dc in the SIDE - see explanation above -, repeat A.1B 5-5-5-5-7-7 times, A.1C, 4-10-18-26-16-26 sc/dc in the SIDE – see explanation above, repeat A.1B 2-2-2-2-3-3 times, A.1C and A.1D. Continue to work like this until piece measures approx. 15-15-16-16-17-17 cm / 6"-6"-6¼"-6¼"-6¾"-6¾". Now inc 1 sc/dc in each side on each side of each marker one time. Inc by working 2 sc/dc in 1 sc/dc on each side of each marker (= 4 sc/dc inc in total). Continue as before with 2 sc/dc more in each side. Continue like this until piece measures approx. 35-36-37-38-39-40 cm / 13¾"-14¼"-14½"-15"-15¼"-15¾", stop after one whole repetition vertically. Cut the yarn. Now divide the piece and finish each part separately. BACK PIECE: = 3-6-10-14-9-14 sc/dc in each side. Beg by working inside 2-3-7-11-6-11 sc/dc. Work 1-3-3-3-3-3 sc/dc, repeat A.1B 5-5-5-5-7-7 times, A.1C and 1-3-3-3-3-3 sc/dc (2-3-7-11-6-11 sc/dc remain on row), turn piece. Work pattern as before until 0-1-1-1-1-1 sc/dc remain, turn piece. Work pattern as before until 0-1-1-1-1-1 sc/dc remain, turn piece. Work pattern as before until 0-1-1-1-1-1 sc/dc remain, turn piece. Work pattern as before until 0-1-1-1-1-1 sc/dc remain. There are now 1 sc/dc in each side. Continue back and forth with pattern as before and 1 sc/dc in each side. When piece measures approx. 50-52-54-56-58-60 cm / 19¾"-20½"-21¼"-22"-22¾"-23⅝" (stop after whole repetition vertically), divide the piece for neck and finish each shoulder separately. RIGHT SHOULDER: Beg in the side. Work over 1 sc/dc in the side, A.1B 1-1-1-1-2-2 times, A.1C and 1 sc/dc. Continue like this until repetition has been worked vertically. Piece measures approx. 54-56-58-60-62-64 cm / 21¼"-22"-22¾"-23⅝"-24⅜"-25¼". LEFT SHOULDER: Work as right but reversed, (i.e. 2 repetitions mid back = neck). RIGHT FRONT PIECE: = 3-6-10-14-9-14 sc/dc in the side.Start mid front and work as follows: A.1A, repeat A.1B 2-2-2-2-3-3 times, A.1C and 1-3-3-3-3-3 sc/dc (2-3-7-11-6-11 sc/dc remain in the side). Turn piece. Work pattern as before. Turn piece. Work pattern as before until 0-1-1-1-1-1 sc/dc remain in the side, turn piece. Work pattern as before, turn piece. Work pattern as before until 0-1-1-1-1-1 sc/dc remain in the side, turn piece. Work pattern as before. There are now 1 sc/dc in the side. Continue back and forth with pattern as before. AT THE SAME TIME when 1 repetition has been worked vertically after piece was divided, dec for neck. Work as follows from RS: A.2 A, A.2 B, A.1B 1-1-1-1-2-2 times, A.1C, A.1D. When all bind off for armhole and neck are done, work as follows - from mid front: A.1A, A.1B 1-1-1-1-2-2 times, A.1C and A.1D. Continue like this until piece measures approx. 54-56-58-60-62-64 cm / 21¼"-22"-22¾"-23⅝"-24⅜"-25¼" (adjust according to back piece to work the no of repetitions on front piece vertically as on back piece). Fasten off. LEFT FRONT PIECE: Work as right front piece but reversed. ASSEMBLY: Sew the shoulder seams. Sew edge to edge with small stitches to avoid a chunky seam. ARMHOLE EDGE: Work an edge around the armhole as follows: ROUND 1: Beg mid under sleeve. Work ch 1, then work sc around the armhole, finish with 1 sl st in ch from beg of round. ROUND 2: Work ch 3, then work 1 dc in every sc the entire round, finish with 1 sl st in 3rd ch from beg of round. Fasten off. Work the same way around the other armhole. EDGE AROUND BODY: Work an edge around the body. Beg at the bottom of right front piece, work up along front piece, around the neck, down along left front piece and along bottom edge. Work as follows: ROUND 1: Work ch 1, then work sc around the body, finish with 1 sl st in ch from beg of round. ROUND 2: ch 1, then work 1 sc in every sc, finish with 1 sl st in ch from beg of round. ROUND 3: ch 1, then work 1 sc in first sc, * ch 3, then work 1 dc in the first of the ch 3, skip 2 sc, 1 sc in next sc *, repeat from *-* and finish with 1 sl st in ch from beg of round. Fasten off. ASSEMBLY: Sew 2 buttons on left front piece, the top button directly below neck dec and the other approx. 6 cm / 2½" from first button. Button between dc in edge on right front piece. |
|||||||||||||
Diagram explanations |
|||||||||||||
|
|||||||||||||
 |
|||||||||||||
 |
|||||||||||||
Have you finished this pattern?Tag your pictures with #dropspattern #delphinevest or submit them to the #dropsfan gallery. Do you need help with this pattern?You'll find 6 tutorial videos, a Comments/Questions area and more by visiting the pattern on garnstudio.com. © 1982-2026 DROPS Design A/S. We reserve all rights. This document, including all its sub-sections, has copyrights. Read more about what you can do with our patterns at the bottom of each pattern on our site. |
|||||||||||||


With over 40 years in knitting and crochet design, DROPS Design offers one of the most extensive collections of free patterns on the internet - translated to 17 languages. As of today we count 324 catalogs and 12290 patterns - 12280 of which are translated into English (US/in).
We work hard to bring you the best knitting and crochet have to offer, inspiration and advice as well as great quality yarns at incredible prices! Would you like to use our patterns for other than personal use? You can read what you are allowed to do in the Copyright text at the bottom of all our patterns. Happy crafting!
Post a comment to pattern DROPS 153-27
We would love to hear what you have to say about this pattern!
If you want to leave a question, please make sure you select the correct category in the form below, to speed up the answering process. Required fields are marked *.