
Popular categories
Looking for a yarn?


Comments / Questions (60)
![]() Melanie wrote:
Melanie wrote:
I asked a question a week ago and have had no answer. Pattern little Oliver
02.09.2025 - 11:59
![]() Melanie wrote:
Melanie wrote:
Hi . The sleeve cap is way too big for the armhole . As per the last question . I am very practiced at sewing in sleeve caps but there is at least 5cm too much . Cast on to underarm measure 14cm . Not the 7 cm on the diagram
27.08.2025 - 17:45
![]() Barb wrote:
Barb wrote:
I am having trouble sewing the sleeve into the arm hole opening. The sleeve cap seems too big. Do you have any tips to help?
24.04.2025 - 01:34DROPS Design answered:
Hi Barb, Here is a link to our video showing you how to sew in a sleeve with a sleeve cap: https://www.garnstudio.com/video.php?id=1826&lang=en Regards, Drops Team.
24.04.2025 - 06:36
![]() Rikke Pedersen wrote:
Rikke Pedersen wrote:
Når forstykket skal deles, passer antallet ikke, hvis jeg følger str 12 år og hækler 4 km og derefter 37 fm, så er det 41 masker. Så bliver den skæv/mindre på den anden side. Så den skal kun deles med 39 masker når man har 78 masker i alt.
07.04.2025 - 19:34
![]() Margrith Misteli wrote:
Margrith Misteli wrote:
Hallo, die Ärmel passen nicht in das Armloch, ich habe genau die gewünschten cm und die beschriebene Maschenanzahl. Trotzdem müsste der Ärmel stark gerafft werden um passend eingenäht zu werden. Was stimmt wohl hier nicht ??
21.01.2025 - 15:00DROPS Design answered:
Liebe Frau Mitselli, sollte die Ärmelkugel 7 cm messen, und auch die Armlochhöhe richtig sein, (und natürlich die Maschenprobe in der Breite, die ist aber sicher richtig) dann sollte die Ärmel schön im Armloch anpassen. Vielleicht kann Ihnen damit Ihr Wollladen - auch per Mail oder Telefon - helfen?
21.01.2025 - 17:16
![]() Helga Eitel wrote:
Helga Eitel wrote:
Rückenteil: Nach ca. 30 cm (achten Sie darauf dass die nächste R. eine R. mit f. M. ist, ...., wie folgt Armloch abk. Kett-M. über die ersten 4 Stb., dann f. M. bis noch 4 Stb. übrig sind. Wenden 3 Lm dann die 2 nächsten Stb. zus. häkeln. Wie soll ich das machen wenn keine Stb. vorhanden sind da ja vorher feste M. gehäkelt wurden ? Hier weiß jch nicht mehr weiter. Freue mich auf baldigeAntwort. Danke.
30.12.2024 - 18:53DROPS Design answered:
Liebe Frau Eitel, diese Reihe soll eine Reihe vom Muster mit festen Maschen sein, dh nach einer Reihe mit Stäbchen. Viel Spaß beim Häkeln!
02.01.2025 - 15:06
![]() Monika wrote:
Monika wrote:
Hallo, danke für Ihre schönen Anleitungen! Zu dieser habe ich zwei Fragen: 1) Wie kommt man bei der Breite von 34 cm auf 26 cm, wenn je Armauschnitt 7 cm gerechnet sind? 2) Kann ich diesen Pullover auch gerade hoch häkeln, also ohne Abnahmen für die Achseln und auch die Ärmel gerade, also ohne Armkugel, arbeiten oder ergibt das keine brauchbare Form? Würde mich sehr über Antwort freuen, eilt nicht! Monika
07.11.2023 - 13:42DROPS Design answered:
Liebe Monika, so wird es nicht gerechnet; die 7 cm sind für die Armkugel, aber in die 1. Größe messen die Armausschnitt nur 8 Maschen beidseitig in der Breite = ca 4 cm. Viel Spaß beim häkeln!
08.11.2023 - 07:47
![]() Marie Nordqvist wrote:
Marie Nordqvist wrote:
Var beskrivs knapphålen? Ska de inte vara på den påvirkade kanten runt halsen och ned mot sprunnet?
01.05.2023 - 15:36DROPS Design answered:
Hei Marie. Det kneppes igjennom en stavmaske, så da trenges det ikke å hekle egen knappehull. Sy knappene på i høyre siden og kneppes igjennom en maske på venstre side. mvh DROPS Design
02.05.2023 - 14:03
![]() Marie Nordqvist wrote:
Marie Nordqvist wrote:
Sen man ökat till 38 maskor på varvet å klippt av tråden, skall man börja med ärmkullen...🤔 Men då är ju bara ärmen drygt en decimeter lång bara. Har man inte missat i beskrivningen, att man skall sticka vidare tills arbetet mäter ett visst mått, innan man börjar med ärmkullen. I beskrivningen, efter ärmkullen, när man minskar nedåt, finns det ju längdangivelser på både 30 och 35 cm??? HJÄLP!
27.04.2023 - 12:38DROPS Design answered:
Hej igen Marie, du börjar uppifrån med ärmkullen och först när du har ökat 1 m i varje sida 7ggr (= 13 varv) har du 38 m och du klipper tråden :)
27.04.2023 - 13:32
![]() Marie Nordqvist wrote:
Marie Nordqvist wrote:
Har nyss skickat in mitt problem! Frågan var ju HUR man gör, när man stickat första sidan på framstycket och skall sticka andra sidan? Vad menas med att sticka i de 4:a första maskorna från första sidan (vid delningen) ? Sen ska man sticka vidare på stolpar, vilken sida är man på då? Efter att man klurat ut det, om man lyckas, ska man fortsätta med sida 2. Förstår inte🤔 Jobbigt😑😅
26.04.2023 - 11:39DROPS Design answered:
Hej Marie, du virkar bakom de 4 första m mitt fram (i samma 4 maskor) sedan fortsætter du över det andra framstycket på samma sätt som du virkade 1:a sidan (framstycket) :)
26.04.2023 - 14:55
|
|
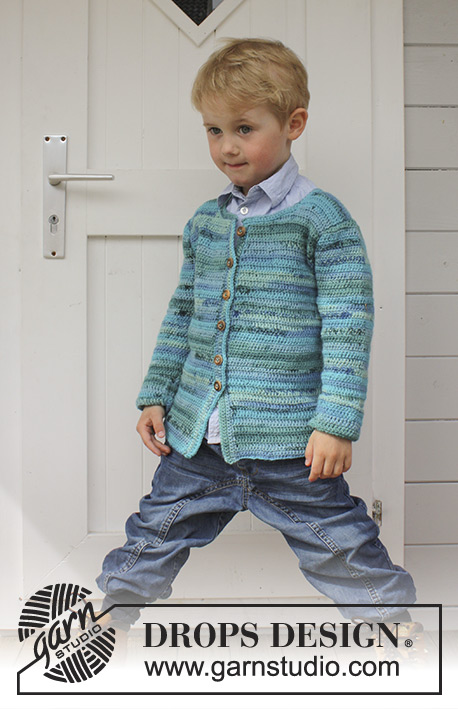
Little Oliver#littleoliversweater |
|
|
|
|
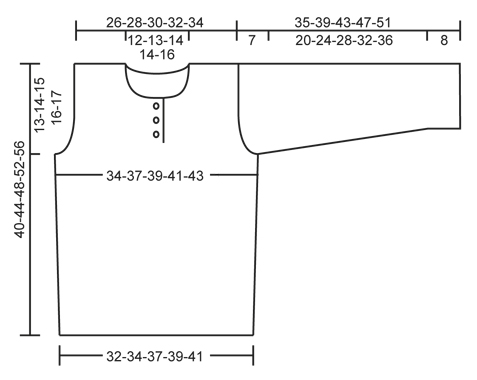
Crochet sweater with vent and buttons at the front in DROPS Merino Extra Fine. Size children 3 - 12 years.
DROPS Children 24-28 |
|
|
CROCHET INFO: On every sc row replace first sc with 1 ch. On every dc row replace first dc with 3 ch. PATTERN ON BODY: ROW 1: 1 dc in every sc in light greyish green. ROW 2: 1 sc in every dc in light greyish green. ROW 3: 1 dc in every sc in gray blue. ROW 4: 1 sc in every dc gray blue. Repeat rows 1 to 4. PATTERN SLEEVE: ROW 1: 1 sc in every dc gray blue. ROW 2: 1 dc in every sc in gray blue. ROW 3: 1 sc in every dc gray blue. ROW 4: 1 dc in every sc in gray blue. ROW 5: 1 sc in every dc gray blue. ROW 6: 1 dc in every sc in gray blue. ROW 7: 1 sc in every dc in light greyish green. ROW 8: 1 dc in every sc in light greyish green. Repeat rows 1 to 8. DECREASE TIP: Dec 1 st by working 2 sts tog. Work 2 sc tog as follows: Insert hook in first st and pull thread through, insert hook in next st and pull yarn through, make 1 YO and pull yarn through all 3 loops on hook. Work 2 dc tog as follows: Work 1 dc in first st but wait with last pull through, work 1 dc in next st but on last pull through, pull yarn through all 3 loops on hook. -------------------------------------------------------- JUMPER: To make the texture the same on the piece work all parts back and forth and sew tog when finished. BACK PIECE: Chain 67-71-76-81-85 with gray blue on hook size 4 mm / G/6. Continue with 1 sc in 2nd ch from hook, then 1 sc in each of the next 2-6-4-2-6 ch, * skip ch 1, 1 sc in each of the next 6 ch *, repeat from *-* the entire row = 58-62-66-70-74 sc (first ch = 1 sc). READ CROCHET INFO! Turn and work 4 rows with 1 sc in every sc. Then work PATTERN BODY until finished measurements - see explanation above. REMEMBER THE CROCHET GAUGE! When piece measures 10-11-12-13-14 cm / 4"-4½"-4¾"-5"-5½", inc 1 st in each side by working 2 sts in the second and next to last st. Repeat inc when piece measures 20-21-22-23-24 cm / 8"-8¼"-8¾"-9"-9½" = 62-66-70-74-78 sts. When piece measures approx. 27-30-33-36-39 cm / 10½"-11¾"-13"-14¼"-15¼" (make sure that next row is a row with sc), dec for armholes as follows: Work sl sts over the first 4 dc, then work sc until 4 dc remain, turn. * Ch 3 (= 1 dc), then work the next 2 dc tog – SEE DECREASE TIP, then work dc until 3 sc remain, work the next 2 dc tog, then 1 dc in last sc. Turn and work 1 row with sc over all sts, turn *. Repeat from *-* 3 more times = 46-50-54-58-62 sts on row. Continue to work until piece measures approx. 39-43-47-51-55 cm / 15¼"-17"-18½"-20"-21½". Now work 2 rows with pattern as before only over the 12-13-14-16-17 sts in each side (the middle 22-24-26-26-28 sts = neck). Fasten off. FRONT PIECE: Work as back piece until piece measures approx. 27-30-33-36-39 cm / 10½"-11¾"-13"-14¼"-15¼" (make sure that next row is a row with sc) = 62-66-70-74-78 dc. Now beg armhole dec - at the same time divide mid front for vent. 1ST SIDE: Work sl sts over the first 4 dc, then work sc over the next 29-31-33-35-37 dc. * Turn and work dc until 3 sc remain, work the next 2 dc tog – SEE DECREASE TIP, then work 1 dc in last sc. Turn and work sc over all dc *, repeat from *-* 3 more times. 8 sts have been dec in total for armhole and 25-27-29-31-33 sts remain on row. Continue as before. When piece measures approx. 35-38-42-45-49 cm / 13¾"-15"-16½"-17¾"-19¼" (make sure that next row beg from the side), beg neck dec. Now only work over the first 17-18-19-21-22 sts. Turn and work back - at the same time work the first 4 sts towards neck tog 2 by 2 – SEE DECREASE TIP! On next row work the 2 outermost sts towards neck tog, repeat this dec on every row 2 more times = 12-13-14-16-17 sts remain on shoulder. Continue to work until piece measures 40-44-48-52-56 cm / 15¾"-17¼"-19"-20½"-22", fasten off. 2ND SIDE: Beg mid front and work 1 sc at the back of each of the outermost 4 sts from 1st side (so that the button bands overlap at the bottom). Then work sc until 4 dc remain, turn and work back. Then work this side as 1st side. SLEEVE: Worked top down. Chain 32-35-38-43-46 on hook size 4 mm / G/6 with gray blue. Work first row as follows: Work 1 sc in 2nd ch from hook, work 1 sc in each of the next 2-1-0-1-0 ch, * skip ch 1, 1 sc in each of the next 3 ch *, repeat from *-* the entire row = 24-26-28-32-34 sc on row (this is 1st row in PATTERN SLEEVE - see explanation above). Then continue stripes as explained in PATTERN SLEEVE. AT THE SAME TIME inc in each side on every row with dc as follows: Inc on every dc-row by working 2 dc in st inside outermost st in each side (= 1 dc inc in each side – NOTE: on rows with sc work 1 sc in every dc without inc). Continue inc like this until there are 38-40-42-46-48 sts on row (adjust so that next row is a row with sc). Cut the yarn and work as follows: ch 4 loosely, work 1 sc in each of the 38-40-42-46-48 dc on row and then work 6 loose ch, turn piece and work 1 dc in 4th ch from hook, 1 dc in each of the next ch 2, work 1 dc in each of the 38-40-42-46-48 sc on row and finish with 1 dc in each of the 4 ch at the end of row = 46-48-50-54-56 dc on row. Insert 1 marker at the end in one side of piece. Sleeve cap is now done. Continue down the sleeve as follows: Continue with PATTERN SLEEVE in stripes as before. AT THE SAME TIME when piece measures 2 cm / ¾" from marker, dec 1 dc/sc in each side by working the second and third dc/sc and the 2 next to last dc/sc tog – SEE DECREASE TIP! Repeat dec every 4th-4th-5th-5th-5th row 5-6-6-7-8 more times (= 6-7-7-8-9 dec in total) = 34-34-36-38-38 sts on row. AT THE SAME TIME when sleeve measures approx. 30-34-39-43-47 cm / 11¾"-13½"-15¼"-17"-18½" – stop after 1 stripe with light greyish green, work with gray blue until finished measurements. When piece measures 35-39-43-47-51 cm / 13¾"-15¼"-17"-18½"-20", fasten off. Work another sleeve. ASSEMBLY: Sew shoulder seams, side seams and sleeve seams edge to edge to avoid a chunky seam. Sew in the sleeves in body. Sew the buttons on right side of mid front and button through sts. CROCHET EDGE: Work an edge up along the vent mid front, around the neck and down along the other vent at the front. Beg from RS and work with gray blue on hook size 4 mm / G/6 as follows: Work 1 sc in 1st st, * ch 1, 1 sc in next st *, repeat from *-* - make sure that the edge is nice and even. Fasten off. |
|
 |
|
Have you finished this pattern?Tag your pictures with #dropspattern #littleoliversweater or submit them to the #dropsfan gallery. Do you need help with this pattern?You'll find 9 tutorial videos, a Comments/Questions area and more by visiting the pattern on garnstudio.com. © 1982-2026 DROPS Design A/S. We reserve all rights. This document, including all its sub-sections, has copyrights. Read more about what you can do with our patterns at the bottom of each pattern on our site. |


With over 40 years in knitting and crochet design, DROPS Design offers one of the most extensive collections of free patterns on the internet - translated to 17 languages. As of today we count 325 catalogs and 12298 patterns - 12288 of which are translated into English (US/in).
We work hard to bring you the best knitting and crochet have to offer, inspiration and advice as well as great quality yarns at incredible prices! Would you like to use our patterns for other than personal use? You can read what you are allowed to do in the Copyright text at the bottom of all our patterns. Happy crafting!
Post a comment to pattern DROPS Children 24-28
We would love to hear what you have to say about this pattern!
If you want to leave a question, please make sure you select the correct category in the form below, to speed up the answering process. Required fields are marked *.