
Popular categories
Looking for a yarn?


|
|
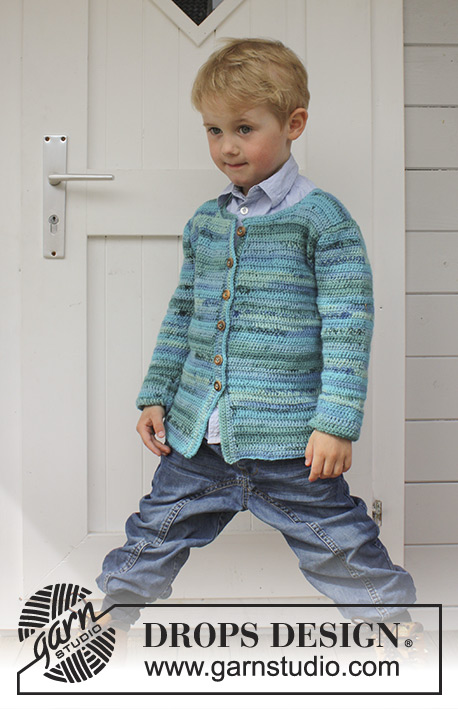
Little Oliver |
|
|
|
|
Crochet sweater with vent and buttons at the front in DROPS Merino Extra Fine. Size children 3 - 12 years.
DROPS Children 24-28 |
|
|
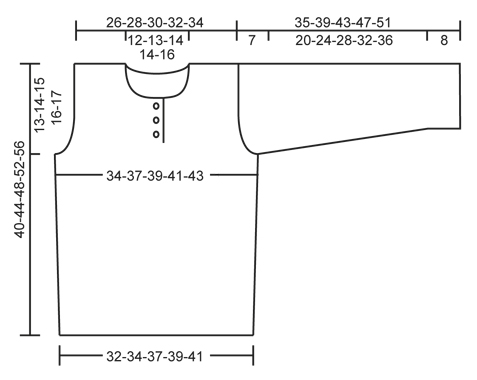
CROCHET INFO: On every sc row replace first sc with 1 ch. On every dc row replace first dc with 3 ch. PATTERN ON BODY: ROW 1: 1 dc in every sc in light greyish green. ROW 2: 1 sc in every dc in light greyish green. ROW 3: 1 dc in every sc in gray blue. ROW 4: 1 sc in every dc gray blue. Repeat rows 1 to 4. PATTERN SLEEVE: ROW 1: 1 sc in every dc gray blue. ROW 2: 1 dc in every sc in gray blue. ROW 3: 1 sc in every dc gray blue. ROW 4: 1 dc in every sc in gray blue. ROW 5: 1 sc in every dc gray blue. ROW 6: 1 dc in every sc in gray blue. ROW 7: 1 sc in every dc in light greyish green. ROW 8: 1 dc in every sc in light greyish green. Repeat rows 1 to 8. DECREASE TIP: Dec 1 st by working 2 sts tog. Work 2 sc tog as follows: Insert hook in first st and pull thread through, insert hook in next st and pull yarn through, make 1 YO and pull yarn through all 3 loops on hook. Work 2 dc tog as follows: Work 1 dc in first st but wait with last pull through, work 1 dc in next st but on last pull through, pull yarn through all 3 loops on hook. -------------------------------------------------------- JUMPER: To make the texture the same on the piece work all parts back and forth and sew tog when finished. BACK PIECE: Chain 67-71-76-81-85 with gray blue on hook size 4 mm / G/6. Continue with 1 sc in 2nd ch from hook, then 1 sc in each of the next 2-6-4-2-6 ch, * skip ch 1, 1 sc in each of the next 6 ch *, repeat from *-* the entire row = 58-62-66-70-74 sc (first ch = 1 sc). READ CROCHET INFO! Turn and work 4 rows with 1 sc in every sc. Then work PATTERN BODY until finished measurements - see explanation above. REMEMBER THE CROCHET GAUGE! When piece measures 10-11-12-13-14 cm / 4"-4½"-4¾"-5"-5½", inc 1 st in each side by working 2 sts in the second and next to last st. Repeat inc when piece measures 20-21-22-23-24 cm / 8"-8¼"-8¾"-9"-9½" = 62-66-70-74-78 sts. When piece measures approx. 27-30-33-36-39 cm / 10½"-11¾"-13"-14¼"-15¼" (make sure that next row is a row with sc), dec for armholes as follows: Work sl sts over the first 4 dc, then work sc until 4 dc remain, turn. * Ch 3 (= 1 dc), then work the next 2 dc tog – SEE DECREASE TIP, then work dc until 3 sc remain, work the next 2 dc tog, then 1 dc in last sc. Turn and work 1 row with sc over all sts, turn *. Repeat from *-* 3 more times = 46-50-54-58-62 sts on row. Continue to work until piece measures approx. 39-43-47-51-55 cm / 15¼"-17"-18½"-20"-21½". Now work 2 rows with pattern as before only over the 12-13-14-16-17 sts in each side (the middle 22-24-26-26-28 sts = neck). Fasten off. FRONT PIECE: Work as back piece until piece measures approx. 27-30-33-36-39 cm / 10½"-11¾"-13"-14¼"-15¼" (make sure that next row is a row with sc) = 62-66-70-74-78 dc. Now beg armhole dec - at the same time divide mid front for vent. 1ST SIDE: Work sl sts over the first 4 dc, then work sc over the next 29-31-33-35-37 dc. * Turn and work dc until 3 sc remain, work the next 2 dc tog – SEE DECREASE TIP, then work 1 dc in last sc. Turn and work sc over all dc *, repeat from *-* 3 more times. 8 sts have been dec in total for armhole and 25-27-29-31-33 sts remain on row. Continue as before. When piece measures approx. 35-38-42-45-49 cm / 13¾"-15"-16½"-17¾"-19¼" (make sure that next row beg from the side), beg neck dec. Now only work over the first 17-18-19-21-22 sts. Turn and work back - at the same time work the first 4 sts towards neck tog 2 by 2 – SEE DECREASE TIP! On next row work the 2 outermost sts towards neck tog, repeat this dec on every row 2 more times = 12-13-14-16-17 sts remain on shoulder. Continue to work until piece measures 40-44-48-52-56 cm / 15¾"-17¼"-19"-20½"-22", fasten off. 2ND SIDE: Beg mid front and work 1 sc at the back of each of the outermost 4 sts from 1st side (so that the button bands overlap at the bottom). Then work sc until 4 dc remain, turn and work back. Then work this side as 1st side. SLEEVE: Worked top down. Chain 32-35-38-43-46 on hook size 4 mm / G/6 with gray blue. Work first row as follows: Work 1 sc in 2nd ch from hook, work 1 sc in each of the next 2-1-0-1-0 ch, * skip ch 1, 1 sc in each of the next 3 ch *, repeat from *-* the entire row = 24-26-28-32-34 sc on row (this is 1st row in PATTERN SLEEVE - see explanation above). Then continue stripes as explained in PATTERN SLEEVE. AT THE SAME TIME inc in each side on every row with dc as follows: Inc on every dc-row by working 2 dc in st inside outermost st in each side (= 1 dc inc in each side – NOTE: on rows with sc work 1 sc in every dc without inc). Continue inc like this until there are 38-40-42-46-48 sts on row (adjust so that next row is a row with sc). Cut the yarn and work as follows: ch 4 loosely, work 1 sc in each of the 38-40-42-46-48 dc on row and then work 6 loose ch, turn piece and work 1 dc in 4th ch from hook, 1 dc in each of the next ch 2, work 1 dc in each of the 38-40-42-46-48 sc on row and finish with 1 dc in each of the 4 ch at the end of row = 46-48-50-54-56 dc on row. Insert 1 marker at the end in one side of piece. Sleeve cap is now done. Continue down the sleeve as follows: Continue with PATTERN SLEEVE in stripes as before. AT THE SAME TIME when piece measures 2 cm / ¾" from marker, dec 1 dc/sc in each side by working the second and third dc/sc and the 2 next to last dc/sc tog – SEE DECREASE TIP! Repeat dec every 4th-4th-5th-5th-5th row 5-6-6-7-8 more times (= 6-7-7-8-9 dec in total) = 34-34-36-38-38 sts on row. AT THE SAME TIME when sleeve measures approx. 30-34-39-43-47 cm / 11¾"-13½"-15¼"-17"-18½" – stop after 1 stripe with light greyish green, work with gray blue until finished measurements. When piece measures 35-39-43-47-51 cm / 13¾"-15¼"-17"-18½"-20", fasten off. Work another sleeve. ASSEMBLY: Sew shoulder seams, side seams and sleeve seams edge to edge to avoid a chunky seam. Sew in the sleeves in body. Sew the buttons on right side of mid front and button through sts. CROCHET EDGE: Work an edge up along the vent mid front, around the neck and down along the other vent at the front. Beg from RS and work with gray blue on hook size 4 mm / G/6 as follows: Work 1 sc in 1st st, * ch 1, 1 sc in next st *, repeat from *-* - make sure that the edge is nice and even. Fasten off. |
|
|
|
|
Have you made this or any other of our designs? Tag your pictures in social media with #dropsdesign so we can see them! Do you need help with this pattern?You'll find tutorial videos, a Comments/Questions area and more by visiting the pattern on garnstudio.com. © 1982-2024 DROPS Design A/S. We reserve all rights. This document, including all its sub-sections, has copyrights. Read more about what you can do with our patterns at the bottom of each pattern on our site. |


With over 40 years in knitting and crochet design, DROPS Design offers one of the most extensive collections of free patterns on the internet - translated to 17 languages. As of today we count 304 catalogs and 11422 patterns - 11417 of which are translated into English (US/in).
We work hard to bring you the best knitting and crochet have to offer, inspiration and advice as well as great quality yarns at incredible prices! Would you like to use our patterns for other than personal use? You can read what you are allowed to do in the Copyright text at the bottom of all our patterns. Happy crafting!
Comments / Questions (55)
Comment faire pour mettre ce modèle dans mes favoris, j'aimerais le tricoter plus tard ? merci d'avance cordialement, N.F.
02.11.2015 - 22:59DROPS Design answered:
Bonjour Mme Flugel, cliquez sur le petit cœur en haut à droite sur la photo, et suivez les indications. Bon crochet!
03.11.2015 - 09:41Hei! Har hatt mye glede av instruksjonsvideoene deres, men jeg savner tips/råd om montering av hekleplagg. På denne genseren har jeg problemer med å montere armen; når jeg syr armen sammen med bolen får jeg en "knekk" i overgangen mellom oppleggsmaskene på armen og der den begynner å skrå. Hilsener fra Bergen
19.10.2015 - 11:55DROPS Design answered:
Hej Jorun, ja der vil være et "knekk" i overgangen, men det kan du skjule ved at sy "på skrå" når du monterer. God fornøjelse!
26.11.2015 - 10:22Bonjour, avez-vous un correctif pour les manches? En effet, je pense qu'il doit y avoir une erreur car pour passer des 26 mailles (réduites) aux 40, il faut tout de même 14 rangs soit pour ma part 11cm environ. Bien loin des 7cm que vous indiquer sur le diagramme, et des 6cm environ pour ma part. Je ne peux donc pas assembler la manche au reste car ça ne correspond pas du tout. Merci
13.09.2015 - 22:26DROPS Design answered:
Bonjour Milou369, votre question a été transféré au Design. Merci d'avance pour votre patience.
14.09.2015 - 13:24Hall, ich habe eine Frage zu den Ärmeln. Muss ich in jeder Stäbchenreihe in der zweiten und vorletzten Masche zunehmen oder nehme ich in einer stäbchenreihe in der zweiten und in dr nächsten stäbchenreihe in der vorletzten masche zu?dazwischen dann eine reihe feste maschen. gruüße aus bayern
09.09.2015 - 11:26DROPS Design answered:
Die Zunahmen erfolgen beidseitig in JEDER Reihe, Sie nehmen also in jeder Reihe je 2 M zu.
20.09.2015 - 10:50Mary wrote:
Hello from Greece. I do not understand how to work the 2nd side of the front piece. Is there a video i can see? Also, I don't understand the corrections. They say the same as the pattern. Thank you in advance.
31.08.2015 - 12:45DROPS Design answered:
Dear Mary, for 2nd side of front piece, work 1 dc (UK-English) behind each of 4 first sts towards neckline on 1st side (= vent, 1st side will overlap 2nd side). You can alternately start with a separate chain and sew the chain behind the first side. Corrections are always made in the online pattern, but are not included in the printed catalogs. Happy crocheting!
31.08.2015 - 14:32Antoaneta Atanasova wrote:
Hello again, Please be patient, I'm still learning. I'm working the smallest size - it says to chain 67 - that means 66 chains left to work with. Then 1+2dc-skip 1- 6dc..,and I have to finish the row with the last 6dc - it means I'll have 9 sk ch and in the end I'll have 57st - not 58 as it says in the pattern. I think the best is to chain a total of 68 at first, then work 1+3dc and keep the skip 1, 6 dc pace afterwards. Then I'll have a total of 58 stitches. Am I right?
28.08.2015 - 21:34DROPS Design answered:
Dear Mrs Atanasova, remember that the 1st ch = 1st dc at the beg of row, so that you have a total of 57 dc + 1st ch (= 1st dc) = 58 dc. Happy crocheting!
31.08.2015 - 11:30Antoaneta Atanasova wrote:
Hello, I'm working on the back piece, and I can't understand the 1st 4 rows - does the turning chain count as a dc?
28.08.2015 - 19:46DROPS Design answered:
Dear Mrs Atanasova, that's right, see also "crochet info" at the beg of the pattern. Happy crocheting!
31.08.2015 - 11:34Mary wrote:
Hello, i am writing from Greece. I have bought a magazine here for the above pattern.As general instructions begin,the sizes are for 6-9 months, 9-12,12-18,18-24 months, 2-3 years,etc. But later on, the mesurements begin from 3-4 years old.And the measurements through the pattern are for these sizes.I think the magazine has made a mistake.Could you please advise what the measurements would be for a 2-3 year old child, so that I can crochet it for my little boy?Thank you
05.08.2015 - 12:24DROPS Design answered:
Dear Mary, that's right this jumper starts with size 3/4 years - you can adjust pattern following your tension and your own measurements (see measurement chart at the end of the pattern you can adapt to measurements to the correct sizes). Your DROPS store will also give you tips & advices. Happy crocheting!
05.08.2015 - 17:51Jeg har heklet ferdig genseren og alt ble rett og fint bortsett fra halsen. Syns ikke den ble så rund og fin som på bildet. Den er litt mer kantete. Har fulgt oppskriften og dobbeltsjekket, men ser ikke noen feil. Hva kan jeg gjøre for å få den finere? Heklet str 6 år.
24.07.2015 - 20:14DROPS Design answered:
Hej, Det er svært at sige, men hvis du fex hækler en m mere imellem striberne, så vil halsen muligvis blive mere rund. God fornøjelse! Du kan prøve at vise den for din lokale butik, så er jeg sikker på at du får hjælp!
28.07.2015 - 14:24I am currently working on the back piece at the arm hole decrease. My concern is the pattern only shapes one side with the arm hole am I reading this wrong?
11.01.2015 - 00:33DROPS Design answered:
Dear Mrs Orr, when you dec for armhole, you have to dec each side:: working sl st over the first 4 tr, then work until 4 tr remain and turn - see video below for how to dec each side - then at the beg of next row, work 3 ch (=1st tr), 2 tr tog, work until 3 tr remain, 2 tr tog, 1 tr in last tr (= 1 tr dec each side). Happy crocheting!
12.01.2015 - 09:57