
Popular categories
Looking for a yarn?


Comments / Questions (199)
![]() Eva Jonsson wrote:
Eva Jonsson wrote:
När jag söker beskrivning på kofta med mormorsrutor kommer inte detta mönster upp.
10.02.2016 - 19:46DROPS Design answered:
Hej. Det ska nu komma upp när du söker på "mormorsrutor". Mvh DROPS Design
26.02.2016 - 09:01
![]() Marie wrote:
Marie wrote:
Skulle man kunna få se bild på ärmkilen och hur den sys fast?
14.09.2015 - 22:19
![]() Jenny wrote:
Jenny wrote:
Nice pattern but beware! I've ordered the right wool (alpaca by drops) but it turned out that with needle size 3 the squares are much bigger: 7x8 cm. A smaller size needle is not possible since this size 3 is already very small for this wool. Shame I have to recalculate the pattern all over now.
08.02.2015 - 22:28DROPS Design answered:
Dear Jenny, crochet hook size is just an indication, remember to adapt you crochet hook to get the right tension, ie 1 square = 6.5 x 6.5 cm and when working tr: approx. 23 tr x 12 rows = 10 x 10 cm. Try with a smaller crochet to get the correct gauge. Happy crocheting!
09.02.2015 - 08:40
![]() Ellen Lobbezoo wrote:
Ellen Lobbezoo wrote:
Goedenavond, nu snap ik niet, hoe moet de mouw met spie tegen de panden worden gehaakt? Ik haak maat m, dus heb de spie moeten splitsen.
28.09.2014 - 18:48DROPS Design answered:
De spie is om te zorgen dat de mouw bovenaan wijder is dan onderaan. De spie is gewoon een onderdeel van de mouw en het midden van de spie is gelijk aan middenonder van de mouw - dit komt tegen het midden van de panden, dus de zijnaad aan.
09.10.2014 - 15:58
![]() MevrFlierman wrote:
MevrFlierman wrote:
De Spie hoe moet die in de mouw worden gezet
26.06.2014 - 13:57DROPS Design answered:
Hoi Mevr. Flierman. De spie zit aan de onderkant van de mouw (is daarom helaas niet te zien op de foto). U heeft 20 of 30 vierkantjes voor elke mouw en u verdeelt ze 4 bij 5 of 6 bij 5. Haak deze aan elkaar tot een groot vierkant. U plaatst nu de spie langs de onderkant van de mouw en haakt de zijkanten van de grote vierkant langs de zijkanten van de spie. Ik hoop dat het zo voor u duidelijker is.
26.06.2014 - 16:09
![]() Helena wrote:
Helena wrote:
Ärmkil i st S. Ökar man 2m, 9ggr med 3 varvs mellanrum, blir kilen alldeles för lång. Funderar på att endast virka 2 varv mellan ökningarna.
17.02.2014 - 18:34DROPS Design answered:
Hej Helena. Mönstret stemmer. Med den rette strikkefasthed bliver din kile ca 22 cm naar du er faerdig med at öge de 2 m og du skal hekle til i alt 33 cm
19.02.2014 - 14:51
![]() Iris wrote:
Iris wrote:
Ich bin dabei, Grundfarbe ist petrol, bin gespannt, ich liebe Granny Squares.
03.01.2014 - 16:27
![]() Barbara wrote:
Barbara wrote:
Ich habe es gemacht. Ist super geworden :-)
15.11.2013 - 15:45
![]() Caroline wrote:
Caroline wrote:
Mouw spie: ik vat hem, heb na wat schuiven voor elkaar gekregen hoe het moet! Vest is nu klaar om te dragen, moet alleen de mouwen en 2x de spie haken.
17.10.2013 - 12:18
![]() Caroline wrote:
Caroline wrote:
1. Welke van de hokjes-tekeningen is de mouw? 2. Wat is een "MOUWSPIE": Haak een stuk van stk in de vorm van een spie die aan de vierkantjes voor de mouw wordt genaaid zodat de mouw breder is aan de bovenkant dan aan de onderkant. Vervang het eerste stk elke toer door 3 l. Ik snap dit stuk niet!
29.09.2013 - 19:12DROPS Design answered:
Hoi Caroline. Geen van de tekeningen zijn voor de mouw, dit zijn puur voor de panden. De spie is het stukje tussen de mouw om de mouw vorm te geven. Je haakt hier stk tussen de vierkantjes zoals beschreven. Je kan een deel van de spie ook zien op de eerste foto.
30.09.2013 - 21:05
|
|
Summer Patchwork#summerpatchworkcardigan |
|
 |
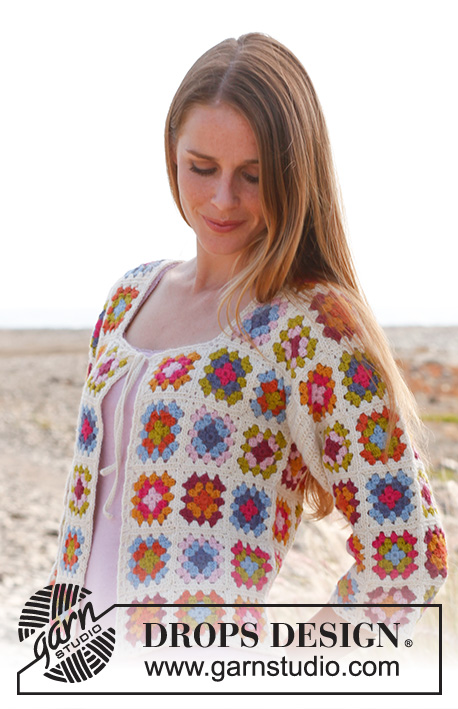 |
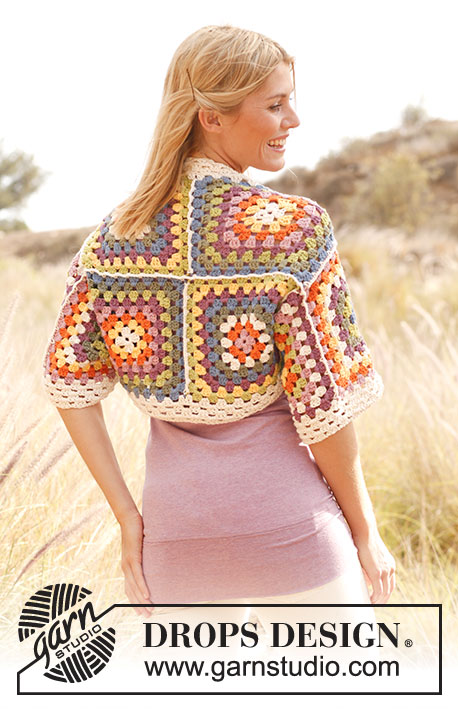
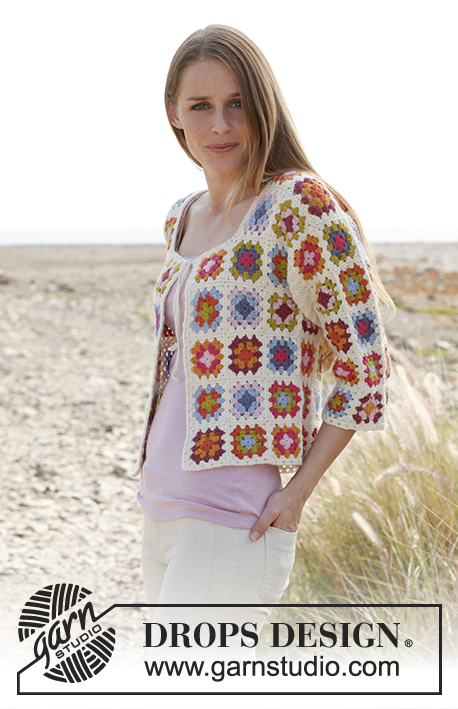
Crochet DROPS jacket with ¾ sleeves and granny squares in ”Alpaca”. Size: S - XXXL
DROPS 147-9 |
|
|
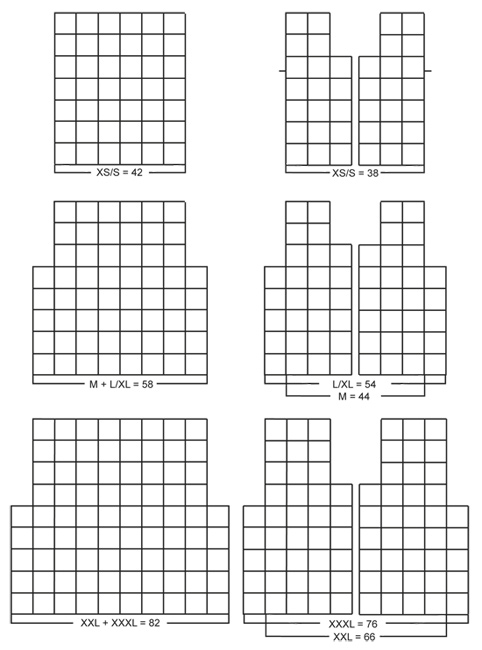
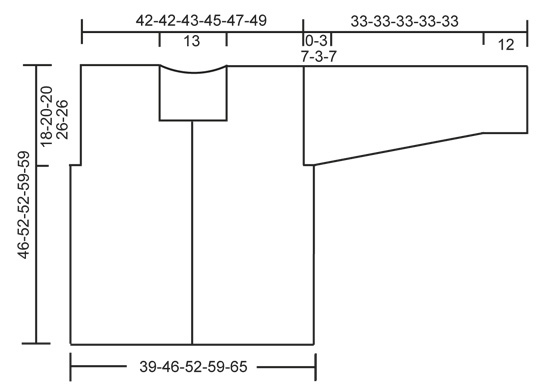
COLORS ON SQUARES: Last round (= color 4) on all squares is off white. SQUARE A: Color 1 = lime, color 2 = orange, color 3 = light blue. SQUARE B: Color 1 = goldenrod, color 2 = light pink, color 3 = dark pink. SQUARE C: Color 1 = light blue, color 2 = lime, color 3 = orange. SQUARE D: Color 1 = dark pink, color 2 = light pink, color 3 = lime. SQUARE E: Color 1 = light pink, color 2 = pink, color 3 = goldenrod. SQUARE F: Color 1 = pink, color 2 = gray purple, color 3 = light blue. SQUARE G: Color 1 = gray purple, color 2 = light blue, color 3 = light pink. SQUARE H: Color 1 = pink, color 2 = gray purple, color 3 = lime. SQUARE I: Color 1 = orange, color 2 = goldenrod, color 3 = dark pink. SQUARE J: Color 1 = light blue, color 2 = lime, color 3 = pink. GRANNY SQUARE: Ch 6 on hook size 3 mm / C with color 1 and form a ring with 1 sl st in first ch. ROUND 1 (color 1): ch3 , 2 dc in ch-ring, * ch 3, 3 dc in ch-ring *, repeat from *-* a total of 3 times and finish with 3 ch and 1 sl st in 3rd ch from beg of round. Turn piece. ROUND 2 (color 2): ch3 , 2 dc in first ch-space, ch 3, 3 dc in same ch-space, * ch 1, 3 dc in next ch-space, ch 3, 3 dc in same ch-space *, repeat from *-* a total of 3 times and finish with 1 ch and 1 sl st in 3rd ch from beg of round. Turn piece. ROUND 3 (color 3): ch3 , 2 dc in first ch-space, ch 1, * 3 dc in next ch-space, ch 3, 3 dc in same ch-space, ch 1, 3 dc in next ch-space, 1 ch *, repeat from *-* a total of 3 times, 3 dc in next ch-space, ch 3, 3 dc in same ch-space, 1 ch and finish with 1 sl st in 3rd ch from beg of round. Turn piece. ROUND 4 (color 4): ch3 , 2 dc in first ch-space, ch 1, * 3 dc in next ch-space, ch 3, 3 dc in same ch-space, ch 1, 3 dc in next ch-space, ch 1, 3 dc in next ch-space, 1 ch *, repeat from *-* a total of 3 times, 3 dc in next ch-space, ch 3, 3 dc in same ch-space, ch 1, 3 dc in next ch-space, 1 ch and finish with 1 sl st in 3rd ch from beg of round. Cut the yarn. 1 square measures approx. 6.5 x 6.5 cm / 2½" x 2½". Work 12-14-15-20-21 squares of every color combination, work in addition 0-2-2-8-8 extra squares (choose your own color combination on these squares) = 120-142-152-208-218 squares in total. SLEEVE GUSSET: Work a piece with dc shaped as a gusset to be sewn under sleeve so it is wider at the top than the at bottom. Replace first dc on every row with 3 ch. Work 7-8-8-8-8 ch on hook size 3 mm / C with off white. Turn and work 1 dc in 4th ch from hook, then work 1 dc in the remaining 3-4-4-4-4 ch = 5-6-6-6-6 dc. Continue back and forth with 1 dc in every dc until piece measures 10 cm / 4". READ ALL OF THE FOLLOWING SECTION BEFORE FINISHING! On next row inc 1 dc in each side by working 2 dc in next to last dc in each side. Repeat inc every 3-2-2-2-2 rows a total of 9-12-12-12-12 times. NOTE: In size XS/S continue with 1 dc in every dc until piece measures 33 cm / 13". In sizes M and XXL divide the piece in the middle when it measures 30 cm / 11¾", then work each side separately with 1 dc in every dc until piece measures 33 cm / 13". In sizes L/XL and XXXL divide the piece in the middle when it measures 26 cm / 10¼", then work each side separately, when inc is done, with 1 dc in every dc until piece measures 33 cm / 13". The piece is divided in the 4 largest sizes because of dec for armholes. This is not done in the smallest size. Work another sleeve gusset. Place the squares tog for back and front piece as shown on diagram – you can choose in which order you want to put the squares. Distribute the remaining 40-40-40-60-60 squares for 2 sleeves, with 20-20-20-30-30 squares on each sleeve. In the 3 smallest sizes there should be 4 x 5 squares and in the 2 largest sizes there should be 6 x 5 squares - there are 5 squares vertically in all sizes. Sew the squares tog edge to edge with off white. Sew sleeve gusset to each side of squares on sleeves and sew sleeves in body – with the widest part of gusset in the bottom of armhole. Then sew the side seams and shoulder seams the same way – NOTE: In sizes M and XXL there is 1 row with squares in the middle of each side under armhole, in sizes L/XL and XXXL there are 2 rows with squares in each side under armhole. Work around the entire jacket with off white as follows (beg mid back of neck): 1 sc in 1 ch at the edge of 1 square, ch 3 and 2 dc in same ch, * ch 1, 3 dc in next ch *, repeat from *-*. NOTE: In the corners faced inwards work as follows: 1 dc in last ch before corner, 1 dc in the corner and 1 dc in first ch after corner. In the corners faced outwards work as follows: 3 dc in ch-space in the corner on square, 3 ch and 3 more dc in the same ch-space. In every corner at the top by neck also work a tie as follows: 3 dc in ch-space in the corner on square, then work loose ch for approx. 28 cm / 11", turn and work 1 sc in every ch on the way back, then 3 dc in the same ch-space in the corner. Work the same way at bottom around the sleeves – over the section between the squares work as follows: * 1 dc in each of the first 3 dc, ch 1, skip 1 dc *, repeat from *-*. |
|
 |
|
 |
|
Have you finished this pattern?Tag your pictures with #dropspattern #summerpatchworkcardigan or submit them to the #dropsfan gallery. Do you need help with this pattern?You'll find 9 tutorial videos, a Comments/Questions area and more by visiting the pattern on garnstudio.com. © 1982-2026 DROPS Design A/S. We reserve all rights. This document, including all its sub-sections, has copyrights. Read more about what you can do with our patterns at the bottom of each pattern on our site. |
|


With over 40 years in knitting and crochet design, DROPS Design offers one of the most extensive collections of free patterns on the internet - translated to 17 languages. As of today we count 325 catalogs and 12298 patterns - 12288 of which are translated into English (US/in).
We work hard to bring you the best knitting and crochet have to offer, inspiration and advice as well as great quality yarns at incredible prices! Would you like to use our patterns for other than personal use? You can read what you are allowed to do in the Copyright text at the bottom of all our patterns. Happy crafting!
Post a comment to pattern DROPS 147-9
We would love to hear what you have to say about this pattern!
If you want to leave a question, please make sure you select the correct category in the form below, to speed up the answering process. Required fields are marked *.