
Popular categories
Looking for a yarn?


Comments / Questions (199)
![]() Marisa Santomaso wrote:
Marisa Santomaso wrote:
Buongiorno, non trovo molto chiare le istruzioni del rinforzo maniche, grazie se posso avere chiarimenti, per esempio quanti saranno i punti finali, partendo dai 6 iniziali. Inoltre ho confezionato la giacca in taglia M, però con manica lunga e non 3/4. Il rinforzo comincia dal polso? Grazie
29.04.2019 - 11:27DROPS Design answered:
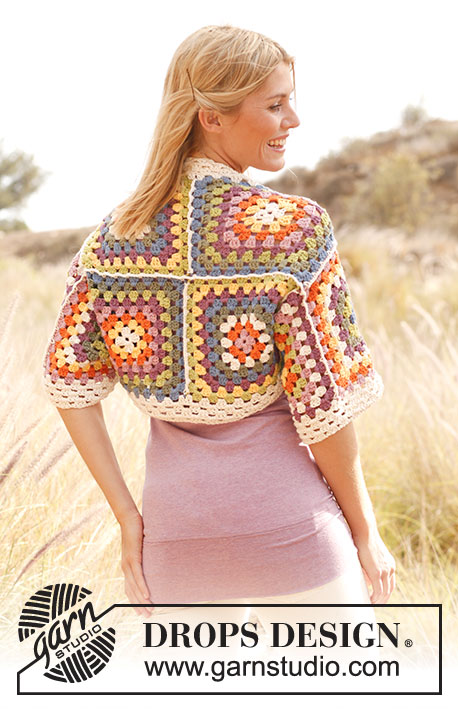
Buongiorno Marisa. Il rinforzo per le maniche, è una parte che si lavora separatamente e che serve per allargare la manica nella parte sotto l'ascella. E' la parte lavorata in panna che si scorge nella fotografia. Dopo gli aumenti avrà 30 maglie (6 m iniziali + 24 m aumentate). Anche se le maniche sono lunghe e non a 3/4, lavora il rinforzo con le misure indicate. Buon lavoro!
29.04.2019 - 12:05
![]() CRISTINA TETTAMANTI wrote:
CRISTINA TETTAMANTI wrote:
La ringrazio della sua risposta. Questo vuol dire che il rinforzo maniche si attacca dopo aver unito le piastrelle
13.04.2019 - 11:06DROPS Design answered:
Buongiorno Cristina. Sì esatto, lo attacca in fase di confezione del capo. Buon lavoro!
13.04.2019 - 11:38
![]() CRISTINA TETTAMANTI wrote:
CRISTINA TETTAMANTI wrote:
Buongiorno nn ho capito la spiegazione rinforzo maniche. E quante piastrelle ci vogliono grazie
13.04.2019 - 09:45DROPS Design answered:
Buongiorno Cristina. A seconda della taglia, il numero delle piastrelle da lavorare è: 120-142-152-208-218. Il rinforzo sotto la manica è quella parte lavorata in panna che si intravvede nella fotografia, sotto l’ascella. Deve lavorare una striscia a maglie alte, aumentando ai lati come indicato nelle spiegazioni per la taglia che sta lavorando. Buon lavoro!
13.04.2019 - 09:57
![]() Heloisa wrote:
Heloisa wrote:
Muito lindo
25.03.2019 - 12:02Tina wrote:
Hej. Dansk spørgsmål. Hvorfor skal man dele kilen i to?
16.07.2018 - 10:23DROPS Design answered:
Hei Tina. Du deler ermkilen i to i de 4 største størrelsene fordi det skal felles inn til ermhull. God fornøyelse
19.07.2018 - 14:50
![]() Rosaria Napolitano wrote:
Rosaria Napolitano wrote:
Buongiorno vorrei fare questo modello in cotone e senza manica usando solo 3 colori. Mi potete consigliare quale filato usare e il quantitativo? Grazie
17.05.2018 - 11:03DROPS Design answered:
Buongiorno Rosaria, per un aiuto così personalizzato può rivolgersi al suo rivenditore DROPS di fiducia. Buon lavoro!
17.05.2018 - 11:15
![]() Camelia wrote:
Camelia wrote:
Please can you tell me what size I would need for a UK size 16. Thank you in anticipation of a reply.
21.01.2018 - 21:35DROPS Design answered:
Dear Camelia, please refer to the measurements given on the schematic drawing on the bottom of the pattern. Compare to a similar styled cardigan if necessary. Happy crafting!
22.01.2018 - 00:14Rebecca Reid wrote:
I am making the sleeve gusset and don;t understand why the gusset is divided and also how to do this and if you do, I can't see anywhere in the pattern about joining it up as I presume it will finish up being a Y shape. Please, please can you help as I can't go any further now and Ive crocheted all 152 squares and would love to get this beautiful pattern finished. Thanks so much. Rebecca
20.01.2017 - 10:15DROPS Design answered:
Dear Mrs Reid, gusset is finished in 2 parts to fit the armhole, ie one of the part will be sewn on armhole on back piece and the other part on armhole on front piece. Happy crocheting!
20.01.2017 - 16:24
![]() Jane Preece wrote:
Jane Preece wrote:
Like others, i am finding the square much bigger than the 6.5x6.5cm indicated in the pattern and i have dropped to a 2mm hook. Any smaller hook will split the alpaca wool. Is is really 6.5cm square after the 4 rounds, including the off white?
17.07.2016 - 16:48DROPS Design answered:
Dear Mrs Preece, remember that every crocheter has his own way to crochet and this can affect tension. Each square should measure here 6,5 x 6,5 cm after 4 rounds (= when it's done). Adjust the hook size if required until you get the measurements. Happy crocheting!
18.07.2016 - 09:25
![]() Marlien Janssen wrote:
Marlien Janssen wrote:
Ik heb het vest gehaakt met het juiste garen en de juiste maat haaknaald. De vierkantjes zijn ook precies de goede maat. Maar ik had twee hele bollen over (lichtblauw en groen) en van de naturelkleur had ik veel te weinig, kon zelfs het vest niet aan elkaar naaien. Heb de rand eromheen nu met andere kleur gedaan. Ik wil dit FF melden, misschien handig voor andere haaksters😊
24.04.2016 - 15:02
|
|
Summer Patchwork#summerpatchworkcardigan |
|
 |
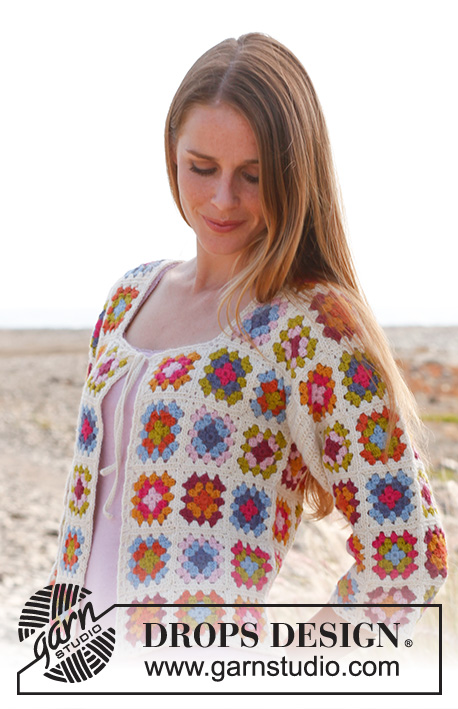 |
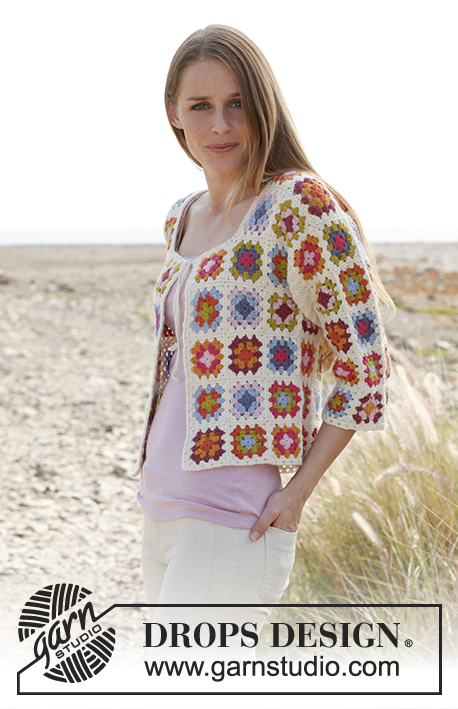
Crochet DROPS jacket with ¾ sleeves and granny squares in ”Alpaca”. Size: S - XXXL
DROPS 147-9 |
|
|
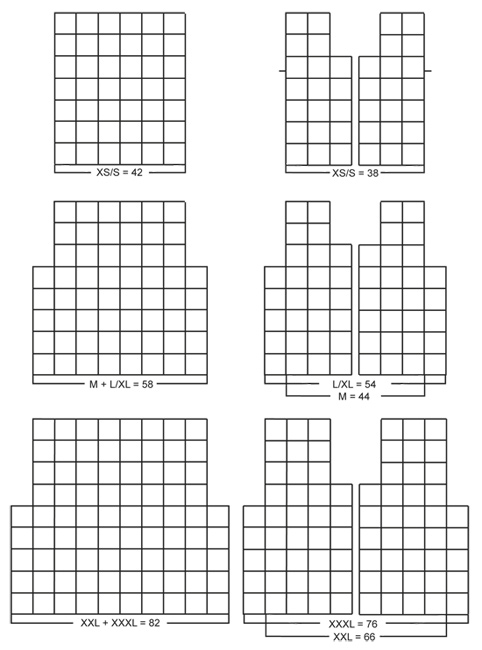
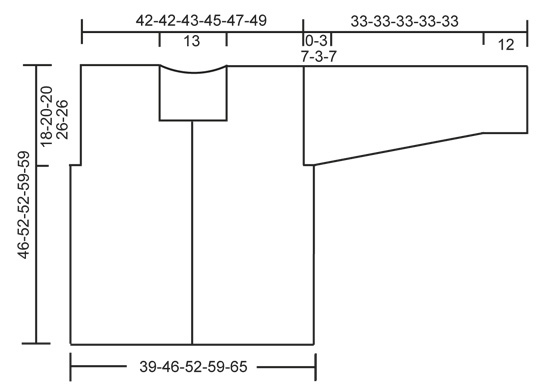
COLORS ON SQUARES: Last round (= color 4) on all squares is off white. SQUARE A: Color 1 = lime, color 2 = orange, color 3 = light blue. SQUARE B: Color 1 = goldenrod, color 2 = light pink, color 3 = dark pink. SQUARE C: Color 1 = light blue, color 2 = lime, color 3 = orange. SQUARE D: Color 1 = dark pink, color 2 = light pink, color 3 = lime. SQUARE E: Color 1 = light pink, color 2 = pink, color 3 = goldenrod. SQUARE F: Color 1 = pink, color 2 = gray purple, color 3 = light blue. SQUARE G: Color 1 = gray purple, color 2 = light blue, color 3 = light pink. SQUARE H: Color 1 = pink, color 2 = gray purple, color 3 = lime. SQUARE I: Color 1 = orange, color 2 = goldenrod, color 3 = dark pink. SQUARE J: Color 1 = light blue, color 2 = lime, color 3 = pink. GRANNY SQUARE: Ch 6 on hook size 3 mm / C with color 1 and form a ring with 1 sl st in first ch. ROUND 1 (color 1): ch3 , 2 dc in ch-ring, * ch 3, 3 dc in ch-ring *, repeat from *-* a total of 3 times and finish with 3 ch and 1 sl st in 3rd ch from beg of round. Turn piece. ROUND 2 (color 2): ch3 , 2 dc in first ch-space, ch 3, 3 dc in same ch-space, * ch 1, 3 dc in next ch-space, ch 3, 3 dc in same ch-space *, repeat from *-* a total of 3 times and finish with 1 ch and 1 sl st in 3rd ch from beg of round. Turn piece. ROUND 3 (color 3): ch3 , 2 dc in first ch-space, ch 1, * 3 dc in next ch-space, ch 3, 3 dc in same ch-space, ch 1, 3 dc in next ch-space, 1 ch *, repeat from *-* a total of 3 times, 3 dc in next ch-space, ch 3, 3 dc in same ch-space, 1 ch and finish with 1 sl st in 3rd ch from beg of round. Turn piece. ROUND 4 (color 4): ch3 , 2 dc in first ch-space, ch 1, * 3 dc in next ch-space, ch 3, 3 dc in same ch-space, ch 1, 3 dc in next ch-space, ch 1, 3 dc in next ch-space, 1 ch *, repeat from *-* a total of 3 times, 3 dc in next ch-space, ch 3, 3 dc in same ch-space, ch 1, 3 dc in next ch-space, 1 ch and finish with 1 sl st in 3rd ch from beg of round. Cut the yarn. 1 square measures approx. 6.5 x 6.5 cm / 2½" x 2½". Work 12-14-15-20-21 squares of every color combination, work in addition 0-2-2-8-8 extra squares (choose your own color combination on these squares) = 120-142-152-208-218 squares in total. SLEEVE GUSSET: Work a piece with dc shaped as a gusset to be sewn under sleeve so it is wider at the top than the at bottom. Replace first dc on every row with 3 ch. Work 7-8-8-8-8 ch on hook size 3 mm / C with off white. Turn and work 1 dc in 4th ch from hook, then work 1 dc in the remaining 3-4-4-4-4 ch = 5-6-6-6-6 dc. Continue back and forth with 1 dc in every dc until piece measures 10 cm / 4". READ ALL OF THE FOLLOWING SECTION BEFORE FINISHING! On next row inc 1 dc in each side by working 2 dc in next to last dc in each side. Repeat inc every 3-2-2-2-2 rows a total of 9-12-12-12-12 times. NOTE: In size XS/S continue with 1 dc in every dc until piece measures 33 cm / 13". In sizes M and XXL divide the piece in the middle when it measures 30 cm / 11¾", then work each side separately with 1 dc in every dc until piece measures 33 cm / 13". In sizes L/XL and XXXL divide the piece in the middle when it measures 26 cm / 10¼", then work each side separately, when inc is done, with 1 dc in every dc until piece measures 33 cm / 13". The piece is divided in the 4 largest sizes because of dec for armholes. This is not done in the smallest size. Work another sleeve gusset. Place the squares tog for back and front piece as shown on diagram – you can choose in which order you want to put the squares. Distribute the remaining 40-40-40-60-60 squares for 2 sleeves, with 20-20-20-30-30 squares on each sleeve. In the 3 smallest sizes there should be 4 x 5 squares and in the 2 largest sizes there should be 6 x 5 squares - there are 5 squares vertically in all sizes. Sew the squares tog edge to edge with off white. Sew sleeve gusset to each side of squares on sleeves and sew sleeves in body – with the widest part of gusset in the bottom of armhole. Then sew the side seams and shoulder seams the same way – NOTE: In sizes M and XXL there is 1 row with squares in the middle of each side under armhole, in sizes L/XL and XXXL there are 2 rows with squares in each side under armhole. Work around the entire jacket with off white as follows (beg mid back of neck): 1 sc in 1 ch at the edge of 1 square, ch 3 and 2 dc in same ch, * ch 1, 3 dc in next ch *, repeat from *-*. NOTE: In the corners faced inwards work as follows: 1 dc in last ch before corner, 1 dc in the corner and 1 dc in first ch after corner. In the corners faced outwards work as follows: 3 dc in ch-space in the corner on square, 3 ch and 3 more dc in the same ch-space. In every corner at the top by neck also work a tie as follows: 3 dc in ch-space in the corner on square, then work loose ch for approx. 28 cm / 11", turn and work 1 sc in every ch on the way back, then 3 dc in the same ch-space in the corner. Work the same way at bottom around the sleeves – over the section between the squares work as follows: * 1 dc in each of the first 3 dc, ch 1, skip 1 dc *, repeat from *-*. |
|
 |
|
 |
|
Have you finished this pattern?Tag your pictures with #dropspattern #summerpatchworkcardigan or submit them to the #dropsfan gallery. Do you need help with this pattern?You'll find 9 tutorial videos, a Comments/Questions area and more by visiting the pattern on garnstudio.com. © 1982-2026 DROPS Design A/S. We reserve all rights. This document, including all its sub-sections, has copyrights. Read more about what you can do with our patterns at the bottom of each pattern on our site. |
|


With over 40 years in knitting and crochet design, DROPS Design offers one of the most extensive collections of free patterns on the internet - translated to 17 languages. As of today we count 325 catalogs and 12298 patterns - 12288 of which are translated into English (US/in).
We work hard to bring you the best knitting and crochet have to offer, inspiration and advice as well as great quality yarns at incredible prices! Would you like to use our patterns for other than personal use? You can read what you are allowed to do in the Copyright text at the bottom of all our patterns. Happy crafting!
Post a comment to pattern DROPS 147-9
We would love to hear what you have to say about this pattern!
If you want to leave a question, please make sure you select the correct category in the form below, to speed up the answering process. Required fields are marked *.