
Popular categories
Looking for a yarn?


Comments / Questions (47)
![]() Michele Andersen Jensen Larsen wrote:
Michele Andersen Jensen Larsen wrote:
Jeg er meget i tvivl om hvor i opskriften jeg skal starte? Er det ved halskant (51 Lm) eller er det ved Poncho (125 Lm) skal lave den størreste str.
27.01.2025 - 08:16DROPS Design answered:
Hei Michele. Du starter å hekle PONCHO der det står: Arb hækles fra halsen og ned med slids midt bagpå.... Når ponchoen er heklet ferdig, skal HALSKANTEN hekles fra der du startet PONCHO. Halskanten (A.3) blir da heklet mottsatt vei en ponchoen. mvh DROPS Design
27.01.2025 - 13:59
![]() Ana Arias Viquez wrote:
Ana Arias Viquez wrote:
Me encantan sus diseños....
02.01.2025 - 17:38
![]() Jan wrote:
Jan wrote:
I cannot find how many chains are required to start this project. I assume it is joined into a round. Thanks Jan
20.03.2023 - 22:33DROPS Design answered:
Hi Jan, Scroll down to below the explanations to PONCHO. Under ROW 1 the number of chain stitches for the various sizes is in the text. Happy crocheting!
21.03.2023 - 07:01
![]() Mayte wrote:
Mayte wrote:
HILERA 4 (con p.a.): Hacer 3 cad (contadas como el 1er p.a.), 1 p.a. en el 1er bucle de cad, hacer 2 p.a. en cada bucle de cad de la hilera No debería ser: HILERA 4 (con p.a.): Hacer 3 cad (contadas como el 1er p.a.), 1 p.a. en el 1er bucle de cad, hacer 1 p.a. en cada bucle de cad de la hilera
06.01.2023 - 23:21DROPS Design answered:
Hola Mayte, no, tienen que ser 2 p.a en cada bucle. Ten en cuenta que en el 1º bucle tienes 3 p.de cad (= 1 p.a) y 1 p.a más, así que tendrás 2 p.a en cada bucle, incluyendo el 1º.
07.01.2023 - 19:38
![]() Mayte wrote:
Mayte wrote:
HILERA 4 (con p.a.): Hacer 3 cad (contadas como el 1er p.a.), 1 p.a. en el 1er bucle de cad, hacer 2 p.a. en cada bucle de cad de la hilera No debería ser HILERA 4 (con p.a.): Hacer 3 cad (contadas como el 1er p.a.), 1 p.a. en el 1er bucle de cad, hacer 1 p.a. en cada bucle de cad de la hilera
27.12.2022 - 19:16DROPS Design answered:
Hola Mayte, no, tienen que ser 2 p.a en cada bucle. Ten en cuenta que en el 1º bucle tienes 3 p.de cad (= 1 p.a) y 1 p.a más, así que tendrás 2 p.a en cada bucle, incluyendo el 1º.
07.01.2023 - 19:38
![]() Lazaroula Drakopoulos wrote:
Lazaroula Drakopoulos wrote:
Hallo gibt es dafür eine Video Anleitung ? Oder ein Video zum Muster ?
27.09.2020 - 17:02DROPS Design answered:
Liebe Frau Drakopoulos, es gibt kein Video zu dem muster aber hier finden Sie wie man Diagramme liest. Viel Spaß beim häkeln!
28.09.2020 - 10:21
![]() Lourdes wrote:
Lourdes wrote:
Hola DROPS! Me encantan sus patrones. Me gustaría que los comentarios pudiera leerlos en mi idioma. Así entiendo las explicaciones que realizan a las preguntas a tejedoras como yo que deseamos realizar sus hermosos patrones.
26.07.2019 - 20:34
![]() Elaine wrote:
Elaine wrote:
I absolutely love this pattern but would like to just make it a wrap and not circular. Would it still be divisible by 3 plus one for the bottom pattern. Thanks
22.06.2019 - 17:54DROPS Design answered:
Dear Elanie, if you want to make this a wrap from the begining you should add about 3-5 stitches to each front edging as a band. The bottom pattern repeat is 16 stitches, so before you start that, you should have the stitchnumber the multiple of 16, and to make it symmetric on both side you should add 11 stitch on the ather frot edge (plus the stitches you use as front bands). Happy Crocheting!
23.06.2019 - 08:45
![]() Trine wrote:
Trine wrote:
Hvilket mål skal jeg tage for at vælge den bedste størrelse?
12.04.2019 - 19:28DROPS Design answered:
Hei Trine. Helt nederst i oppskriften finner du en målskisse med alle plaggets mål i alle størrelser. Der kan du se vidden/bredden tvers over både øverst og nederst, bruk disse målene når du velger størrelse. Husk at målene må ganges med 2 for å få omkretsen hele veien rundt. God fornøyelse
23.04.2019 - 12:55
![]() Carmen Hernandez Regalado wrote:
Carmen Hernandez Regalado wrote:
Y Cómo distribuyo equitativamente los aumentos en la hilera 2, si el número que me da la división no es un número exacto si no un número con decimales, ...cada cuantos puntos debo hacer el aumento en ese caso (106 : 31 = 3,41)?. Gracias
21.10.2018 - 04:00DROPS Design answered:
Hola Carmen. Seguimos recomendando hacer los aumentos aprox. cada 3er punto.
21.10.2018 - 22:02
|
||||||||||||||||||||||
Spearmint#spearmintponcho |
||||||||||||||||||||||
 |
 |
|||||||||||||||||||||
Crochet DROPS poncho in ”Muskat”. Size: S - XXXL.
DROPS 147-35 |
||||||||||||||||||||||
|
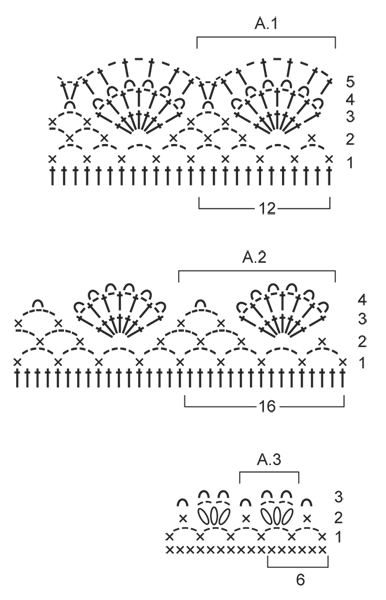
PATTERN: See diagrams A.1 to A.3 and read explanation below. INCREASE TIP 1 (applies ROW 2): Inc 1 dc by working 2 dc in same sc. INCREASE TIP 2: All inc are done on rows/rounds with only dc (i.e. not on rows/rounds with holes). Inc 1 dc by working 1 dc in next dc, 2 dc in next ch-space. PATTERN A.1: ROUND 1: ch 1, 1 sc in 3rd ch from previous round, * ch 3, skip 2 dc, 1 sc in next dc *, repeat from *-*, finish with ch 3 and 1 sl st in 1st sc from beg of round = 56-60-64-68-72-76 ch-spaces. Sl sts until 1st ch-space. ROUND 2: ch 1, 1 sc in same space, ** 7 dc in next ch-space, * 1 sc in next ch-space, ch 3 *, repeat from *-* 1 more time, 1 sc in next ch-space **, repeat from **-** the entire round (14-15-16-17-18-19 times in total) - but when repeating the last time, repeat *-* 2 times, then finish round with 1 sl st in 1st sc from beg of round. Sl sts until 1st dc. ROUND 3: * Work 1 dc in each of the next 7 dc with 1 ch between every dc (NOTE: Replace 1st dc on round with 3 ch) = 7 dc and 6 ch-spaces, 1 sc in next ch-space, ch 3, 1 sc in next ch-space *, repeat from *-* the entire round, finish with 1 sl st in 3rd ch from beg of round. Sl sts until 1st ch-space. ROUND 4: Work 1 PICOT - read explanation below - in every ch-space the entire round (= 7 picots over every repetition), finish with 1 sl st in 1st sc from beg of round. Sl sts until ch-space on 1st picot. ROUND 5: ** In ch-space on each of the next 6 picots work * 1 dc in ch-space, ch 1 *, repeat from *-* 2 times in ch-space on next picot ** = 8 dc and 8 ch-spaces over every repetition, repeat from **-** the entire round, finish with 1 sl st in 3rd ch from beg of round. ROUND 6 (not shown in diagram): ch 3 (counted as 1st dc), 1 dc in 1st ch-space, work 2 dc in every ch-space the entire round = 16 dc over every repetition, finish with 1 sl st in 3rd ch from beg of round = 224-240-256-272-288-304 dc. Do not cut the yarn. PICOT: 1 picot = 1 sc, ch 3, 1 sc in same ch-space/sc. PATTERN A.2: ROUND 1: ch 1, 1 sc in 3rd ch from previous round, * ch 4, skip 3 dc, 1 sc in next dc *, repeat from *-*, finish with ch 4 and 1 sl st in 1st sc from beg of round = 56-60-64-68-72-76 ch-spaces. Sl sts until 1st ch-space. ROUND 2: ch 1, 1 sc in same space, ** 7 dc in next ch-space, * 1 sc in next ch-space, 5 ch *, repeat from *-* 1 more time, 1 sc in next ch-space **, repeat from **-** the entire round (15 times in total) - but when repeating the last time, repeat *-* 2 times, then finish round with 1 sl st in 1st sc from beg of round. Sl sts until 1st dc. ROUND 3: Work 1 dc in each of the next 7 dc with 1 ch between every dc = 7 dc and 6 ch-spaces, 1 sc in next ch-space, ch 5, 1 sc in next ch-space *, repeat from *-* the entire round, finish with 1 sl st in 3rd ch from beg of round. Sl sts until 1st ch-space. ROUND 4: Work 1 picot in every ch-space the entire round and finish with 1 sl st in 1st sc from beg of round. PATTERN A.3 (neck edge): ROW 1: ch 1, 1 sc in 1st sc, * ch 3, skip 2 sc, 1 sc in next sc *, repeat from *-* until 2 sc remain, finish with ch 3 and 1 sc in last sc = 32-34-36-38-40-42 sc and 31-33-35-37-39-41 ch-spaces, turn. ROW 2: Sl sts until 1st ch-space, ch 1, 1 sc in same space, * in next ch-space work 3 bobbles - read explanation below - with 2 ch between every bobble, 1 sc in next ch-space *, repeat from *-* the entire row (finish with 1 sc in last ch-space), turn. ROW 3: Work 1 picot in every ch-space and 1 picot in every sc. BOBBLE: 1 bobble = work 2 dc in same ch-space - but wait with last pull through on both sts, pull yarn through all 3 sts on hook. ---------------------------------------------------------- PONCHO: Worked from neck and down with vent mid back. The piece is first worked back and forth and then in the round. ROW 1: With Muskat and hook size 4.5 mm/US 7, ch 95-101-107-113-119-125, turn and work 1 sc in 2nd ch from hook, then 1 sc in every ch = 94-100-106-112-118-124 sc (divisible by 3 + 1 sc), turn. ROW 2: ch 3 (counted as 1st dc), then work dc in every sc - AT THE SAME TIME inc 31-31-31-33-33-33 dc - READ INCREASE TIP 1 - evenly on row = 125-131-137-145-151-157 dc, turn. ROW 3 (with holes): ch 4 (counted as 1st dc + 1 ch), * skip 1 dc, 1 dc in next dc, ch 1 *, repeat from *-*, finish with 1 dc in 3rd ch from beg of previous row = 63-66-69-73-76-79 dc with 1 ch between every dc, turn. ROW 4 (with dc): ch 3 (counted as 1st dc), 1 dc in 1st ch-space, work 2 dc in every ch-space on row - AT THE SAME TIME inc 16-16-16-18-18-18 dc - READ INCREASE TIP 2 - evenly on row, NOTE! Work 1 dc in last ch-space on row, finish with 1 dc in 3rd ch from beg of previous row = 141-147-153-163-169-175 dc, turn. ROW 5: Work as ROW 3 = 71-74-77-82-85-88 dc with 1 ch between every dc, turn. ROW 6: ch 3, 1 dc in 1st ch-space, work 2 dc in every ch-space on row - AT THE SAME TIME inc 3-5-7-5-7-9 dc evenly on row, finish with 1 dc in 3rd ch from beg of previous row = 144-152-160-168-176-184 dc. REMEMBER THE CROCHET GAUGE! Continue to work in the round as follows: ROUND 1 (with holes): ch 4 (counted as 1st dc + 1 ch), * skip 1 dc, 1 dc in next dc, ch 1 *, repeat from *-*, finish with 1 sl st in 3rd ch from beg of round = 72-76-80-84-88-92 dc with 1 ch between every dc. ROUND 2 (with dc): ch 3 (counted as 1st dc), 1 dc in 1st ch-space, work 2 dc in every ch-space the entire round - AT THE SAME TIME inc 4 dc evenly on round, finish with 1 sl st in 3rd ch from beg of round = 148-156-164-172-180-188 dc. Repeat 1st and 2nd ROUND 5-6-7-8-9-10 more times (i.e. inc with 4 dc evenly every other round a total of 6-7-8-9-10-11 times) = 168-180-192-204-216-228 dc on round. Then work 1st and 2nd ROUND alternately WITHOUT inc until piece measures approx. 26-29-31-34-36-39 cm / 10¼"-11½"-12¼"-13½"-14¼"-15¼" (finish with 1 round with only dc = ROUND 2). Then work diagram A.1 - see diagram and explanation above. When A.1 has been worked 1 time vertically, there are 224-240-256-272-288-304 dc on round. Then work diagram A.2 - see diagram and read explanation above - 1 time vertically, fasten off. NECK EDGE: Worked back and forth. Work from RS diagram A.3 - see diagram and read explanation above - around the entire neck edge (start mid back), do not cut the yarn. Then ch for 24 cm / 9½", turn and work sl sts in every ch on return = 1 tie, fasten off. Work another tie the same way in the corner on the other side of vent. |
||||||||||||||||||||||
Diagram explanations |
||||||||||||||||||||||
|
||||||||||||||||||||||
 |
||||||||||||||||||||||
 |
||||||||||||||||||||||
Have you finished this pattern?Tag your pictures with #dropspattern #spearmintponcho or submit them to the #dropsfan gallery. Do you need help with this pattern?You'll find 6 tutorial videos, a Comments/Questions area and more by visiting the pattern on garnstudio.com. © 1982-2026 DROPS Design A/S. We reserve all rights. This document, including all its sub-sections, has copyrights. Read more about what you can do with our patterns at the bottom of each pattern on our site. |
||||||||||||||||||||||


With over 40 years in knitting and crochet design, DROPS Design offers one of the most extensive collections of free patterns on the internet - translated to 17 languages. As of today we count 324 catalogs and 12290 patterns - 12280 of which are translated into English (US/in).
We work hard to bring you the best knitting and crochet have to offer, inspiration and advice as well as great quality yarns at incredible prices! Would you like to use our patterns for other than personal use? You can read what you are allowed to do in the Copyright text at the bottom of all our patterns. Happy crafting!
Post a comment to pattern DROPS 147-35
We would love to hear what you have to say about this pattern!
If you want to leave a question, please make sure you select the correct category in the form below, to speed up the answering process. Required fields are marked *.