
Popular categories
Looking for a yarn?


Comments / Questions (65)
![]() Karina wrote:
Karina wrote:
Ik begrijp niet goed hoe ik de hals van het voorpand moet haken. Ik zou op 10 CM moeten uit komen en de hals aan het achterpand naaien maar dat is mij niet duidelijk hoe dat ik het moet doen
11.06.2025 - 21:04DROPS Design answered:
Dag Karina,
Als het goed is haak je op het eind van beide voorpanden 2 lange stroken van 10 cm alleen over de buitenste steken. Dus er steekt een strook uit, zeg maar. De lange kant daarvan die tegen de zijde van de schouder zit, naai je op de hals vast tot midden achter. Hetzelfde doe je bij het andere voorpand.
21.06.2025 - 11:22
![]() Edith wrote:
Edith wrote:
Ik kom nog even terug op de fout in dit patroon. Het grote oma- vierkant wordt voor 2/3 gebruikt voor het voorpand en voor 1/3 voor het achterpand. De eerste regel onder ACHTERPAND klopt echt niet: je moet de markeerder niet op de helft maar op een derde van de zijkant zetten. Zó sneu als mensen uw verkeerde instructie opvolgen en er dan pas achterkomen dat dit een te smal voorpand en een te breed achterpand bewerkstelligt!
15.12.2023 - 15:48
![]() Edith Hoekstra wrote:
Edith Hoekstra wrote:
In de eerste regel van HET ACHTERPAND staat dat je de markeerder op DE HELFT van het voorpand moet zetten om vanaf daar het achterpand te haken. Moet dit niet EEN DERDE zijn?
12.12.2023 - 10:48DROPS Design answered:
Dag Edith,
De markeerders moeten in de zijnaad komen, zodat je vanaf midden voor tot de zijnaad en vanaf middenachter tot de zijnaad dezelfde lengte hebt.
13.12.2023 - 21:16
![]() Manoli wrote:
Manoli wrote:
Los patrones para mi poco entender no son muy explicativos. Me gustaría si pudieran que me mandaran otros y foto parte trasera de la labor. Soy principiante. Un saludo. Gracias
27.09.2021 - 18:52
![]() Simonetta wrote:
Simonetta wrote:
Vorrei cortesemente avere spiegazioni più dettagliate sul davanti destro. Non capisco il centro davanti dov'è. Forse ho sbagliato tutto dalla inizio. Mi servirebbero spiegazioni più facili sui diagrammi. Grazie
16.04.2021 - 19:28DROPS Design answered:
Buonasera Simonetta, per centro davanti si intende l'inizio del cardigan sul davanti. Buon lavoro!
17.04.2021 - 11:48
![]() Sarah wrote:
Sarah wrote:
I am trying to work the neck edge, and it is all very confusing. Under the "Right front piece" section, it tells me to "work neck edge with dc-groups back and forth over the other dc-groups mid front". Am I working horizontally or vertically, and is the neck edge the dc-groups that will be left when I work the shoulders together, or is it the mid front, above where the button will eventually be? Thanks!
20.03.2020 - 15:05DROPS Design answered:
Dear Sarah, when right front piece has been worked until height to shoulder (as on back piece), you will continue working only over the dc-groups towards mid-front (toward opening, not towards shoulder) as before until neck edge measures 7 to 10 cm. Happy crocheting!
20.03.2020 - 16:04
![]() Connie wrote:
Connie wrote:
Uhm, I can't download this. I do this everyday and it's not my fault.
16.09.2018 - 04:23DROPS Design answered:
Dear Connie, our pattern can only be print, but you can use a virtual printer to save them as a .PDF file. Happy crocheting!
17.09.2018 - 08:59Dalene wrote:
Is the neck edge (yoke) worked as one piece (i.e. from mid-front A around the neck to mid-front B)?
06.07.2018 - 16:08DROPS Design answered:
Dear Dalene, back and each front pieces are worked separately from armholes to shoulders. Shawl collar is shaped working over the outermost sts towards front edge remaining after sts for shoulders. Happy crocheting!
09.07.2018 - 07:34
![]() Susan Sullivan wrote:
Susan Sullivan wrote:
I love this pattern and possibly will be leading my crochet class through the construction as a class project. I have a suggestion that I think would help everyone a lot. If you would show additional shots of the garment - from the back - and then some detail shots of the areas like the armhole, seaming, neckline - the places where people always ask questions - it would so helpful. Thank you for all that you are now doing - your designs are lovely!
15.04.2018 - 22:37
![]() Canadinhas wrote:
Canadinhas wrote:
Bonjour, ça fait combien de pelotes en tout car je voudrais le faire uni....? merci!
16.09.2017 - 17:50DROPS Design answered:
Bonjour Mme Canadinhas, en fonction de la qualité choisie, vous pourrez recalculer ici la quantité nécessaire pour votre taille. Bon crochet!
18.09.2017 - 09:14
|
||||||||||||||||
Arabica#arabicacardigan |
||||||||||||||||
|
|
||||||||||||||||
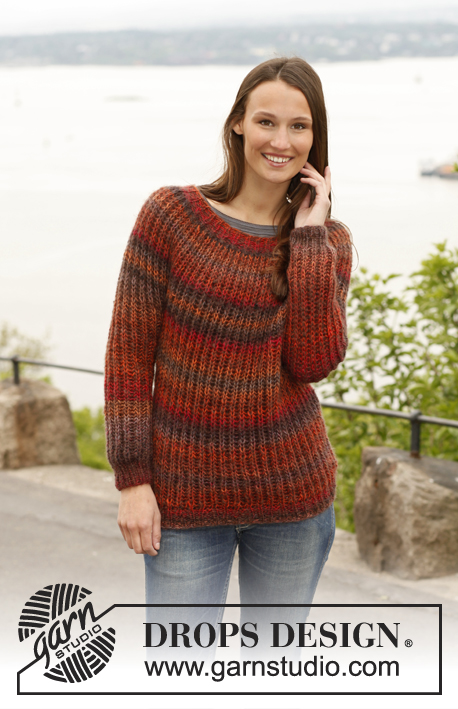
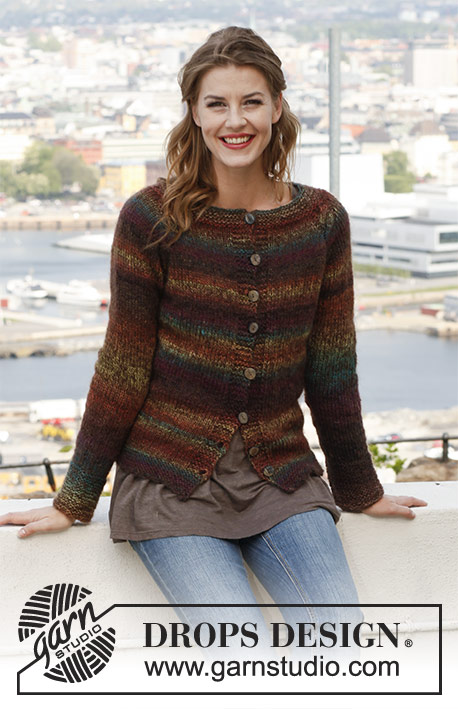
Crochet DROPS jacket with granny squares in ”Delight”, “Fabel and “Kid-Silk”. Size: S - XXXL.
DROPS 143-22 |
||||||||||||||||
|
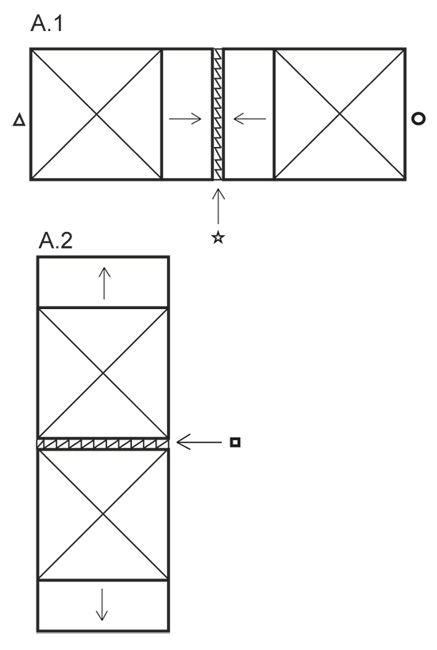
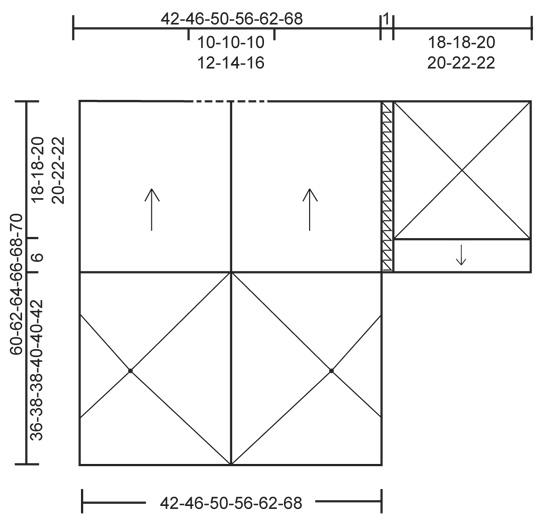
STRIPES BODY: DE = Delight, F = Fabel, KS = Kid-Silk ROUND 1: 1 strand brown F + 1 strand dark brown KS ROUND 2: 1 strand DE + 1 strand dark brown KS ROUND 3: 1 strand DE + 1 strand light beige KS ROUND 4: 1 strand brown F + 1 strand dark brown KS ROUND 5-6: 1 strand DE + 1 strand dark brown KS ROUND 7: 1 strand black F + 1 strand dark brown KS Repeat rounds 1 to 7. STRIPES SLEEVE: ROUND 1: 1 strand DE + 1 strand light beige KS ROUND 2-3: 1 strand DE + 1 strand dark brown KS ROUND 4: 1 strand black F + 1 strand dark brown KS Repeat rounds 1 to 4. -------------------------------------------------------- JACKET: Work 2 large granny squares for front piece which are then lengthened for back piece. Work 4 squares for sleeves which are lengthened before working 2 and 2 tog on overarm. Finally work yoke upwards with dc-groups back and forth before working all parts tog. RIGHT FRONT PIECE + BACK PIECE: Ch 6 on hook size 4 mm / G/6 with 1 strand brown Fabel and 1 strand dark brown Kid-Silk (= 2 strands) and form a ring with 1 sl st in first ch. ROUND 1: ch 3 (= 1 dc), 2 dc in ch-ring, ch 3, * 3 dc in ch-ring, ch 3 *, repeat from *-* a total of 3 times and finish with 1 sl st in 3rd ch from beg of round, turn piece (= 4 dc-groups with 3 ch between each). Then work STRIPES BODY – see explanation above, AT THE SAME TIME continue in the round as explained below. ROUND 2: ch 3 (= 1 dc), 2 dc in first ch-space, ch 3, 3 dc in same ch-space, * ch 1, 3 dc in next ch-space, ch 3, 3 dc in same ch-space *, repeat from *-* a total of 3 times and finish with 1 ch and 1 sl st in 3rd ch from beg of round, turn piece. ROUND 3: ch 3 (= 1 dc), 2 dc in first ch-space, ch 1, * 3 dc in next ch-space, ch 3, 3 dc in same ch-space, ch 1, 3 dc in next ch-space, 1 ch *, repeat from *-* a total of 3 times, 3 dc in next ch-space, ch 3, 3 dc in same ch-space, 1 ch and finish with 1 sl st in 3rd ch from beg of round, turn piece. Continue in the round like this (on every round worked there is 1 dc-group more between every corner) until square measures approx. 36-38-38-40-40-42 cm / 14¼"-15"-15"-15¾"-15¾"-16½" along each side (= approx. 18-19-19-20-20-21 rounds in the round). Fasten off. Now lengthen the square and work dc-groups back and forth along one side of the square as follows (continue STRIPES BODY as before - adjust so that when 1 row remains until finished measurements, work last row with 1 strand black Fabel + 1 strand dark brown Kid Silk): ROW 1: 1 sl st in ch-space in the corner on square, ch 4 (= 1 dc + 1 ch), * 3 dc in next ch-space, 1 ch *, repeat from *-* until last ch-space (= corner) and finish with 3 dc in ch-space in the corner, turn piece. ROW 2: ch 4 (= 1 dc + 1 ch), * 3 dc in next ch-space, 1 ch *, repeat from *-* until last ch-space and finish with 3 dc in last ch-space. Repeat 2nd row until square measures approx. 24-27-31-36-42-47 cm / 9½"-10⅝"-12¼"-14¼"-16½"-18"½ from the centre and outwards (i.e. 42-46-50-56-62-68 cm / 16½"-18"-19¾"-22"-24⅜"-26¾" from one side to the other side measured at the widest). Fasten off. LEFT FRONT PIECE + BACK PIECE: Work as right piece. Work the 2 squares tog mid back so that rows worked back and forth are against each other - see illustration A.1. Work with 1 strand black Fabel + 1 strand dark brown Kid-Silk as follows: 1 sc in outermost dc in the corner on one square, ch 1, 1 sc in ch-space in the corner on the other square, * ch 3, 1 sc in ch-space on first square, ch 1, 1 sc in ch-space on the other square *, repeat from *-* and finish with ch 3, 1 sc in dc on first square, 1 ch and 1 sl st in dc on the other square. SLEEVE: Beg as on right front piece but from and with 2nd round work STRIPES SLEEVE – see explanation above. When 1 round remains before square measures 18-18-20-20-22-22 cm / 7"-7"-8"-8"-8¾"-8¾", work last round with 1 strand black Fabel + 1 strand dark brown Kid-Silk. Then work back and forth along one side on the square the same way as on back piece (continue stripes as before - adjust so that when 1 row remains until finished measurements, work last row with 1 strand black Fabel + 1 strand dark brown Kid Silk). When square measures 24-24-26-26-28-28 cm / 9½"-9½"-10¼"-10¼"-11"-11" at the widest, fasten off. Sleeve at the front is now done. Work another piece the same way (= sleeve at the back). Then work the 2 squares tog on overarm as shown in illustration A.2 – work them tog the same way as piece was worked tog mid back. Work 2 squares with lengthening the same way for the other sleeve and work them tog on overarm as explained above. BACK PIECE: Insert 1 marker in the middle of one front piece so that there are 21-23-25-28-31-34 cm / 8¼"-9"-9¾"-11"-12¼"-13⅜" from mid back until marker and 21-23-25-28-31-34 cm / 8¼"-9"-9¾"-11"-12¼"-13⅜" from marker mid front – insert marker between 2 dc-groups. Insert another marker on the other front piece. There are now approx. 42-46-50-56-62-68 cm / 16½"-18"-19¾"-22"-24⅜"-26¾" between the 2 markers on back piece and approx. 21-23-25-28-31-34 dc-groups between markers. Then work dc-groups back and forth between the 2 markers at the back with 1 strand Delight + 1 strand dark brown Kid-Silk (= 2 strands – NOTE: Work with these 2 strands until finished measurements) as follows: 1 sl st in ch-space between 2 dc-groups, ch 4 (= 1 dc + 1 ch), * 3 dc in next ch-space, 1 ch *, repeat from *-* and finish with 3 dc in ch-space at the marker, turn piece. Work next row as follows: ch 4 (= 1 dc + 1 ch), * 3 dc in next ch-space, 1 ch *, repeat from *-* and finish with 3 dc in last ch-space, turn piece. Work back and forth like this until 2 rows remain before piece measures 60-62-64-66-68-70 cm / 23⅝"-24⅜"-25¼"-26"-26¾"-27½" from bottom edge and up (i.e. piece measures approx. 22-22-24-24-26-26 cm / 8¾"-8¾"-9½"-9½"-10¼"-10¼" from where back piece beg). Now work 2 rows with dc-groups back and forth over the outermost 16-18-20-22-24-26 cm / 6¼"-7"-8"-8¾"-9½"-10¼" on one shoulder (i.e. over approx. 8-9-10-11-12-13 dc-groups). Cut the thread and work 2 rows with dc-groups over the outermost 16-18-20-22-24-26 cm / 6¼"-7"-8"-8¾"-9½"-10¼" on the other shoulder (make sure to work the same no of dc-groups on both shoulders = approx. 5-5-5-6-7-8 dc-groups mid back of neck). Piece measures approx. 60-62-64-66-68-70 cm / 23⅝"-24⅜"-25¼"-26"-26¾"-27½" from the shoulder to bottom edge and 24-24-26-26-28-28 cm / 9½"-9½"-10¼"-10¼"-11"-11" from the shoulder and down to where back piece beg. RIGHT FRONT PIECE: Work dc-groups the same way back and forth over right front piece, from mid front and to marker in the side with 1 strand Delight + 1 strand dark brown Kid-Silk (= 2 strands – NOTE: Work with these 2 strands until finished measurements). When front piece is the same length as back piece, work neck edge with dc-groups back and forth over the other dc-groups mid front (do not work over dc-groups on shoulder and make sure that same no of dc-groups have been worked on the shoulder at the front and back). Work back and forth until neck edge measures approx. 7-7-7-8-9-10 cm / 2¾"-2¾"-2¾"-3⅛"-3½"-4", cut and fasten the thread. LEFT FRONT PIECE: Work as right front piece but reversed. ASSEMBLY: Work shoulders tog the same way as the other parts were worked tog. Sew neck edge to neck line at the back of neck without sewing it tog mid back (to make an open split at the back). Work sleeve on to sleeve line. And work the openings under the sleeves tog. CROCHET EDGE: Work a finishing edge at the bottom around both sleeves and around the entire opening of jacket with 1 strand black Fabel + 1 strand dark brown Kid-Silk as follows: ROW/ROUND 1: Beg at the outer edge in the corner on neck edge at the back of neck, work towards front piece around the entire jacket and to the corner on the neck edge at the back of neck in the other side with 1 strand black Fabel + 1 strand dark brown Kid-Silk as follows: 1 sl st in outermost st in the corner on neck edge, ch 4 (= 1 dc + 1 ch), then work 3 dc in every ch or ch-space and 1 ch between every dc-group, finish with 1 dc in outermost st in the corner on neck edge. ROUND 2: Work around the entire opening on jacket (also along mid back in vent on neck edge): 1 sl st in first st, * ch 4, 1 sc in next ch-space *, repeat from *-* and finish with ch 4 and 1 sl st in sl st from beg of round. Fasten off. Work 1 buttonhole loop approx. 30-30-32-32-34-34 cm / 11¾"-11¾"-12½"-12½"-13½"-13½" from the shoulder and down on left front piece (try the jacket on for desired placement). Work with 1 strand black Fabel + 1 strand dark brown Kid-Silk as follows: 1 sc in first st, ch 7, 1 sc in same st. Fasten off. Sew the button on to right front piece. |
||||||||||||||||
Diagram explanations |
||||||||||||||||
|
||||||||||||||||
 |
||||||||||||||||
 |
||||||||||||||||
Have you finished this pattern?Tag your pictures with #dropspattern #arabicacardigan or submit them to the #dropsfan gallery. Do you need help with this pattern?You'll find 9 tutorial videos, a Comments/Questions area and more by visiting the pattern on garnstudio.com. © 1982-2026 DROPS Design A/S. We reserve all rights. This document, including all its sub-sections, has copyrights. Read more about what you can do with our patterns at the bottom of each pattern on our site. |
||||||||||||||||


With over 40 years in knitting and crochet design, DROPS Design offers one of the most extensive collections of free patterns on the internet - translated to 17 languages. As of today we count 324 catalogs and 12290 patterns - 12280 of which are translated into English (US/in).
We work hard to bring you the best knitting and crochet have to offer, inspiration and advice as well as great quality yarns at incredible prices! Would you like to use our patterns for other than personal use? You can read what you are allowed to do in the Copyright text at the bottom of all our patterns. Happy crafting!
Post a comment to pattern DROPS 143-22
We would love to hear what you have to say about this pattern!
If you want to leave a question, please make sure you select the correct category in the form below, to speed up the answering process. Required fields are marked *.