
Popular categories
Looking for a yarn?


Comments / Questions (36)
![]() Willemien Wierenga-Bremmer wrote:
Willemien Wierenga-Bremmer wrote:
Gewijzigd online: 30.07.2013 Begin aan de goede kant en brei 8 nld in RIBBELST (= 4 ribbels) - zie uitleg boven. Kunt u ook aangeven waar deze wijziging hoort in eht patroon? Ik kan dat niet vinden. Alvast dank, Willemien
06.04.2023 - 14:51DROPS Design answered:
Dag Willemien,
In het online patroon is de wijziging al doorgevoerd en het staat aan in een van de eerste regels onder de paragraaf 'PAS'
12.04.2023 - 20:33
![]() Julia wrote:
Julia wrote:
Hallo, ich habe eine Frage zum Stricken der Rundpasse. So wie ich das verstehe, sollte man an den vier Markierern das Zopfmuster stricken und auch dort jeweils rechts und links davon Maschen zunehmen. Stimmt das? Das würde bedeuten, ich nehme direkt im Muster Maschen dazu, sieht das nicht komisch aus? Oder ist das so zu verstehen, dass man nicht direkt neben den Markierern, sondern neben dem Muster zunimmt? Danke und viele Grüße
20.11.2020 - 18:32DROPS Design answered:
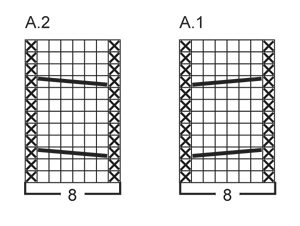
Liebe Julia, die Markierer sind in der Mitte von den Zöpfe = 4 Maschen vor A.1/A.2 + 4 Maschen nach A.1/A.2, die Raglanzunahmen werden beidseitig von A.1/A.2 gestrickt, dh stricken Sie bis A.1/A.2, 1 Umschlag, A.1/A.2 stricken, 1 Umschlag - und so bei jedem Markierer stricken (= 8 Zunahmen pro Zunahmenrunde). Viel Spaß beim stricken!
23.11.2020 - 07:59
![]() Mireille Crick wrote:
Mireille Crick wrote:
For the pattern October, do you knit with the thread of the 2 different yarns for the whole cardigan? If so, why do you need less yarn for the 'brushed alpaca silk ' than for the 'delight'yarn? Thanks.
02.11.2020 - 17:37DROPS Design answered:
Hi Mireille, Yes the whole garment is worked with 2 strands. The length of wool in a ball varies between the different qualities, which is why you need slightly less Silk yarn in weight than Delight. Happy knitting!
03.11.2020 - 05:49
![]() Berbett wrote:
Berbett wrote:
Bonjour, Le rendu de la couleur du gilet n'est pas le même que celui du modèle présenté (delight n° 10, alpaca n°5) le rendu est plus foncé et terne. Pia.
16.07.2018 - 00:43
![]() Anja Wagner wrote:
Anja Wagner wrote:
Hallo! Ich würde gerne diese schöne Jacke stricken. Allerdings ist die Wolle Drops Vivaldi ausverkauft. Könnten Sie mir hier bitte eine Garnalternative nennen? Vielen Dank! Viele Grüße - Anja
30.05.2015 - 10:37DROPS Design answered:
Liebe Anja, eine gute Alternative mit sehr ähnlichem und tollem Flauschcharakter ist Brushed Alpaca Silk. Ein ebenso dunkles Braun wie bei Vivaldi gibt es bei Brushed Alpaca Silk nicht, aber beige (Fb 05) würde sich stattdessen anbieten, die Jacke bekommt dann einen etwas helleren Charakter und die Farben von Delight dürften damit etwas besser zur Geltung kommen und nicht so stark gedämpft werden. Aber letztendlich sind die Farben nur Geschmackssache, lassen Sie sich einfach von den Farbpaletten inspirieren! Die benötigte Garnmenge ist übrigens identisch, Brushed Alpaca Silk und Vivaldi haben auf 50 m gerechnet dieselbe Lauflänge.
30.05.2015 - 11:08
![]() Gertrud wrote:
Gertrud wrote:
Für diese Jacke habe ich mich entschieden, die werde ich stricken. Find sie einfach schön!
10.10.2014 - 16:13
![]() ClaraTejeteje wrote:
ClaraTejeteje wrote:
En la situación de tener 96p tras realizar los aumentos: 18 p+1 Primer MP +2 12p+2 Segundo MP +1 24p +1 Tercer MP +2 12p +2 Cuarto MP +1 18 p ¿El diagrama A1 o el A2, no sé, no debería estar entre Primer y Segundo MP y entre Tercer y Cuarto MP? No entiendo que estén los MP en el centro de las torsadas...¿Cuál diagrama en cuál? ¿Y dónde se empieza? Entre los marcapuntos primero y segundo tras los aumentos hay 2p+12+2p, un total de 16 p y el diagrama tiene 8p...,¿Centrado?
08.10.2014 - 10:37DROPS Design answered:
Hola Clara. Los MP se colocan de la misma manera: 18 pts - MP - 12 pts - MP - 24 pts - MP - 12 pts - MP - 18 pts. Las trenzas (torzadas) están SOBRE (no entre) los MP. Los MP están en el centro de los pts de la trenza. Los diagramas te vienen debajo del patrón. Si tienes alguna dificultad para seguir el patrón te recomendamos acudir a la tienda más cercana de Drops.
13.10.2014 - 12:55
![]() Sabine wrote:
Sabine wrote:
Bonjour, J'aimerai tricoter ce modèle en pull avec Drops Delight n0 17 "framboisier" en l'associant avec un autre fil. Quelle couleur en Vivaldi et en Brush Alpaca Silk conviendraient ? Merci
25.09.2014 - 11:03DROPS Design answered:
Bonjour Sabine, pensez à contacter votre magasin DROPS (ses coordonnées mail et téléphone se trouvent dans la liste des détaillants en Suisse) - il pourra vous renseigner sur les associations possibles. Bon tricot!
25.09.2014 - 13:52
![]() Marie wrote:
Marie wrote:
Merci de votre réponse aussi rapide, je mls mets de ce pas. Jevous tiens au courant. Merci encore.Marie
25.07.2014 - 21:36
![]() Marie wrote:
Marie wrote:
Bonjour, j, ai un problème pour ce modèle, le raglan J'ai mis les marqueurs. Il faut ensuite tricoter 3 m à chacun des 4 marqueurs, tricoter 2 fois chacune des 2m avant/après les marqueurs côté manches, idem pour le dos. Si je dois tricoter 2 fois 2 m avant et après cela me fait 4m et pas 3 comme indiqué. A ce moment la on ne parle pas encore du diagramme. Je commence le diagramme après la première augmentation? ? Merci de m'éclairer. Marie
25.07.2014 - 12:06DROPS Design answered:
Bonjour Marie, les premières augmentations se font: 1 m avant le 1er marqueur (devant), 2 m après le 1er marqueur, 2 m avant le 2ème marqueur (manche), 1 m après le 2ème marqueur et 1 m avant le 3ème marqueur (dos), 2 m après le 3ème marqueur et 1 m avant le 4ème marqueur (manche) et 1 m après les 4ème marqueur (devant). Tricotez 1 rang sur l'env et continuez en suiv les diag. comme indiqué. Bon tricot!
25.07.2014 - 14:31
|
|||||||||||||
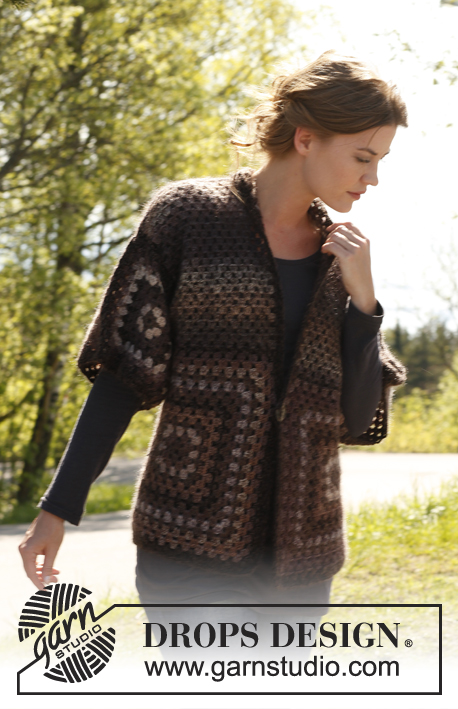
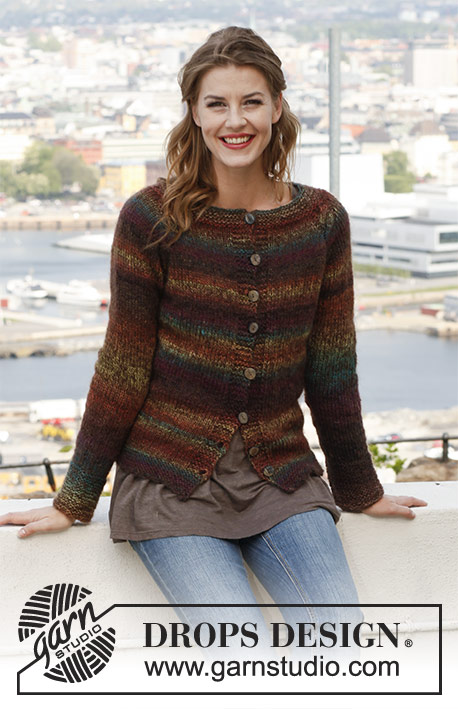
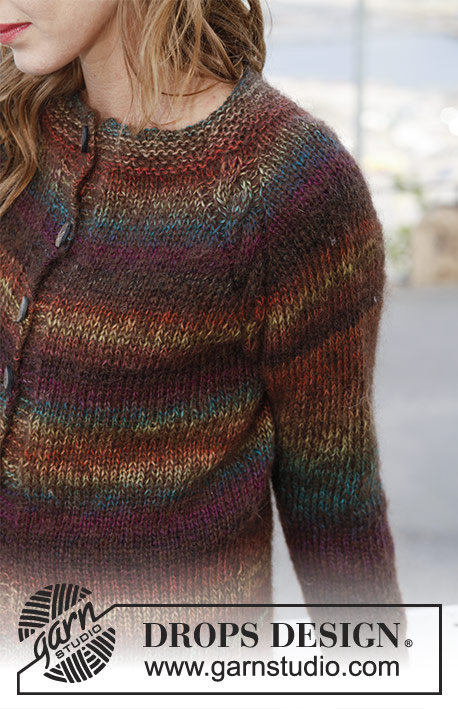
October#octobercardigan |
|||||||||||||
 |
 |
||||||||||||
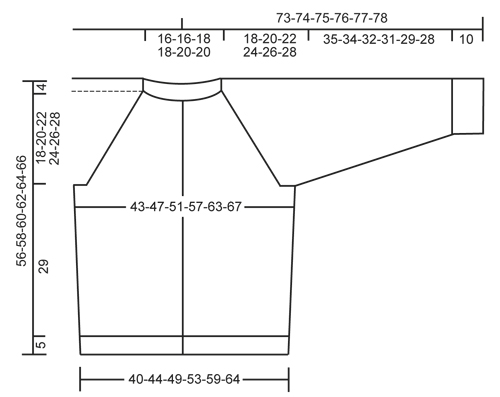
Knitted DROPS jacket with raglan, worked top down in Delight and Vivaldi or Delight and Brushed Alpaca Silk. Size: S - XXXL.
DROPS 143-23 |
|||||||||||||
|
GARTER ST (back and forth on needle): K all rows. 1 ridge = 2 K rows. GARTER ST (in the round on circular needle): * K 1 round and P 1 round *, repeat from *-*. BUTTONHOLES: Bind off for buttonholes on right band. 1 buttonhole = K tog third and fourth st from edge and make 1 YO. Bind off for buttonholes when piece measures (measured from the neck and down): SIZE S: 2, 9, 16, 23, 30, 37, 44 and 51 cm / ¾",3½",6¼",9",11¾",14½",17¼" and 20" SIZE M: 2, 9, 17, 24, 31, 39, 46 and 53 cm / ¾",3½",6¾",9½",12¼",15¼",18" and 21" SIZE L: 2, 10, 17, 25, 32, 40, 47 and 55 cm / ¾",4",6¾",9¾",12½",15¾",18½" and 21⅝" SIZE XL: 2, 9, 17, 25, 33, 41, 49 and 57 cm / ¾",3½",6¾",9¾",13",16⅛",19¼" and 22½" SIZE XXL: 2, 10, 18, 26, 34, 42, 50 and 59 cm / ¾",4",7",10¼",13⅜",16½",19¾" and 23¼" SIZE XXXL: 2, 11, 19, 27, 36, 44, 52 and 61 cm / ¾",4⅜",7½",10⅝",14¼",17¼",20½" and 24" PATTERN: See diagrams A.1 and A.2. Diagrams show all rows seen from RS. RAGLAN: Beg 4 sts before marker: Make 1 YO on needle, work diagram A.1/A.2 (marker is in the middle of repetition), make 1 YO on needle. On next row work YO twisted in stockinette st to avoid holes. DECREASE TIP (applies to body and sleeves): Work until 2 sts remain before marker, K 2 tog and then K 2 twisted tog. -------------------------------------------------------- JACKET: Worked back and forth on circular needle from neck, top down. YOKE: LOOSELY cast on 80-80-88-88-92-92 sts (includes 6 band sts in each side towards mid front) on circular needle size 5 mm / US 8 with 1 strand Delight and 1 strand Vivaldi (= 2 strands). Beg from RS and work 4 ridges (i.e 8 rows) in GARTER ST - see explanation above. Remember BUTTONHOLES on right band - see explanation above. Switch to circular needle size 6 mm / US 10 and K 1 row from RS while AT THE SAME TIME inc 4-4-8-8-12-12 sts evenly (do not inc over bands) = 84-84-96-96-104-104 sts. Then work in stockinette st while AT THE SAME TIME working an elevation in the back of neck as follows (1st row = WS and K the 6 band sts at beg of row): Work until 16-16-18-18-19-19 sts remain, turn, tighten yarn and work until 16-16-18-18-19-19 sts remain in the other side, turn, tighten yarn and work until 26-26-29-29-31-31 sts remain, turn, tighten yarn and work until 26-26-29-29-31-31 sts remain in the other side, turn, tighten yarn and work until 36-36-40-40-43-43 sts remain, turn, tighten yarn and work until 36-36-40-40-43-43 sts remain in the other side, turn, tighten yarn and work the rest of row. Now insert 4 markers in the piece for raglan as follows (insert the markers in the piece without working the row): Insert 1st marker after 18-18-21-21-23-23 sts (= front piece), insert 2nd marker after 12-12-12-12-12-12 sts (= sleeve), insert 3rd marker after 24-24-30-30-34-34 sts (= back piece) and insert 4th marker after 12-12-12-12-12-12 sts (= sleeve). 18-18-21-21-23-23 sts remain on needle after last marker on front piece. READ ALL OF THE FOLLOWING SECTION BEFORE CONTINUING: K 1 row from RS (bands are worked in garter st) while AT THE SAME TIME inc 3 sts at each of the 4 markers as follows: Work 2 sts in each of the 2 sts on inside of markers in towards sleeves and work 2 sts on the inside of markers in towards front and back piece (12 sts inc on row, i.e. 4 sts on each sleeve, 2 sts on back piece and 1 st on each front piece) = 96-96-108-108-116-116 sts. Then work in stockinette st with 6 band sts in garter st in each side towards mid front. REMEMBER THE GAUGE! AT THE SAME TIME on next row from RS (i.e. on first row from RS after inc at the markers), work cable according to diagram A.1 over sts at 1st and 3rd marker and cable according to diagram A.2 over sts at 2nd and 4th marker (markers are in the middle of each cable). AT THE SAME TIME on same row from RS (i.e. while at the same time beg to work diagrams), inc for RAGLAN – see explanation above, on each side of the 4 markers (= 8 sts inc). Repeat inc for raglan every other row (i.e. on every row from RS), 12-16-15-19-21-25 more times and then every 4th row (i.e. on every other row from RS) a total of 2-1-2-1-1-0 times = 216-240-252-276-300-324 sts. Inc for raglan are now done. Work 1 row from WS as before. Then work 1 row from RS as before while AT THE SAME TIME K sts in cable in diagram A.1 tog 2 by 2 and K sts in cable in diagram A.2 twisted tog 2 by 2 (= 3 sts dec per cable) = 204-228-240-264-288-312 sts remain on needle. Work next row as follows from WS: Work until 1st marker, slip the 42-48-48-54-58-64 sts between 1st and 2nd marker on a stitch holder for sleeve, cast on 6-6-6-8-8-8 new sts over stitch holder, work until 3rd marker, slip the 42-48-48-54-58-64 sts between 3rd and 4th marker on a stitch holder for sleeve, cast on 6-6-6-8-8-8 new sts over stitch holder and work the rest of row = 132-144-156-172-188-200 sts on needle (piece measures approx. 22-24-26-28-30-32 cm / 8¾"-9½"-10¼"-11"-11¾"-12½" from shoulder and down). BODY: NOW MEASURE PIECE FROM HERE! Continue back and forth in stockinette st and 6 band sts in garter st in each side towards mid front. AT THE SAME TIME insert 1 marker in the middle of the 6-6-6-8-8-8 new sts in each side. When piece measures 10 cm / 4", dec 1 st each side of markers in each side - READ DECREASE TIP (= 4 sts dec). Repeat dec every 12-12-12-8-8-8 cm / 4¾"-4¾"-4¾"-3⅛"-3⅛"-3⅛", 1-1-1-2-2-2 more times = 124-136-148-160-176-188 sts. Continue to work until piece measures 29 cm / 11⅜" (piece now measures approx. 51-53-55-57-59-61 cm / 20"-21"-21⅝"-22½"-23¼"-24" from shoulder and down). Switch to circular needle size 5 mm / US 8 and work in garter st back and forth for 5 cm / 2", then LOOSELY bind off. Piece measures approx. 56-58-60-62-64-66 cm / 22"-22¾"-23⅝"-24⅜"-25¼"-26" from shoulder and down. SLEEVE: Slip sts from one stitch holder on a short circular needle size 6 mm / US 10 (switch to double pointed needles when needed) and cast in addition on 6-6-6-8-8-8 new sts under sleeve = 48-54-54-62-66-72 sts. NOW MEASURE PIECE FROM HERE! Insert a marker at beg of round (= mid under sleeve). Continue in stockinette st in the round until sleeve measures 2-4-4-4-4-2 cm / ¾"-1½"-1½"-1½"-1½"-¾". Now dec 2 sts mid under sleeve - READ DECREASE TIP. Repeat dec every 4-2½-2½-2-1½-1½ cm / 1½"-⅞"-⅞"-¾"-½"-½", 8-11-10-13-14-17 more times = 30-30-32-34-36-36 sts. When sleeve measures 35-34-32-31-29-28 cm / 13¾"-13⅜"-12½"-12¼"-11⅜"-11" (shorter measurements in the larger sizes because of wider shoulders and longer sleeve cap), switch to double pointed needles size 5 mm / US 8. Work in garter st in the round for 10 cm / 4", then LOOSELY bind off. Work the other sleeve the same way. ASSEMBLY: Sew the openings under the sleeves. Sew on buttons. |
|||||||||||||
Diagram explanations |
|||||||||||||
|
|||||||||||||
|
|||||||||||||
|
|||||||||||||
Have you finished this pattern?Tag your pictures with #dropspattern #octobercardigan or submit them to the #dropsfan gallery. Do you need help with this pattern?You'll find 11 tutorial videos, a Comments/Questions area and more by visiting the pattern on garnstudio.com. © 1982-2025 DROPS Design A/S. We reserve all rights. This document, including all its sub-sections, has copyrights. Read more about what you can do with our patterns at the bottom of each pattern on our site. |
|||||||||||||


With over 40 years in knitting and crochet design, DROPS Design offers one of the most extensive collections of free patterns on the internet - translated to 17 languages. As of today we count 314 catalogs and 11822 patterns - 11812 of which are translated into English (US/in).
We work hard to bring you the best knitting and crochet have to offer, inspiration and advice as well as great quality yarns at incredible prices! Would you like to use our patterns for other than personal use? You can read what you are allowed to do in the Copyright text at the bottom of all our patterns. Happy crafting!
Post a comment to pattern DROPS 143-23
We would love to hear what you have to say about this pattern!
If you want to leave a question, please make sure you select the correct category in the form below, to speed up the answering process. Required fields are marked *.