
Popular categories
Looking for a yarn?


Comments / Questions (146)
![]() Susanne Rasmussen wrote:
Susanne Rasmussen wrote:
Jeg kan ikke få hæklefastheden til at passe, selvom jeg hækler på nål nr 3 og meget fast. Der må da være fejl i opskriften
20.04.2020 - 17:38DROPS Design answered:
Hej Susanne, Hækler du med Muskat? husk at du skal hækle en lidt større prøve, så luftmaskebuerne ikke bliver udstrakt i bredden...
21.04.2020 - 14:26
![]() Sushma M Nayak wrote:
Sushma M Nayak wrote:
Hi, I am finding it difficult to do the sleeves, are the sleeves done seperately then joined to arm hole? or are we starting the sleeves from arm hole. If we are starting from sleeves what is the assembly for? Thanks in advance:)
20.03.2020 - 15:18DROPS Design answered:
Dear Mrs M Nayak, the sleeves are crocheted top down direct from the armholes, start in the 1st ch-space at the bottom of armhole and work around armhole and continue back and forth to the bottom edge. Then crochet sleeves together as you crocheted shoulders. Happy crocheting!
20.03.2020 - 16:11
![]() Martina wrote:
Martina wrote:
Ich verstehe diesen Satz nicht:Die Arbeit drehen und 1 fM in die 2. Lm von der Nadel häkeln, danach je 1 fM in jede der 3-5-1-2-4 nächsten Lm, *, Also die 3-5-1-2-4 nächsten Lm, muss ich die dann überspringen? Und ist das dann der Anfang der jacke?
13.02.2020 - 19:20DROPS Design answered:
Liebe Martina, die Anfangsluftmaschenkette ist oft zu fest, dann wird die 1. Reihe zu eng sein, deshalb häkelt mann mehr Luftmaschen am Anfang und bei der 1. Reihe überspringen Sie regelmäßig Luftmaschen, dh bei der 1. Grösse z.B. häkeln Sie 1 fM in jede der 3 nächsten Lm = 3 fM über 3 Lm, dann (1 Lm überpsringen, 1 fM in jede der 6 nächsten Lm = 6 fM über 7 Lm). Anfang der Jacket befindet sich von unten nach oben (unter Brust bis nach Schulter) und dann häkelt man von der Anschlagskante bis nach unten siehe Pfeile in der Maßskizze. Viel Spaß beim häkeln!
14.02.2020 - 08:20
![]() Sushma wrote:
Sushma wrote:
Hi, I have difficulty in understanding the below line "Repeat dec every 4-3-3-2-2 cm / 1½"-1 1/8"-1 1/8"-3/4"-3/4" (dec alternately in the right and left side) until 11-11-13-13-15 large ch-spaces remain + ch-space used when turning. " What is meant by alternately in the right and left side?
29.11.2019 - 05:43DROPS Design answered:
Hi Sushma, It means you first decrease on the one side of the piece (e.g. right mid-front) then the other side (e.g. left mid-front). Happy crocheting!
29.11.2019 - 08:07
![]() Tony wrote:
Tony wrote:
Hallo, werden die Ärmel in runden oder hin & her gearbeitet? Aus der Anleitung ist das für mich nicht ganz klar. Es gibt später einen Kommentar das der Ärmel zusammengehäkelt werden soll..... Vielen Dank
06.10.2019 - 12:28DROPS Design answered:
Lieber Tony, die Ärmel werden in Reihen, dh in Hin- und Rückreihen gehäkelt. Viel Spaß beim häkeln!
07.10.2019 - 09:35
![]() Julia wrote:
Julia wrote:
Mam problem z wykończeniem dołu. Dla rozmiaru M wyszło mi 28 powtórzeń wzoru, a nie 24, ale to może wynikać z mojego błędu. Bardziej martwi mnie to, że w drugim rzędzie ściegu fantazyjnego 2 w opisie należy omijać dwa słupki, a schemat nakazuje omijać jeden. Ominięcie jednego wydaje się rozsądniejsze, bo są trzy obok siebie w poprzednim rzędzie. Jak należy to zrobić?
09.08.2019 - 14:28DROPS Design answered:
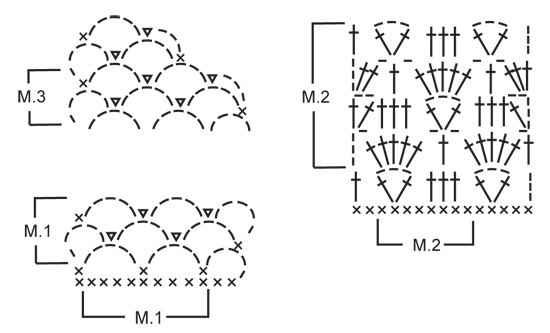
Witaj Julio! Trzeba omijać 2 słupki, ponieważ w poprzednim rzędzie mamy 5 słupków obok siebie: słupek za łukiem i 3 kolejne słupki obok siebie, następnie 1 słupek przed łukiem. Spójrz na schemat M.2. Miłej pracy!
12.08.2019 - 18:33
![]() Karin wrote:
Karin wrote:
Var i mönstret finns beskrivning för avmaskning för ärmhål?
16.06.2019 - 21:40DROPS Design answered:
Hej, man avmaskar för ärmhål då arbetet delas till fram- och bakstycke. Dvs. det hoppas över maskor i varje sida då man börjar virka de olika delarna.
20.06.2019 - 14:09
![]() Marisa Serra wrote:
Marisa Serra wrote:
Hello, I'm not so sure how to go about with the gauge, it's a bit confusing. Could you please provide a more simpler explanation or version of the gauge that I could work with?
08.05.2019 - 22:52DROPS Design answered:
Hi Marisa, You need to do a small trial piece of crocheting with the yarn and hook suggested. If the 5 large chain-spaces from M.1 gives you 10 cm in length then your guage is right. If your trial is too small you need to increase a hook size, if too large then decrease a hook size. I hope this helps and happy crocheting!
09.05.2019 - 08:03
![]() Carina wrote:
Carina wrote:
Ja ja ik snapt het hartelijk dank voor het veder helpen 👌
21.04.2019 - 18:34DROPS Design answered:
Dag Carina,
Hartstikke fijn, veel haakplezier!
25.04.2019 - 12:22
![]() Carina wrote:
Carina wrote:
Hallo,... Ik heb een vraagje in verband met het aan elkaar hechten van de schouders volgens de beschrijving moet je 1 vasten in de eerste grote I-lus op het voorpand 2 lossen in de eerste grote I-lus op het achterpand, nu is mijn vraag worden de schouders dan niet hellemaal vanaf het begin en einde samengehaakt want er blijven toch dan 2 steken aan het begin en einde toch open
17.04.2019 - 11:15DROPS Design answered:
Dag Carina,
Dat klopt, maar als je de mouw erin zet worden deze steken aan de mouw gekoppeld en dan krijg je een mooiere overgang bij de kop van de mouw.
21.04.2019 - 17:30
|
||||||||||||||||
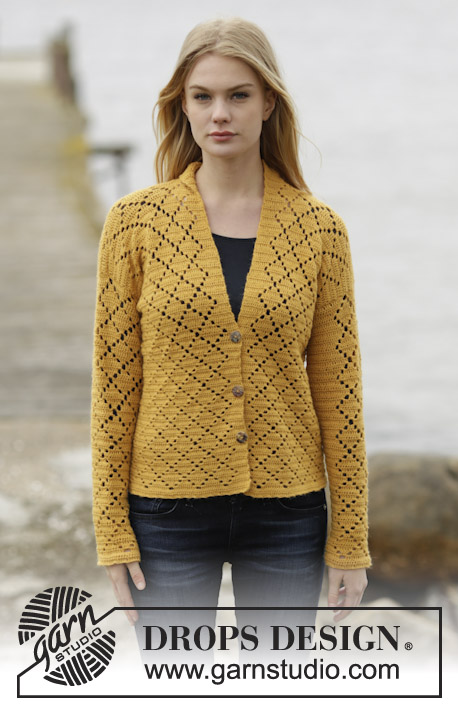
Buttercup#buttercupcardigan |
||||||||||||||||
 |
 |
|||||||||||||||
Crochet DROPS jacket in ”Muskat”. Size: XS - XXXL.
DROPS 136-30 |
||||||||||||||||
|
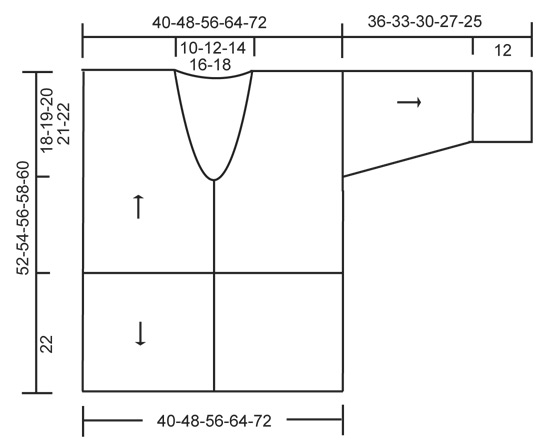
PATTERN 1 (also see diagram M.1): ROW 1: See explanation in pattern. ROW 2: ch 5, 1 sc in middle ch on first ch-space, ch 2, 1 sl st in same ch, * ch 5, 1 sc in middle ch on next ch-space, ch 2, 1 sl st in same ch *, repeat from *-* until 1 ch-space remains, ch 5, 1 sc in middle ch on last ch-space, turn piece. Repeat 2nd row upwards. PATTERN 2 (also see diagram M.2): ROW 1: See explanation in pattern. ROW 2: ch 4, * 5 dc in ch-space, ch 1, skip 2 dc, 1 dc in next dc, ch 1, skip 2 dc *, repeat from *-* until 1 ch-space remains, work 5 dc in this ch-space, ch 1 and 1 dc in 3rd ch from beg of row, turn piece. ROW 3: ch 5, 1 dc in first dc, * skip 1 dc, 1 dc in each of the next 3 dc, skip 1 dc, in next dc work 1 dc + ch 3 + 1 dc *, repeat from *-* until 5 dc remain, skip 1 dc, 1 dc in each of the next 3 dc, skip 1 dc, 1 dc + ch 2 + 1 dc in 3rd ch from beg of previous row, turn piece. ROW 4: ch 3, 2 dc in first ch-space, * ch 1, skip 2 dc, 1 dc in next dc, ch 1, skip 2 dc, in next ch-space work 5 dc *, repeat from *-* until 5 dc remain, ch 1, skip 2 dc, 1 dc in next dc, ch 1, skip 2 dc, in last ch-space work 3 dc, turn piece. ROW 5: 3 ch, skip 2 dc, * in next dc work 1 dc + 3 ch + 1 dc, skip 1 dc, 1 dc in each of the next 3 dc, skip 1 dc *, repeat from *-* until 4 dc remain, in next dc work 1 dc + 3 ch + 1 dc, skip 2 dc, 1 dc in 3rd ch from beg of previous row. Repeat rows 2 to 5. -------------------------------------------------------- JACKET: Worked back and forth from mid front. First work PATTERN 1 up to shoulder, then work PATTERN 2 from cast on edge and down. The sleeves are worked from armholes and down. Ch 187-224-262-298-335 on hook size 4.5 mm/US 7 with Muskat. Turn, work 1 sc in 2nd ch from hook, then work 1 sc in each of the next 3-5-1-2-4 ch, * skip ch 1, work 1 sc in each of the next 6 ch *, repeat from *-* the rest of row = 160-192-224-255-287 sc. Work next row as follows: ch 5, skip the first 2 sc, 1 sc in next sc, * ch 5, skip 3 sc, 1 sc in next sc, ch 5, skip 4 sc, 1 sc in next sc *, repeat from *-* until 4-0-5-0-5 sc remain, work these: SIZE XS/S: ch 5, skip 3 sc, 1 sc in last sc. Sizes M and XXL are done. SIZE L/XL and XXXL: ch 5, skip 4 sc, 1 sc in last sc. Turn piece (= 35-42-49-56-63 large ch-spaces + loop used when turning at beg of row). Continue PATTERN 1 (beg on 2nd row) – see explanation above! REMEMBER THE CROCHET GAUGE! When piece measures approx. 12-13-14-15-16 cm / 4¾"-5⅛"-5½"-6"-6¼", divide for armholes and finish each piece separately. RIGHT FRONT PIECE: Work diagram M.1 back and forth over the first 9-11-12-14-16 large ch-spaces - AT THE SAME TIME next time 3rd row in diagram is worked, dec for neck according to diagram M.3. Repeat dec until 6-7-9-10-11 large ch-spaces remain on shoulder. Continue to work diagram M.1 until piece measures approx. 29-31-33-35-37 cm / 11⅜"-12¼"-13"-13¾"-14½"– work last row as follows: ch 5, 1 sc in middle ch on first ch-space from previous row, * ch 5, 1 sc in middle ch on next ch-space *, repeat from *-* the rest of row, cut the yarn. LEFT FRONT PIECE: Work as right front piece but reversed. BACK PIECE: Work back and forth over the middle 17-20-25-28-31 large ch-spaces. When piece measures approx. 29-31-33-35-37 cm / 11⅜"-12¼"-13"-13¾"-14½" (count so that no of ch-spaces vertically on front piece is the same as on back piece), work 1 last row over 6-7-9-10-11 ch-spaces in each side as on front piece (the 5-6-7-8-9 middle ch-spaces = neck). EDGE AT THE BOTTOM: Work down from cast on edge as follows (beg from WS): 1 sl st in first sc, then ch 3, skip 2 sc, in next sc work 1 dc + ch 3 + 1 dc, * skip 2 sc, work 1 dc in each of the next 3 sc, skip 2 sc, in next sc work 1 dc + ch 3 + 1 dc *, repeat from *-* until 4-4-4-3-3 sc remain, skip 3-3-3-2-2 sc and work 1 dc in last sc, turn piece. Continue PATTERN 2 (beg on 2nd row) – see explanation above! There will be a total of 20-24-28-32-36 repetitions on row. Work diagram M.2 for approx. 22 cm / 8¾", finish after 2nd or 4th row in pattern. Work last row as follows: * ch 3, skip 1 st (either 1 dc or 1 ch), 1 sc in next dc *, repeat from *-* the rest of row, cut the thread. The entire body measures approx. 52-54-56-58-60 cm / 20½"-21¼"-22"-22¾"-23⅝" vertically. ASSEMBLY: Crochet the shoulders tog as follows: * 1 sc in first large ch-space on front piece, ch 2, 1 sc in first large ch-space on back piece, ch 2 *, repeat from *-* on both shoulders. SLEEVE: Worked back and forth from armhole and down. Work 1 sc in first ch-space at the bottom of armhole, * ch 5, skip approx. 2 cm / ¾", fasten with 1 sc *, repeat from *-* until bottom of other side of armhole, there should be 18-19-20-21-22 ch-spaces in total. Turn and continue with 2ND ROW in PATTERN 1 (= 17-18-19-20-21 large ch-spaces on row + ch-space used when turning). When piece measures 2 cm / ¾", dec 1 large ch-space at the end of next row, this is done by working until 2 large ch-spaces remain, ch 5, skip first ch-space and work 1 sc in middle ch on last ch-space. Repeat dec every 4-3-3-2-2 cm / 1½"-1⅛"-1⅛"-¾"-¾" (dec alternately in the right and left side) until 11-11-13-13-15 large ch-spaces remain + ch-space used when turning. When sleeve measures 24-21-18-15-13 cm / 9½"-8¼"-7"-6"-5⅛" (shorter measurements in the larger sizes because of wider shoulders), work next row as follows: ch 5, 1 sc in middle ch on first ch-space, * ch 5, 1 sc in middle ch on next ch-space *, repeat from *-* the rest of row. Work next row as follows: 4 sc in every ch-space and 3 sc in last ch-space on row = 47-47-55-55-63 sc. Work next row as follows: ch 3, skip the first 2 sc, in next sc work 1 dc + ch 3 + 1 dc, * skip 2 sc, work 1 dc in each of the next 3 sc, skip 2 sc, in next sc work 1 dc + ch 3 + 1 dc *, repeat from *-* until 4 sc remain, skip 3 sc and work 1 dc in last sc, turn piece. Continue PATTERN 2 (beg on 2nd row) – see explanation above! There will be a total of 6-6-7-7-8 repetitions on row. When diagram M.2 has been worked for approx. 12 cm / 4¾" (finish after 2nd or 4th row in pattern), work next row as follows: * ch 3, skip 1 st (either 1 dc or 1 ch), 1 sc in next dc *, repeat from *-* the rest of row, cut the yarn. ASSEMBLY: Work sleeve seams tog the same way as on shoulders. BANDS AND NECK EDGE: Work 1 sc row up along right band, around the neck and down along left band - make sure that sc row neither tightens nor widens the edges. There should be approx. 16 sc on 10 cm / 4". Turn and work 1 row with 1 sc in every sc - when finished around the neck and beg down right front piece work as follows: 1 sc in first sc, ch 2, skip 2 sc (= button hole), continue with sc down along the rest of front piece. Turn and work 1 sc row – work 2 sc in ch-space. Fasten off. Sew on button. |
||||||||||||||||
Diagram explanations |
||||||||||||||||
|
||||||||||||||||
 |
||||||||||||||||
 |
||||||||||||||||
Have you finished this pattern?Tag your pictures with #dropspattern #buttercupcardigan or submit them to the #dropsfan gallery. Do you need help with this pattern?You'll find 3 tutorial videos, a Comments/Questions area and more by visiting the pattern on garnstudio.com. © 1982-2026 DROPS Design A/S. We reserve all rights. This document, including all its sub-sections, has copyrights. Read more about what you can do with our patterns at the bottom of each pattern on our site. |
||||||||||||||||


With over 40 years in knitting and crochet design, DROPS Design offers one of the most extensive collections of free patterns on the internet - translated to 17 languages. As of today we count 324 catalogs and 12285 patterns - 12275 of which are translated into English (US/in).
We work hard to bring you the best knitting and crochet have to offer, inspiration and advice as well as great quality yarns at incredible prices! Would you like to use our patterns for other than personal use? You can read what you are allowed to do in the Copyright text at the bottom of all our patterns. Happy crafting!
Post a comment to pattern DROPS 136-30
We would love to hear what you have to say about this pattern!
If you want to leave a question, please make sure you select the correct category in the form below, to speed up the answering process. Required fields are marked *.