
Popular categories
Looking for a yarn?


Comments / Questions (146)
![]() Lise R. wrote:
Lise R. wrote:
Hej. Jeg synes det ser ud til at der er en fejl i symbolforklaringen til diagrammet. Betyder en vandret streg ikke en luftmaske?
15.03.2013 - 10:29DROPS Design answered:
Jo, det er en luftmaske. Det staar ogsaa i diagrammet (= lm).
15.03.2013 - 16:37Manda Bala wrote:
Mi piace molto. Bellissimo.
13.03.2013 - 01:59
![]() Hanne Nielsen wrote:
Hanne Nielsen wrote:
Hej! I har nogle dejlige opskrifter og garner. Ang. opskrifter ved jeg ikke hvilken størrelse jeg skal vælge, mangler længde og overvidde. Er det mig der ikke kan finde det på hjemmesiden? venlig hilsen hanne
08.03.2013 - 14:11DROPS Design answered:
Hej Hanne. Nederst paa vores mönstre kan du finde en maaltabel. Her staar maalene per str i cm. Du kan sammenligne disse med dine egne maal og vaelge din str. God fornöjelse.
08.03.2013 - 16:43
![]() Saroj wrote:
Saroj wrote:
I am working the bottom edge . What does 20 repetitions of the row mean . Please help.
25.02.2013 - 14:42DROPS Design answered:
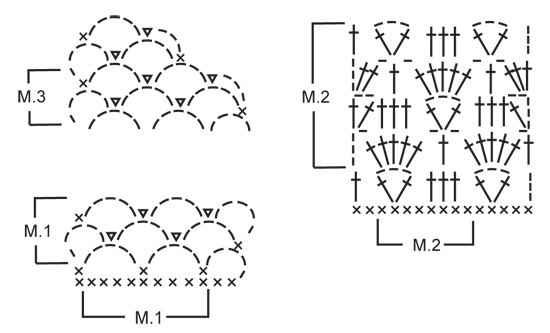
Dear Mrs Saroj, M.2 is a pattern worked on 8 sts (see frame in diagram below), you will repeat 20 times the "frame" M.2 in the diagram. Happy crocheting!
26.02.2013 - 10:10
![]() Bettan wrote:
Bettan wrote:
Imönstret för st M på M.1 ska det delas för ärmhål vid 13 cm. Men hur mäter man? Utspänt blir arbetet 14 cm och under virknin bara 7,5 cm.
13.02.2013 - 19:59DROPS Design answered:
Du ska nu inte dra för mycket, då blir det för kort... Har du 5 stora lm-bågar på 10 cm ?
12.03.2013 - 11:26
![]() REYNAUD wrote:
REYNAUD wrote:
Je ne comprends ps les explications du premier rang et s'il y a réellement 27 diminutions passant de 187 à 160 points
04.02.2013 - 16:56DROPS Design answered:
Bonjour Madame Reynaud, au 1er rang, on saute des ml à intervalles réguliers pour que le bord de montage ne soit pas trop serré, ainsi on a une chaînette de base de 187 ml mais 160 ms à la fin du 1er rang. Bon crochet !
05.02.2013 - 15:54
![]() Harriet wrote:
Harriet wrote:
Hej! När man ska sticka bakstycket börjar man om med samma mått som framstycket el. stickar man utifrån framstycket? svårt att förstå mönstret
26.01.2013 - 23:00DROPS Design answered:
Mönstret börjar här: KOFTA: Arb virkas fram och tillbaka från mitt fram..... följ mönstret och se M.1 ovanför när du kommer till det osv.
29.01.2013 - 09:40
![]() Melanie wrote:
Melanie wrote:
Ich habe eine Frage zu obengenanntem Muster. Angeschlagen habe ich 187 Maschen (kleinste Grösse). Nun bin ich beim Punkt "Rechtes Vorderteil" und bin nicht ganz sicher wie es weiteregeht. Ich muss M1 über die ersten 9 Luftmaschen-Bogen häkeln, aber was ist gemeint mit "GLEICHZEITIG beim der nächsten 3. Reihe gemäss M3". Erstens, wird M3 nirgends beschrieben und zweitens, was wird mit 3. Reihe gemeint, geht es um die nächste 3. Reihe Luftmaschen-Bogen, die ich häkle?
22.10.2012 - 08:19DROPS Design answered:
Hallo Melanie, M3 ist unten bei den Diagrammen abgebildet (oberstes Diagramm links). Sie sehen, dass dort in der 3. R die Abnahmen beginnen. Gutes Gelingen!
22.10.2012 - 10:39
![]() Tina wrote:
Tina wrote:
Ho un enorme problema ! Ho completato la giacca ( taglia M) ma è piccola mentre la taglia L/XL è troppo grande ora devo farla da capo ma che misure devo usare per ottenere la taglia intermedia tra M e L/XL ? Posso in qualche modo calcolare il numero di catenelle giuste (mantenendo le proporzioni) per ottenere una giacca con una circonferenza vita di circa 100 cm ( quella M viene 90 cm ). Grazie mille :)
29.07.2012 - 20:40DROPS Design answered:
Mi dispiace che debba rifare tutto:-( . Mi dici che la M misura 90 cm, ma guardando lo schema dovrebbe misurare 96 (48+48)cm. Forse stringi un po' troppo le maglie? Potresti provare a fare un campione con un uncinetto più grande (5 o 5,5). L'altra alternativa è di aumentare le catenelle iniziali. Vedo che da taglia a taglia aumentano di ca 37 m (ca 2 diagrammi M.2). Tu potresti aumentare con 17 cat p.es. Dovresti fare un campione per vedere la misura. Spero tu riesca a sistemarla!
30.07.2012 - 14:26
![]() D Herrera wrote:
D Herrera wrote:
Onduidelijke instructie om te beginnen vooral wat betreft maat M, er staat niets over het overgaan naar de volgende toer, maar pardoes herhaal van *-* tot er 4-0-5-0-5 v over zijn. Maten M en XXL zijn nu klaar. Dat vind ik heel vreemd. Als je dit gaat maken roept het dus veel vragen op. Bij voorbaat dank voor de toelichting.
03.06.2012 - 15:23DROPS Design answered:
Als u *-* herhaalt heeft u 0-0 v over voor maat M en XXL aan het eind. Dit betekent dus dat deze toer voor deze twee maten nu klaar zijn. Vervolgens schrijven we hoe men de overige maten moet afhaken. Vervolgens staat er "keer het werk" en dan de volgende instructies. Ik heb de volgorde en spaties in het patroon een beetje veranderd om dit duidelijker te laten zien.
06.06.2012 - 10:12
|
||||||||||||||||
Buttercup#buttercupcardigan |
||||||||||||||||
 |
 |
|||||||||||||||
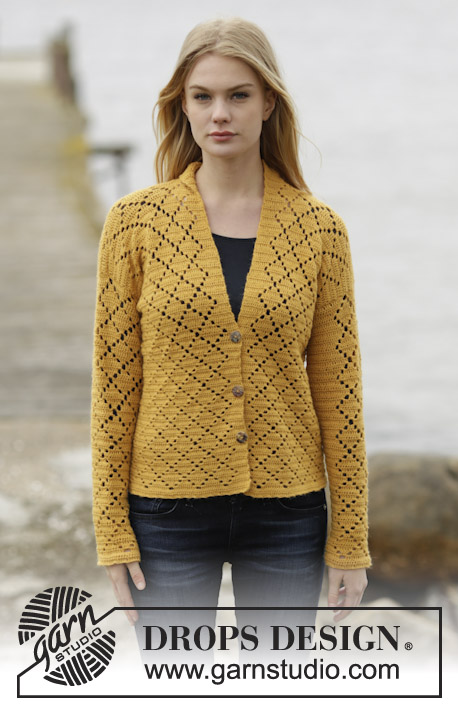
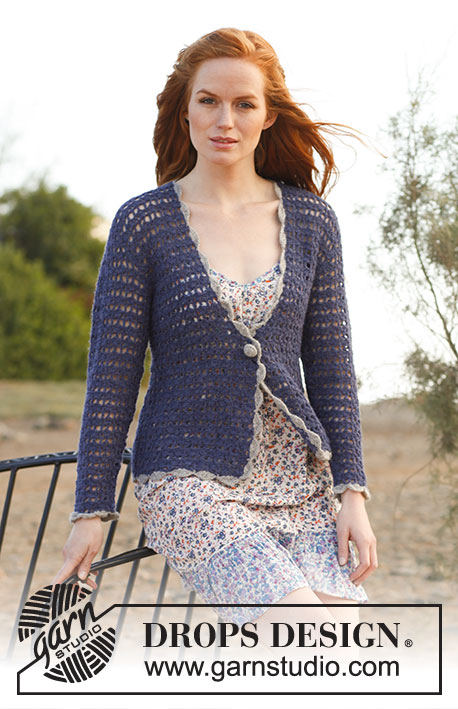
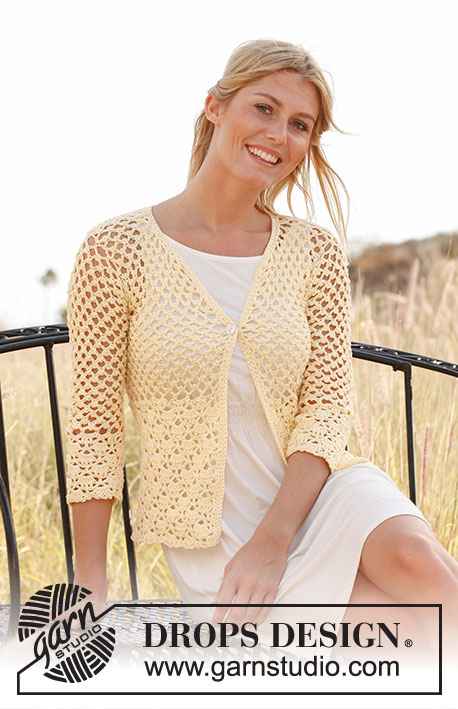
Crochet DROPS jacket in ”Muskat”. Size: XS - XXXL.
DROPS 136-30 |
||||||||||||||||
|
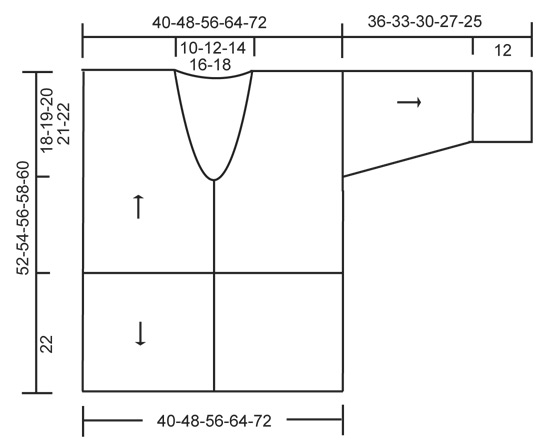
PATTERN 1 (also see diagram M.1): ROW 1: See explanation in pattern. ROW 2: ch 5, 1 sc in middle ch on first ch-space, ch 2, 1 sl st in same ch, * ch 5, 1 sc in middle ch on next ch-space, ch 2, 1 sl st in same ch *, repeat from *-* until 1 ch-space remains, ch 5, 1 sc in middle ch on last ch-space, turn piece. Repeat 2nd row upwards. PATTERN 2 (also see diagram M.2): ROW 1: See explanation in pattern. ROW 2: ch 4, * 5 dc in ch-space, ch 1, skip 2 dc, 1 dc in next dc, ch 1, skip 2 dc *, repeat from *-* until 1 ch-space remains, work 5 dc in this ch-space, ch 1 and 1 dc in 3rd ch from beg of row, turn piece. ROW 3: ch 5, 1 dc in first dc, * skip 1 dc, 1 dc in each of the next 3 dc, skip 1 dc, in next dc work 1 dc + ch 3 + 1 dc *, repeat from *-* until 5 dc remain, skip 1 dc, 1 dc in each of the next 3 dc, skip 1 dc, 1 dc + ch 2 + 1 dc in 3rd ch from beg of previous row, turn piece. ROW 4: ch 3, 2 dc in first ch-space, * ch 1, skip 2 dc, 1 dc in next dc, ch 1, skip 2 dc, in next ch-space work 5 dc *, repeat from *-* until 5 dc remain, ch 1, skip 2 dc, 1 dc in next dc, ch 1, skip 2 dc, in last ch-space work 3 dc, turn piece. ROW 5: 3 ch, skip 2 dc, * in next dc work 1 dc + 3 ch + 1 dc, skip 1 dc, 1 dc in each of the next 3 dc, skip 1 dc *, repeat from *-* until 4 dc remain, in next dc work 1 dc + 3 ch + 1 dc, skip 2 dc, 1 dc in 3rd ch from beg of previous row. Repeat rows 2 to 5. -------------------------------------------------------- JACKET: Worked back and forth from mid front. First work PATTERN 1 up to shoulder, then work PATTERN 2 from cast on edge and down. The sleeves are worked from armholes and down. Ch 187-224-262-298-335 on hook size 4.5 mm/US 7 with Muskat. Turn, work 1 sc in 2nd ch from hook, then work 1 sc in each of the next 3-5-1-2-4 ch, * skip ch 1, work 1 sc in each of the next 6 ch *, repeat from *-* the rest of row = 160-192-224-255-287 sc. Work next row as follows: ch 5, skip the first 2 sc, 1 sc in next sc, * ch 5, skip 3 sc, 1 sc in next sc, ch 5, skip 4 sc, 1 sc in next sc *, repeat from *-* until 4-0-5-0-5 sc remain, work these: SIZE XS/S: ch 5, skip 3 sc, 1 sc in last sc. Sizes M and XXL are done. SIZE L/XL and XXXL: ch 5, skip 4 sc, 1 sc in last sc. Turn piece (= 35-42-49-56-63 large ch-spaces + loop used when turning at beg of row). Continue PATTERN 1 (beg on 2nd row) – see explanation above! REMEMBER THE CROCHET GAUGE! When piece measures approx. 12-13-14-15-16 cm / 4¾"-5⅛"-5½"-6"-6¼", divide for armholes and finish each piece separately. RIGHT FRONT PIECE: Work diagram M.1 back and forth over the first 9-11-12-14-16 large ch-spaces - AT THE SAME TIME next time 3rd row in diagram is worked, dec for neck according to diagram M.3. Repeat dec until 6-7-9-10-11 large ch-spaces remain on shoulder. Continue to work diagram M.1 until piece measures approx. 29-31-33-35-37 cm / 11⅜"-12¼"-13"-13¾"-14½"– work last row as follows: ch 5, 1 sc in middle ch on first ch-space from previous row, * ch 5, 1 sc in middle ch on next ch-space *, repeat from *-* the rest of row, cut the yarn. LEFT FRONT PIECE: Work as right front piece but reversed. BACK PIECE: Work back and forth over the middle 17-20-25-28-31 large ch-spaces. When piece measures approx. 29-31-33-35-37 cm / 11⅜"-12¼"-13"-13¾"-14½" (count so that no of ch-spaces vertically on front piece is the same as on back piece), work 1 last row over 6-7-9-10-11 ch-spaces in each side as on front piece (the 5-6-7-8-9 middle ch-spaces = neck). EDGE AT THE BOTTOM: Work down from cast on edge as follows (beg from WS): 1 sl st in first sc, then ch 3, skip 2 sc, in next sc work 1 dc + ch 3 + 1 dc, * skip 2 sc, work 1 dc in each of the next 3 sc, skip 2 sc, in next sc work 1 dc + ch 3 + 1 dc *, repeat from *-* until 4-4-4-3-3 sc remain, skip 3-3-3-2-2 sc and work 1 dc in last sc, turn piece. Continue PATTERN 2 (beg on 2nd row) – see explanation above! There will be a total of 20-24-28-32-36 repetitions on row. Work diagram M.2 for approx. 22 cm / 8¾", finish after 2nd or 4th row in pattern. Work last row as follows: * ch 3, skip 1 st (either 1 dc or 1 ch), 1 sc in next dc *, repeat from *-* the rest of row, cut the thread. The entire body measures approx. 52-54-56-58-60 cm / 20½"-21¼"-22"-22¾"-23⅝" vertically. ASSEMBLY: Crochet the shoulders tog as follows: * 1 sc in first large ch-space on front piece, ch 2, 1 sc in first large ch-space on back piece, ch 2 *, repeat from *-* on both shoulders. SLEEVE: Worked back and forth from armhole and down. Work 1 sc in first ch-space at the bottom of armhole, * ch 5, skip approx. 2 cm / ¾", fasten with 1 sc *, repeat from *-* until bottom of other side of armhole, there should be 18-19-20-21-22 ch-spaces in total. Turn and continue with 2ND ROW in PATTERN 1 (= 17-18-19-20-21 large ch-spaces on row + ch-space used when turning). When piece measures 2 cm / ¾", dec 1 large ch-space at the end of next row, this is done by working until 2 large ch-spaces remain, ch 5, skip first ch-space and work 1 sc in middle ch on last ch-space. Repeat dec every 4-3-3-2-2 cm / 1½"-1⅛"-1⅛"-¾"-¾" (dec alternately in the right and left side) until 11-11-13-13-15 large ch-spaces remain + ch-space used when turning. When sleeve measures 24-21-18-15-13 cm / 9½"-8¼"-7"-6"-5⅛" (shorter measurements in the larger sizes because of wider shoulders), work next row as follows: ch 5, 1 sc in middle ch on first ch-space, * ch 5, 1 sc in middle ch on next ch-space *, repeat from *-* the rest of row. Work next row as follows: 4 sc in every ch-space and 3 sc in last ch-space on row = 47-47-55-55-63 sc. Work next row as follows: ch 3, skip the first 2 sc, in next sc work 1 dc + ch 3 + 1 dc, * skip 2 sc, work 1 dc in each of the next 3 sc, skip 2 sc, in next sc work 1 dc + ch 3 + 1 dc *, repeat from *-* until 4 sc remain, skip 3 sc and work 1 dc in last sc, turn piece. Continue PATTERN 2 (beg on 2nd row) – see explanation above! There will be a total of 6-6-7-7-8 repetitions on row. When diagram M.2 has been worked for approx. 12 cm / 4¾" (finish after 2nd or 4th row in pattern), work next row as follows: * ch 3, skip 1 st (either 1 dc or 1 ch), 1 sc in next dc *, repeat from *-* the rest of row, cut the yarn. ASSEMBLY: Work sleeve seams tog the same way as on shoulders. BANDS AND NECK EDGE: Work 1 sc row up along right band, around the neck and down along left band - make sure that sc row neither tightens nor widens the edges. There should be approx. 16 sc on 10 cm / 4". Turn and work 1 row with 1 sc in every sc - when finished around the neck and beg down right front piece work as follows: 1 sc in first sc, ch 2, skip 2 sc (= button hole), continue with sc down along the rest of front piece. Turn and work 1 sc row – work 2 sc in ch-space. Fasten off. Sew on button. |
||||||||||||||||
Diagram explanations |
||||||||||||||||
|
||||||||||||||||
 |
||||||||||||||||
 |
||||||||||||||||
Have you finished this pattern?Tag your pictures with #dropspattern #buttercupcardigan or submit them to the #dropsfan gallery. Do you need help with this pattern?You'll find 3 tutorial videos, a Comments/Questions area and more by visiting the pattern on garnstudio.com. © 1982-2026 DROPS Design A/S. We reserve all rights. This document, including all its sub-sections, has copyrights. Read more about what you can do with our patterns at the bottom of each pattern on our site. |
||||||||||||||||


With over 40 years in knitting and crochet design, DROPS Design offers one of the most extensive collections of free patterns on the internet - translated to 17 languages. As of today we count 324 catalogs and 12285 patterns - 12275 of which are translated into English (US/in).
We work hard to bring you the best knitting and crochet have to offer, inspiration and advice as well as great quality yarns at incredible prices! Would you like to use our patterns for other than personal use? You can read what you are allowed to do in the Copyright text at the bottom of all our patterns. Happy crafting!
Post a comment to pattern DROPS 136-30
We would love to hear what you have to say about this pattern!
If you want to leave a question, please make sure you select the correct category in the form below, to speed up the answering process. Required fields are marked *.