
Popular categories
Looking for a yarn?


Comments / Questions (146)
![]() Bente Christensen wrote:
Bente Christensen wrote:
Hvordan hækler jeg ærmerne fra ærmegabet og ned?
06.03.2026 - 21:18DROPS Design answered:
Hei Bente. Vi skal hjelpe deg så godt vi kan, men hva er det du ikke skjønner med det som står under ÆRME og Arb hækles frem og tilbage fra ærmegabet og ned. .....osv.? mvh DROPS Design
09.03.2026 - 14:01
![]() Cindy wrote:
Cindy wrote:
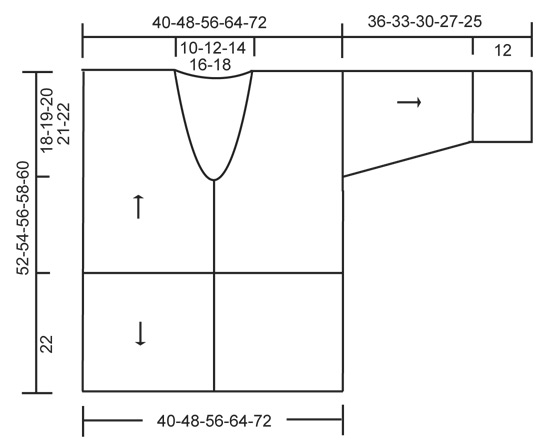
I’d like to ask the same question as Fiona, where is the size chart? if you are referring to the drawing of the cardigan with multiple lines and numbers, then please show me how it’s supposed to be read, it’s not a chart, it’s a drawing and doest explain what each of the lines and numbers mean? I’ve never seen anything so confusing, A chart would list each size and the corresponding measurements but this does not.
16.08.2025 - 03:22DROPS Design answered:
Hi Cindy, The series of numbers by each line correspond to the different sizes (XS/S - M - L/XL - XXL - XXXL). For example, the line above the sleeve is for the sleeve length and size XS/S has a sleeve-length of 36 cm, size M a sleeve-length of 33 cm, etc.. The number below this line is for the cuff-length. The same method is used for the length and width of the piece, with the series of numbers below the lines for the neck-length and width. Hope this helps. Regards, Drops Team.
18.08.2025 - 06:53
![]() Regina wrote:
Regina wrote:
Er der billeder til at kunne forstå hvordan jakken bygges op? Jeg fortår ikke helt fx i hvilken ende jeg hækler M3 på højre forstykke, da jeg ikke forstår, hvordan hele stykket skal se ud, inden det syes sammen. vh Regina
28.06.2025 - 20:19DROPS Design answered:
Hej Regina, jo vi har lavet pile i måleskitsen nederst i opskriften, så du ser hvilken retning arbejdet hækles :) M.3 er mod midt foran på halsen :)
01.07.2025 - 08:52
![]() Fiona wrote:
Fiona wrote:
The sizes given for this pattern are … Size: XS/S - M - L/XL - XXL - XXXL But where is the size chart showing the relevant measurements (waist, bust, sleeve length etc)?
23.06.2025 - 22:56DROPS Design answered:
Hi Fiona, The size chart is at the bottom of the pattern. Regards, Drops Team.
25.06.2025 - 06:39
![]() Sylvia Dreiser wrote:
Sylvia Dreiser wrote:
Hallo, Ich habe die ersten 3 Reihen gehäkelt in Grösse M. Da heisst es in der Anleitung, dass man bei M dann fertig ist. Ich vermute, dass es von da an im Abschnitt "Rechtes Vorderteil" mit Muster M1 weitergeht. Was ich nicht verstehe: Vorderteile und Rückteil: Werden die nicht in einem gehäkelt? D.h. wenn ich M1 im Rechten Vorderteil häkele, häkele ich in dieser Reihe nicht einfach weiter über Rückteil und Linkes Vorderteil? Danke für die Klarstellung.
08.05.2025 - 00:29DROPS Design answered:
Liebe Frau Dreiser, wenn man Grösse M. und XXL sind hier fertig. am Ende der 2. Reihe liest, ist es nur gemeint daß die Reihe fertig in diesen Größen ist, in XS/S und in L/XL sowie XXXL ist die Reihe noch nicht fertig, das Ende wird gehäkelt, wie für diese Größen erklärt. So häkeln Sie in M weiter mit Muster-1 bis die Arbeit 13 cm misst. Viel Spaß beim Häkeln!
08.05.2025 - 13:44
![]() DE SMET Carine wrote:
DE SMET Carine wrote:
Bonjour, Comment faire pour voir le modèle avec une autre couleur ? Merci pour votre réponse Carine
24.04.2025 - 07:47DROPS Design answered:
Bonjour Mme De Smet, si vous êtes sur Ravelry, vous pourrez voir ce gilet dans différentes couleurs ici; pour toute assistance au choix d'une couleur, n'hésitez pas à contacter votre magasin, même par mail ou téléphone. Bon crochet!
24.04.2025 - 09:00
![]() Sylvia wrote:
Sylvia wrote:
Hallo! Ich stehe etwas auf dem Schlauch. Ich bin ganz am Anfang und lese erstmal die Anleitung durch. Da ist eine Abschnitt, der heisst "Jacke". Und dann gibt es Abschnitte "Rechtes Vorderteil, Linkes Vorderteil ,Rückteil". Beginnt man beim Abschnitt "Jacke"? Und was ist dann Jacke - der Beginn von einem Vorderteil? Danke für die Erklärung.
02.04.2025 - 03:34DROPS Design answered:
Liebe Silvia, die Jacke wird von unten nach oben gehäkelt, zuerst häkelt man Rumpfteil in 1 Stück: bei Hinreihen so: rechtes Vorderteil, Rückenteil und linkes Vorderteil (bei Rückreihen: linkes Vorderteil, Rückenteil und rechtes Vorderteil), so bis Armlöcher, dann wird man jedes Vorderteil sowie Rückenteil separat bis zum Schulter häkeln. Dann wird man die untere Kante, von oben (ab die Anschlagsluftmaschenkette für Rumpfteil) nach unten häkeln. Kann das Ihnen helfen? Viel Spaß beim Häkeln!
02.04.2025 - 08:10
![]() Juani wrote:
Juani wrote:
Czy na Teneryfie znajdę sklep stacjonarny sprzedający włóczji DROPS i akcesoria? Dziękuję!
01.10.2024 - 13:42DROPS Design answered:
Witaj Juani, Nasze sklepy w Hiszpanii możesz sprawdzić tutaj: https://www.garnstudio.com/findastore.php?id=23&cid=5
06.10.2024 - 14:26
![]() Kitty wrote:
Kitty wrote:
Ik ben bezig met rechter voorpand. Daar staat dat ik vanaf de 3e toer moet minderen, maar is dat niet veel te vroeg? Als ik op de foto van het vestje kijk, is het ongeveer toer nr 10 waar er pas geminderd word, naast het knoopje. Ik snap het niet.
09.09.2023 - 18:53DROPS Design answered:
Dag Kitty,
Je splitst het werk bij een hoogte van 12-13-14-15-16 cm. Je hebt dan al die lengte aan boogjes. Daarna ga je minderen voor de hals als je op een derde toer in het telpatroon bent.
13.09.2023 - 20:44
![]() Byzantine Dixie wrote:
Byzantine Dixie wrote:
I am almost done with my 3rd iteration of this pattern. Like others I thought it was going to be way too big. I am a US 2-3x. So instead of making the largest size I made the middle one. Frankly, that was a little too small. So I went up to the size between the middle and the largest and that size is perfect. I make the top portion as instructed by the pattern but add different stitches to the bottom portion and make the sleeves hit at the elbow. I LOVE THIS PATTERN! Thank you!
26.06.2023 - 19:16
|
||||||||||||||||
Buttercup#buttercupcardigan |
||||||||||||||||
 |
 |
|||||||||||||||
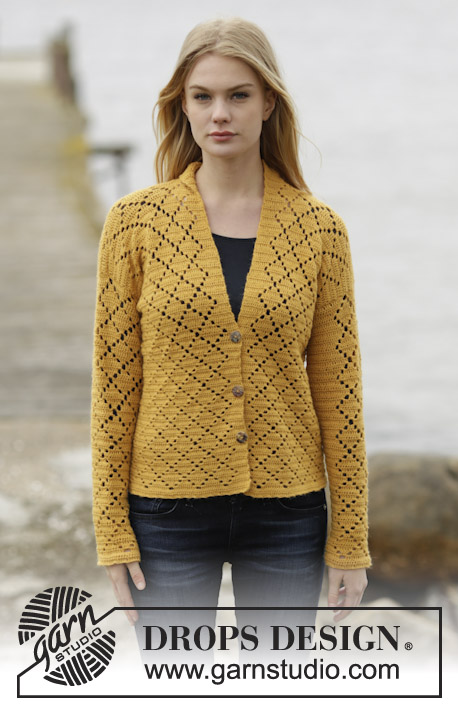
Crochet DROPS jacket in ”Muskat”. Size: XS - XXXL.
DROPS 136-30 |
||||||||||||||||
|
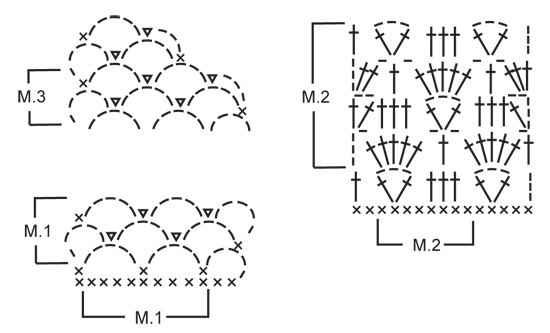
PATTERN 1 (also see diagram M.1): ROW 1: See explanation in pattern. ROW 2: ch 5, 1 sc in middle ch on first ch-space, ch 2, 1 sl st in same ch, * ch 5, 1 sc in middle ch on next ch-space, ch 2, 1 sl st in same ch *, repeat from *-* until 1 ch-space remains, ch 5, 1 sc in middle ch on last ch-space, turn piece. Repeat 2nd row upwards. PATTERN 2 (also see diagram M.2): ROW 1: See explanation in pattern. ROW 2: ch 4, * 5 dc in ch-space, ch 1, skip 2 dc, 1 dc in next dc, ch 1, skip 2 dc *, repeat from *-* until 1 ch-space remains, work 5 dc in this ch-space, ch 1 and 1 dc in 3rd ch from beg of row, turn piece. ROW 3: ch 5, 1 dc in first dc, * skip 1 dc, 1 dc in each of the next 3 dc, skip 1 dc, in next dc work 1 dc + ch 3 + 1 dc *, repeat from *-* until 5 dc remain, skip 1 dc, 1 dc in each of the next 3 dc, skip 1 dc, 1 dc + ch 2 + 1 dc in 3rd ch from beg of previous row, turn piece. ROW 4: ch 3, 2 dc in first ch-space, * ch 1, skip 2 dc, 1 dc in next dc, ch 1, skip 2 dc, in next ch-space work 5 dc *, repeat from *-* until 5 dc remain, ch 1, skip 2 dc, 1 dc in next dc, ch 1, skip 2 dc, in last ch-space work 3 dc, turn piece. ROW 5: 3 ch, skip 2 dc, * in next dc work 1 dc + 3 ch + 1 dc, skip 1 dc, 1 dc in each of the next 3 dc, skip 1 dc *, repeat from *-* until 4 dc remain, in next dc work 1 dc + 3 ch + 1 dc, skip 2 dc, 1 dc in 3rd ch from beg of previous row. Repeat rows 2 to 5. -------------------------------------------------------- JACKET: Worked back and forth from mid front. First work PATTERN 1 up to shoulder, then work PATTERN 2 from cast on edge and down. The sleeves are worked from armholes and down. Ch 187-224-262-298-335 on hook size 4.5 mm/US 7 with Muskat. Turn, work 1 sc in 2nd ch from hook, then work 1 sc in each of the next 3-5-1-2-4 ch, * skip ch 1, work 1 sc in each of the next 6 ch *, repeat from *-* the rest of row = 160-192-224-255-287 sc. Work next row as follows: ch 5, skip the first 2 sc, 1 sc in next sc, * ch 5, skip 3 sc, 1 sc in next sc, ch 5, skip 4 sc, 1 sc in next sc *, repeat from *-* until 4-0-5-0-5 sc remain, work these: SIZE XS/S: ch 5, skip 3 sc, 1 sc in last sc. Sizes M and XXL are done. SIZE L/XL and XXXL: ch 5, skip 4 sc, 1 sc in last sc. Turn piece (= 35-42-49-56-63 large ch-spaces + loop used when turning at beg of row). Continue PATTERN 1 (beg on 2nd row) – see explanation above! REMEMBER THE CROCHET GAUGE! When piece measures approx. 12-13-14-15-16 cm / 4¾"-5⅛"-5½"-6"-6¼", divide for armholes and finish each piece separately. RIGHT FRONT PIECE: Work diagram M.1 back and forth over the first 9-11-12-14-16 large ch-spaces - AT THE SAME TIME next time 3rd row in diagram is worked, dec for neck according to diagram M.3. Repeat dec until 6-7-9-10-11 large ch-spaces remain on shoulder. Continue to work diagram M.1 until piece measures approx. 29-31-33-35-37 cm / 11⅜"-12¼"-13"-13¾"-14½"– work last row as follows: ch 5, 1 sc in middle ch on first ch-space from previous row, * ch 5, 1 sc in middle ch on next ch-space *, repeat from *-* the rest of row, cut the yarn. LEFT FRONT PIECE: Work as right front piece but reversed. BACK PIECE: Work back and forth over the middle 17-20-25-28-31 large ch-spaces. When piece measures approx. 29-31-33-35-37 cm / 11⅜"-12¼"-13"-13¾"-14½" (count so that no of ch-spaces vertically on front piece is the same as on back piece), work 1 last row over 6-7-9-10-11 ch-spaces in each side as on front piece (the 5-6-7-8-9 middle ch-spaces = neck). EDGE AT THE BOTTOM: Work down from cast on edge as follows (beg from WS): 1 sl st in first sc, then ch 3, skip 2 sc, in next sc work 1 dc + ch 3 + 1 dc, * skip 2 sc, work 1 dc in each of the next 3 sc, skip 2 sc, in next sc work 1 dc + ch 3 + 1 dc *, repeat from *-* until 4-4-4-3-3 sc remain, skip 3-3-3-2-2 sc and work 1 dc in last sc, turn piece. Continue PATTERN 2 (beg on 2nd row) – see explanation above! There will be a total of 20-24-28-32-36 repetitions on row. Work diagram M.2 for approx. 22 cm / 8¾", finish after 2nd or 4th row in pattern. Work last row as follows: * ch 3, skip 1 st (either 1 dc or 1 ch), 1 sc in next dc *, repeat from *-* the rest of row, cut the thread. The entire body measures approx. 52-54-56-58-60 cm / 20½"-21¼"-22"-22¾"-23⅝" vertically. ASSEMBLY: Crochet the shoulders tog as follows: * 1 sc in first large ch-space on front piece, ch 2, 1 sc in first large ch-space on back piece, ch 2 *, repeat from *-* on both shoulders. SLEEVE: Worked back and forth from armhole and down. Work 1 sc in first ch-space at the bottom of armhole, * ch 5, skip approx. 2 cm / ¾", fasten with 1 sc *, repeat from *-* until bottom of other side of armhole, there should be 18-19-20-21-22 ch-spaces in total. Turn and continue with 2ND ROW in PATTERN 1 (= 17-18-19-20-21 large ch-spaces on row + ch-space used when turning). When piece measures 2 cm / ¾", dec 1 large ch-space at the end of next row, this is done by working until 2 large ch-spaces remain, ch 5, skip first ch-space and work 1 sc in middle ch on last ch-space. Repeat dec every 4-3-3-2-2 cm / 1½"-1⅛"-1⅛"-¾"-¾" (dec alternately in the right and left side) until 11-11-13-13-15 large ch-spaces remain + ch-space used when turning. When sleeve measures 24-21-18-15-13 cm / 9½"-8¼"-7"-6"-5⅛" (shorter measurements in the larger sizes because of wider shoulders), work next row as follows: ch 5, 1 sc in middle ch on first ch-space, * ch 5, 1 sc in middle ch on next ch-space *, repeat from *-* the rest of row. Work next row as follows: 4 sc in every ch-space and 3 sc in last ch-space on row = 47-47-55-55-63 sc. Work next row as follows: ch 3, skip the first 2 sc, in next sc work 1 dc + ch 3 + 1 dc, * skip 2 sc, work 1 dc in each of the next 3 sc, skip 2 sc, in next sc work 1 dc + ch 3 + 1 dc *, repeat from *-* until 4 sc remain, skip 3 sc and work 1 dc in last sc, turn piece. Continue PATTERN 2 (beg on 2nd row) – see explanation above! There will be a total of 6-6-7-7-8 repetitions on row. When diagram M.2 has been worked for approx. 12 cm / 4¾" (finish after 2nd or 4th row in pattern), work next row as follows: * ch 3, skip 1 st (either 1 dc or 1 ch), 1 sc in next dc *, repeat from *-* the rest of row, cut the yarn. ASSEMBLY: Work sleeve seams tog the same way as on shoulders. BANDS AND NECK EDGE: Work 1 sc row up along right band, around the neck and down along left band - make sure that sc row neither tightens nor widens the edges. There should be approx. 16 sc on 10 cm / 4". Turn and work 1 row with 1 sc in every sc - when finished around the neck and beg down right front piece work as follows: 1 sc in first sc, ch 2, skip 2 sc (= button hole), continue with sc down along the rest of front piece. Turn and work 1 sc row – work 2 sc in ch-space. Fasten off. Sew on button. |
||||||||||||||||
Diagram explanations |
||||||||||||||||
|
||||||||||||||||
 |
||||||||||||||||
 |
||||||||||||||||
Have you finished this pattern?Tag your pictures with #dropspattern #buttercupcardigan or submit them to the #dropsfan gallery. Do you need help with this pattern?You'll find 3 tutorial videos, a Comments/Questions area and more by visiting the pattern on garnstudio.com. © 1982-2026 DROPS Design A/S. We reserve all rights. This document, including all its sub-sections, has copyrights. Read more about what you can do with our patterns at the bottom of each pattern on our site. |
||||||||||||||||


With over 40 years in knitting and crochet design, DROPS Design offers one of the most extensive collections of free patterns on the internet - translated to 17 languages. As of today we count 324 catalogs and 12278 patterns - 12268 of which are translated into English (US/in).
We work hard to bring you the best knitting and crochet have to offer, inspiration and advice as well as great quality yarns at incredible prices! Would you like to use our patterns for other than personal use? You can read what you are allowed to do in the Copyright text at the bottom of all our patterns. Happy crafting!
Post a comment to pattern DROPS 136-30
We would love to hear what you have to say about this pattern!
If you want to leave a question, please make sure you select the correct category in the form below, to speed up the answering process. Required fields are marked *.