Comments / Questions (42)
![]() Nancy wrote:
Nancy wrote:
Diese Anleitung macht leider so keinen Sinn: ich nehme doch nicht nur an der Vorderseite ab?! Nehme ich nicht an allen Markierungen gleichzeitig ab?
18.11.2021 - 16:44DROPS Design answered:
Liebe Nancy, bei "bei der nächsten R. von der Vorderseite" ist hier "bei der nächsten Hinreihe" gemeint. Die Abnahmen werden bei jeder Markierungen gestrickt: das 1. Mal auf der rechten Seite aller Markierungen (= vor jeder Mark) und das nächste Mal auf der linken Seite aller Markierungen (= nach jeder Mark), immer bei einer Hin-Reihen. Hoffentlich kann das Ihnen helfen.
18.11.2021 - 17:41
![]() Nancy wrote:
Nancy wrote:
Yoke Abnahmen: in der Anleitung heißt es, das nur an der Vorderseite abgenommen wird, was überhaupt keinen Sinn macht! Wird nicht an allen markern gleichzeitig abgenommen?
18.11.2021 - 16:42
![]() Nancy wrote:
Nancy wrote:
Ich verstehe die Anleitung mit den Ärmeln nicht obwohl ich mir das Video angeschaut habe. Lege ich die Maschen auf jeder Seite des Mittelteiles auf die Nadel und stricke ich dann weiter nach oben? Vielen Dank
13.11.2021 - 18:13DROPS Design answered:
Liebe Nancy, für die Passen stricken Sie zuerst alle Maschen vom rechten Vorderteil, dann stricken Sie die Maschen von einer Ärmel (die abgekettene Maschen von der Ärmel sind gegen die abgekettene Maschen vom Rumpftetil), dann stricken Sie die Maschen vom Rückenteil und dann von der 2. Ärmel genauso wie bei der 1. und enden Sie mit linken Vorderteil. Sollten die ersten Reihen etwas schwierig sein, können Sie z.B. mit 2 Rundnadeln stricken, nach einpaar Reihen wird es einfacher sein. Viel Spaß beim stricken!
15.11.2021 - 07:40
![]() Gudrun Leufstadius wrote:
Gudrun Leufstadius wrote:
Hej! Skall sticka en barnkofta Drops design modell DE-004-bn. Garn Drops Delight Jag undrar över mjukheten i det garnet. Om det är lite stickigt för ett känsligt barn. Om det är så finns det då något jämförbart garn att byta ut det med. Med vänlig hälsning Gudrun Leufstadius
12.04.2021 - 10:39DROPS Design answered:
Hej Gudrun, DROPS Delight er mjukt, men alla er olika känsliga... det mjukaste vi har är DROPS Baby Merino som kan stickas på samma mönster (samma stickfasthet) :)
12.04.2021 - 13:50
![]() Morel wrote:
Morel wrote:
Bonjour Lorsque l'on parle de rang , s'agit il d'un aller et retour ou d' aller simple ?
25.02.2021 - 10:45DROPS Design answered:
Bonjour Mme Morel, quand on parle de rang, on tricote toutes les mailles sur l'aiguille 1 fois, autrement dit, soit un "aller" (= sur l'endroit) soit un "retour" (= sur l'envers). Bon tricot!
25.02.2021 - 11:56
![]() Antje wrote:
Antje wrote:
Ich fange die Jacke gerade an und habe leider schon ein Problem. Nach dem Bündchen soll ich gleichmäßig abnehmen, aber nicht über den Blendenmaschen! Was sind denn die Blendenmaschen?
09.04.2020 - 19:43DROPS Design answered:
Liebe Antje, hier muss die Anleitung korrigiert sein, es sind hier keine Blendemaschen (die werden später aufgefassen bzw gestrickt), die Abnahmen stricken Sie zwischen den Randmaschen. Eine Korrektur wird erfolgen. Viel Spaß beim stricken!
14.04.2020 - 09:08
![]() Helene Jepsen wrote:
Helene Jepsen wrote:
Hejsa. Hvad gør jeg forkert? Jeg tager str 7/8 tæller 38 masker i hver side tager 22 masjer ind på rygstykket. Og får så 154 masker ialt men, der står at der kun skal være 76 mellem mærkerne. Så er det 24 masker der skal ind eller? Mvh Helene
12.06.2019 - 16:16DROPS Design answered:
Hei Helene. Du skal felle de 22 maskene jevnt fordelt over ALLE maskene (untatt 1 knatmaske i hver side), dette gjøres før du setter merkene. Når det er sagt, så kan jeg se at det er en feil her: du skal ha 78 masker mellom merkene (= ryggstykket). Du har lagt opp 176 masker, så har du felt 22 masker jevnt fordel slik at du har 154 masker på pinnen. Så setter du et merke 38 masker inn fra hver side. Du har da altså 38 (forstykke) + 78 (bakstykke) + 38 (forstykke) = 154 masker. Vi skal få rettet oppskriften umiddelbart. God fornøyelse
13.06.2019 - 09:46
![]() Nadpassions wrote:
Nadpassions wrote:
Bonjour, J’en suis à l´empiecement , je ne comprends pas :alterner gauche et droite de chaque marqueur. Est-ce des le premier rang de diminution... à chaque marqueur? Merci de votre aide Nadia
17.03.2019 - 11:17DROPS Design answered:
Bonjour Nadpassions, vous diminuez 10 m à chaque tour de diminutions (= 1 m à chaque marqueur), mais la 1ère fois, vous diminuez à gauche de chaque marqueur (= après chaque marqueur), la fois suivante à droite de chaque marqueur (= avant chaque marqueur) et continuez ainsi, une fois après, une fois avant les marqueurs, soit toujours 10 diminutions par rang. Bon tricot!
18.03.2019 - 10:34
![]() Nadpassions wrote:
Nadpassions wrote:
J’adore ce modèle. Très agréable à tricoter
17.03.2019 - 11:12
![]() Nadpassions wrote:
Nadpassions wrote:
Bonjour J’en suis à l’empiecement, je ne comprends pas comment alterner à gauche et à droite du marqueur... à partir du 1er rang de diminution...à chaque marqueur...merci pour votre aide. Nadia
17.03.2019 - 11:11
Heathcliff#heathcliffcardigan |
|
|
|
|
Knitted cardigan in garter st, with round yoke in DROPS Delight. Size children 3 to 12 years.
DROPS Children 22-5 |
|
|
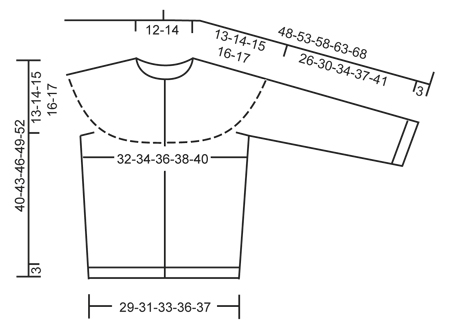
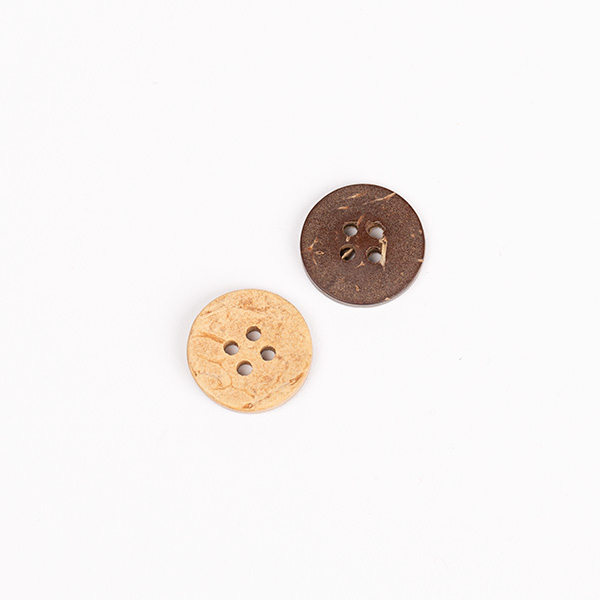
YARN CHANGE TIP: To make the color transitions in Delight pretty when switching ball, it is important to find a ball that starts with the same color that last ball ended with. GARTER ST (back and forth on needle): K all rows. -------------------------------------------------------- JACKET: Worked back and forth on circular needle from mid front. READ YARN CHANGE TIP! Cast on 152-164-176-188-196 sts (includes 1 edge st in each side towards mid front) on circular needle size 2.5 mm / US 1or2 with Delight. Work as follows (seen from from RS): 1 edge st in GARTER ST - see explanation above - * K 2, P 2 *, repeat from *-* until 3 sts remain, K 2 and 1 edge st in garter st. When piece measures 3 cm / 1⅛", switch to circular needle size 3.5 mm / US 4. K 1 row (from RS) over all sts while AT THE SAME TIME dec 18-20-22-24-24 sts evenly = 134-144-154-164-172 sts. Insert 2 markers in the piece; 34-36-38-41-43 sts in from each side (= 66-72-78-82-86 sts between markers on back piece). Continue in garter st over all sts. REMEMBER THE GAUGE! When piece measures 7-8-9-10-11 cm / 2¾"-3⅛"-3½"-4"-4⅜", inc 1 st on each side of both markers. Repeat inc every 5-6-6-7-7 cm / 2"-2⅜"-2⅜"-2¾"-2¾" a total of 3 times = 146-156-166-176-184 sts. When piece measures 27-29-31-33-35 cm / 10⅝"-11⅜"-12¼"-13"-13¾", bind off 6 sts in each side for armholes (i.e. bind off 3 sts on each side of both markers) = 134-144-154-164-172 sts remain on needle. Put piece aside and knit the sleeves. SLEEVE: Worked back and forth on needle. Cast on 50-54-54-58-58 sts (includes 1 edge st in each side) on needle size 2.5 mm / US 1or2 with Delight. Work rib = K 2/P 2 with 1 edge st in garter st in each side. When piece measures 3 cm / 1⅛", switch to circular needle size 3.5 mm / US 4. K 1 row (from RS) while at the same time dec 6-6-4-4-2 sts evenly = 44-48-50-54-56 sts. Continue in garter st over all sts. When piece measures 6 cm / 2⅜", inc 1 st in each side. Repeat inc every 3-4-4-4½-4½ cm / 1⅛"-1½"-1½"-1¾"-1¾" a total of 7-7-8-8-9 times = 58-62-66-70-74 sts. When piece measures 29-33-37-40-44 cm / 11⅜"-13"-14½"-15¾"-17¼", bind off 4 sts at beg and end of next row from RS = 50-54-58-62-66 sts remain on needle, cut the yarn. Put piece aside and knit another sleeve. YOKE: Slip sleeves on to same circular needle as body where armholes were bound off = 234-252-270-288-304 sts. Insert 10 markers in the piece as follows: First marker after 18-18-18-18-17 sts, then 22-24-26-28-30 sts between the markers, 18-18-18-18-17 sts remain after last marker. K 5-5-7-7-7 rows before starting dec (1st row = WS). On next row (= RS), dec 1 st on the left side of all markers by K 2 tog. Repeat dec every 6th row a total of 4-4-5-5-5 times, every 4th row a total of 4-5-5-5-6 times and then every other row a total of 8-8-8-9-9 times – NOTE: Dec alternately on the right and left side of all markers. After all dec, 74-82-90-98-104 sts remain on needle. Then work an elevation in the back as follows: Work 43-47-51-55-58 sts, turn, tighten yarn and work 12 sts back, turn, tighten yarn and work 18 sts, turn, tighten yarn and work 24 sts, turn, continue like this by working 6 sts more on every turn until a total of 60-60-72-72-84 sts have been worked. Turn and work until mid front again. Slip sts on a stitch holder and work the bands. LEFT FRONT BAND: Pick up approx. 90 to 120 sts on circular needle size 2.5 mm / US 1or2 with Delight, pick up inside 1 edge st along left front edge. K 1 row from WS while at the same time adjusting no of sts to 109-117-125-133-141. Then work rib as follows from RS (from the top): 1 st in garter st, * K 2, P 2 *, repeat from *-*, finish with K 2 and 2 sts in garter st. When rib measures 2.5 cm / ⅞", bind off with K over K and P over P. RIGHT BAND: Work as left band but after 1 cm / ⅜", bind off for 7-7-7-8-8 button holes evenly. 1 BUTTON HOLE = bind off 2 P sts and cast on 2 new sts on next row over these sts. Upper button hole should be approx. 1 cm / ⅜" from the top, and bottom hole approx. 4-5 cm / 1½"-2" from bottom edge. NECK EDGE: Pick up 6 sts at the top of right front band on circular needle size 2.5 mm / US 1or2 with Delight. Then work the 74-82-90-98-104 sts from stitch holder back on needle, then knit up 6 sts at the top of left front band = 86-94-102-110-116 sts. K 1 row from WS while at the same time dec 2-6-6-6-8 sts evenly (do not dec over band sts) = 84-88-96-104-108 sts. Continue to work rib as follows seen from RS: 1 st in garter st, * K 2, P 2 *, repeat from *-*, finish with K 2 and 1 st in garter st. When edge measures approx. 2.5 cm / ⅞", bind off with K over K and P over P. ASSEMBLY: Sew the sleeve seams inside 1 edge st. Sew tog the openings under the sleeves and sew on buttons. |
|
 |
|
Have you finished this pattern?Tag your pictures with #dropspattern #heathcliffcardigan or submit them to the #dropsfan gallery. Do you need help with this pattern?You'll find 15 tutorial videos, a Comments/Questions area and more by visiting the pattern on garnstudio.com. © 1982-2026 DROPS Design A/S. We reserve all rights. This document, including all its sub-sections, has copyrights. Read more about what you can do with our patterns at the bottom of each pattern on our site. |


Post a comment to pattern DROPS Children 22-5
We would love to hear what you have to say about this pattern!
If you want to leave a question, please make sure you select the correct category in the form below, to speed up the answering process. Required fields are marked *.