
Popular categories
Looking for a yarn?


Comments / Questions (43)
![]() Martha wrote:
Martha wrote:
Hola, un gusto poder saludarlos, sobra decir que me enamore de su pagina, ahora esto atorada en esta parte de este patron. Continuar cerrando para el escote a cada lado como sigue: En cada 2ª fila: 2 pts 4-4-4-3-3-3 vcs y 1 pt 6-6-9-4-9-9 vcs, ahora cerrar en cada 4ª fila : 1 pt 0-1-0-4-2-3 vcs. Es decir en las primeras disminuciones, quiere decir 2 veces 2pj x 4 veces? Agradezco sus atenciones, que sigan teniendo mucho exito
16.08.2024 - 01:44DROPS Design answered:
Hola Martha, estás cerrando, no disminuyendo pts. Cierras cada punto por separado. Para la talla más pequeña, cierras 2 pts a cada lado (así que cierras al inicio de cada fila 2 pts, y así cierras cada 2ª fila para cada lado del escote) 4 veces por lado. Así que son 16 pts y no 8. De la misma forma, cuando cierres 1 pt serían 6 veces a cada lado, o 12 veces en total. Puedes ver el siguiente video sobre cómo cerrar/rematar puntos por el lado derecho: https://www.garnstudio.com/video.php?id=15&lang=en
18.08.2024 - 23:36
![]() Sandra wrote:
Sandra wrote:
In the yolk the pattern states to knit until piece measures 45cm then slip 6 sts in each side on stitch holder towards mid front, how do I know which stitches go on stitch holder. Is it the first and last stitch’s of the row.
07.04.2024 - 23:51DROPS Design answered:
Dear Sandra, these are the 6 outermost sts, right at the mid front edge. You slip the first 6 sts on the row from the right side and then the first 6 sts on the next row from the wrong side. Remember to first work the stitches before slipping them to avoid cutting the thread. Happy knitting!
08.04.2024 - 00:47
![]() Karin WITTEVEEN wrote:
Karin WITTEVEEN wrote:
Hoe moet je bij de hals 3x2st afkanten en 4x1st afkanten. En bij de 4 de naald 4x1steek afkanten. Is dat per naald dus 10 steken totaal. En 1 x 4 steken?
10.04.2015 - 10:52DROPS Design answered:
Beste Karin,3x2st afkanten en 4x1st afkanten wil zeggen dat je in drie naalden waarvan het begin van de naald aan de kant van de hals is (dus niet aan de kant van de mouw) 2 steken afkant en in de daaropvolgende vier naalden aan het begin van de naald 1 steek. De naalden die je aan de kant van de mouw begint, kan je dus geen steken af. Dus je kant in totaal 10 steken af, verdeeld over 14 naalden, om de naald.
10.04.2015 - 12:41
![]() Kristin Gudem wrote:
Kristin Gudem wrote:
Er denne jakken noe stor i størrelsen? Synes det hørtes voldsomt ut med masker i forhold til andre oppskrifter med Paris? Likte den veldig godt, men kjedelig om den blir altfor stor. Begynte å legge opp, men syntes det ble så veldig mye...
29.01.2015 - 22:45DROPS Design answered:
Hej Kristin, følger du opskriften og overholder strikkefastheden får du målene du ser i skitsen nederst i opskriften. Husk at fletter bruger gerne flere masker da de trække arbejdet sammen. God fornøjelse!
02.02.2015 - 13:58
![]() Heather Heaven wrote:
Heather Heaven wrote:
Love my finished cardigan, but it took me 750g of Paris cotton to complete - not the 600 g stated!
27.02.2014 - 16:11
![]() Marijke wrote:
Marijke wrote:
Hallo, wat wordt er bedoeld in het telpatroon met verkeerde kant? Kom hier niet uit. Groeten marijke
20.02.2014 - 15:40DROPS Design answered:
Hoi Marijke. Bij het breien heb je een goede en verkeerde kant. In het telpatroon wordt er beschreven hoe je de symbolen op de goede en op de verkeerde kant moet breien. Kijk hier hoe je onze telpatronen moet lezen
21.02.2014 - 10:41
![]() Mamenko wrote:
Mamenko wrote:
Ce modèle m'avait séduite mais, après en avoir tricoté les trois quarts, j'ai tout démoli : la Paris est beaucoup trop grosse pour le motif. Il ne rend pas bien, il n'a pas du tout l'allure de la photo. Je le referai, mais dans un fil plus fin, comme, par exemple, la Cotton Light.
22.08.2013 - 12:32
![]() Mamenko wrote:
Mamenko wrote:
Le modèle est joli ... sur la photo et il le serait sûrement avec un coton comme "cotton light". Mais la Paris est beaucoup trop grosse pour le dessin, qui, du coup, manque d'élégance. Je suis très déçue du résultat.
01.08.2013 - 19:28
![]() Helle Eriksen wrote:
Helle Eriksen wrote:
Jeg kan i kommentarerne at flere skriver at jakken bliver for stor. I skrev at det ikke passede, hvorfor jeg gik i gang. Jeg har strikket ca. 50 trøjer efter jeres mønstre og det har altid passet, men ikke denne. Min strikkefasthed passer, jeg strikker i str. L og i diagrammet måler den 51 cm men min måler 61 cm og det er jo alt for stor. Må trevle op og finde et andet mønster
05.06.2013 - 18:50
![]() Helle Eriksen wrote:
Helle Eriksen wrote:
Jeg forstår ikke en del af mønster 1. 13. pind hvor der i forklaring til diagram står flg: RETTEN: 1 m på hj.p foran arb. 1 vr, 1 r fra hj.p. VRANGEN: 1 m på hj.p bag arb. 1 r, 1 vr fra hj.p. Betyder VRANGEN at man skal strikke det anførte på vrangsiden af arbejdet? Der står jo noget andet for vrangsiden?
26.04.2013 - 18:08DROPS Design answered:
Det betyder at disse to symboler kan forekommme på både ret og vrang. Se pind 17 og 18 i M.1. Pind 17 er på retten og pind 18 er på vrang. Så strikker du en RET pind, da følger du kun beskrivelsen for retten, men strikker du en VRANG pind, så følger du kun beskrivelsen for vrangen
28.04.2013 - 16:56
|
|||||||||||||||||||||||||||||||||||||
Verity#veritycardigan |
|||||||||||||||||||||||||||||||||||||
 |
 |
||||||||||||||||||||||||||||||||||||
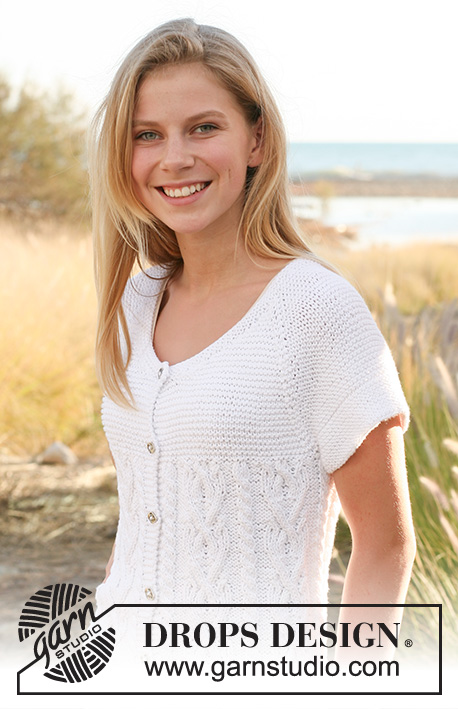
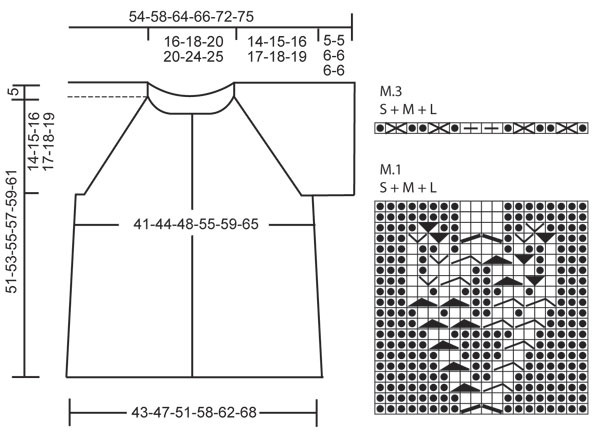
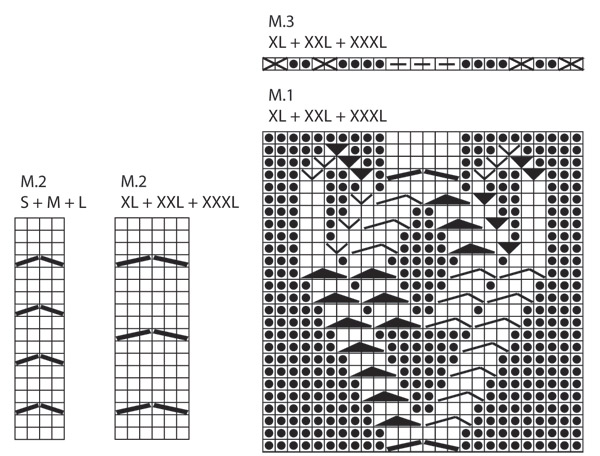
Knitted DROPS jacket with cables and raglan sleeves in "Paris". Size: S - XXXL.
DROPS 128-33 |
|||||||||||||||||||||||||||||||||||||
|
PATTERN: See diagram M.1 to M.3. The diagram shows the pattern from RS. NOTE! See diagram for size. GARTER ST (back and forth on needle): K all rows. KNITTING TIP: If knitting gauge is incorrect in height and the knitting is too tight, the raglan sleeve will be too short and the armholes too small. This can be adjusted by working 1 extra row without dec evenly spaced between dec. DECREASE TIP (applies to raglan): All dec are done from RS. Dec as follows before marker: K 2 tog. Dec as follows after marker: Slip 1 st as if to K, K 1, psso. BUTTON HOLES: Bind off for button holes on right front band. 1 button hole = bind off 3rd band st. On next row cast on 1 new st over the bind off st. Bind off for button holes when piece measures (NOTE! bind off the last button hole at the neck in garter st on neckline): SIZE S: 4, 12, 20, 28, 36 and 45 cm / 1½",4¾",8",11",14¼",17¾". SIZE M: 3, 10, 17, 24, 31, 38 and 46 cm / 1⅛",4",6¾",9½",12¼",15",18". SIZE L: 4, 11, 18, 25, 32, 39 and 47 cm / 1½",4⅜",7",9¾",12½",15¼",18½". SIZE XL: 3, 10, 18, 25, 32, 40 and 48 cm / 1⅛",4",7",9¾",12½",15¾",19". SIZE XXL: 2, 10, 17, 25, 33, 40 and 49 cm / ¾",4",6¾",9¾",13",15¾",19¼". SIZE XXXL: 2, 10, 18, 26, 34, 42 and 50 cm / ¾",4",7",10¼",13⅜",16½",19¾". -------------------------------------------------------- BODY: Worked back and forth on circular needle. Cast on 167-179-195-218-234-254 sts (including 5 band sts each side) on circular needle size 4 mm / US 6 with Paris. Work 6 rows in GARTER ST - see explanation above! Insert 2 markers in the piece after 45-48-52-58-62-67 sts from each side (back piece = 77-83-91-102-110-120 sts). Switch to circular needle size 5 mm / US 8. Work front bands in garter st until finished measurements. REMEMBER THE GAUGE! Continue to K 1 row from RS while AT THE SAME TIME inc 15-15-15-20-20-20 sts evenly on each front piece and 29-29-29-38-38-38 sts evenly on back piece = 226-238-254-296-312-332 sts. K 1 row from WS. Work as follows (NOTE! see diagram for size): 5 band sts, M.2, M.1, M.2, M.1, M.2, P 6-12-20-6-14-24 sts (marker in the side is in the middle of these), M.2, M.1, M.2, M.1, M.2, M.1, M.2, M.1, M.2, P 6-12-20-6-14-24 sts (marker in the side is in the middle of these), M.2, M.1, M.2, M.1, M.2 and 5 band sts. Continue like this until piece measures approx. 12 cm / 4¾". NOTE! Remember to bind off for BUTTON HOLES - see explanation above. Now dec 1 st each side of every marker. Repeat dec when piece measures approx. 24 cm / 9½" = 218-230-246-288-304-324 sts. SIZE L + XXL + XXXL: repeat dec when piece measures 36 cm / 14¼". = 218-230-242-288-300-320 sts. When piece measures approx. 36-37-38-39-40-41 cm / 14¼"-14½"-15"-14¼"-15¾"-16" (adjust so that 2 rows remain vertically of M.1), work next row from RS as follows: Size S + M + L: 5 band sts, M.2, M.1, M.2, M.1, K 2 sts tog 2 times, P 2-8-14 sts (marker in the side is in the middle of these), K 2 sts tog 2 times, M.1, M.2, M.1, M.2, M.1, M.2, M.1, K 2 sts tog 2 times, P 2-8-14 sts (marker in the side is in the middle of these), K 2 sts tog 2 times, M.1, M.2, M.1, M.2 and 5 band sts. Size XL + XXL + XXXL: 5 band sts, M.2, M.1, M.2, M.1, K 2 sts tog 3 times, P 2-8-18 sts (marker in the side is in the middle of these), K 2 sts tog 3 times, M.1, M.2, M.1, M.2, M.1, M.2, M.1, K 2 sts tog 3 times, P 2-8-18 sts (marker in the side is in the middle of these), K 2 sts tog 3 times, M.1, M.2, M.1, M.2 and 5 band sts. 8-8-8-12-12-12 sts have now been dec. On next row from WS, bind off 8 sts in each side (= 4 sts on each side of marker) for armholes = 194-206-218-260-272-292 sts remain on needle. Put piece aside and work the sleeves. SLEEVE: Worked back and forth on needle. Cast on 58-62-64-68-74-76 sts (includes 1 edge st each side) on needle size 4 mm / US 6. Work in GARTER ST - see explanation above! When piece measures 5-5-6-6-6-6 cm / 2"-2"-2⅜"-2⅜"-2⅜"-2⅜" (adjust so that next row is from RS) bind off 5 sts at beg of the next 2 rows = 48-52-54-58-64-66 sts. Put sleeve aside. Knit another sleeve. YOKE: READ KNITTING TIP! Slip sleeves and body on to same circular needle size 4 mm / US 6 = 290-310-326-376-400-424 sts. Insert a marker in all transitions between sleeves and body piece = 4 markers. On first row from RS K tog all sts in M.2 2 by 2, work M.3 over all sts in M.1, K sleeve sts and work band sts in garter st as before = 228-248-264-299-323-347 sts. NOTE! in size S the first/last st in M.3 in each side has already been bind off for armhole. K 1 row from WS over all sts. Continue to K every row over all sts while AT THE SAME TIME dec for RAGLAN - see explanation above! NOTE! First dec is only done on the body, not the sleeves. Dec beg on 1st row! Size XXL + XXXL: Every 6th dec is only done on the body, not the sleeve. Dec every 4 rows: 9-9-9-9-4-2 times (incl 1st dec) and then on every other row: 7-9-10-12-23-29 times. AT THE SAME TIME when piece measures 44-45-46-47-48-49 cm / 17¼"-17¾"-18"-18½"-19"-19¼" (i.e. after dec for raglan 7-7-7-7-10-12 times) slip 6-6-6-8-8-8 sts in each side on a stitch holder towards mid front. Continue to bind off for neck in each side as follows: On every other row: 2 sts 4-4-4-3-3-3 times and 1 st 6-6-9-4-9-9 times, then bind off on every 4th row: 1 st 0-1-0-4-2-3 times. After all dec, pick up 20 to 40 sts (incl sts on stitch holder) in neck on each front piece. Work 6 rows in garter st while AT THE SAME TIME on 1st row adjusting no of sts to 98-110-118-124-136-146. Bind off. ASSEMBLY: Sew sleeve seams inside 1 edge st and sew openings under the sleeves. Sew on buttons. |
|||||||||||||||||||||||||||||||||||||
Diagram explanations |
|||||||||||||||||||||||||||||||||||||
|
|||||||||||||||||||||||||||||||||||||
 |
|||||||||||||||||||||||||||||||||||||
 |
|||||||||||||||||||||||||||||||||||||
Have you finished this pattern?Tag your pictures with #dropspattern #veritycardigan or submit them to the #dropsfan gallery. Do you need help with this pattern?You'll find 17 tutorial videos, a Comments/Questions area and more by visiting the pattern on garnstudio.com. © 1982-2026 DROPS Design A/S. We reserve all rights. This document, including all its sub-sections, has copyrights. Read more about what you can do with our patterns at the bottom of each pattern on our site. |
|||||||||||||||||||||||||||||||||||||


With over 40 years in knitting and crochet design, DROPS Design offers one of the most extensive collections of free patterns on the internet - translated to 17 languages. As of today we count 324 catalogs and 12290 patterns - 12280 of which are translated into English (US/in).
We work hard to bring you the best knitting and crochet have to offer, inspiration and advice as well as great quality yarns at incredible prices! Would you like to use our patterns for other than personal use? You can read what you are allowed to do in the Copyright text at the bottom of all our patterns. Happy crafting!
Post a comment to pattern DROPS 128-33
We would love to hear what you have to say about this pattern!
If you want to leave a question, please make sure you select the correct category in the form below, to speed up the answering process. Required fields are marked *.