
Popular categories
Looking for a yarn?


Comments / Questions (43)
![]() Birgit wrote:
Birgit wrote:
Merci de préciser s'il s'agit de brides, doubles brides ou demi brides :)
14.06.2016 - 16:41DROPS Design answered:
Bonjour Birgit, retrouvez la signification des abréviations et les mailles sous l'onglet "vidéos" et dans le lexique. Bon crochet!
14.06.2016 - 19:12
![]() Cristina wrote:
Cristina wrote:
Hola! En la vuelta 2, desde que se cierran los 7 bucles con 5 cad pone "1 p.bjs en el mismo bucle de cad *, repetir de *a* un total de 4 veces (= 4 pétalos de p.a. y 4 bucles de cad). Cambiar color y virar la pieza." pero no es posible porque hay un "hueco" hasta llegar al otro pétalo. ¿Qué falta? ¿lo pueden dibujar, por favor? ¿y poner una foto más clara y amplia?
22.11.2015 - 10:13DROPS Design answered:
Hola Cristina. Es imposible añadir diagramas y fotos a los patrones ya publicados. He repasado el patrón y las explicaciones y están correctos. No entiendo lo del hueco. Si puedes concretar tu pregunta, porque no puedes realizar esta vta. También puedes acudir a tu tienda DROPS más cercana con la labor a ver si te pueden aconsejar.
26.11.2015 - 10:56
![]() Eva Lundberg wrote:
Eva Lundberg wrote:
Jag älskar den här filten och den är så rolig att göra. Jag har virkat tidigare bla har jag gjort spetsdukar, de har jag spänt upp på strykbrädan med nålar och sprayet med stärkelse för att de ska hålla formen. Hur gör jag med dessa rutor, det står i beskrivningen endast att fukta dem, men de blir ju lite buckliga. vilken storlek har rutorna på filten, jag får dem till ca 18 cm utspända. Har ni några tips till mig?
04.10.2015 - 18:46
![]() Freddi wrote:
Freddi wrote:
Beklager! Jeg fant ut av oppskriften og er nå ferdig med pleddet! Takk for fantastisk oppskrift :)
15.10.2014 - 00:00
![]() Freddi wrote:
Freddi wrote:
Jeg skjønner ikke OMG.3 - hvilken lm-bue er det snakk om? Jeg skjønner ikke hvordan det skal se ut... Kan det være feil i oppskriften?
09.09.2014 - 23:04
![]() Freddi wrote:
Freddi wrote:
Jeg skjønner ikke OMG.3 - hvilken lm-bue er det snakk om? Jeg skjønner ikke hvordan det skal se ut... Kan det være feil i oppskriften?
09.09.2014 - 23:04
![]() Iris Verbunt wrote:
Iris Verbunt wrote:
Hallo, mag ik vragen of de kleurencombinatie van vierkant nummer 4 kloppen??
02.03.2014 - 07:15DROPS Design answered:
Hoi Iris. Ja, de combinaties kloppen. Waarom?
03.03.2014 - 14:10
![]() Anette Hageland wrote:
Anette Hageland wrote:
Hei, har nesten hekklet teppe ferdig, men hva regnes som vrangsiden av ruten? hvordan skal en legge rutene (rekkefølge) når en hekkler dem sammen? Mvh Anette
24.01.2014 - 22:13DROPS Design answered:
Hei Anette. Der er ikke rigtig en ret og vrang side paa dine ruter - de skulle gerne vaere ens paa begge sider. Du maa selv bestemme din rekkefölge naar du hekler sammen.
29.01.2014 - 11:00
![]() Cathrine wrote:
Cathrine wrote:
Et nydelig teppe. Jeg synes derimot det er enklere å hekle utifra diagram. Har dere diagram over rutene?
18.10.2013 - 12:05DROPS Design answered:
Hej Cathrine. Nej desværre har vi ingen diagram på denne rude.
21.10.2013 - 16:54
![]() Gerd wrote:
Gerd wrote:
Det måste vara fel på färgordningen i ruta 1. Tycker att det ser ut att var 2 varv vitt, på bilden
14.06.2011 - 18:54
|
|
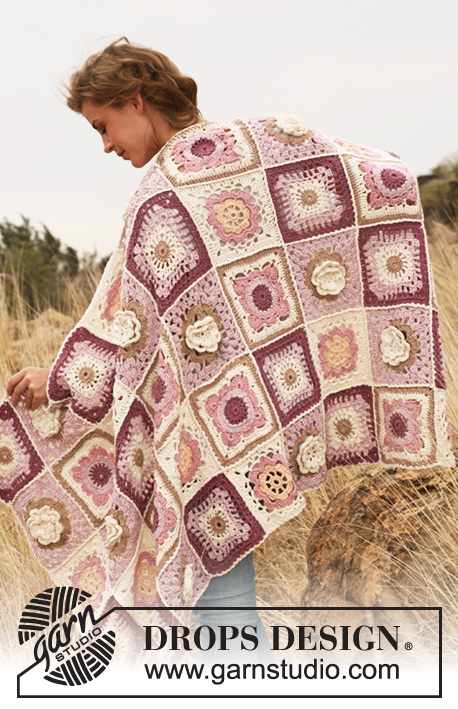
A Weekend in New England#aweekendinnewenglandblanket |
|
|
|
|
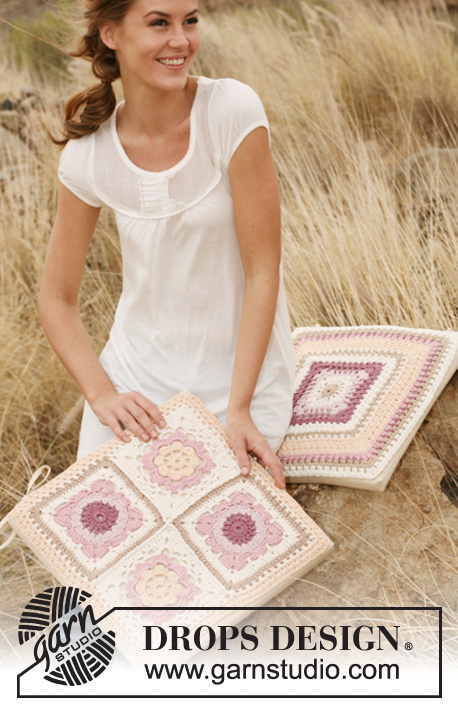
Crochet DROPS blanket in "Fabel".
DROPS 130-42 |
|
|
COLORS: SQUARE 1: 1st round = 100, 2nd round = 100, 3rd round = 655, 4th round = 100, 5th round = 623, 6th round = 623 and 7th round = 100. SQUARE 2: 1st round = 655, 2nd round = 655, 3rd round = 100, 4th round = 623, 5th round = 100, 6th round = 100 and 7th round = 655. SQUARE 3: 1st round = 623, 2nd round = 623, 3rd round = 100, 4th round = 655, 5th round = 100, 6th round = 100 and 7th round = 623. SQUARE 4: 1st round = 655, 2nd round = 655, 3rd round = 623, 4th round = 100, 5th round = 655, 6th round = 655 and 7th round = 100. -------------------------------------------------------- SQUARE: Work 10 squares with every color combination = a total of 40 Squares. Ch 8 on hook size 4 mm / G/6 with Fabel - see COLORS above - and form a ring with 1 sl st in first ch. ROUND 1: Ch 4 (= 1 tr), 5 tr in ch-ring, ch 3, * 6 tr in ch-ring, ch 3 *, repeat from *-* a total of 3 times, finish with 1 sl st in the 4th ch from beg of round (= 4 dc-leaves and 4 ch spaces). ROUND 2: * ch 5, continue to work 1 tr in every 6 tr from previous round, but wait with last pull through until all have been worked (= 7 loops on hook), now pull yarn through all loops, ch 5, 1 sl st in ch space, ch 5, 1 sl st in same ch space *, repeat from *-* a total of 4 times (= 4 dc-leaves and 4 ch spaces). Switch color and turn piece. ROUND 3: ch 4, in ch space (5 ch from previous round) work (2 tr, ch 1, 3 tr, ch 2, 3 tr, ch 1, 3 tr), 1 sc at top of leaf, * in next ch space work (3 tr, ch 1, 3 tr, ch 2, 3 tr, ch 1, 3 tr), 1 sc at top of next leaf *, repeat from *-* a total of 3 times and finish with 1 sl st in 4th ch from beg of round (= 8 small ch spaces (1 ch) and 4 corner-loops (2 ch) on the round). Cut the yarn. Switch color and turn piece. ROUND 4: Ch 4, in sc at top of leaf work (2 tr, ch 2, 3 tr), * in next small ch space work 1 sc, then in corner-loop work (6 tr, ch 2, 6 tr) and in next small ch space work 1 sc, in sc at top of leaf work (3 tr, ch 2, 3 tr) *. Repeat from *-* a total of 3 times and finish with 1 sc in next small ch space, then in corner-loop work (6 tr, ch 2, 6 tr), 1 sc in next small ch space and 1 sl st in 4th ch from beg of round. Cut the yarn. Switch color and turn piece. ROUND 5: Ch 3, continue to work dc the entire round. NOTE! in tr and sc from previous round work in st, in ch from previous round work around ch. In corner-loops work (2 dc, ch 2, 2 dc) and in 2 ch work 1 dc. Finish with 1 sl st in 3rd ch from beg of round. A total of 100 dc + 2 ch in every corner. ROUND 6: As 5th round. A total of 116 dc + 2 ch in every corner. Switch color. ROUND 7: As 5th round. A total of 132 dc + 2 ch in every corner. ASSEMBLY: NOTE! it might be wise to steam iron every square before assembly. Place the squares with 5 squares in width and 8 squares in height. Crochet squares tog with off white - crochet squares tog alongside and then across. Place 2 squares tog WS to WS and work tog from RS as follows: 1 sc in corner of first square, ch 2, 1 sc in corner of next square, ch 2, 1 sc in next st on first square, ch 2, 1 sc in next st on second square, ch 2, 1 sc in next st on first square, ch 2, 1 sc in next st on second square etc. finish when 1 sc has been worked in the last corner on both squares, cut and fasten the thread. NOTE! Make sure that the transitions between every square are pretty when the squares are worked tog alongside. CROCHET BORDER: Work a final border around the entire blanket on hook size 4 mm / G/6 with off white - start in one corner and work from RS. Beg with ch 3, continue to work 1 dc in every st, in the corners work (2 dc, ch 2, 2 dc), and make sure that enough dc are worked in the transitions between 2 and 2 squares so that the edge is not tight. Finish with 1 sl st in 3rd ch from beg of round. Fasten off. |
|
Have you finished this pattern?Tag your pictures with #dropspattern #aweekendinnewenglandblanket or submit them to the #dropsfan gallery. Do you need help with this pattern?You'll find 7 tutorial videos, a Comments/Questions area and more by visiting the pattern on garnstudio.com. © 1982-2026 DROPS Design A/S. We reserve all rights. This document, including all its sub-sections, has copyrights. Read more about what you can do with our patterns at the bottom of each pattern on our site. |


With over 40 years in knitting and crochet design, DROPS Design offers one of the most extensive collections of free patterns on the internet - translated to 17 languages. As of today we count 324 catalogs and 12290 patterns - 12280 of which are translated into English (US/in).
We work hard to bring you the best knitting and crochet have to offer, inspiration and advice as well as great quality yarns at incredible prices! Would you like to use our patterns for other than personal use? You can read what you are allowed to do in the Copyright text at the bottom of all our patterns. Happy crafting!
Post a comment to pattern DROPS 130-42
We would love to hear what you have to say about this pattern!
If you want to leave a question, please make sure you select the correct category in the form below, to speed up the answering process. Required fields are marked *.