
Popular categories
Looking for a yarn?


Comments / Questions (22)
Renée wrote:
Hi Thanks for your response, but I figured it out myself, I was just a bit confused by the mid front and mid back. I am very pleased with the result. It looks really lovely. Thanks for all your help!
13.12.2013 - 11:48Renée wrote:
Hi Could you please explain the assembly instructions as they are rather confusing.
10.12.2013 - 10:44DROPS Design answered:
Dear Renée, on both pieces, you increased on one side and not on the other one. Put both pieces tog so that edge without inc are on mid back. Sew cast off rows together starting from mid front, and continue along edges on back side, this seam should measure approx. 30 cm (back of head). Happy knitting!
10.12.2013 - 13:41
![]() Renée wrote:
Renée wrote:
Thank you for clarifying.
08.12.2013 - 11:21René wrote:
Just to clarify; for part 1 you do the increase at the beginning of the row after the edge stitch. And for Part 2, you do the increase before the final stitch at the end of the row. You wrote in your previous post that you do the increase every other row, but you meant every 4th row as stated in the pattern.
02.12.2013 - 09:31DROPS Design answered:
Dear Renée, you are correct, I mistyped last answer, you inc approx. every 2 cm, ie every 4 th row (= every 2nd row from RS). Inc will be done at beg of row from RS for 1st part and at the end of row from RS for 2nd part. Happy knitting!
02.12.2013 - 13:57Renée wrote:
The pattern states that the part 1 increase,should be done on the RS. I assumed this was the right side of the work, i.e. the side worn outwards. But, as this is garter stitch there is no right/outer side or wrong/inner side, as both sides look the same. The part 2 increase is done on the left side. I am a little puzzled. Surely, it does not matter which side you do the increase on, as you would merely join the 2 sides that have been increased? Or I am missing something?
29.11.2013 - 15:44DROPS Design answered:
Dear Renée, you will inc here at the right side of piece, seen from RS, ie at beg of row every other row. And for 2nd part you will inc at the end of row every other row (=every row from WS). Happy knitting!
29.11.2013 - 16:46Renee wrote:
Thank you!
21.11.2013 - 13:02Renée wrote:
Hi I am confused by the increase. I realise a YO is needed, but do not know what is meant by "inc 1 st from RS inside 1 st on the right side of the piece". I understand that the increase is done with the Right Side (RS) of the knitting facing you. However, I am not sure what is meant by "inside 1 st on the right side of the piece" Do you mean you knit the first stitch in the row and then do the YO? Can you please explain.
20.11.2013 - 10:06DROPS Design answered:
Dear Renée, it means you will inc after the edge st, at the beg of row, seen from RS: K1 (edge st), YO (inc) and continue until end of RS row. Happy knitting!
20.11.2013 - 11:13
![]() Siv Aarflot wrote:
Siv Aarflot wrote:
Denne kunne vært morsom og prøve seg på.
01.02.2012 - 15:27
![]() Faultier wrote:
Faultier wrote:
Sehr leicht zu stricken, wunderschön und hält warm.
23.01.2011 - 19:31
![]() Karen Sanborn wrote:
Karen Sanborn wrote:
This one is very nice to wear with a coat during winter
30.06.2010 - 18:29
|
|
Sandy Wind |
|
 |
 |
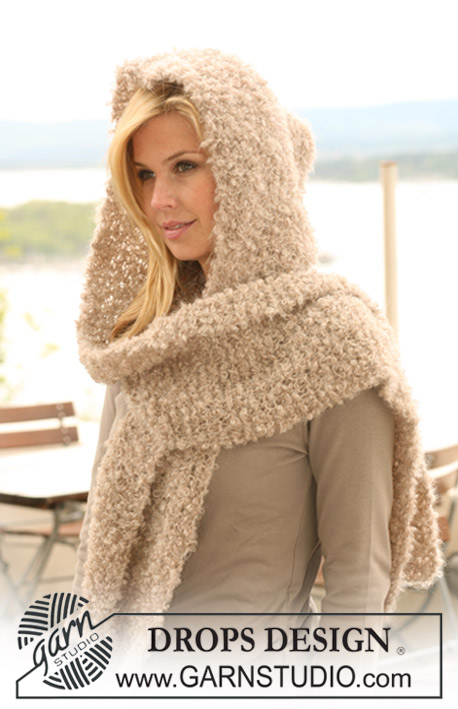
DROPS hooded scarf in garter st in ”Puddel”.
DROPS 123-36 |
|
|
GARTER ST (back and forth on needle): K all rows. INCREASING TIP: Inc with 1 YO. On next row K YO into back of loop to avoid a hole. -------------------------------------------------------- HOODED SCARF: Worked in 2 parts sewn tog afterwards. PART 1: Worked back and forth on needle. Cast on 25 sts on needle size 7 mm / US 10 ½. Work GARTER ST – see above! REMEMBER THE GAUGE! When piece measures 106 cm / 42" inc 1 st from RS inside 1 st on the right side of piece – See INCREASING TIP! Repeat the inc on every 4th row (approx every 2 cm / ¾") a total of 8 times = 33 sts. Continue in garter st. Bind off LOOSELY when piece measures 130 cm / 51". PART 2: Like part 1, but inc on the left side of piece. ASSEMBLY: The sides without inc = mid back. Sew the 2 parts tog at the top, edge to edge, beg mid front. Continue the seam approx 30 cm / 12" down along the back of hooded scarf. Fasten thread. |
|
Have you finished this pattern?Tag your pictures with #dropspattern or submit them to the #dropsfan gallery. Do you need help with this pattern?You'll find 7 tutorial videos, a Comments/Questions area and more by visiting the pattern on garnstudio.com. © 1982-2026 DROPS Design A/S. We reserve all rights. This document, including all its sub-sections, has copyrights. Read more about what you can do with our patterns at the bottom of each pattern on our site. |
|


With over 40 years in knitting and crochet design, DROPS Design offers one of the most extensive collections of free patterns on the internet - translated to 17 languages. As of today we count 324 catalogs and 12285 patterns - 12275 of which are translated into English (US/in).
We work hard to bring you the best knitting and crochet have to offer, inspiration and advice as well as great quality yarns at incredible prices! Would you like to use our patterns for other than personal use? You can read what you are allowed to do in the Copyright text at the bottom of all our patterns. Happy crafting!
Post a comment to pattern DROPS 123-36
We would love to hear what you have to say about this pattern!
If you want to leave a question, please make sure you select the correct category in the form below, to speed up the answering process. Required fields are marked *.