
Popular categories
Looking for a yarn?


Comments / Questions (125)
![]() Ann wrote:
Ann wrote:
Do you have videos on how to sew the seam for the knitted wrist edge and then the seam for the seed stitch body, both with an invisible seam? (The shoulder seam video you have up is a different stitch). Thanks!
15.05.2016 - 16:24DROPS Design answered:
Dear Ann, seam on upper sleeve/shoulder and under arm can be worked both as a shoulder seam. You can then tighten the yarn a bit more to tighten sts tog and make it less visible. Happy knitting!
17.05.2016 - 10:17
![]() Erika wrote:
Erika wrote:
So on the right front piece we are binding off the neck stitches on the RS and on the left front piece we bind off on the WS-- doesn't this mean the neck shaping will happen on different rows and not be even?
21.04.2016 - 02:54DROPS Design answered:
Dear Erika, there may be only 1 row difference that will not be visible then. Happy knitting!
21.04.2016 - 09:12
![]() Erika wrote:
Erika wrote:
On the left front piece when you bind off the first 2 stitches do you do this on the RS or WS? When you put the 11 stitches on to the stitch holder do you knit across those stitches so that the yarn ends up back on the right side of the cable?
19.04.2016 - 04:01DROPS Design answered:
Dear Erika, the 2 sts dec over cable are worked from WS as on right front piece - You can put the 11 sts for neck on a st holder at the beg of a row from WS so that you work them first and don't have to cut the yarn. Happy knitting!
19.04.2016 - 09:07
![]() Hanne Andersen wrote:
Hanne Andersen wrote:
Når man køber garn til 31kr pr. Nøgle er det slet ikke ok at der er knuder midt i nøglet . Troede man kunne strikke videre. Sidder lige nu i en håbløs kamp på at redde mit strikketøj. Knuden gik op 6 cm under hvor jeg var nået til og trævler op nedefra lige nu . Jeg er så skuffet og ærgerlig
21.02.2016 - 22:38
![]() Abigail wrote:
Abigail wrote:
If m1 goes 1st on the RS it will be the left front piece though, no? You said the opposite below. Please confirm. I think this pattern needs to be clarified as it is very unclear. Thank you for your help.
18.02.2016 - 13:23DROPS Design answered:
Dear Abigail, the first row in pattern is worked from WS, ie you will start with left front piece and finish with right front piece. On next row from RS, you will first work right front piece and then finish with left front piece (jacket is worked bottom up). Happy knitting!
18.02.2016 - 14:21
![]() Abigail wrote:
Abigail wrote:
Oh sorry, ignore my last comment. The pattern for the body is k6 m3 m2 m1 k6 on the RS , and k6 m1 m2 m3 on the WS, correct?
18.02.2016 - 12:37DROPS Design answered:
Dear Abigail, from WS (= 1st row after bottom edge and inc evenly) work K6, M.3, M.2, M.1 and K6 - from RS, work K6, M.1, M.2, M.3 and K6. M.3 is worked at beg of row from WS and end of row from RS, M.1 is worked at end of row from WS and beg of row from RS. Happy knitting!
18.02.2016 - 14:11
![]() Abigail wrote:
Abigail wrote:
So opposite m3 on the WS will be m1 on RS? So EVERY row (WS & RS) is this sequence: K6 m3 m2 m1 k6?
18.02.2016 - 12:17Abigail wrote:
When starting the chart rows, it looks like to me: WS: k6, m3, m2, m1, k6 On the next row, RS, should this be: k6, m3, m2, m1, k6 Or, should it be: k6, m1, m2, m3, k6, so that you are matching up the charts m1 and m3 on either side?
17.02.2016 - 18:12DROPS Design answered:
Dear Abigail, from RS you will work, K6, M.1, M.2, M.3 and K6, ie M1 is worked on the right front piece and M3 on the left front piece. Happy knitting!
18.02.2016 - 09:55
![]() Hev wrote:
Hev wrote:
If the charts show the RS only, how do you know what to do on the WS please? Thank you for your assistance
17.02.2016 - 17:26DROPS Design answered:
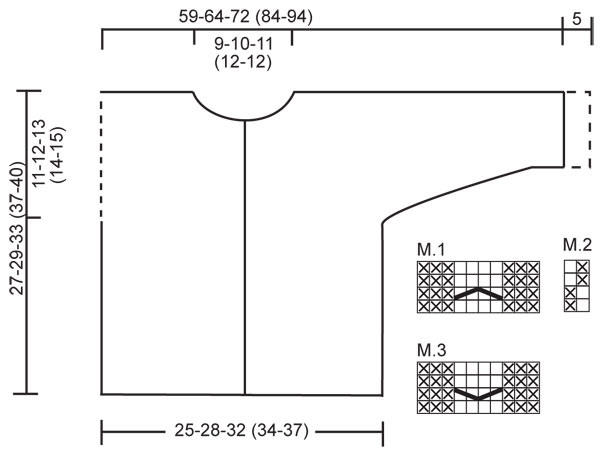
Dear Mrs Hev, in diagrams 1 square = 1 st x 1 row. The x symbol= reversed stocking st (= P from RS but K from WS) and the white symbole = stocking st (= K from RS but P from WS), as explained under diagram text. So that M.1 is worked over 10 sts and 4 rows. Happy knitting!
18.02.2016 - 09:53
![]() Hev wrote:
Hev wrote:
Hi, the instruction "First row in M.1 and M.3 = WS." Is saying m1 and m3 start on the WS, but doesn't the m2 chart start on WS as well? If so, that instruction should probably include m2. Please clarify. Thank you.
17.02.2016 - 12:17DROPS Design answered:
Dear Hev, that's right, 1st row in M.2 will be also worked here from WS. Happy knitting!
17.02.2016 - 17:04
|
|||||||||||||
Little Pixie#littlepixiejacket |
|||||||||||||
 |
 |
||||||||||||
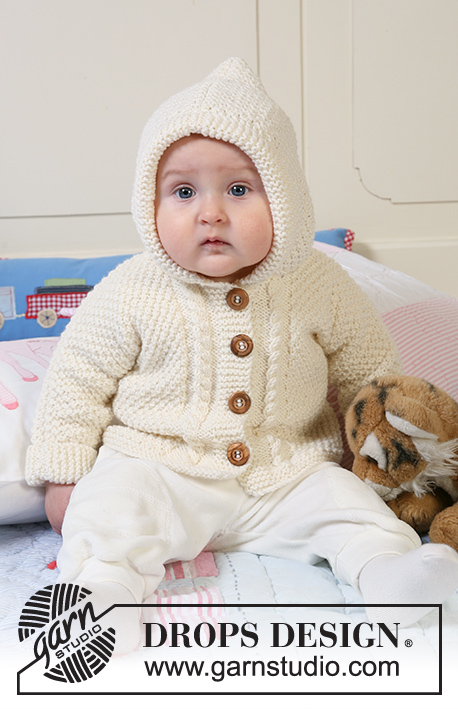
Jacket in seed st knitted in one piece with hood, textured pattern and cables for baby and children in DROPS Merino Extra Fine
DROPS Baby 19-5 |
|||||||||||||
|
JACKET: GARTER ST (back and forth on needle): K all rows. PATTERN: See diagram M.1 to M.3. Diagram shows the pattern from RS. First row in M.1 and M.3 = WS. BUTTONHOLES: Make buttonholes on right front band. 1 buttonhole = K tog 2nd and 3rd st from mid front and make 1 YO. K YO on next row. Make buttonholes when piece measures: Size 1/3 months: 4, 10, 16 and 22 cm / 1½", 4", 6¼" and 8¾". Size 6/9 months: 4, 11, 18 and 24 cm / 1½", 4⅜", 7" and 9½". Size 12/18 months: 3, 9, 15, 21 and 27 cm / 1⅛", 3½", 6", 8¼" and 10⅝". Size 2 years: 3, 10, 17, 24 and 31 cm / 1⅛", 4", 6¾", 9½" and 12¼". Size 3/4 years: 3, 11, 19, 27 and 34 cm / 1⅛", 4⅜", 7½", 10⅝" and 13⅜". -------------------------------------------------------- -------------------------------------------------------- JACKET: Worked back and forth on circular needle from mid front up to the armhole. Then front and back pieces are worked separately and new sts cast on each side for sleeves. The jacket is assembled sewing the upper arm/shoulder and under arm seams. BODY PIECE: Cast on 117-131-145 (155-169) sts (includes 6 front band sts each side towards mid front) on circular needle size 4 mm / US 6 with Merino Extra Fine. Work 6 rows GARTER ST – see above (first row = RS), then K 1 row from RS, AT THE SAME TIME inc 1 st in the 10th and 11th st from mid front, repeat the inc at the end of row (in 11th and 10th st on needle) = 121-135-149 (159-173) sts. Insert a marker 34-38-42 (44-48) sts in from each side (= 53-59-65 (71-77) sts between markers on back piece). Now work next row as follows from WS: 6 garter sts (= front band), M.3 (= 10 sts), M.2 on the next 89-103-117 (127-141) sts, M.1 (= 10 sts) and 6 garter sts (= front band). Continue in pattern like this - REMEMBER BUTTONHOLES ON RIGHT FRONT BAND - see above. REMEMBER THE GAUGE! When piece measures 16-17-20 (23-25) cm / 6¼"-6¾"-8" (9"-9¾") divide piece by markers and complete front and back pieces separately. RIGHT FRONT PIECE: = 34-38-42 (44-48) sts. Continue in pattern as before, AT THE SAME TIME cast on new sts for sleeve at the end of every row towards the side as follows: 4 sts 2-2-3 (3-3) times, 8 sts 1-1-1 (1-3) times, 10 sts 1-1-1 (2-1) times and 19-22-23 (23-24) sts 1 time = 79-86-95 (107-118) sts - NOTE: incorporate inc sts in M.2 as you go along. After the last inc continue as before but work 10 sts towards sleeve edge in garter st (= folding edge on sleeve). When 1 row remains before piece measures 23-25-28 (32-35) cm / 9"-9¾"-11" (12½"-13¾") – adjust to a row from WS - dec 2 sts over cable by P2 tog twice on the 4 cable sts. On next row from RS slip 9-11-12 (12-13) sts towards mid front on a stitch holder for neck. Bind off to shape the neckline at the beg of every row from mid front: 2 sts 2 times and 1 st 2-2-3 (3-3) times = 62-67-74 (86-96) sts left on needle (= shoulder + sleeve). Continue in M.2 and bind off when piece measures 27-29-33 (37-40) cm / 10⅝"-11⅜"-13" (14½"-15¾"). LEFT FRONT PIECE: Like right front piece but mirrored. BACK PIECE: = 53-59-65 (71-77) sts. Continue in M.2 as before, AT THE SAME TIME cast on new sts each side at the end of every row as described for front piece = 143-155-171 (197-217) sts. Now continue in M.2 with 10 garter sts each side on sleeve edges. When piece measures 25-27-31 (35-38) cm / 9¾"-10⅝"-12¼" (13¾"-15") cast of the middle 17-19-21 (23-23) sts for neck and complete each shoulder/sleeve separately. Bind off 1 st on neckline on next row = 62-67-74 (86-96) sts left on needle (= shoulder + sleeve). Bind off when piece measures 27-29-33 (37-40) cm / 10⅝"-11⅜"-13" (14½"-15¾"). Repeat on the other side. ASSEMBLY: Sew shoulder/upper arm seams, edge to edge with neat sts. Sew under arm seams. Sew on buttons. Fold the bottom 5 cm / 2" on both sleeve edges towards RS, if needed attach with a few sts. HOOD: Pick up from RS approx 55 to 75 sts round neck (includes sts from stitch holders at front) on circular needle size 4 mm / US 6 with Merino Extra Fine. K 1 row from WS, then K 1 row from RS, AT THE SAME TIME inc evenly to 85-89-93 (97-101) sts. Continue in M.2 with 6 sts each side in garter st - AT THE SAME TIME cast on 6 new sts at the end of the next 2 rows for folding edge = 97-101-105 (109-113) sts – work these 6 sts in garter st. Continue in M.2 with 12 garter sts each side until hood measures 21-23-25 (27-28) cm / 8¼"-9"-9¾" (10⅝"-11"), bind off. Fold hood double and sew tog at the top. Fold the garter st edge double towards RS and attach at the bottom each side. |
|||||||||||||
Diagram explanations |
|||||||||||||
|
|||||||||||||
 |
|||||||||||||
Have you finished this pattern?Tag your pictures with #dropspattern #littlepixiejacket or submit them to the #dropsfan gallery. Do you need help with this pattern?You'll find 10 tutorial videos, a Comments/Questions area and more by visiting the pattern on garnstudio.com. © 1982-2026 DROPS Design A/S. We reserve all rights. This document, including all its sub-sections, has copyrights. Read more about what you can do with our patterns at the bottom of each pattern on our site. |
|||||||||||||


With over 40 years in knitting and crochet design, DROPS Design offers one of the most extensive collections of free patterns on the internet - translated to 17 languages. As of today we count 324 catalogs and 12272 patterns - 12262 of which are translated into English (US/in).
We work hard to bring you the best knitting and crochet have to offer, inspiration and advice as well as great quality yarns at incredible prices! Would you like to use our patterns for other than personal use? You can read what you are allowed to do in the Copyright text at the bottom of all our patterns. Happy crafting!
Post a comment to pattern DROPS Baby 19-5
We would love to hear what you have to say about this pattern!
If you want to leave a question, please make sure you select the correct category in the form below, to speed up the answering process. Required fields are marked *.