
Popular categories
Looking for a yarn?


Comments / Questions (125)
![]() Diahann wrote:
Diahann wrote:
Hi! Do you knit on the RS: M1, M2 and then M3? Or do you always knit M3, M2 and M1 regardless of which side you are on?
24.06.2019 - 22:35DROPS Design answered:
Hello Diahann. On right side you knit M1, M2 and then M3. Happy knitting!
24.06.2019 - 22:41
![]() Susanna Pohjonen wrote:
Susanna Pohjonen wrote:
Hei! Tein helmineuleisen palmikkojakun hupulla vauvalle ja siitä on nyt tullut kyselyitä. Saako kyseisellä ohjeella tehtyjä paitoja myydä eteenpäin somessa?
08.02.2019 - 21:57DROPS Design answered:
Hei, emme salli malliemme mukaan neulottujen töiden myymistä. Voit kuitenkin antaa neuleita lahjaksi.
18.02.2019 - 17:50
![]() Jp wrote:
Jp wrote:
Dann verstehe ich die Zeichnung nicht. Da in der Erklärung steht, dass hinreihe rechts und Rückreihe links gestrickt werden soll!??!
27.09.2018 - 19:04DROPS Design answered:
Lieber JP, oops Sie sind ja rechts, die 1. Reihe bei allen Diagramme ist eine Hinreihe = wird links nach rechts gelesen, und die 2. Reihe (mit Zöpfe) wird die Hinreichen = rechts nach links gelesen. Viel Spaß beim stricken!
28.09.2018 - 08:21
![]() JP wrote:
JP wrote:
Hallo, ist beim Maschensatz (M1-M3) lediglich die Hinreihe gezeichnet oder Hin- und Rückreihe? Vielen Dank
24.09.2018 - 19:55DROPS Design answered:
Liebe JP, alle Reihen sind im Diagramme gezeigt, die Hin- sowie die Rückreihen. Die Hinreihen lesen Sie rechts nach links (von der rechten unteren Ecke) und die Rückreihen lesen Sie links nach rechts. Viel Spaß beim stricken!
25.09.2018 - 10:01
![]() Daniela Schiroli wrote:
Daniela Schiroli wrote:
Buongiorno, posso lavorare questo giacchino con i ferri dritti?
31.08.2018 - 06:38DROPS Design answered:
Buongiorno Daniela. Il cardigan viene lavorato avanti e indietro. Può usare i ferri dritti e seguire le spiegazioni così come scritte. Buon lavoro!
31.08.2018 - 06:59
![]() Beth Ann Richter wrote:
Beth Ann Richter wrote:
Should I sew the shoulder/upper arm seams, and the under arm seams, from the right side? Is there a preferred way to sew them? Thank you!
15.08.2018 - 01:39DROPS Design answered:
Dear Mrs Ritcher, yes you will sew the upper and lower seam from the right side. This video shows how to sew pieces in such cases. Happy finishing!
16.08.2018 - 08:58
![]() Myriam Elhadad wrote:
Myriam Elhadad wrote:
Bonjour, Je ne comprends pas, j'ai acheté 7 pelotes de Drops Merino Extra fine de 50g (350g), comme indiqué, pour réaliser le modèle en deux ans, mais il me manque au moins une ou deux pelotes. Comment faire?
15.04.2018 - 19:50DROPS Design answered:
Bonjour Mme Elhadad, aviez-vous bien le bon échantillon (21 m x 28 rangs = 10 x 10 cm) ? Nous n'avons encore eu aucun retour de ce type sur ce modèle pourtant populaire. Bon tricot!
16.04.2018 - 09:45
![]() Heike wrote:
Heike wrote:
M2 ist bei Größe 2 mit 103 Maschen vorgesehen, das Muster beinhaltet aber ja nur 2 Maschen im Wechsel...müsste das nicht eine gerade Maschenzahl sein?
08.04.2018 - 23:49DROPS Design answered:
Liebe Heike, M.2 wird dann im total 51 x in der Breite wiederholt, dann stricken Sie die erste M in M.2 = 51x2 + 1 = 103 M. Viel Spaß beim stricken!
09.04.2018 - 11:00
![]() Nancy wrote:
Nancy wrote:
I thought cables are done on right side but if we start first row of diagram on wrong side they will be done on wrong side. Is this right? Also i thought seed stitch was two rows same as appear second two rows opposite but answer on pattern says its three rows. Im confused. Thank you
03.03.2018 - 22:59DROPS Design answered:
Dear Nancy, if you look at the diagram for the cable pattern, you can see that the first row (which is knitted from the wrong sice) is only knits and purls, thus the second row, where you change the stitches are indeed on the right side. Happy Knitting!
04.03.2018 - 17:56
![]() Poitzsch wrote:
Poitzsch wrote:
Hallo, ganz lieben Dank für die schnelle Hilfe,schön das es Euch GIBT!!!!!!! Mfg Regina
11.01.2018 - 18:53
|
|||||||||||||
Little Pixie#littlepixiejacket |
|||||||||||||
 |
 |
||||||||||||
Jacket in seed st knitted in one piece with hood, textured pattern and cables for baby and children in DROPS Merino Extra Fine
DROPS Baby 19-5 |
|||||||||||||
|
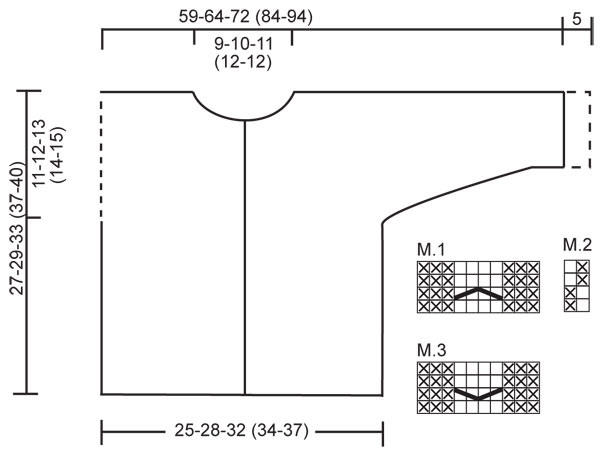
JACKET: GARTER ST (back and forth on needle): K all rows. PATTERN: See diagram M.1 to M.3. Diagram shows the pattern from RS. First row in M.1 and M.3 = WS. BUTTONHOLES: Make buttonholes on right front band. 1 buttonhole = K tog 2nd and 3rd st from mid front and make 1 YO. K YO on next row. Make buttonholes when piece measures: Size 1/3 months: 4, 10, 16 and 22 cm / 1½", 4", 6¼" and 8¾". Size 6/9 months: 4, 11, 18 and 24 cm / 1½", 4⅜", 7" and 9½". Size 12/18 months: 3, 9, 15, 21 and 27 cm / 1⅛", 3½", 6", 8¼" and 10⅝". Size 2 years: 3, 10, 17, 24 and 31 cm / 1⅛", 4", 6¾", 9½" and 12¼". Size 3/4 years: 3, 11, 19, 27 and 34 cm / 1⅛", 4⅜", 7½", 10⅝" and 13⅜". -------------------------------------------------------- -------------------------------------------------------- JACKET: Worked back and forth on circular needle from mid front up to the armhole. Then front and back pieces are worked separately and new sts cast on each side for sleeves. The jacket is assembled sewing the upper arm/shoulder and under arm seams. BODY PIECE: Cast on 117-131-145 (155-169) sts (includes 6 front band sts each side towards mid front) on circular needle size 4 mm / US 6 with Merino Extra Fine. Work 6 rows GARTER ST – see above (first row = RS), then K 1 row from RS, AT THE SAME TIME inc 1 st in the 10th and 11th st from mid front, repeat the inc at the end of row (in 11th and 10th st on needle) = 121-135-149 (159-173) sts. Insert a marker 34-38-42 (44-48) sts in from each side (= 53-59-65 (71-77) sts between markers on back piece). Now work next row as follows from WS: 6 garter sts (= front band), M.3 (= 10 sts), M.2 on the next 89-103-117 (127-141) sts, M.1 (= 10 sts) and 6 garter sts (= front band). Continue in pattern like this - REMEMBER BUTTONHOLES ON RIGHT FRONT BAND - see above. REMEMBER THE GAUGE! When piece measures 16-17-20 (23-25) cm / 6¼"-6¾"-8" (9"-9¾") divide piece by markers and complete front and back pieces separately. RIGHT FRONT PIECE: = 34-38-42 (44-48) sts. Continue in pattern as before, AT THE SAME TIME cast on new sts for sleeve at the end of every row towards the side as follows: 4 sts 2-2-3 (3-3) times, 8 sts 1-1-1 (1-3) times, 10 sts 1-1-1 (2-1) times and 19-22-23 (23-24) sts 1 time = 79-86-95 (107-118) sts - NOTE: incorporate inc sts in M.2 as you go along. After the last inc continue as before but work 10 sts towards sleeve edge in garter st (= folding edge on sleeve). When 1 row remains before piece measures 23-25-28 (32-35) cm / 9"-9¾"-11" (12½"-13¾") – adjust to a row from WS - dec 2 sts over cable by P2 tog twice on the 4 cable sts. On next row from RS slip 9-11-12 (12-13) sts towards mid front on a stitch holder for neck. Bind off to shape the neckline at the beg of every row from mid front: 2 sts 2 times and 1 st 2-2-3 (3-3) times = 62-67-74 (86-96) sts left on needle (= shoulder + sleeve). Continue in M.2 and bind off when piece measures 27-29-33 (37-40) cm / 10⅝"-11⅜"-13" (14½"-15¾"). LEFT FRONT PIECE: Like right front piece but mirrored. BACK PIECE: = 53-59-65 (71-77) sts. Continue in M.2 as before, AT THE SAME TIME cast on new sts each side at the end of every row as described for front piece = 143-155-171 (197-217) sts. Now continue in M.2 with 10 garter sts each side on sleeve edges. When piece measures 25-27-31 (35-38) cm / 9¾"-10⅝"-12¼" (13¾"-15") cast of the middle 17-19-21 (23-23) sts for neck and complete each shoulder/sleeve separately. Bind off 1 st on neckline on next row = 62-67-74 (86-96) sts left on needle (= shoulder + sleeve). Bind off when piece measures 27-29-33 (37-40) cm / 10⅝"-11⅜"-13" (14½"-15¾"). Repeat on the other side. ASSEMBLY: Sew shoulder/upper arm seams, edge to edge with neat sts. Sew under arm seams. Sew on buttons. Fold the bottom 5 cm / 2" on both sleeve edges towards RS, if needed attach with a few sts. HOOD: Pick up from RS approx 55 to 75 sts round neck (includes sts from stitch holders at front) on circular needle size 4 mm / US 6 with Merino Extra Fine. K 1 row from WS, then K 1 row from RS, AT THE SAME TIME inc evenly to 85-89-93 (97-101) sts. Continue in M.2 with 6 sts each side in garter st - AT THE SAME TIME cast on 6 new sts at the end of the next 2 rows for folding edge = 97-101-105 (109-113) sts – work these 6 sts in garter st. Continue in M.2 with 12 garter sts each side until hood measures 21-23-25 (27-28) cm / 8¼"-9"-9¾" (10⅝"-11"), bind off. Fold hood double and sew tog at the top. Fold the garter st edge double towards RS and attach at the bottom each side. |
|||||||||||||
Diagram explanations |
|||||||||||||
|
|||||||||||||
 |
|||||||||||||
Have you finished this pattern?Tag your pictures with #dropspattern #littlepixiejacket or submit them to the #dropsfan gallery. Do you need help with this pattern?You'll find 10 tutorial videos, a Comments/Questions area and more by visiting the pattern on garnstudio.com. © 1982-2026 DROPS Design A/S. We reserve all rights. This document, including all its sub-sections, has copyrights. Read more about what you can do with our patterns at the bottom of each pattern on our site. |
|||||||||||||


With over 40 years in knitting and crochet design, DROPS Design offers one of the most extensive collections of free patterns on the internet - translated to 17 languages. As of today we count 324 catalogs and 12272 patterns - 12262 of which are translated into English (US/in).
We work hard to bring you the best knitting and crochet have to offer, inspiration and advice as well as great quality yarns at incredible prices! Would you like to use our patterns for other than personal use? You can read what you are allowed to do in the Copyright text at the bottom of all our patterns. Happy crafting!
Post a comment to pattern DROPS Baby 19-5
We would love to hear what you have to say about this pattern!
If you want to leave a question, please make sure you select the correct category in the form below, to speed up the answering process. Required fields are marked *.