
Popular categories
Looking for a yarn?


Comments / Questions (125)
![]() Tiziana wrote:
Tiziana wrote:
Buonasera, sto facendo la taglia 12/18 mesi e sto aumentando le maglie per le maniche. Fin qui tutto bene ho raggiunto i 95 punti. Successivamente mi trovo a lavorare insieme le due maglie che compongono ogni metà della treccina (quindi 95-2≠93) e per lo scollo 2mx2 volte e 1mx3 volte, in tutto 7 maglie che tolte alle 93 precedenti mi da' un totale di 86 maglie e non 74 come indicato. Per favore potreste cortesemente dirmi dove sto sbagliando? Grazie infinite!
27.09.2024 - 01:01
![]() Herdís wrote:
Herdís wrote:
Hvernig á að prjóna ermar á þessa peysu? Ég sé enga lýsingu á því í uppskriftinni.
23.08.2024 - 14:54DROPS Design answered:
Blessuð Herdís. Í kaflanum undir HÆGRA FRAMSTYKKI þá er útskýring á hvernig á að fitja upp nýjar lykkjur fyrir ermi í lok hverrar umferðar í hlið. Gangi þér vel.
25.08.2024 - 12:46
![]() Dorottya wrote:
Dorottya wrote:
Üdvözlöm! Az ujja kialakításához 4 szemet kell felszedni az első lépésben, nem 1 szemet.
16.06.2024 - 21:16
![]() Fabienne wrote:
Fabienne wrote:
Bonjour, j’aimerai ne pas faire de capuche, dans ce cas, est-ce que l’on termine le tricot de la même manière ? Merci
08.02.2024 - 07:14DROPS Design answered:
Bonjour Fabienne, vous pouvez relever les mailles de la même façon qu'au début de la capuche ensuite, tricotez votre col dans le point souhaité et de la longueur désirée. Bon tricot!
08.02.2024 - 08:46
![]() Barbara Beck wrote:
Barbara Beck wrote:
Ich verstehe die Anweisung nicht, wie der Ärmel zu stricken ist. Bitte um Hilfe. Danke
16.10.2023 - 21:55DROPS Design answered:
Liebe Frau Beck, die Maschen für die Ärmel werden am Ende jeder Hin-Reihe (beim rechten Vorderteil) / am Ende jeder Rückreihe (bei linken Vorderteil) / am Ende jeder Hin- + Rückreihe (= beidseitig am Rückenteil). Diese neuen Maschen werden imm M.2 gestrickt, dann mit 10 Maschen krausrechts für die Kante von dem Ärmel. Viel Spaß beim stricken!
17.10.2023 - 09:38
![]() Birgit wrote:
Birgit wrote:
Vielen Dank für die tolle Anleitung und die schnelle Antwort auf meine Frage! Die Jacke ist wunderschön geworden und alle Angaben (auch die, wie viel Wolle benötigt wird) haben exakt gepasst!!!
14.10.2023 - 12:41
![]() Birgit wrote:
Birgit wrote:
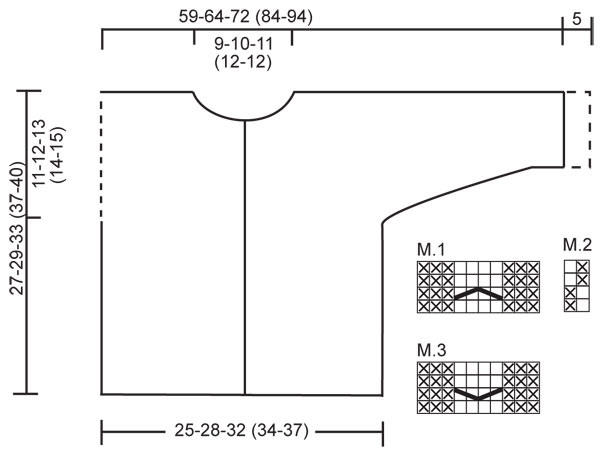
Kann die Längenangabe im Diagramm von Arm und Schulter (59-64-72) stimmen?
18.09.2023 - 21:10DROPS Design answered:
Liebe Birgit, dies ist die gesamte Länge von einem Ärmel bis anderen (wenn die 5 cm beim Ärmel gefaltet sind). Viel Spaß beim stricken!
19.09.2023 - 09:09
![]() Irene wrote:
Irene wrote:
Når jeg samler masker op til hætten fra retsiden, og så strikker de 6 retmasker i start og slut af pinden, så bliver første 6 retmasker ikke længere rillet, men ser ud som om jeg strikker ret/vrang, altså glatstrik ? Hvordan kan jeg undgå det ?
18.09.2023 - 17:19DROPS Design answered:
Hei Irene. Om du strikker opp de 6 første maskene vrang, vil du da få det til å se ut som riller? Bare husk å få det likt på begge sider. Men iflg oppskriften blir det 2 pinner rett etterhverandre (1. pinne = maskene som ble satt på en tråd + 2. pinne når det plukkes opp til hette). mvh DROPS Design
26.09.2023 - 13:35
![]() Liselotte Hansen wrote:
Liselotte Hansen wrote:
Til denne opskrift , vil jeg gerne strikke den i drops sky . Er det mugligt ? Kan man bruge samme maskeantal som står i opskriften
13.08.2023 - 19:03
![]() Francine wrote:
Francine wrote:
Comment avoir les explications en français ? Merci
17.04.2023 - 15:15DROPS Design answered:
Bonjour Francine, cliquez sur le menu déroulant sous la photo pour sélectionner "français". Bon tricot!
17.04.2023 - 16:01
|
|||||||||||||
Little Pixie#littlepixiejacket |
|||||||||||||
 |
 |
||||||||||||
Jacket in seed st knitted in one piece with hood, textured pattern and cables for baby and children in DROPS Merino Extra Fine
DROPS Baby 19-5 |
|||||||||||||
|
JACKET: GARTER ST (back and forth on needle): K all rows. PATTERN: See diagram M.1 to M.3. Diagram shows the pattern from RS. First row in M.1 and M.3 = WS. BUTTONHOLES: Make buttonholes on right front band. 1 buttonhole = K tog 2nd and 3rd st from mid front and make 1 YO. K YO on next row. Make buttonholes when piece measures: Size 1/3 months: 4, 10, 16 and 22 cm / 1½", 4", 6¼" and 8¾". Size 6/9 months: 4, 11, 18 and 24 cm / 1½", 4⅜", 7" and 9½". Size 12/18 months: 3, 9, 15, 21 and 27 cm / 1⅛", 3½", 6", 8¼" and 10⅝". Size 2 years: 3, 10, 17, 24 and 31 cm / 1⅛", 4", 6¾", 9½" and 12¼". Size 3/4 years: 3, 11, 19, 27 and 34 cm / 1⅛", 4⅜", 7½", 10⅝" and 13⅜". -------------------------------------------------------- -------------------------------------------------------- JACKET: Worked back and forth on circular needle from mid front up to the armhole. Then front and back pieces are worked separately and new sts cast on each side for sleeves. The jacket is assembled sewing the upper arm/shoulder and under arm seams. BODY PIECE: Cast on 117-131-145 (155-169) sts (includes 6 front band sts each side towards mid front) on circular needle size 4 mm / US 6 with Merino Extra Fine. Work 6 rows GARTER ST – see above (first row = RS), then K 1 row from RS, AT THE SAME TIME inc 1 st in the 10th and 11th st from mid front, repeat the inc at the end of row (in 11th and 10th st on needle) = 121-135-149 (159-173) sts. Insert a marker 34-38-42 (44-48) sts in from each side (= 53-59-65 (71-77) sts between markers on back piece). Now work next row as follows from WS: 6 garter sts (= front band), M.3 (= 10 sts), M.2 on the next 89-103-117 (127-141) sts, M.1 (= 10 sts) and 6 garter sts (= front band). Continue in pattern like this - REMEMBER BUTTONHOLES ON RIGHT FRONT BAND - see above. REMEMBER THE GAUGE! When piece measures 16-17-20 (23-25) cm / 6¼"-6¾"-8" (9"-9¾") divide piece by markers and complete front and back pieces separately. RIGHT FRONT PIECE: = 34-38-42 (44-48) sts. Continue in pattern as before, AT THE SAME TIME cast on new sts for sleeve at the end of every row towards the side as follows: 4 sts 2-2-3 (3-3) times, 8 sts 1-1-1 (1-3) times, 10 sts 1-1-1 (2-1) times and 19-22-23 (23-24) sts 1 time = 79-86-95 (107-118) sts - NOTE: incorporate inc sts in M.2 as you go along. After the last inc continue as before but work 10 sts towards sleeve edge in garter st (= folding edge on sleeve). When 1 row remains before piece measures 23-25-28 (32-35) cm / 9"-9¾"-11" (12½"-13¾") – adjust to a row from WS - dec 2 sts over cable by P2 tog twice on the 4 cable sts. On next row from RS slip 9-11-12 (12-13) sts towards mid front on a stitch holder for neck. Bind off to shape the neckline at the beg of every row from mid front: 2 sts 2 times and 1 st 2-2-3 (3-3) times = 62-67-74 (86-96) sts left on needle (= shoulder + sleeve). Continue in M.2 and bind off when piece measures 27-29-33 (37-40) cm / 10⅝"-11⅜"-13" (14½"-15¾"). LEFT FRONT PIECE: Like right front piece but mirrored. BACK PIECE: = 53-59-65 (71-77) sts. Continue in M.2 as before, AT THE SAME TIME cast on new sts each side at the end of every row as described for front piece = 143-155-171 (197-217) sts. Now continue in M.2 with 10 garter sts each side on sleeve edges. When piece measures 25-27-31 (35-38) cm / 9¾"-10⅝"-12¼" (13¾"-15") cast of the middle 17-19-21 (23-23) sts for neck and complete each shoulder/sleeve separately. Bind off 1 st on neckline on next row = 62-67-74 (86-96) sts left on needle (= shoulder + sleeve). Bind off when piece measures 27-29-33 (37-40) cm / 10⅝"-11⅜"-13" (14½"-15¾"). Repeat on the other side. ASSEMBLY: Sew shoulder/upper arm seams, edge to edge with neat sts. Sew under arm seams. Sew on buttons. Fold the bottom 5 cm / 2" on both sleeve edges towards RS, if needed attach with a few sts. HOOD: Pick up from RS approx 55 to 75 sts round neck (includes sts from stitch holders at front) on circular needle size 4 mm / US 6 with Merino Extra Fine. K 1 row from WS, then K 1 row from RS, AT THE SAME TIME inc evenly to 85-89-93 (97-101) sts. Continue in M.2 with 6 sts each side in garter st - AT THE SAME TIME cast on 6 new sts at the end of the next 2 rows for folding edge = 97-101-105 (109-113) sts – work these 6 sts in garter st. Continue in M.2 with 12 garter sts each side until hood measures 21-23-25 (27-28) cm / 8¼"-9"-9¾" (10⅝"-11"), bind off. Fold hood double and sew tog at the top. Fold the garter st edge double towards RS and attach at the bottom each side. |
|||||||||||||
Diagram explanations |
|||||||||||||
|
|||||||||||||
 |
|||||||||||||
Have you finished this pattern?Tag your pictures with #dropspattern #littlepixiejacket or submit them to the #dropsfan gallery. Do you need help with this pattern?You'll find 10 tutorial videos, a Comments/Questions area and more by visiting the pattern on garnstudio.com. © 1982-2026 DROPS Design A/S. We reserve all rights. This document, including all its sub-sections, has copyrights. Read more about what you can do with our patterns at the bottom of each pattern on our site. |
|||||||||||||


With over 40 years in knitting and crochet design, DROPS Design offers one of the most extensive collections of free patterns on the internet - translated to 17 languages. As of today we count 324 catalogs and 12272 patterns - 12262 of which are translated into English (US/in).
We work hard to bring you the best knitting and crochet have to offer, inspiration and advice as well as great quality yarns at incredible prices! Would you like to use our patterns for other than personal use? You can read what you are allowed to do in the Copyright text at the bottom of all our patterns. Happy crafting!
Post a comment to pattern DROPS Baby 19-5
We would love to hear what you have to say about this pattern!
If you want to leave a question, please make sure you select the correct category in the form below, to speed up the answering process. Required fields are marked *.