
Popular categories
Looking for a yarn?


Comments / Questions (125)
![]() Titi wrote:
Titi wrote:
Where the pattern says "at the end of every row towards the side as follows: 4 sts 2-2-3 (3-3) times, 8 sts 1-1-1 (1-3) times, 10 sts 1-1-1 (2-1) times and 19-22-23 (23-24) sts 1 time = 79-86-95 (107-118) sts " , I understand every row means: every RS row, is it correct?
06.10.2014 - 06:30DROPS Design answered:
Dear Titi, you are correct, it will be at the end of every RS row for right front piece (RS rows start with front band sts). Happy knitting!
06.10.2014 - 10:43
![]() Ingalill Danielsson wrote:
Ingalill Danielsson wrote:
Stickar minsta storlek. Har kommit till ärmarna, men förstår inte siffrorna/hur jag skall göra:4m 2-2-3 (3-)ggr, 8m 1-1-1 osv
04.10.2014 - 19:06
![]() Schiller wrote:
Schiller wrote:
Ich habe Probleme bei der Zunahme am Ärmel Maschenanzahl stimmt lt.Beschreibung ist aber viel zu spitz geworden und zu breit-stimmen die Angaben??
24.09.2014 - 15:55DROPS Design answered:
Die Angaben sollten so richtig sein. Haben Sie die M vielleicht durch Umschläge/Herausstricken zugenommen? Das wäre nicht richtig, die M müssen zusätzlich neu angeschlagen werden. Das Video "Seitlich neue Maschen anschlagen" unter "Videos" im Kopf neben dem Foto zeigt Ihnen zwei Techniken dazu.
25.09.2014 - 00:25
![]() Michelle Lewis wrote:
Michelle Lewis wrote:
Ignore my previous comment! I see that you put the pattern as a little chart.
11.06.2014 - 22:42
![]() Michelle Lewis wrote:
Michelle Lewis wrote:
The stitch pattern for this pattern needs correcting. It is clearly a seed stitch but the stitch pattern is indicated as garter stitch (K every row) .
11.06.2014 - 22:40
![]() Ruth Jørgensen wrote:
Ruth Jørgensen wrote:
Hvordan forståes udtagning til ærme 8m 1-1-1 (1-3) gange. Jeg sendte en men tror den gik afsted som kommentar. Den er mere fyldestgørende.
19.01.2014 - 10:23DROPS Design answered:
Hej Ruth. Vi har faaet begge ;-) Se mit svar herunder.
22.01.2014 - 14:56
![]() Ruth Jørgensen wrote:
Ruth Jørgensen wrote:
Jeg er kommet til udtagning til ærme i denne opskrift,størrelse 6/9 mdr, men forstår simpelt hen ikke hvordan 8 m 1-1-1 (1-3) gange skal forståes. Hvor mange masker skal der tages ud og hvor mange gange skal dette ske. Håber på hurtigt svar
19.01.2014 - 10:20DROPS Design answered:
Hej Ruth. Du skal ikke tage ud, du skal saette ny masker op til aermet. Dvs, paa höjre forstykke saetter du masker op til slut af hver p. For str 6/9 mdr: 2 gange 4 m, 1 gang 8 m, 1 gang 10 m og 1 gang 22 m. God fornöjelse videre.
22.01.2014 - 14:55
![]() Carolina wrote:
Carolina wrote:
Die Garnangaben für die Größe 3/4 Jahren sind nicht richitig. Man benötigt für diese Größe 450g Wolle
13.01.2014 - 12:57
![]() Steckler Marianne wrote:
Steckler Marianne wrote:
Habe dieses Jäckchen für meine Enkelin gestrickt.Es ist wunderschön geworden.Nun möchte meine Schwiegertochter auch so eine Jacke.Gibt es auch eine Anleitung für Erwachsene? Das wäre super.Es grüßt Sie Marianne Steckler
13.10.2013 - 20:40DROPS Design answered:
Liebe Marianne, in der Musterdatenbank finden Sie verschiedene Kapuzenjacken für Erwachsene. Geben Sie als Stichwort "Jacke" und unter Fachwortsuche "Kapuze" ein und wählen die Hauptkategorie Damen.
14.10.2013 - 09:31
![]() Mieke Dijkstra wrote:
Mieke Dijkstra wrote:
Ik heb de kleinste maat gebreid. Totaal 150 gram wol nodig gehad, dus 250 gram zoals in patroon aangegeven is te veel.
05.08.2013 - 10:50
|
|||||||||||||
Little Pixie#littlepixiejacket |
|||||||||||||
 |
 |
||||||||||||
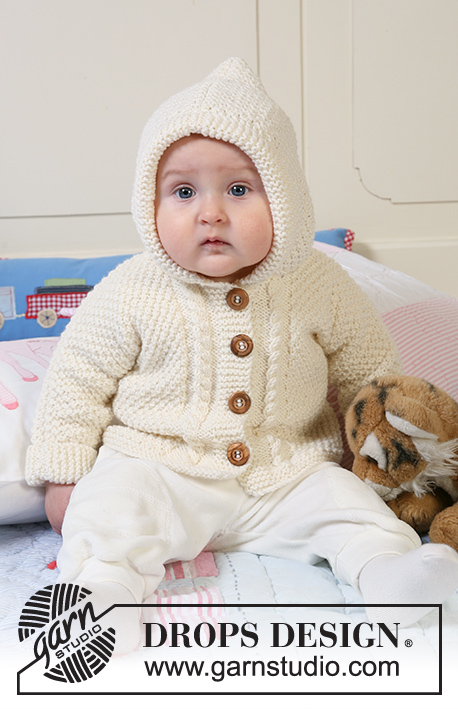
Jacket in seed st knitted in one piece with hood, textured pattern and cables for baby and children in DROPS Merino Extra Fine
DROPS Baby 19-5 |
|||||||||||||
|
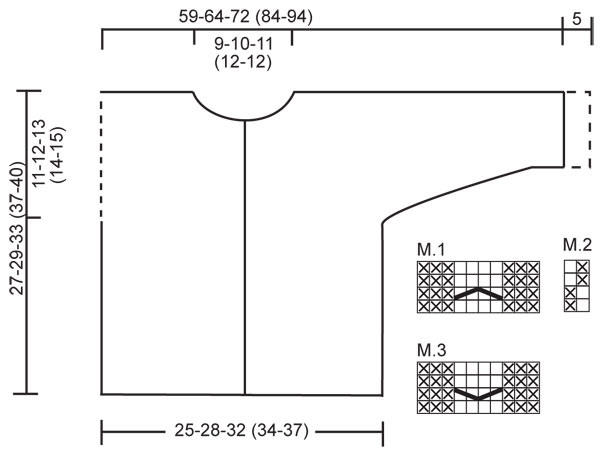
JACKET: GARTER ST (back and forth on needle): K all rows. PATTERN: See diagram M.1 to M.3. Diagram shows the pattern from RS. First row in M.1 and M.3 = WS. BUTTONHOLES: Make buttonholes on right front band. 1 buttonhole = K tog 2nd and 3rd st from mid front and make 1 YO. K YO on next row. Make buttonholes when piece measures: Size 1/3 months: 4, 10, 16 and 22 cm / 1½", 4", 6¼" and 8¾". Size 6/9 months: 4, 11, 18 and 24 cm / 1½", 4⅜", 7" and 9½". Size 12/18 months: 3, 9, 15, 21 and 27 cm / 1⅛", 3½", 6", 8¼" and 10⅝". Size 2 years: 3, 10, 17, 24 and 31 cm / 1⅛", 4", 6¾", 9½" and 12¼". Size 3/4 years: 3, 11, 19, 27 and 34 cm / 1⅛", 4⅜", 7½", 10⅝" and 13⅜". -------------------------------------------------------- -------------------------------------------------------- JACKET: Worked back and forth on circular needle from mid front up to the armhole. Then front and back pieces are worked separately and new sts cast on each side for sleeves. The jacket is assembled sewing the upper arm/shoulder and under arm seams. BODY PIECE: Cast on 117-131-145 (155-169) sts (includes 6 front band sts each side towards mid front) on circular needle size 4 mm / US 6 with Merino Extra Fine. Work 6 rows GARTER ST – see above (first row = RS), then K 1 row from RS, AT THE SAME TIME inc 1 st in the 10th and 11th st from mid front, repeat the inc at the end of row (in 11th and 10th st on needle) = 121-135-149 (159-173) sts. Insert a marker 34-38-42 (44-48) sts in from each side (= 53-59-65 (71-77) sts between markers on back piece). Now work next row as follows from WS: 6 garter sts (= front band), M.3 (= 10 sts), M.2 on the next 89-103-117 (127-141) sts, M.1 (= 10 sts) and 6 garter sts (= front band). Continue in pattern like this - REMEMBER BUTTONHOLES ON RIGHT FRONT BAND - see above. REMEMBER THE GAUGE! When piece measures 16-17-20 (23-25) cm / 6¼"-6¾"-8" (9"-9¾") divide piece by markers and complete front and back pieces separately. RIGHT FRONT PIECE: = 34-38-42 (44-48) sts. Continue in pattern as before, AT THE SAME TIME cast on new sts for sleeve at the end of every row towards the side as follows: 4 sts 2-2-3 (3-3) times, 8 sts 1-1-1 (1-3) times, 10 sts 1-1-1 (2-1) times and 19-22-23 (23-24) sts 1 time = 79-86-95 (107-118) sts - NOTE: incorporate inc sts in M.2 as you go along. After the last inc continue as before but work 10 sts towards sleeve edge in garter st (= folding edge on sleeve). When 1 row remains before piece measures 23-25-28 (32-35) cm / 9"-9¾"-11" (12½"-13¾") – adjust to a row from WS - dec 2 sts over cable by P2 tog twice on the 4 cable sts. On next row from RS slip 9-11-12 (12-13) sts towards mid front on a stitch holder for neck. Bind off to shape the neckline at the beg of every row from mid front: 2 sts 2 times and 1 st 2-2-3 (3-3) times = 62-67-74 (86-96) sts left on needle (= shoulder + sleeve). Continue in M.2 and bind off when piece measures 27-29-33 (37-40) cm / 10⅝"-11⅜"-13" (14½"-15¾"). LEFT FRONT PIECE: Like right front piece but mirrored. BACK PIECE: = 53-59-65 (71-77) sts. Continue in M.2 as before, AT THE SAME TIME cast on new sts each side at the end of every row as described for front piece = 143-155-171 (197-217) sts. Now continue in M.2 with 10 garter sts each side on sleeve edges. When piece measures 25-27-31 (35-38) cm / 9¾"-10⅝"-12¼" (13¾"-15") cast of the middle 17-19-21 (23-23) sts for neck and complete each shoulder/sleeve separately. Bind off 1 st on neckline on next row = 62-67-74 (86-96) sts left on needle (= shoulder + sleeve). Bind off when piece measures 27-29-33 (37-40) cm / 10⅝"-11⅜"-13" (14½"-15¾"). Repeat on the other side. ASSEMBLY: Sew shoulder/upper arm seams, edge to edge with neat sts. Sew under arm seams. Sew on buttons. Fold the bottom 5 cm / 2" on both sleeve edges towards RS, if needed attach with a few sts. HOOD: Pick up from RS approx 55 to 75 sts round neck (includes sts from stitch holders at front) on circular needle size 4 mm / US 6 with Merino Extra Fine. K 1 row from WS, then K 1 row from RS, AT THE SAME TIME inc evenly to 85-89-93 (97-101) sts. Continue in M.2 with 6 sts each side in garter st - AT THE SAME TIME cast on 6 new sts at the end of the next 2 rows for folding edge = 97-101-105 (109-113) sts – work these 6 sts in garter st. Continue in M.2 with 12 garter sts each side until hood measures 21-23-25 (27-28) cm / 8¼"-9"-9¾" (10⅝"-11"), bind off. Fold hood double and sew tog at the top. Fold the garter st edge double towards RS and attach at the bottom each side. |
|||||||||||||
Diagram explanations |
|||||||||||||
|
|||||||||||||
 |
|||||||||||||
Have you finished this pattern?Tag your pictures with #dropspattern #littlepixiejacket or submit them to the #dropsfan gallery. Do you need help with this pattern?You'll find 10 tutorial videos, a Comments/Questions area and more by visiting the pattern on garnstudio.com. © 1982-2026 DROPS Design A/S. We reserve all rights. This document, including all its sub-sections, has copyrights. Read more about what you can do with our patterns at the bottom of each pattern on our site. |
|||||||||||||


With over 40 years in knitting and crochet design, DROPS Design offers one of the most extensive collections of free patterns on the internet - translated to 17 languages. As of today we count 324 catalogs and 12272 patterns - 12262 of which are translated into English (US/in).
We work hard to bring you the best knitting and crochet have to offer, inspiration and advice as well as great quality yarns at incredible prices! Would you like to use our patterns for other than personal use? You can read what you are allowed to do in the Copyright text at the bottom of all our patterns. Happy crafting!
Post a comment to pattern DROPS Baby 19-5
We would love to hear what you have to say about this pattern!
If you want to leave a question, please make sure you select the correct category in the form below, to speed up the answering process. Required fields are marked *.