
Popular categories
Looking for a yarn?


Comments / Questions (12)
![]() Drops Design wrote:
Drops Design wrote:
Hej igen Gitte. Hvis du har fulgt opskriften så vil det nederste måle 7 gange mere.... Se forklaring for ærmet! For hver gang du strikker 2 pinde foroven så strikker du 14 pinde forneden. Så målet forneden skal jo altså blive 7 gange større! God fornøjelse!
27.10.2010 - 13:55
![]() Gitte wrote:
Gitte wrote:
....ærmet måler nu 10 cm øverts som beskrevet i opskriften, men det måler så kun 40 cm nederst, og der står at det skal måle 70 cm nederst (når det måler 10 cm øverst)?? Og det er strikket fuldstændig som opskriften beskriver?
27.10.2010 - 13:51
![]() Ragnhild wrote:
Ragnhild wrote:
Går og venter på denne oppskriften håper den kommer snart
25.01.2010 - 15:44
![]() Betty wrote:
Betty wrote:
Sehr elegant! ich mag es so sehr!
19.01.2010 - 13:54
![]() Virginie wrote:
Virginie wrote:
La pure classe !! J'adore !!!
19.01.2010 - 13:46
![]() Elin wrote:
Elin wrote:
Åh vad vacker. Den måste jag göra!!!
14.01.2010 - 22:04
![]() Margit wrote:
Margit wrote:
Den er meget flot med de brede ærmer, den vil jeg gerne strikke
09.01.2010 - 13:57Barbarella wrote:
J'aime les manches, moins le col.
05.01.2010 - 21:21
![]() Emma wrote:
Emma wrote:
OH! Un GRR à manches kimono!
28.12.2009 - 10:51
![]() Ragnhild wrote:
Ragnhild wrote:
Denne blir kjempeartig å strikke
11.12.2009 - 14:58
|
|
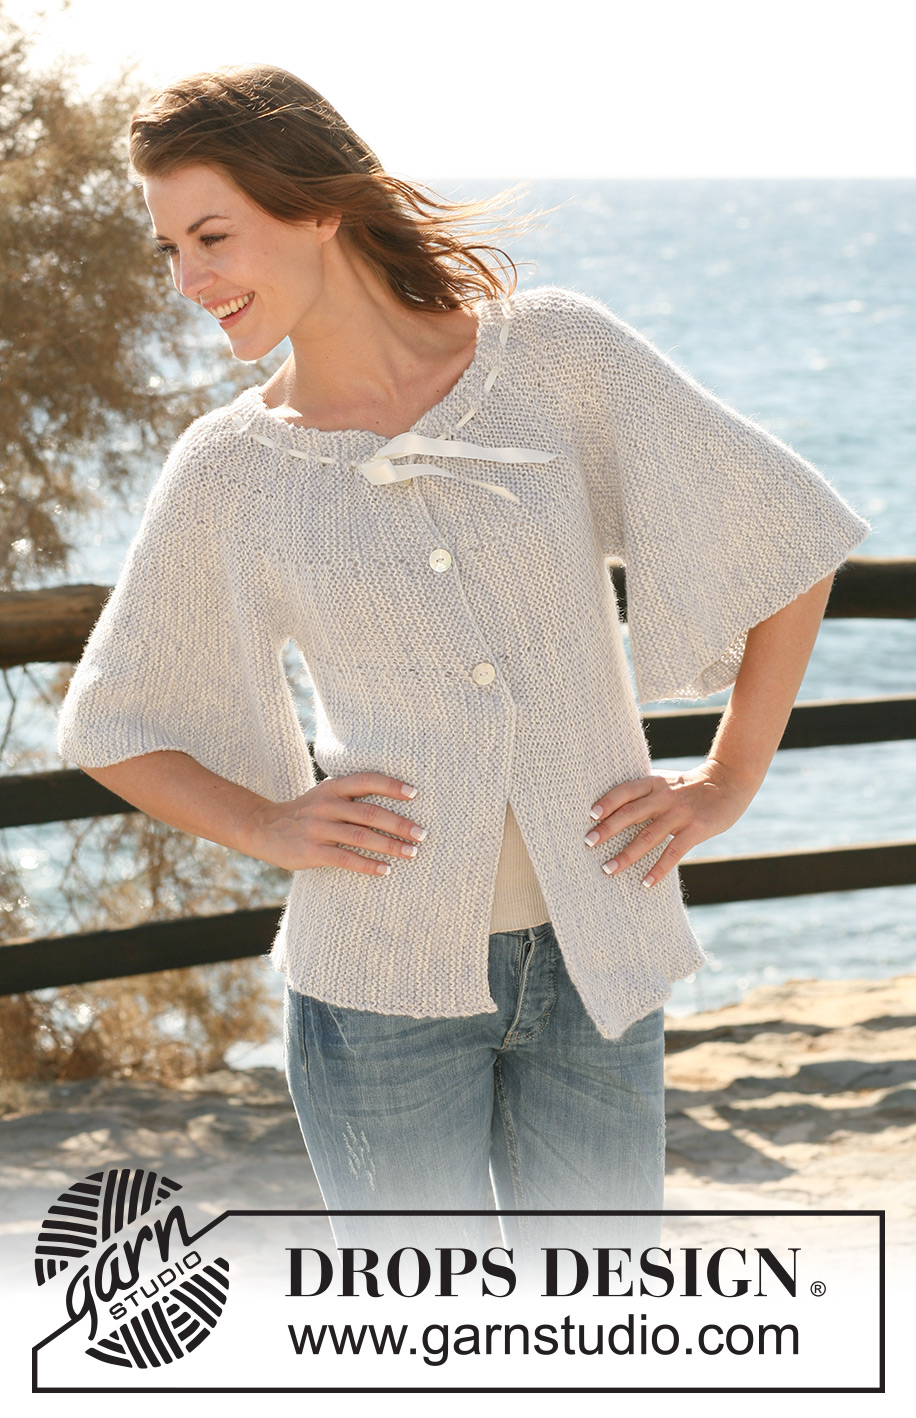
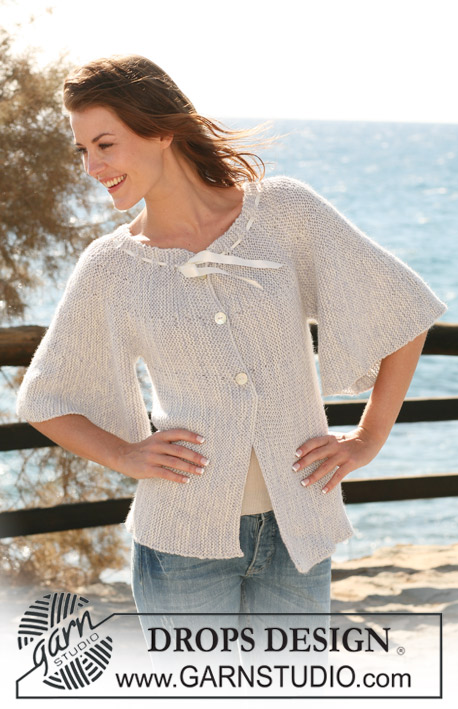
Tread Lightly#treadlightlycardigan |
|
 |
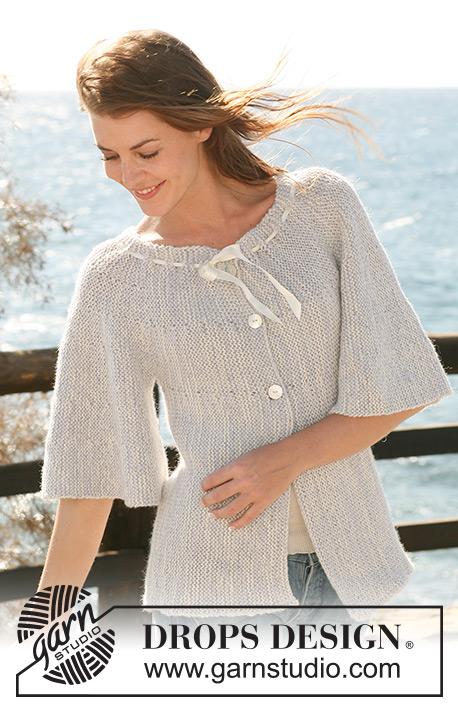 |
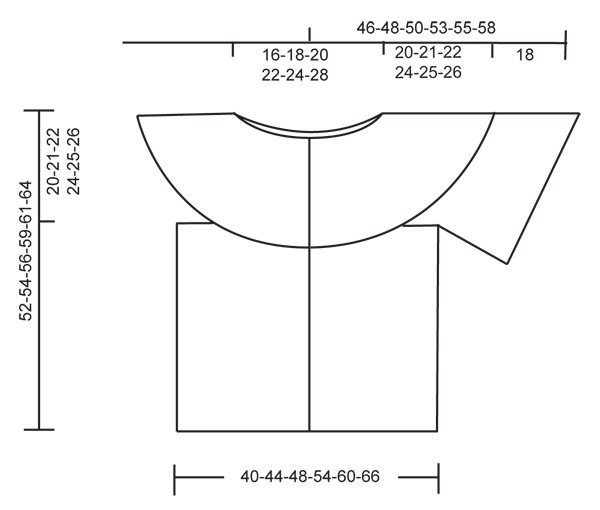
DROPS jacket knitted from side to side in 2 threads ”Alpaca”. Size S - XXXL.
DROPS 118-36 |
|
|
GARTER ST (back and forth on needle): K all rows. TURNS: Work turns as follows: * Work row from bottom edge to neck on all sts, turn piece and work return row. Work row from bottom edge to marker-1, turn piece and work return row. Work row from bottom edge to marker-2, turn piece and work return row. Work row from bottom edge to marker-3, turn piece and work return row. Work row from bottom edge to neck on all sts, turn piece and work return row *. Repeat from *-*. 1 repeat = 4 rows at the top and 10 rows at bottom edge. -------------------------------------------------------- -------------------------------------------------------- Piece worked from side to side. Rows from RS beg at bottom edge and finish at the neck. Beg mid front on left front piece, knit the sleeve, back piece, the other sleeve and finish with right front piece. LEFT FRONT PIECE: Worked back and forth on needle. LOOSELY cast on 88-92-96-100-104-108 sts on circular needle size 5 mm / US 8 with 1 thread of each color. Work GARTER ST - see above – for 3 cm / 1⅛" on all sts (= front band). Insert 3 markers in piece, from RS: marker-1 = after 54-56-58-60-62-64 sts, marker-2 = after 69-72-75-78-81-84 sts, marker-3 = after 83-87-91-95-99-103 sts. Leave the markers in the same place throughout to make sure the turns sit in straight lines. Continue in garter st, AT THE SAME TIME work TURNS - see above. Continue with turns until piece measures 23-25-27-30-33-36 cm / 9"-9¾"-10⅝"-11¾"-13"-14¼" from cast on row – measured along bottom edge of piece. Slip the bottom 54-56-58-60-62-64 sts on a stitch holder (sts to be used for back piece). Continue on remaining sts for sleeve. LEFT SLEEVE: Cast on 32 new sts = 66-68-70-72-74-76 sts in total. Insert 6 markers in piece, from RS: Marker-1 = after 14 sts Marker-2 = after 23 sts Marker-3 = after 32 sts (= marker-1 from earlier). Marker-4 = after 47-48-49-50-51-52 sts (= marker-2 from earlier). Marker-5 = after 54-56-57-59-60-62 sts. Marker-6 = after 61-63-65-67-69-71 sts (= marker-3 from earlier). Continue in garter st and work turns as follows, beg from RS: * Work row from bottom edge on all sts to the neck, turn piece and work return row. Work row from bottom edge to Marker-1, turn piece and work return row. Work row from bottom edge to Marker-2, turn piece and work return row. Work row from bottom edge to Marker-3, turn piece and work return row. Work row from bottom edge to Marker-4, turn piece and work return row. Work row from bottom edge to Marker-5, turn piece and work return row. Work row from bottom edge to Marker-6, turn piece and work return row *, repeat from *-*. 1 repeat = 2 rows at the top and 14 rows at the bottom). Continue until sleeve measures approx 70 cm / 27½" (measured at the bottom, measures approx 10 cm / 4" at the top). Bind off the bottom 32 sts = 34-36-38-40-42-44 sts left on needle. BACK PIECE: Slip the 54-56-58-60-62-64 sts from stitch holder at the side back on needle = 88-92-96-100-104-108 sts. Continue with turns as described for front piece with 3 markers as before. Continue until piece measures 40-44-48-54-60-66 cm / 15¾"-17¼"-19"-21¼"-23⅝"-26" from when sts from stitch holder were slipped back on needle at the side (measured at the bottom of piece). Slip the bottom 54-56-58-60-62-64 sts on a stitch holder (to be used for right front piece). Now continue for sleeve. RIGHT SLEEVE: Like left sleeve. RIGHT FRONT PIECE: Slip the 54-56-58-60-62-64 sts from stitch holder back on needle = 88-92-96-100-104-108 sts. Continue with turns as on back piece with 3 markers as before. Adjust to left front piece, less the front band (right front piece now measures 20-22-24-27-30-33 cm / 8"-8¾"-9½"-10⅝"-11¾"-13" along bottom edge) and now work 3 cm / 1⅛" garter st without turns on all sts, AT THE SAME TIME after 1.5 cm / ½" make buttonholes on next row from RS as follows: work 52-54-56-58-60-62 sts, K2 tog, work 13-14-15-16-17-18 sts, K2 tog, work 12-13-14-15-16-17 sts, work K2 tog, work remaining sts on row. On next row cast on 1 new st over each dec st. Bind off when front band measures 3 cm / 1⅛". ASSEMBLY: Sew seam under sleeve. Thread the silk ribbon through the top row with turns and tie a bow mid front. Sew buttons on left front piece. |
|
 |
|
Have you finished this pattern?Tag your pictures with #dropspattern #treadlightlycardigan or submit them to the #dropsfan gallery. Do you need help with this pattern?You'll find 11 tutorial videos, a Comments/Questions area and more by visiting the pattern on garnstudio.com. © 1982-2026 DROPS Design A/S. We reserve all rights. This document, including all its sub-sections, has copyrights. Read more about what you can do with our patterns at the bottom of each pattern on our site. |
|


With over 40 years in knitting and crochet design, DROPS Design offers one of the most extensive collections of free patterns on the internet - translated to 17 languages. As of today we count 324 catalogs and 12290 patterns - 12280 of which are translated into English (US/in).
We work hard to bring you the best knitting and crochet have to offer, inspiration and advice as well as great quality yarns at incredible prices! Would you like to use our patterns for other than personal use? You can read what you are allowed to do in the Copyright text at the bottom of all our patterns. Happy crafting!
Post a comment to pattern DROPS 118-36
We would love to hear what you have to say about this pattern!
If you want to leave a question, please make sure you select the correct category in the form below, to speed up the answering process. Required fields are marked *.