
Popular categories
Looking for a yarn?


Comments / Questions (63)
![]() Kathy Pratl wrote:
Kathy Pratl wrote:
How do I fit in the shortened rows? If I start on the right side of work, do I do all shortened rows A and B, which equals 12 shortened rows. And then do I do ONLY 2 rows of pattern and repeat shortened rows again. Am I suppose to end up with 12 rows of shortened rows to every 2 rows of pattern ?
07.04.2021 - 21:19DROPS Design answered:
Dear Kathy, if you are wondering about the hat, then yes, you are almost right, you knit 2 rows of pattern for each 6 row repeat (the 1st on the RS and the 6th on the WS), which is 4 pattren rows for every double repeat (12 rows.) Happy Knitting!
07.04.2021 - 21:33
![]() Daria wrote:
Daria wrote:
Buongiorno, credo di aver capito come lavorare il modello. Il mio errore era inserire i segnapunti mentre montavo le maglie. Inoltre il motivo M1-M2 va lavorato solo da A fino a 26 maglie e poi si lavora a maglia legaccio. Grazie per l'aiuto :-)
19.01.2021 - 09:39DROPS Design answered:
Buongiorno Daria, esatto, M.1 e M.2 si lavorano su 26 maglie, il resto come indicato nel testo. Buon lavoro!
19.01.2021 - 10:50
![]() Daria wrote:
Daria wrote:
Buongiorno,ho lavorato i primi due ferri (Row1(RS):k12,p2k2,p4,k4,p4,k2,p2,k26; Row 2(WS):p26,M1(k2,p2,k4,p4,k4,p2,k2) ; inserito i segnapunti;mi trovo a dover lavorare (al dritto del lavoro) a ferri accorciati M1 (dal secondo ferro) fino al segnapunti 4 ma mi trovo con solo 6 mg da lavorare anzichè 52.Non capisco dove sto sbagliando.
18.01.2021 - 14:00DROPS Design answered:
Buonasera Daria, i segnapunti vanno inseriti appena dopo l'avvio delle maglie, senza lavorare le maglie. Il primo ferro è dal diritto del lavoro così come quello su cui iniziare a lavorare i ferri accorciati e il segnapunti 4 si trova dopo 52 maglie. Buon lavoro!
18.01.2021 - 19:15
![]() Daria wrote:
Daria wrote:
Leggendo lo schema m1 dal basso verso l"alto,a quale riga del motivo m1 corrisponde il primo ferro accorciato? Cosa significa quella freccia sulla sinistra dello schema m1(settima riga contando dal basso)?
17.01.2021 - 20:17DROPS Design answered:
Buonasera Daria, nel basco il 1° ferro a ferro accorciati è sul 2° ferro di M.1. La freccia indica con quale ferro deve finire il lavoro una volta raggiunta la misura corretta, come indicato nelle spiegazioni. Buon lavoro!
17.01.2021 - 21:13
![]() Daria wrote:
Daria wrote:
Buonasera, lavorando il primo ferro accorciato (fino al segnapunto 4 ) il numero di maglie da lavorare sono 20+6 (motivo M1+M2)?
17.01.2021 - 18:19DROPS Design answered:
Buongiorno Daria, il segnapunti 4 è posizionato a 52 maglie dall'inizio per la prima taglia. Se preferisce può mettere dei numerini ai segnapunti per identificarli durante i ferri accorciati. Buon lavoro!
17.01.2021 - 18:31
![]() Edit wrote:
Edit wrote:
It appears to me that there is a mistake in the explanation of the diagram: …. needle behind piece, K2, K2 …. front of piece, K2, K2. I followed the instructions very carefully and the pattern didn't work out (there were two purls instead of two knits on RS)... Then I changed it : ...behind piece, K2, P2 from cable needle, ... in front of piece, P2, K2. Now the pattern is seamless!(I thought to help the others.) Edit
30.09.2020 - 13:42
![]() Anna wrote:
Anna wrote:
Ich verstehe nicht, wie ich mitten im Muster wenden soll. Wendepunkt 1 fällt mitten in eine Verzopfung. -? Ich bin kein Anfänger, finde die Anleitung aber sehr kompliziert. Schon die erste Reihe nach dem Anschlag, wieso "von vorne aus gesehen"? Wenn man die Marker nach dem Anschlag setzt, passt das mit der Beschreibung der ersten Reihe schon gar nicht mehr
29.09.2020 - 22:01DROPS Design answered:
Liebe Anna, (bei der Mütze) die Markierungen werden ohne zu stricken eingesetzt = vor der 1. Markierung haben Sie 32 M, diee 32 M stricken Sie bei den Hinreihen: 1 M kraus re, 5 M glatt re, M.2 (= 6 M), M.1 (= 20 M) = (1+5+6+20=32 M = die 1. Markierung ist nach M.1 (Hinreihen)/vor M.1 (Rückreihen). Die verkürzten Reihen stricken Sie dann wie erklärt und wie in Fig. 1 gezeigt. Oder stricken Sie den Kragen, Dann ist die 1. Markierung nach 27 M= 4 M kraus re, M1 (20 M), 3 M kraus re (von der Vorderseite gesehen = Am anfang von einer Hinreihe gesehen). Viel Spaß beim stricken!
30.09.2020 - 08:25
![]() MaryJean Walker wrote:
MaryJean Walker wrote:
Understand shortened rows but not last sentence - 12 rows in middle of piece, 4rows on right, 2 rows on left?
17.02.2020 - 17:09DROPS Design answered:
Dear Mrs Walker, when you have worked the short rows 1 time from * to * you have worked a total of 12 rows in the middle of piece, 4 rows on the right side of piece and 2 rows on the left side of piece (seen from RS). Happy knitting!
18.02.2020 - 09:15
![]() Fanny wrote:
Fanny wrote:
Bonjour, Il manque une explication sur où commence A et où est B Le bas est A et le B est le haut du béret Le 1er marqueur est donc positionné après le point fantaisies ( 1 point mousse, 5 jersey, M2 ( 6), M1(20) )= 32 mailles lors du 1er rang endroit du diagramme, Le reste des marqueurs de place dans les points mousses suivants Pouvez-vous me le confirmer ? Merci d'avance
16.12.2019 - 22:12DROPS Design answered:
Bonjour Fanny, tout à fait, le bas du béret est bien A et donc B est le haut, la flèche start indique le 1er rang sur l'endroit - et les chiffres du haut indiquent les marqueurs, donc effectivement, le 1er marqueur se trouve après les 32 premières m = après M.2 vu sur l'endroit et les autres sont répartis dans la partie du bonnet qui sera tricotée au point mousse. Bon tricot!
17.12.2019 - 09:24
![]() Mrs D wrote:
Mrs D wrote:
IF someone wanted the TWINE Love hat but can\'t follow the free instructions so they could make one for themselves, WOULD you make this hat and sell the finished hat? Also, what would it cost in USA dollars? Thank you
01.12.2019 - 16:05DROPS Design answered:
Dear Mrs D, we only provide the free patterns to make our garments & patterns. You are welcome to contact a DROPS store and ask them, or join the DROPS Workshop to ask your question there. Happy knitting!
02.12.2019 - 10:30
|
|||||||||||||||||||
Twine Love |
|||||||||||||||||||
|
|
|||||||||||||||||||
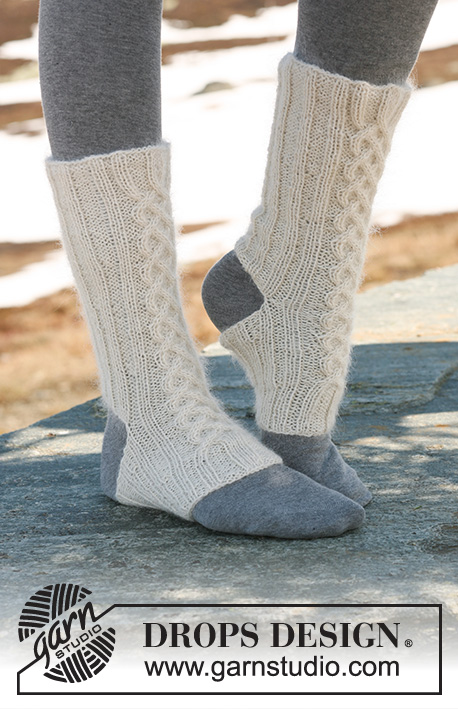
DROPS Basque hat and shoulder wrap with cables knitted from side to side in ”Alpaca” and ”Kid-Silk”.
DROPS 115-32 |
|||||||||||||||||||
|
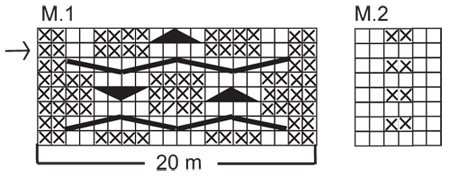
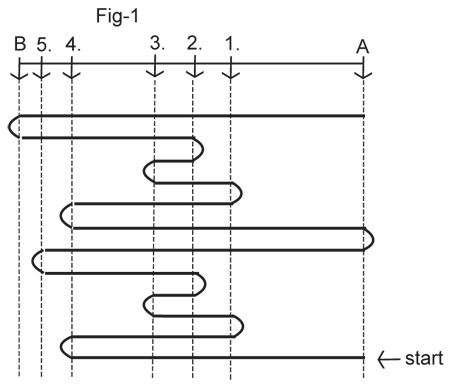
GARTER ST (back and forth on needle): K all rows. PATTERN: See diagram M.1 and M.2 – pattern in diagram is seen from RS and shows 1 pattern repeat (first row = WS). ---------------------------------------------------------- ---------------------------------------------------------- BASQUE HAT: SHORTENED ROWS: To make the hat wider in the middle to create the Basque shape. When turning mid piece, tighten thread before working return row to avoid holes in transitions. Work shortened rows as follows – see Fig-1 (beg by A): * work row to marker-4, turn, work row to marker-1, turn, work row to marker-3, turn, work row to marker-2, turn, work row to marker-5, turn, work all sts on row (= to A), turn, work row to marker-4, turn, work row to marker-1, turn, work row to marker-3, turn, work row to marker-2, turn, work all sts on row (= to B), turn, work all sts on row (= to A) *, repeat from *-*. I.e. 1 repeat = 12 rows in the middle of piece, 4 rows on right side of piece and 2 rows on left side of piece. HAT: Worked back and forth on needle from side to side. Loosely cast on 58-62 sts with 1 thread of each quality on needle size 3.5 mm / US 4. Insert 5 markers in piece as follows from bottom edge: MARKER-1 after 32-32 sts, MARKER-2 after a total of 40-40 sts, MARKER-3 after a total of 46-48 sts, MARKER-4 after a total of 52-56 sts and MARKER- 5 after a total of 56-60 sts, = 2 sts left after the last marker. Work first row as follows (from RS): K12, P2, K2, P4, K4, P4, K2, P2 and K26-30. Work next row as follows (from WS): 26-30 garter sts, M.1 (= 20 sts), M.2 (= 6 sts), 5 stockinette sts and 1 garter st (the bottom 6 sts = folding edge). Continue in pattern like this, AT THE SAME TIME work SHORTENED ROWS – see above. Continue until hat measures approx 48-54 cm / 19"-21¼" along bottom edge (by A) – adjust so that last row is the row marked by an arrow in diagram. Bind off loosely with K over K and P over P. ASSEMBLY: Sew hat tog mid back, edge to edge. Run a thread through sts at the top of hat, tighten thread and fasten. Fold bottom edge towards WS along folding edge and fasten – make sure to have an even seam. ---------------------------------------------------------- SHOULDER WRAP: SHORTENED ROWS: To make the piece wider along bottom edge work shortened rows as follows (beg from RS - when turning mid piece, tighten thread to avoid holes in transitions): * Work 2 rows on all sts, work row to marker-2, turn, work return row, work row to marker-1, turn, work return row *, repeat from *-*. I.e. 1 repeat = 6 rows along bottom edge and 2 rows at the top. SHOULDER WRAP: Worked back and forth on needle from side to side. Loosely cast on 52-56 sts on needle size 3.5 mm / US 4 with 1 thread of each quality. Insert 2 markers in piece as follows (from RS): MARKER-1 after 27-27 sts, MARKER-2 after a total of 37-39 sts = 15-17 sts left at the top after last marker. Let markers follow the piece as you go along. Work SHORTENED ROWS - see above (NOTE: work the bottom 4 sts in 2 threads Alpaca + 1 thread Kid-Silk, i.e. 3 threads, throughout), AT THE SAME TIME work pattern as follows - first row = RS: K4, P2, K2, P4, K4, P4, K2, P2 and K28-32. Work next row as follows from WS: 28-32 garter sts, M.1 (= 20 sts) and 4 garter sts. Continue in pattern like this until piece measures 35-40 cm / 13¾"-15¾" at the top (= approx 105-120 cm / 41⅜"-47¼" along bottom edge, the opposite side) – adjust so that last row is the row marked with an arrow in diagram. NOTE: Make all measurements when piece is lying flat. Bind off loosely with K over K and P over P. Sew shoulder wrap tog mid back, edge to edge. |
|||||||||||||||||||
Diagram explanations |
|||||||||||||||||||
|
|||||||||||||||||||
 |
|||||||||||||||||||
 |
|||||||||||||||||||
Have you finished this pattern?Tag your pictures with #dropspattern or submit them to the #dropsfan gallery. Do you need help with this pattern?You'll find 14 tutorial videos, a Comments/Questions area and more by visiting the pattern on garnstudio.com. © 1982-2026 DROPS Design A/S. We reserve all rights. This document, including all its sub-sections, has copyrights. Read more about what you can do with our patterns at the bottom of each pattern on our site. |
|||||||||||||||||||


With over 40 years in knitting and crochet design, DROPS Design offers one of the most extensive collections of free patterns on the internet - translated to 17 languages. As of today we count 324 catalogs and 12290 patterns - 12280 of which are translated into English (US/in).
We work hard to bring you the best knitting and crochet have to offer, inspiration and advice as well as great quality yarns at incredible prices! Would you like to use our patterns for other than personal use? You can read what you are allowed to do in the Copyright text at the bottom of all our patterns. Happy crafting!
Post a comment to pattern DROPS 115-32
We would love to hear what you have to say about this pattern!
If you want to leave a question, please make sure you select the correct category in the form below, to speed up the answering process. Required fields are marked *.