
Popular categories
Looking for a yarn?


Comments / Questions (78)
![]() Monica wrote:
Monica wrote:
Har stickat den. Var jättehärlig att sticka o skön att använda. Blir varm på kroppen, men luftig under armarna. Perfekt projekt! :-)
10.11.2010 - 10:22
![]() DROPS Design DE wrote:
DROPS Design DE wrote:
Hallo! Ja, in den neuen Übersetzungen sprechen wir nicht mehr von Markierungsfäden sondern allgemein von Markierungen, die angebracht werden. Dann kann jede wählen, was sie vorzieht.
08.06.2010 - 07:43
![]() Hyperactive wrote:
Hyperactive wrote:
Ich habe die Jacke gestrickt, es ging unglaublich schnell und sie gefällt mir sehr gut. Ich werde sicher noch mal eine Jacke nach diesem Muster stricken, aber evtl. mit anderem Zopf-Muster. Würde ich Ärmel machen, würde ich sie nachträglich anstricken (abwärts), aber ohne Ärmel gefällt sie mir gut.
07.06.2010 - 14:05
![]() Hyperactive wrote:
Hyperactive wrote:
Hallo! Die Jacke strickt sich sehr schnell. Ich wünschte nur, es wären statt Markierungsfäden Ring-Maschenmarkierer auf den Nadeln gewesen. Damit wäre es noch ein Stück leichter gewesen.
07.06.2010 - 14:02
![]() Vivi wrote:
Vivi wrote:
Hvordan følger man diagrammerne når man laver vendningerne midt på trøjen?
27.12.2009 - 11:41Malgosia wrote:
Piekna. Uroku dodaja krotkie rekawy. Zrobie sobie taka. Cudowna strona internetowa. Szkoda tylko, ze nie jest tlumaczona na jezyk polski. No, moze w przyszlosci sie doczekam. Pozdrowienia dla wszystkich
01.12.2009 - 21:53
![]() Corinne wrote:
Corinne wrote:
Superbe !! je crois que je vais me lancer !!!
26.11.2009 - 19:27
![]() Tut wrote:
Tut wrote:
Bare så flot.
25.11.2009 - 20:24
![]() Dorothea Holtz wrote:
Dorothea Holtz wrote:
Diese Jacke ist wunderschön, die werde ich stricken.
18.11.2009 - 12:04
![]() Joanne wrote:
Joanne wrote:
I love it!
07.11.2009 - 22:00
|
|||||||||||||||||||
Endless Braid |
|||||||||||||||||||
|
|
|||||||||||||||||||
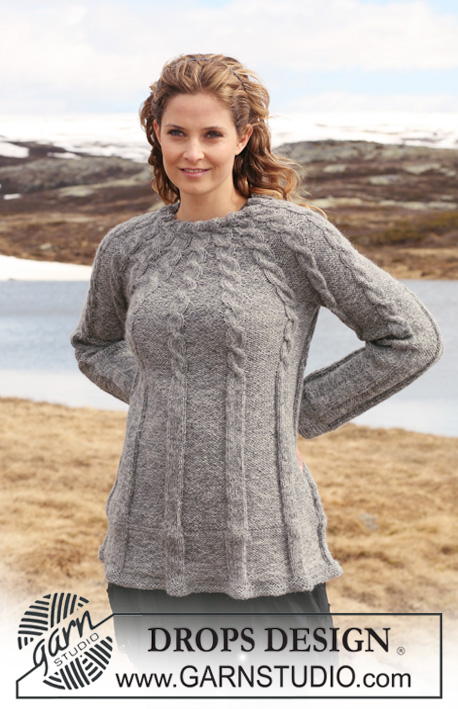
DROPS Jacket knitted from side to side with cable pattern in ”Snow”. Size S to XXXL.
DROPS 116-25 |
|||||||||||||||||||
|
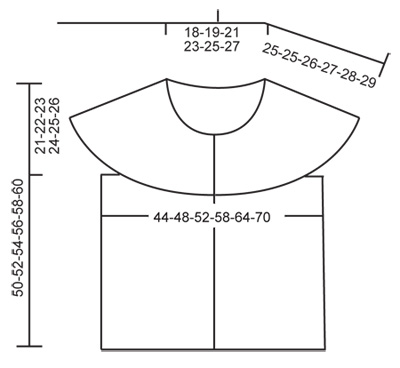
GARTER ST (back and forth on needle): K all rows. PATTERN: See diagram M.1 to M.3. Diagram shows the pattern from RS. TURNS: Work turns as follows: * Work all sts from bottom edge to neckline, turn piece and work return row. Work next row from bottom edge to Marker-1, turn piece and work return row – see KNITTING TIP. Work next row to Marker-2, turn piece and work return row. Work next row to Marker-3, turn piece and work return row. Work next row on all sts, turn piece and work return row *. Repeat from *-*. KNITTING TIP: When turning piece mid row, slip first st as if to K, tighten thread and continue (to avoid a hole in transition). -------------------------------------------------------- -------------------------------------------------------- The jacket is worked from side to side. Rows from RS beg at bottom edge and row ends at neckline. Beg mid front on left front piece, work the sleeve, back piece, the other sleeve, and finish with right front piece. LEFT FRONT PIECE: Worked back and forth on needle. Loosely cast on 56-58-60-62-64-66 sts on circular needle size 8 mm / US 11 with Snow. Work 4 cm / 1½" GARTER ST – see above – and then K 1 row from WS, AT THE SAME TIME inc 12 sts evenly = 68-70-72-74-76-78 sts. Insert 3 markers from RS (from bottom edge towards neckline) as follows: Marker-1 = after 32-33-34-35-36-37 sts. Marker-2 = after 52-53-55-56-58-59 sts. Marker-3 = after 63-65-67-69-71-73 sts. Leave markers in piece until finished measurements, so that the turns are worked in straight lines. Continue as follows from RS: 5 garter sts, 28-29-31-32-34-35 stockinette sts, M.1 (= 11 sts), M.2 (= 8 sts), M.3 (= 11 sts), 0-1-1-2-2-3 stockinette sts and finish with 5 garter sts. Continue in pattern like this until finished measurements. AT THE SAME TIME work TURNS – see above. Continue with turns until piece measures 26-28-30-33-36-39 cm / 10¼"-11"-11¾"-13"-14¼"-15¼" from cast on row – measured at bottom of piece. Insert a marker in piece. Slip the bottom 29-30-31-32-33-34 sts on a stitch holder (to be used for back piece later). Now work left sleeve. LEFT SLEEVE: = 39-40-41-42-43-44 sts on needle. Continue in pattern as before, but work the 3 sts towards sleeve edge in garter st. Now work the turns as follows: * Work all sts from bottom edge to neckline, turn piece and work return row. Work next row from bottom edge to Marker-2, turn piece and work return row – see KNITTING TIP. Work next row to Marker 3, turn piece and work return row. Work next row on all sts, turn piece and work return row *. Repeat from *-*. Continue until sleeve measures 30-31-32-33-34-35 cm / 11¾"-12¼"-12½"-13"-13⅜"-13¾", measured at bottom. BACK PIECE: Slip the 29-30-31-32-33-34 sts from stitch holder back on needle = 68-70-72-74-76-78 sts. Continue with turns and pattern as on front piece until piece measures 44-48-52-58-64-70 cm / 17¼"-19"-20½"-22¾"-25¼"-27½" from the marker at the side (measured at bottom of piece). Slip the bottom 29-30-31-32-33-34 sts on a stitch holder (to be used for front piece later). Now work right sleeve. RIGHT SLEEVE: Like left sleeve. RIGHT FRONT PIECE: Slip the 29-30-31-32-33-34 sts from stitch holder back on needle = 68-70-72-74-76-78 sts. Continue with turns as on back piece. When piece measures 22-24-26-29-32-35 cm / 8¾"-9½"-10¼"-11⅜"-12½"-13¾" (adjust to the same no of rows as on left front piece), K 1 row from WS, AT THE SAME TIME dec 12 sts evenly = 56-58-60-62-64-66 sts. Continue in garter st. After 2 cm / ¾" make buttonholes on next row from RS as follows: Work 14 sts, K2 tog, work 10-11-12-13-14-15 sts, K2 tog, work 10-10-11-11-12-12 sts, K2 tog, work 9-10-10-11-11-12 sts, K2 tog, work remaining sts. On next row cast on 1 new st before the K2 tog from previous row. Work a total of 4 cm / 1½" garter st and bind off. Sew on buttons. |
|||||||||||||||||||
Diagram explanations |
|||||||||||||||||||
|
|||||||||||||||||||
 |
|||||||||||||||||||
 |
|||||||||||||||||||
Have you finished this pattern?Tag your pictures with #dropspattern or submit them to the #dropsfan gallery. Do you need help with this pattern?You'll find 15 tutorial videos, a Comments/Questions area and more by visiting the pattern on garnstudio.com. © 1982-2026 DROPS Design A/S. We reserve all rights. This document, including all its sub-sections, has copyrights. Read more about what you can do with our patterns at the bottom of each pattern on our site. |
|||||||||||||||||||


With over 40 years in knitting and crochet design, DROPS Design offers one of the most extensive collections of free patterns on the internet - translated to 17 languages. As of today we count 325 catalogs and 12298 patterns - 12288 of which are translated into English (US/in).
We work hard to bring you the best knitting and crochet have to offer, inspiration and advice as well as great quality yarns at incredible prices! Would you like to use our patterns for other than personal use? You can read what you are allowed to do in the Copyright text at the bottom of all our patterns. Happy crafting!
Post a comment to pattern DROPS 116-25
We would love to hear what you have to say about this pattern!
If you want to leave a question, please make sure you select the correct category in the form below, to speed up the answering process. Required fields are marked *.