
Popular categories
Looking for a yarn?


Comments / Questions (55)
![]() Isabelle wrote:
Isabelle wrote:
Bonjour, il est indiqué 300g pour le bonnet. Est-ce 300g pour le bonnet seul ou pour l'ensemble bonnet écharpe Merci pour votre réponse.
08.11.2025 - 11:51
![]() Isabelle wrote:
Isabelle wrote:
Bonjour, il est indiqué 300g de fournitures pour le bonnet. Est-ce 300g pour l'ensemble, ou le bonnet seul ? Merci d'avance pour votre réponse.
08.11.2025 - 11:49DROPS Design answered:
Bonjour Isabelle, les 300 g sont pour l'ensemble bonnet et écharpe. Bon crochet!
10.11.2025 - 07:06
![]() Puissant wrote:
Puissant wrote:
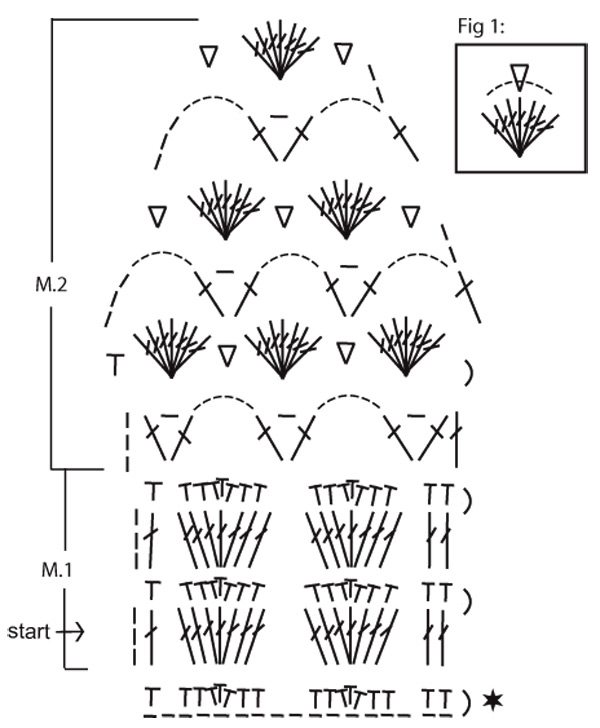
Bonjour, je n'arrive pas à faire le 1 er rang du M2 du croquis du diagramme de l'écharpe coco. Avez-vous une vidéo ? Cordialement. Delphine
12.09.2025 - 14:30DROPS Design answered:
Bonjour Delphine, crochetez le 1er rang de M.2 (sur l'envers) ainsi: 3 mailles en l'air, (1 bride, 1 maille en l'air, 1 bride) entre la 1ère et la 2ème maille serrée du rang précédent, puis (6 mailles en l'air, (1 bride, 1 maille en l'air, 1 bride entre les 2 groupes de mailles serrées suivantes = sautez 7 ms et crochetez entre la 7ème et la 8ème ms)) répétez de (à) et terminez par 1 bride dans la 1ère maille serrée du rang précédent. Bon crochet!
12.09.2025 - 15:23
![]() Lynne Macfadyen wrote:
Lynne Macfadyen wrote:
Rang 3 : je ne comprends pas comment faire un ms dans une bride du rang 2 tout en gardant le travail plat. J'arrive donc pas à réellement commencer le beret bien que je trouve le modèle très joli.
14.02.2025 - 13:47DROPS Design answered:
Bonjour Mme Macfayden, avez-vous vu cette vidéo? Nous y montrons comment réaliser ce motif pour le béret - en espérant qu'elle puisse vous aider. Bon crochet!
14.02.2025 - 16:18
![]() Laroche wrote:
Laroche wrote:
Bonjour, Pour l'écharpe j'ai terminé M1 et M2 et je suis arrivée à la 2e partie où il est indiqué de reprendre la 1re partie. On peut donc fermer la 1re partie déjà crochetée ? Et reprendré tout à zéro pour la 2e partie ? Merci d'avance.
16.03.2023 - 18:41DROPS Design answered:
Bonjour Mme Laroche, pour la 2ème partie, crochetez comme pour la 1ère partie, vous assemblerez ensuite les chainettes de base ensemble au milieu de l'écharpe; vous pouvez aussi crocheter directement dans les mailles en l'air de la 1ère partie pour éviter une couture. On procède ainsi pour que les extrémités (M.2) de l'écharpe soient identiques. Bon crochet!
17.03.2023 - 08:41
![]() Hannah Pitt wrote:
Hannah Pitt wrote:
I’m stuck on round 8 - is it right that I need to do the dc into a stitch on round 6 or does it mean 7? If so, which stitch? Is there a video to help with more than just rounds 1-6? Thanks in advance
02.01.2023 - 20:58DROPS Design answered:
Dear Mrs Pitt, correct, you have to insert the crochet in the stitch 2 rounds below, ie the dc should be worked in the 4th treble from round 6 = in the middle of the shell. Ie as you crocheted the dc on round 6 in the treble from round 4 (see time code 13:30 in the video). Happy crocheting!
03.01.2023 - 09:19
![]() Patty wrote:
Patty wrote:
Hello. I just made the hat and would love to make the scarf. Im just having a little issue with M2. I dont see where you start or how many chains to to start it. I know M.2 is the second piece right?Thank for your help.
30.11.2020 - 18:09DROPS Design answered:
Dear Patty, the scarf is worked in two parts sewn together on mid back, you first crochet the first piece casting on 18 ch and work 17sc (US-Terms) then work M.1 until piece measures 28 cm and work then M.2 until piece measures 42 cm in total, work then the 2nd piece the same way except you will divide piece into 2 parts and work them spearate for 10 cm, and then finish 2nd piece as 1st piece and sew both pieces together. Happy crocheting!
01.12.2020 - 09:01
![]() Capelle wrote:
Capelle wrote:
Bonjour , je suis nouvelle et aimerait crocheter cette belle écharpe ..et pas le bonnet . Combien de pelotes akaska faut il commander ? Il est indiqué la quantité pour les deux ouvrages , merci pour vos explications. Superbe site et fils de très belle qualité.
03.11.2019 - 10:22DROPS Design answered:
Bonjour Mme Capelle, nous avons ici uniquement la quantité pour l'ensemble et pas pour chaque pièce. Utilisez notre convertisseur pour connaître la quantité nécessaire en Alaska (on prendra le fil Alaska en double pour avoir la même tension qu'1 fil Eskimo). Bon crochet!
04.11.2019 - 16:49
![]() Gillet Françoise wrote:
Gillet Françoise wrote:
Je vous remercie de votre réponse aussi rapide .Ce site est vraiment sérieux et offre tant de joyaux plus jolis les uns que les aures.Je recommence les rangs du béret et merci encore.
17.07.2017 - 15:23
![]() Françoise Gillet wrote:
Françoise Gillet wrote:
Bonjour; J'aimerais vraiment faire ce bonnet et je ne comprens pas les rangs suivants la suite de la vidéo (rangs 7,8,9 etc) auriez vous un diagramme pour faire le bonnet ? je vous remercie
17.07.2017 - 07:11DROPS Design answered:
Bonjour Mme Gillet, suivez attentivement les explications des rangs 7 à 9, on va répéter les rangs 5 et 6 mais avec un nombre de mailles en l'air différent et plus de coquilles à chaque fois. Bon crochet!
17.07.2017 - 09:46
|
||||||||||||||||||||||
Doce de Coco |
||||||||||||||||||||||
|
|
||||||||||||||||||||||
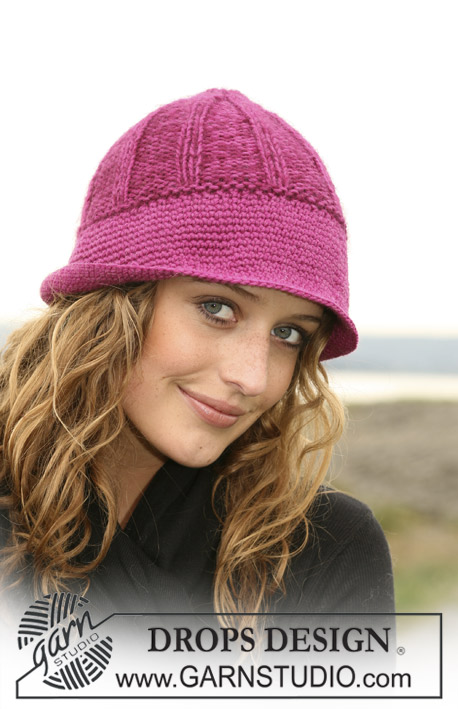
DROPS crochet Basque hat and scarf with shell pattern in ”Snow”.
DROPS 109-49 |
||||||||||||||||||||||
|
HAT Crochet tip: Always replace first sc on round with 1 ch, first dc with 3 ch and first tr with 4 ch. Finish each round with 1 sl st in first sc/dc/tr on round. Decreasing tip: Dec 1 sc as follows: Work 1 sc without pulling thread through sts (= 2 sts on hook). Work next sc and now pull thread through all 3 sts on hook. HAT Work 3 ch on hook size 8 mm [L/11] with Snow and form a ring with a sl st. See Crochet tip! Round 1: 5 sc in ring. Round 2: 2 dc in each sc = 10 dc. Round 3: 4 ch (= 1 tr) + 1 ch + 1 tr in first dc, 5 ch, * skip 1 dc, 1 tr + 1 ch + 1 tr in next dc, 5 ch *, repeat from *-*, finish round with skipping the last dc, 1 sl st in 4th ch from beg of round. Round 4: 1 sl st in first ch-loop, in all 1-ch-loops from previous round work 6 tr (= 1 shell) and in all 5-ch-loops from previous round work 1 sc – crochet this sc through dc from round 2 as well - *, finish round with 1 sl st in 4th ch from beg of round = 5 tr-groups (= 5 shells). Round 5: 4 ch (= 1 tr), * 7 ch, skip shell, 1 tr + 1 ch + 1 tr + 1 ch + 1 tr in sc between 2 shells *, repeat from *-*, and finish with 7 ch, 1 tr + 1 ch + 1 tr + 1 ch in the last sc and 1 sl st in 4th ch from beg of round. Round 6: Work sl st to the middle of the first ch-loop, * 1 sc in the middle of 7-ch-loop – crochet this sc down between tr from shell on round 4 as well - 6 tr in the first ch-loop, 1 sc in the middle of the 3 tr, 6 tr in the second 1-ch-loop *, repeat from *-*, and finish with 1 sl st in first sc from beg of round. Round 7: 9 ch, * skip shell, 1 tr + 1 ch + 1 tr in sc between 2 shells, 5 ch *, repeat from *-* and finish with 1 tr + 1 ch in the last sc and 1 sl st in 4th ch from beg of round. Round 8: Work sl sts to the middle of ch-loop, in all 5-ch-loops work 1 sc in the middle of loop – crochet this sc through stitch from round 6 as well -, and in all 1-ch-loops work 6 tr. Finish round with 1 sl st in first sc from beg of round (= 10 shells). Round 9: 10 ch, * skip shell, 1 tr + 1 ch + 1 tr in sc between 2 shells, 6 ch *, repeat from *-* and finish with 1 tr + 1 ch in the last sc and 1 sl st in 4th ch from beg of round. Round 10: Work sl sts to the middle of ch-loop. In all 6-ch-loops work 1 sc in the middle of loop - crochet this sc down between tr in shell from round 8 as well - and in all 1-ch-loops work 6 tr, finish with 1 sl st in first sc from beg of round. Round 11: 1 c in each tr from previous round = 60 sc. Round 12: * 1 sc in each of the first 3 sc, 2 sc tog – see Decreasing tip! *, repeat from *-* = 48 sc. Round 13: 1 sc in each sc. Round 14: * 1 sc in each of the first 2 sc, 2 sc tog *, repeat from *-* = 36 sc. Round 15 to 17: 1 sc in each sc, cut the thread. SCARF Pattern: See diagram M.1 and M.2. Scarf: Worked in 2 pieces, sewn tog in the middle afterwards. First piece: Crochet 18 loose ch with Snow (includes 1 ch to turn with) on crochet hook size 8 mm [L/11]. Row 1: 1 sc in 2nd ch from hook, 1 sc in next ch, skip 1 ch, 1 sc in each of the next 2 ch, 3 sc in next sc, 1 sc in each of the next 2 ch, skip 2 ch, 1 sc in each of the next 2 ch, 3 sc in next ch, 1 sc in each of the next 2 ch, skip 1 ch, 1 sc in the last ch = 17 sc. Now continue in M.1 until piece measures approx 28 cm [11"] – adjust to a full repeat – and then work M.2. After M.2 piece measures approx 42 cm [16½"]. Second piece: Like first piece until piece measures approx 17 cm [6 ¾"]. Now divide piece in the centre (creating an oblong hole to put the other piece through). Work row to the centre = 9 sts, turn piece, and work rows back and forth on these 9 sts for 10 cm [4"], cut the tread. Repeat on the other side. Hole now measaures 10 cm [4"]. Work 1 row on all sts (= 18 sts) and now work M.2 as described for first piece. Assembly: Sew tog the 2 pieces mid back, sew edge to edge to avoid a chunky seam. |
||||||||||||||||||||||
Diagram explanations |
||||||||||||||||||||||
|
||||||||||||||||||||||
 |
||||||||||||||||||||||
Have you finished this pattern?Tag your pictures with #dropspattern or submit them to the #dropsfan gallery. Do you need help with this pattern?You'll find 7 tutorial videos, a Comments/Questions area and more by visiting the pattern on garnstudio.com. © 1982-2026 DROPS Design A/S. We reserve all rights. This document, including all its sub-sections, has copyrights. Read more about what you can do with our patterns at the bottom of each pattern on our site. |
||||||||||||||||||||||


With over 40 years in knitting and crochet design, DROPS Design offers one of the most extensive collections of free patterns on the internet - translated to 17 languages. As of today we count 324 catalogs and 12290 patterns - 12280 of which are translated into English (US/in).
We work hard to bring you the best knitting and crochet have to offer, inspiration and advice as well as great quality yarns at incredible prices! Would you like to use our patterns for other than personal use? You can read what you are allowed to do in the Copyright text at the bottom of all our patterns. Happy crafting!
Post a comment to pattern DROPS 109-49
We would love to hear what you have to say about this pattern!
If you want to leave a question, please make sure you select the correct category in the form below, to speed up the answering process. Required fields are marked *.