
Popular categories
Looking for a yarn?


Comments / Questions (238)
![]() Birgit Trede wrote:
Birgit Trede wrote:
In der Anleitung steht man soll 2 Maschen weniger stricken. Wo? Am Anfang, am Ende oder mittendrin?
26.12.2018 - 12:41DROPS Design answered:
Liebe Frau Trede, jedesMal Sie die 1./2. Reihe stricken, stricken Sie 2 M weniger, dh das 1. Mal stricken Sie 102-112-124-140 M, das 2. Mal (Reihe 5/6) stricken Sie 100-110-122-138 M, dann 98-108-120-136 M usw. (= 2 Maschen weniger am Anfang der Hinreihe, bei der Rückreihe stricken Sie dieselbe Maschenanzahl wie bei der Hinreihe). Viel Spaß beim stricken!
02.01.2019 - 09:50Sonya wrote:
Sorry I did not phrase my question well. It was about the main body of the jacket, not the sleeves. How do you decrease stitches in rows 1 and 2? I assume that stitches are not knitted together, but slipped off the end? Is this correct?
15.10.2018 - 12:07DROPS Design answered:
Dear Sonya, when working M.1 you work short rows as follows: row 1 and 2: over all sts, row 3 and 4 over the first 18-16-20 sts, then repeat these 4 rows, but work first 2 rows leaving 2 sts unworked at the end of row 1, then leaving 4 more sts unworked at the end of row 6-12 times in total (see size), then leaving 8 more sts unworked at the end of row 1 until the 18-16-20 sts from outermost side remain. When all short rows are done, repeat whole short rows. Happy knitting!
15.10.2018 - 14:03Sonya wrote:
Hi I have been reading all the comments to try to figure out how to work the decreases. I can’t figure it out though, are these cast off or retained?
15.10.2018 - 00:02DROPS Design answered:
Dear Sonya, when you have to decrease evenly on sleeves, work the decreases as explained here. Happy knitting!
15.10.2018 - 10:47Zuzana wrote:
Dobrý deň, rada by som vedieť, či môžem na tento sveter použiť aj priadzu cotton merino (skupina B)? Nosím veľkosť M. Ak by som štrikovala podľa návodu (bez upravenia počtu ok) veľkosť M/L s cotton merino 1 priadzou, bude výsledný sveter veľkosti M alebo mám štrikovať veľkosť XL/XXL? Alebo mi viete poradiť ako upraviť počty ok na cotton merino priadzu alebo to nie je možné? Veľmi pekne ďakujem.
20.06.2018 - 21:54Oana wrote:
Hi Lena,again 😢.i understood very well your explanation,thank you so much.now the pattern started with 2 knitted rows or with the diagram?when those 2 knitted rows shall be repeated?when all the reduced stitches are done?also when the last stitches shall be purled?thank you again
06.02.2018 - 19:56DROPS Design answered:
Dear Oana, you will work in pattern as shown in diagram (= with first sts in garter st seen from RS and all other sts in pattern as shown in M.1) and work the short rows over the first sts seen from RS until only the garter sts remain (= the outermost sts of circle). And repeat the short rows from row 1 all the way (at the same time you will then have to shape armholes). Happy knitting!
07.02.2018 - 08:39Oana wrote:
Hi.i am still confused about the pattern. so 1st row is worked as in the M1 diagram, 2nd row as well.starting 3rd row, the first 16 stitches are worked then turn and work over the 16 stitches.the 5th row , we work over the 16stitches till the end when we work over the 110 stitches and turn the work and knit till the end of row?(or we stop before 18 stitches).here where i am stalked and i don't know how to do it.would you please explain it for me.thank you so much
01.02.2018 - 18:25DROPS Design answered:
Dear Oana, in 2nd size work 2 rows over the 112 sts, 2 rows over the first 16 sts, 2 rows over the 112 sts - 2 = 110 sts, work 2 rows over the first 16 sts, 2 rows over the 110 - 2 sts, 2 rows over the first 16 sts and so on, working 2 sts less when working row 1 &2, ie you will work next 108 sts, then 106 sts and so on a total of 10 times, then work 4 sts less a total of 12 times then 8 sts less a total of 5 times until the first 16 sts remain, at the same time continue working the short rows over the first 16 sts. Happy knitting!
02.02.2018 - 08:39
![]() DOLFIN wrote:
DOLFIN wrote:
Bonjour, J'ai fait ma couture au dos, mais cela forme un "bec", j'ai redéfais et rabattu mes mailles plus souplement, mais j'ai toujours un bec. J'ai même enlevé un motif entier, mais rien n'y fait. Pouvez-vous m'aider ? Merci
27.01.2018 - 10:17DROPS Design answered:
Bonjour Mme Dolfin, assemblez les mailles rabattues à celles du montage en suivant cette technique et en veillant à ne pas trop serrer la couture. Un blocage (lavage/séchage) peut aider à ce que la couture soit plate, mais veillez à bien avoir les bonnes dimensions pour le cercle (le bon nombre de motifs) pour que le cercle ait la bonne taille et forme. Bon assemblage!
29.01.2018 - 09:17
![]() Gisela Fydrich wrote:
Gisela Fydrich wrote:
Vielen Dank. Ich hatte es gerade auch verstanden. Habe zu kompliziert gedacht.
06.07.2017 - 09:38
![]() Gisela Fydrich wrote:
Gisela Fydrich wrote:
Hallo.Das mit dem Stricken klappt super.Aber ich habe eine Frage zum messen.Wenn die Arbeit vor mir liegt, messe ich dann von A zur 69 Masche? Vielen Dank im voraus.
05.07.2017 - 14:55DROPS Design answered:
Liebe Frau Fydrich, der Markierer (am besten ein Faden) soll im 69. Masche sein, dann messen Sie an den Markierer entlang (das Bandmaß wird nicht gerade sondern am Bogen sein). Viel Spaß beim stricken!
06.07.2017 - 09:25Mel wrote:
Think I must be thick. I do not understand how the pattern works ie how can the chart be knitted on the same short rows, or are 248 stitches cast on? the pattern is not clear to me.
31.05.2017 - 09:06DROPS Design answered:
Dear Mel, you are working back and forth on 102-112-124-140 sts (see size) with short rows so that the beg of rows from RS will be the outside of circle and the end of rows from RS (where you will work less rows) will be the inner side, ie the center of circle. When working armholes, you will work the outermost sts and the inner sts separately but at the same time, ie with 2 balls to make sure short rows will continue. Then you will sew the cast off sts to the cast on sts to get the whole circle. Happy knitting!
31.05.2017 - 10:13
|
||||||||||||||||
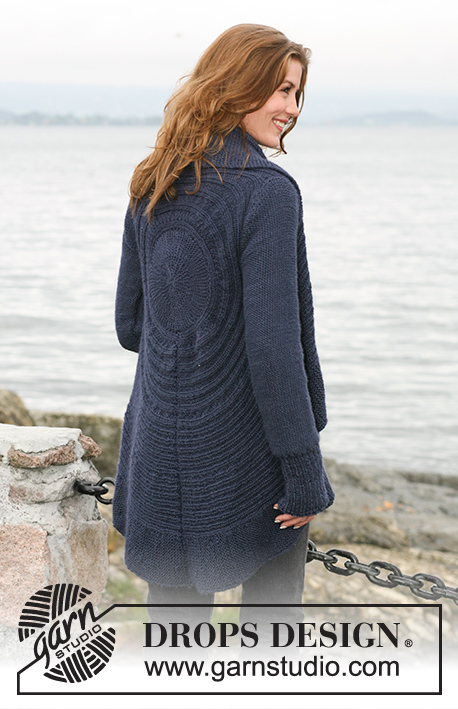
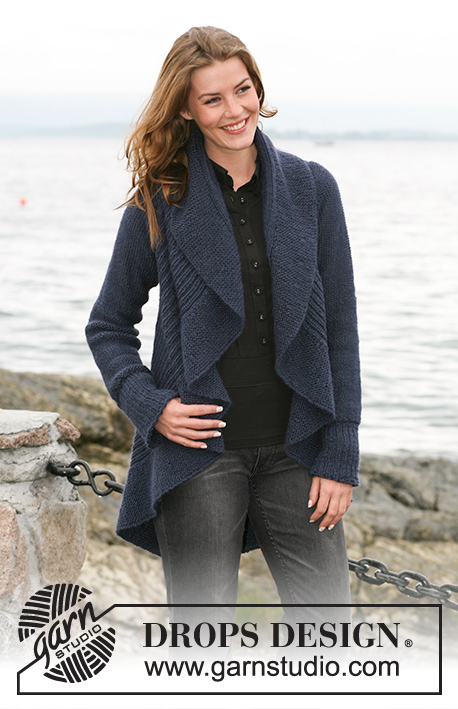
Blue Moon |
||||||||||||||||
 |
 |
|||||||||||||||
DROPS circular jacket in "SIlke-Alpaca" or ”Air” with texture pattern. Size: S to XXXL
DROPS 102-6 |
||||||||||||||||
|
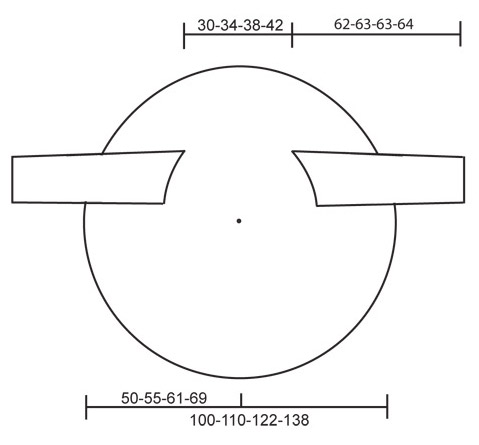
Knitting gauge: 17 sts x 22 rows stockinette sts = 10 x 10 cm [4" x 4"] Pattern: See diagram M.1. Diagrams are seen from RS. NOTE: Each size has own diagram. Short rows: Work short rows to ensure circular shape of piece, as follows: 1st / 2nd row: Knit 102-112-124-140 sts, turn piece and knit back. 3rd / 4th row: Knit back and forth over 18-16-20-20 first sts on row (these sts = outermost on circle) – read knitting tip 1 below. Repeat 1st to 4th rows, but reduce stitch number by 2 sts on every 1st/2nd row before turning piece – repeat this 10-10-12-12 times in total, then reduce sts number knitted by 4 sts before piece is turned – repeat this 6-9-8-12 times in total and from this point reduce sts number by 8 sts before piece is turned – repeat 5-5-6-6 times in total. Remaining are 18-16-20-20 outermost sts of circle. Start again from beginning over all sts. – read Knitting tip 2 below. Knitting tip 1: When turning piece slip the first st as if to knit and tighten yarn before continuing knitting. This is done to avoid holes when turning. This does not applies to innermost 20-20-24-24 sts of circle – when piece is turned knit all sts as normal. Knitting tip 2: On row where all sts are knit, P 20-20-24-24 innermost sts in circle (seen from RS). Then continue as before with chart M.1. Measuring tip: All measurements on circle are done with piece lying flat. Do not measure across! Measurements follow curve to 63rd - 69th -73rd - 81st sts. CIRCLE Knit piece back and forth on needle to make room for all sts. Cast on 102-112-124-140 sts on circular needle size 4.5 mm [US 7] with Air. Insert 1 marking thread or stitch marker after 63-69-73-81 sts, make all measurements from this point. Knit chart M.1 (see diagram for your size) from right to left (i.e. from outside towards inside on circle)1st row = RS. At the same time as chart M.1 knit Short rows – see explanation above – to make circular shape. When piece measures 37-40-49-57 cm [14½"-15¾"-19¼"-22½"] from marking thread or stitch marker – read measuring tip – knit armholes. Armhole: Slip outermost 63-69-73-81 sts onto an extra needle size 4.5 mm [US 7] (circular needle to make room for all sts). Continuing, bind off next 2 sts (= armhole). Insert 1 marking thread or stitch marker between 2 bound off sts. Leave remaining sts on needle. Continuing, knit 2 parts (sts before and after armhole) separately, but knit them at the same time on separate needles with separate balls of yarn. This is done so the short rows are correct on both sides of armhole. Continue with pattern and short rows as earlier. When armhole measures 18-21-23-25 cm [7"-8¼"-9"-9¾"] cast on 2 new sts over armhole(i.e. between the 2 parts). Continuing, slip all sts onto one needle again = 102-112-124-140 sts. Insert 1 marking thread or stitch marker after 63-69-73-81 sts. Continuing, measure piece from this point. Now knit chart M.1 and short rows on all sts. Continue like this until piece measures approx 15-17-19-21 cm [6"-6 ¾"-7½"-8 ¼"], this should be a ½ circle. Continue until piece measures approx 30-34-38-42 cm [11 ¾"-13⅜"-15"-16½"] from marking thread – read measuring tip. Now make armholes in same way. When all sts are back on one needle again insert 1 marking thread or stitch marker after 63-69-73-81 sts. Continue measuring from here. Continue with chart M.1 and short rows until piece measures approx 37-40-49-57 cm [14½"-15 ¾"-19 ¼"-22½"] from marking thread or stitch markers (adjust to 1 whole pattern repeat with short rows). Bind off loosely. Sleeve: Knit piece back and forth on circular needles. Cast on 56-59-65-68 sts (incl 1 front edge sts on each side) on needles size 4.5 mm [US 7] with Air. P1 row from WS. Continue with Rib K2/P1 and 1 edge sts on each side. When Rib measures 13-13-14-14 cm [5⅛"-5⅛"-5½"-5½"] K 1 row from WS at the same time dec 10-11-13-14 sts evenly = 46-48-52-54 sts. Continue in stockinette sts with WS out until complete measurement. When piece measures 16 cm [6¼"] inc 1 sts on each side on every 9 -4.5 -3.5 -3 cm [3½"-1 ¾"-1 ¼"-1⅛"] 5-9-11-13 times in total = 56-66-74-80 sts. When piece measures 56 cm [22"] bind off top shape sleeve top on each side on every other row: 4 sts 1-2-2-2 times. Continuing, bind off 2 sts on each side until piece measures approx 61-62-62-63 cm [24"-24⅜"-24⅜"-24 ¾"]. Then bind off 4 sts 1 time on each side. Piece measures approx 62-63-63-64 cm [24⅜"-24 ¾"-24 ¾"-25 ¼"]. Bind off remaining sts. Assembly: Sew circle tog in outermost edge of cast on sts and bind off edge. Sew in sleeves so seams under sleeve meet at middle of marking thread or stitch marker placed at bottom of armhole and middle of sleeve top meet marking thread or stitch marker placed on top of armhole. Sew sleeve seams. |
||||||||||||||||
Diagram explanations |
||||||||||||||||
|
||||||||||||||||
 |
||||||||||||||||
 |
||||||||||||||||
Have you finished this pattern?Tag your pictures with #dropspattern or submit them to the #dropsfan gallery. Do you need help with this pattern?You'll find 14 tutorial videos, a Comments/Questions area and more by visiting the pattern on garnstudio.com. © 1982-2026 DROPS Design A/S. We reserve all rights. This document, including all its sub-sections, has copyrights. Read more about what you can do with our patterns at the bottom of each pattern on our site. |
||||||||||||||||


With over 40 years in knitting and crochet design, DROPS Design offers one of the most extensive collections of free patterns on the internet - translated to 17 languages. As of today we count 324 catalogs and 12278 patterns - 12268 of which are translated into English (US/in).
We work hard to bring you the best knitting and crochet have to offer, inspiration and advice as well as great quality yarns at incredible prices! Would you like to use our patterns for other than personal use? You can read what you are allowed to do in the Copyright text at the bottom of all our patterns. Happy crafting!
Post a comment to pattern DROPS 102-6
We would love to hear what you have to say about this pattern!
If you want to leave a question, please make sure you select the correct category in the form below, to speed up the answering process. Required fields are marked *.