
Popular categories
Looking for a yarn?


Comments / Questions (185)
![]() Elaine wrote:
Elaine wrote:
Pour le col le point de fantaisie se fait seulement sur les 2 mailles au centre du devant, est-ce que j’ai bien compris le patron?
20.03.2019 - 12:44DROPS Design answered:
Bonjour Elaine, en fait pour le col, on doit continuer les côtes du devant, mais on ne continue pas les torsades - reformulation faite. Bon tricot!
20.03.2019 - 13:37
![]() Elaine Hébert wrote:
Elaine Hébert wrote:
Dans la légende des diagrammes, il y a un carré vide presque effacé ou l’on doit mettre 5 mailles sur une aiguille auxiliaire derrière l’ouvrage. Dans quel diagramme doit-on le faire? J’ai beau regarder mais je ne vois vraiment pas à quel diagramme l’appliquer.
10.03.2019 - 14:49DROPS Design answered:
Bonjour Mme Hébert, le symbole dont vous parlez semble être le 8ème symbole (et son équivalent le 9ème = les 5 m sont placées devant). Vous retrouvez ces deux symboles dans M.3 (= les 10 mailles endroit de M.3 qui sont tricotées en torsades). Bon tricot!
11.03.2019 - 10:51
![]() Elaine Hébert wrote:
Elaine Hébert wrote:
Est-ce que la laine Alaska est une laine douce sur la peau , non piquante? Si non par qu'elle laine peut-on la remplacer qui donnera la même tenue sans créer de démangeaisons?
16.02.2019 - 18:48DROPS Design answered:
Bonjour Mme Hébert, la sensibilité de chacun étant différent, je vous invite à contacter votre magasin DROPS - même par mail ou téléphone - on pourra vous y apporter une assistance personnalisée au choix de votre laine. Bon tricot!
18.02.2019 - 09:45
![]() Faggi Isabelle wrote:
Faggi Isabelle wrote:
Y a t il une erreur ? lorsque j'additionne les mailles pour un modele M sur le devant dos j'ai 5+24+26+24+5=84 On me dit de continuer sur les 72 m restantes. Hors sur 159 -84 =75 Et non pas 72 comme il est dit. ??????
21.01.2019 - 20:08DROPS Design answered:
Bonjour Mme Faggi, vous avez bien 159 m en taille M: 5 m end + 24 m en côtes (3/3), M.1 (= 26 m), 24 m en côtes (3/3), 5 m end, 72 m en côtes (3/3), 3 m env = 5+24+26+24+5+72+3= 159 m. On n'a pas le même nombre de mailles pour le devant et le dos car il n'y a pas de torsades dans le dos et on prépare le motif dès le 1er tour et M.1 (on diminue ensuite 2 m dans le dos et on augmente 4 m sur le devant) = 161 M. Bon tricot!
22.01.2019 - 08:06
![]() Sven Danch wrote:
Sven Danch wrote:
Vielen Dank. ich habe mich schon gewundert.
14.01.2019 - 15:56
![]() Sven Danch wrote:
Sven Danch wrote:
Hallo, ich hab mal noch ne Frage. Werden die Maschen bei M2 zwischen den glatt rechts gestrickten immer als linke oder werden alle mit kreuz markierten im Perlmuster gestrickt? Ich habe sie alle links gestrickt und jetzt zieht es sich zusammen, sodas man nur die glatt gestrickten sieht.
12.01.2019 - 15:42DROPS Design answered:
Lieber Sven, die Maschen mit dem Kreuz in M.2 abwechslungsweise rechts und links gestrickt: rechts bei der 1. Runde (= leeres Kästchen), links bei der 2. Runde (= Kreuz). Viel Spaß beim stricken!
14.01.2019 - 10:10
![]() Sven Danch wrote:
Sven Danch wrote:
Hallo! Nach 12 cm soll ich 4 M zunehmen und das ganze 4 mal bei größe L. Wie integriere ich das ins Muster?
05.01.2019 - 22:25DROPS Design answered:
Lieber Herr Danch, die neuen Maschen (= Zunahmen) sollen so gestrickt werden, damit M.2 immer weiter gestrickt wird, dh Sie sollen immer das Muster haben (1 M kraus rechts, 6 M glatt rechts). Viel Spaß beim stricken!
07.01.2019 - 11:04
![]() Sven Danch wrote:
Sven Danch wrote:
Hallo! Ich hätte da mal eine du..e Frage. Wird das Vorder- und Rückenteil in Runden oder in Reihen gestrickt? Weil nirgendwo etwas von zusammen nähen steht.
04.01.2019 - 13:31DROPS Design answered:
Lieber Herr Danch, das Vorder- und Rückenteil werden in der Runde in einem Stück bis zum Armlöcher gestrickt, dann stillgelegt. Die Ärmel werden dann separat gestrickt. Alle Maschen sind dann alle zusammen für die Passe bis zum Halsausschnitt in der Runde gestrickt, nach Halsausschnitt stricken Sie in Reihen. Viel Spaß beim stricken!
04.01.2019 - 15:11
![]() Darlene Ritchie wrote:
Darlene Ritchie wrote:
What letter A B C D etc. would be worsted weight yarn?
08.12.2018 - 21:00DROPS Design answered:
Dear Mrs Ritchie, please find here an overview of all our yarns sorted by yarn groups - for any further assistance choosing the yarn, you are welcome to contact your DROPS store, even per mail or telephone. Happy knitting!
10.12.2018 - 09:13
![]() Larocque wrote:
Larocque wrote:
Re bonjour, pour M2 si j'ai bien compris c'est un tour tout à l'endroit, l'autre tour 5 end. 1 env. 5 end. et ainsi de suite?
23.03.2018 - 16:03DROPS Design answered:
Exactement. Bon travail!
23.03.2018 - 18:02
|
||||||||||||||||||||||||||||
To the Sea |
||||||||||||||||||||||||||||
|
|
||||||||||||||||||||||||||||
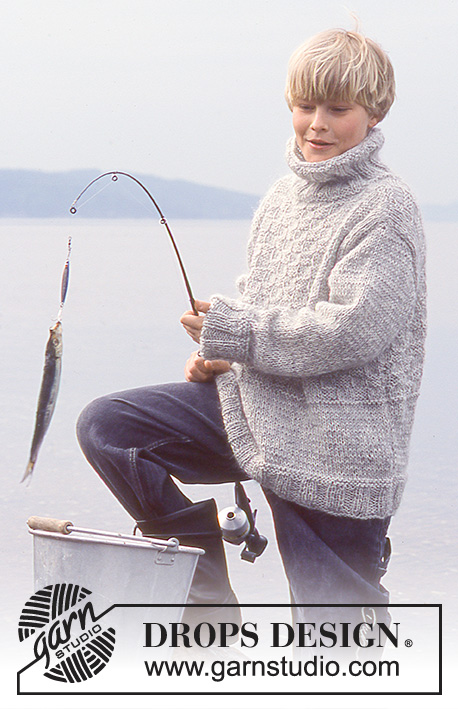
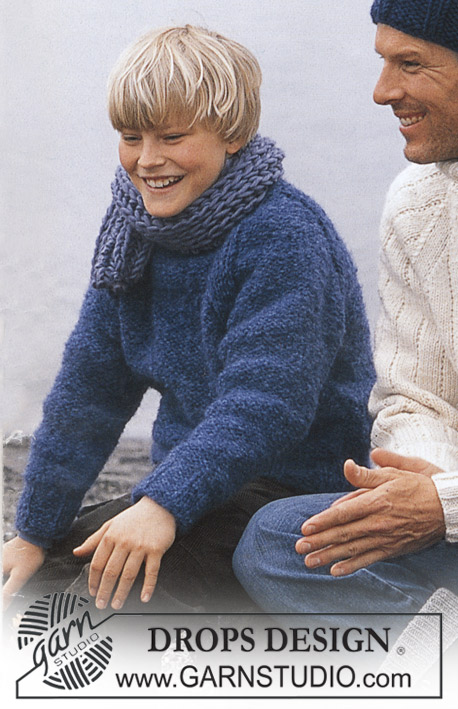
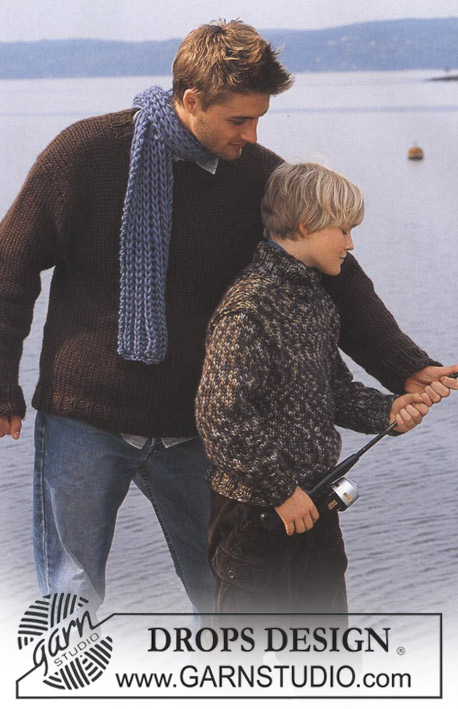
Knitted men's sweater with cables and high neck in DROPS Alaska, plus hat in DROPS Snow
DROPS 85-23 |
||||||||||||||||||||||||||||
|
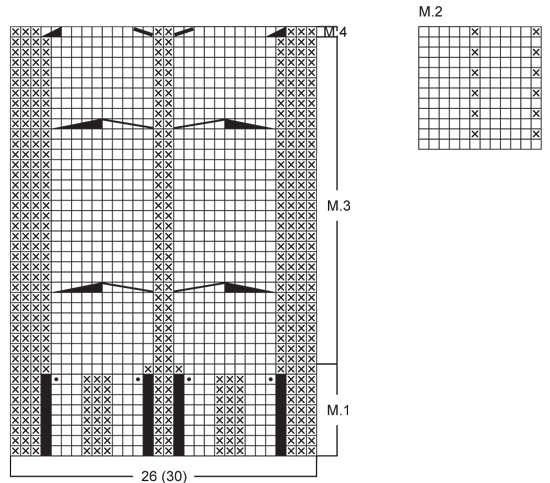
Gauge: 17 sts x 22 rows on larger needles in stockinette st = 10 x 10 cm. Rib: *K 3, P 3*, repeat from *-*. Pattern: See the chart below. The pattern is seen from the right side. Decreasing tips (for raglan): Dec as follows on right side: Start 4 sts before the marker: Sl 1 as if to knit, K 1, psso, K 4 (the marker is in the middle of these 4 sts), K 2 tog. Dec as follows on wrong side: Start 4 sts before the marker, P 2 tog, P 4, P 2 tog, twisting sts (if this is too difficult, sl 2, return to left needle 1 by 1, twisting each, then P 2 tog). BODY Cast on 155-159-179-183-203 sts on smaller circular needles; join and knit rib as follows: K 3-5-3-5-3 (put a marker in the center st = side), *P 3, K 3*, repeat *-* over the following 24-24-30-30-36 sts, Pattern 1 (= 26 sts), *K 3, P 3*, repeat *-* over the following 24-24-30-30-36 sts, K 3-5-3-5-3 (put a marker in the center st = side), *P 3, K 3*, repeat *-* over the following 72-72-84-84-96 sts and finish with P 3. On the last row of Pattern 1 dec 2 sts on back and at the same time inc 4 sts on the front as shown in chart = 157-161-181-185-205 sts. When Pattern 1 is complete (the piece measures approx. 4 cm) change to larger circular needles and continue as follows: K 3-5-3-5-3, Pattern 2 over the following 24-24-30-30-36 sts, Pattern 3 (= 30 sts), Pattern 2 over the following 24-24-30-30-36 sts – reverse the pattern so that it will be the same on both sides of Pattern 3, K 3-5-3-5-3 and Pattern 2 over the remaining 73-73-85-85-97 sts. When the piece measures 12 cm inc 1 st at each side of sts with markers at each side every 5-4-6-4-4 cm a total of 4-6-4-6-6 times – knit the increased sts in Pattern 2 as you go along = 173-185-197-209-229 sts. When the piece measures 34-41-42-43-43 cm bind off 7 sts at each side for armhole (= the sts with the markers + 3 sts each side = 82-88-94-100-110 sts on front and 77-83-89-95-105 sts on back. Lay piece aside and knit the sleeves. SLEEVE Cast on 42-42-42-48-48 sts on double-pointed needles 4 mm [US 6]; join and place a marker at the join. Knit rib. When the piece measures 4 cm change to larger double pointed needles and work following Pattern 2 (the pattern will not come out even). When the piece measures 9-12-14-14-14 cm inc 1 st on each side of seed st at marker every 3.5-2.5-2-2.5-2 cm a total of 11-14-17-15-20 times (knit the incd sts into the pattern as you go along) = 64-70-76-78-88 sts. When the piece measures 50-51-53-53-54 cm bind off 7 sts at marker (the st with the marker + 3 sts each side of marker) = 57-63-69-71-81 sts. Lay piece aside and knit second sleeve. Yoke: Put the sleeves in on the same circular needles as Body where you bound off for armhole = 273-297-321-337-377 sts Put a marker in each transition between Body and sleeves = 4 markers. Knit 2-3-0-0-0 rows before decreasing. Read the entire next section before knitting: Raglan shaping: Dec 1 st at each side of each marker (= 8 decs) – see Decreasing tips above. Dec every other row 18-21-23-24-24 times and every row 0-0-1-1-6 times. Pattern: When the piece measures 50-59-61-63-65 cm – adjust to end after a cable – knit Pattern 4 over the center 30 sts (decreasing the 4 sts incd on the last row of Pattern 1 at lower edge of Body) – knit the remaining sts as before. On the next row put the center 30-30-30-34-34 sts on a st holder for the neck and knit back and forth on needles. Continue to dec 1 st at each neck edge every other row 1-2-2-2-2 times. After all raglan and neck shaping is complete, 93-91-91-95-95 sts remain and the piece measures approx. 56-66-68-70-72 cm to shoulder. Neckband: Pick up and knit approx. 32-38 sts in front neck (incl. sts on st holder) on double-pointed needles and put all sts on same needles = approx. 125-133 sts. Join and P 1 row, then K 1 row, decreasing evenly distributed to 83-89-89-95-95 sts. Knit rib (K 3, P 3) – but at center front there should be a P 2, following pattern on front. When the collar measures 18-20-20-22-22 cm bind off all sts in rib. Fold neckband out to right side. If you want a crew neck, knit as follows: knit rib until the collar measures approx. 10-11-12-12-13 cm, bind off in pattern. Fold the neckband to wrong side and stitch in place. Assembly: Sew opening under the sleeve. HAT: Sizes: one-size Materials: DROPS SNOW from Garnstudio 100 gr nr 15, marine blue. DROPS 9 mm [US 13] double-pointed needles, or size needed to obtain correct gauge. Gauge: 10 sts x 14 rows in stockinette st = 10 x 10 cm. Rib: *P 5, K 2*, repeat from *-*. Hat: Cast on 56 sts; join and place a marker at the join. Knit 1 row stockinette st, then knit rib – see instructions above. When the piece measures 12 cm dec all P 5 to P 4 = 48 sts. When the piece measures 15 cm dec all P 4 to P 3 = 40 sts. Dec in the same way 2 more times with 3 cm between each dec round so that there will be 1 P less for each dec round = 24 sts – the rib is now *K 2, P 1*. When the piece measures 22 cm knit the next row as follows: *K 2 tog, P 1*, repeat from *-* over all sts = 16 sts. Cut yarn and pull through the remaining sts, fasten neatly. Hat measures approx 23 cm high. |
||||||||||||||||||||||||||||
Diagram explanations |
||||||||||||||||||||||||||||
|
||||||||||||||||||||||||||||
 |
||||||||||||||||||||||||||||
 |
||||||||||||||||||||||||||||
Have you finished this pattern?Tag your pictures with #dropspattern or submit them to the #dropsfan gallery. Do you need help with this pattern?You'll find 25 tutorial videos, a Comments/Questions area and more by visiting the pattern on garnstudio.com. © 1982-2026 DROPS Design A/S. We reserve all rights. This document, including all its sub-sections, has copyrights. Read more about what you can do with our patterns at the bottom of each pattern on our site. |
||||||||||||||||||||||||||||


With over 40 years in knitting and crochet design, DROPS Design offers one of the most extensive collections of free patterns on the internet - translated to 17 languages. As of today we count 324 catalogs and 12278 patterns - 12268 of which are translated into English (US/in).
We work hard to bring you the best knitting and crochet have to offer, inspiration and advice as well as great quality yarns at incredible prices! Would you like to use our patterns for other than personal use? You can read what you are allowed to do in the Copyright text at the bottom of all our patterns. Happy crafting!
Post a comment to pattern DROPS 85-23
We would love to hear what you have to say about this pattern!
If you want to leave a question, please make sure you select the correct category in the form below, to speed up the answering process. Required fields are marked *.