
Popular categories
Looking for a yarn?


Comments / Questions (195)
![]() Hella wrote:
Hella wrote:
Hallo. Ik raak in de war van de beschrijving vd mindering. Heb alle vragen doorgelopen, en daar wordt het alleen maar warriger van. In de breivolgorde aan de goede kant heb ik: rechtervoorpand/mouw; mouw/achterpand; achterpand/mouw; mouw/linkervoorpand. De beschrijving voor minderen geeft 1 richting aan, maar de minderingen moeten naar elkaar toebuigen bij raglan en dus omwisselen. Als ik van mouw naar achterpand ga, moet ik dan eerst op 2 steken afhalen en overhalen en dan vijf op het pand?
07.02.2023 - 23:03DROPS Design answered:
Dag Hella,
Als je op een pand bent (dus de steken op je rechter naald horen dan bij het voor- of achterpand) begin je 5 steken voor de markeerdraad/merkdraad en minder je 2 steken zoals beschreven.Als je op een mouw bent begin j 2 steken voor de markeerdraad/merkdraad en minder je 2 steken zoals beschreven.
08.02.2023 - 11:17
![]() Caitlin R wrote:
Caitlin R wrote:
In the English translation it says “ Knit rib, keeping 3 sts in garter st at each side for front edges,” but the piece appears to be knit in the round, so I don’t know where this garter stitch part is supposed to go. Later in the pattern it says “ Place a marker in the 36-38-40-44-48th st in from each side,” but again, I don’t know where the side starts and ends if it’s knit in the round. Thank you for your help!
22.01.2023 - 19:26DROPS Design answered:
Dear Caitlin, body is worked back and forth on circular needle, ie you will work rib pattern with 3 sts in garter stitch on each side. Count the number of sts from the beginning of the row, first seen from RS (1st side) and then from WS (2nd side). The sts between markers are for back piece. Happy knitting!
23.01.2023 - 10:11
![]() Nicole De Neve wrote:
Nicole De Neve wrote:
Bonjour Vous suggérez pour une veste xl 850gr Karisma et 550gr Alpaga le pull terminé va peser 1,3kg cela me semble énorme et surtout lourd à porter., est-ce correct ? Je vais me limiter à tricoter cette veste rien qu'en Alpaga ce sera chaud et LEGER
11.01.2023 - 19:02DROPS Design answered:
Bonjour Mme De Neve, les quantités sont effectivement correctes; vous pouvez naturellement utiliser notre convertisseur pour voir les alternatives proposées et les nouvelles quantités correspondantes. Votre magasin saura également vous conseiller - même par mail ou téléphone - si vous avez besoin d'aide. Bon tricot!
12.01.2023 - 09:32
![]() Ewa Fellnert wrote:
Ewa Fellnert wrote:
Drops Richard där beskrivningen säger 850 g Drops Karisma (100 m/50 g) som ska stickas tillsammans med 550 g Drops Alpacka, på 4,4 och 5,5 stickor. Jag vill använda bara Drops Alaska i stället stickas på stl 5 (75 g/100 m). Jag har tänkt och räknat, har provat Drops garnomvandlare, men kört fast, hur många nystan av Alaska (50 g) behöver jag köpa? Och...kan jag sticka runt på rundstickor och klippa upp framstycket sedan?
11.01.2023 - 11:15
![]() Gina wrote:
Gina wrote:
I’ve never knit a raglan before and I’m having a lot of trouble understanding the yoke decreases. However, you have a video for knitting a raglan from the bottom up wherein the decreases seem to be the same as in this sweater. Can I use the method shown in the video on this sweater as well? Thank you in advance for your help.
19.12.2022 - 20:38DROPS Design answered:
Hi Gina, Our videos are there to help whenever you get stuck or need help with a technique. So, yes, please do use the video to help with the raglan. Happy knitting!
20.12.2022 - 06:47
![]() Brigitte wrote:
Brigitte wrote:
Gibt es eine Randmasche oder ist jeweils die erste/letzte der 3 kraus R Maschen die Randmasche?
01.12.2022 - 14:31DROPS Design answered:
Liebe Brigitte, es sind keine extra Randmaschen, die 3 ersten und die 3 letzten Maschen sind die 3 kraus rechte Maschen. Viel Spaß beim stricken!
01.12.2022 - 17:28
![]() Sílvia wrote:
Sílvia wrote:
Perdón, en una de las dudas que planteaba, me he dado cuenta de que había hecho mal los cálculos. Efectivamente, después de dar forma al Raglán deben quedar en la aguja 71. Perdón por las molestias!
01.12.2022 - 12:50
![]() Sílvia wrote:
Sílvia wrote:
Tengo otra duda sobre el patrón: en talla XL, indica de empezar el CUELLO cuando el tejido mida 60 cm. Podría ser que se tuviera de empezar el cuello, cunado aún estoy dando forma al raglán, o bien las indicaciones para el CUELLO empiezan cuando ya se han terminado las indicaciones del raglán (25 veces las disminuciones a los lados de los marcapuntos)? Muchas gracias
28.11.2022 - 23:59DROPS Design answered:
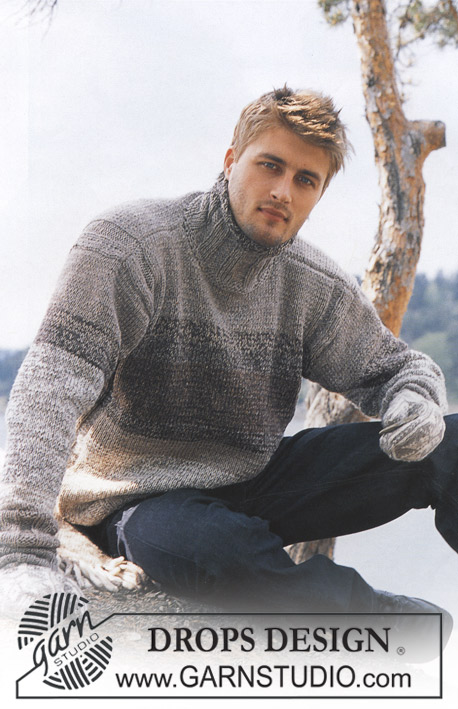
Hola Sílvia, el cuello se empieza a trabajar en las últimas filas de la forma del raglán (como puedes ver en la foto).
06.12.2022 - 19:16
![]() Sílvia wrote:
Sílvia wrote:
Duda importante sobre las disminuciones para el raglán, por favor: En talla XL, empiezo el raglán con 299 puntos, disminuyo 25 veces 8 puntos (total dim 200 pt), más las disminuciones del cuello (6p en cada borde en un gancho (=12)/dim 2 p 2 veces en cada orilla(=8p)/dim 1 p 4 veces en cada orilla (=8)), en total me quedan 61 puntos, pero en las instrucciones dice que han de quedar 71 puntos. Me pregunto si las instrucciones están equivocadas o yo no entiendo el patróns. Gracias
28.11.2022 - 23:55DROPS Design answered:
Hola Sílvia, 299 pts iniciales -200 (25x8) - los 12 pts en el gancho - 8 pts (2 pts 2 veces) - 8 pts (1 pt 4 veces) = 71 pts.
06.12.2022 - 19:15
![]() Susanne Pesch wrote:
Susanne Pesch wrote:
Hallo, ich habe die Jacke gestrickt in blau und sie ist wunderschön geworden. Kann die Jacke mit Wollwaschprogramm in der Maschine gewaschen werden oder besser nur von Hand? Sie saugt schon sehr viel Wasser auf und ist schwer auszuwringen.
16.10.2022 - 17:33
|
|||||||
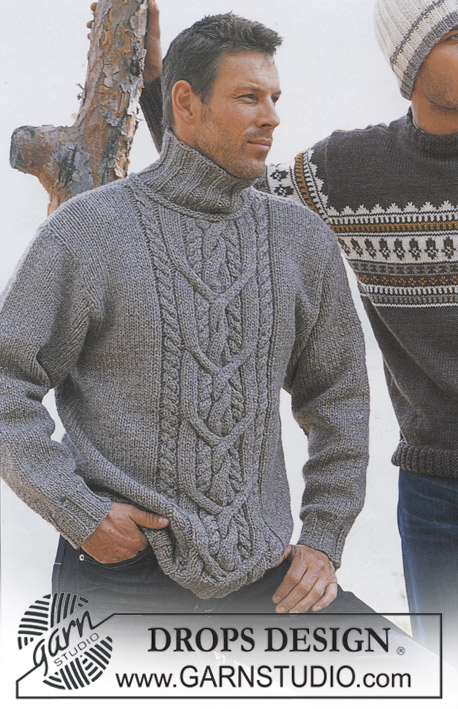
Richard |
|||||||
|
|
|||||||
Knitted jacket for men, with raglan, high neck and zipper in DROPS Karisma and DROPS Alpaca
DROPS 85-13 |
|||||||
|
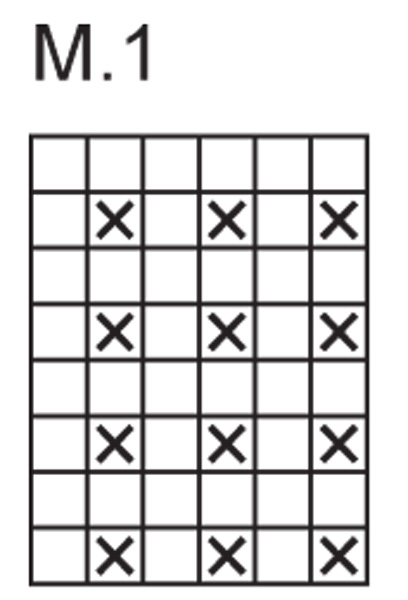
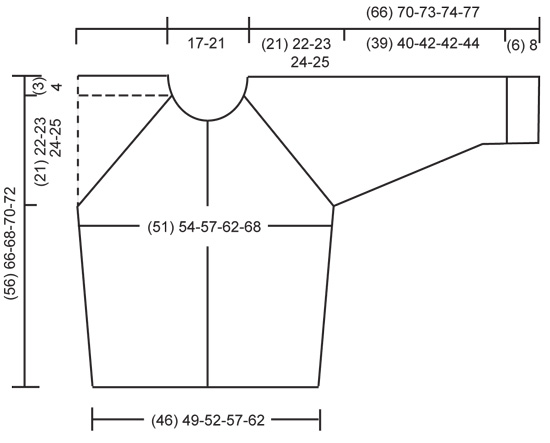
Gauge: 15 sts x 21 rows with 1 strand of each yarn on larger needles in stockinette st = 10 x 10 cm. Rib: *K 1, P 1*, repeat from *-*. Pattern: The diagrams are showing all rows seen from the right side. Decreasing tips (for raglan): All decs are made on the right side. On front- and back piece dec before the 3 sts before/after the marker, and on the sleeves dec right beside the marker. Start 2 sts before the marker on the sleeves and 5 sts before the marker on front and back, and work as follows: K 2 tog, 1 st in seed st, K 1, 1 st in seed st, slip 1 st as if to knit, K 1, psso. ___________________________________________________________________ BODY The cardigan are worked back and fort on circular needle. Cast on 137-147-155-171-187 sts on smaller circular needles with 1 strand Karisma + 1 strand Alpaca. Knit rib, keeping 3 sts in garter st at each side for front edges, and begin and end rib with K 1 (seen from the right side). When the piece measures 3-4-4-4-4 cm change to larger circular needles and Pattern 1, keeping 3 sts in garter st at each side for front edges. See that the K rib in the pattern is above the K rib in ribbing. Place a marker in the 36-38-40-44-48th st in from each side (it will be a K 1), there are 65-71-75-83-91 sts between markers on back. When the piece measures 10-12-12-12-12 cm inc 1 st at each side of both sts with markers. Inc every 5-6-6-6-6 cm a total of 4 times = 153-163-171-187-203 sts – knit the increased sts into the pattern as you go along. When the piece measures 32-40-41-42-43 cm bind off 7 sts at each side for armholes (= bind off the st with the marker + 3 sts each side of that st) = 67-73-77-85-93 sts on back and 36-38-40-44-48 sts on each front. Lay piece aside and knit the sleeves. SLEEVES Sleeves knitted in the round. Cast on 32-34-36-36-40 sts on smaller double-pointed needles with 1 strand Karisma + 1 strand Alpaca; join and place a marker at the join. Knit rib – start with K 1 at marker. When the piece measures 6-8-8-8-8 cm change to larger double-pointed needles and Pattern 1 – see that the K rib in the pattern is above the K rib in the ribbing. When the piece measures 10-14-10-14-10 cm inc 1 st each side of the K st at marker every 2.5-2-2.5-2-2.5 cm a total of 14-16-16-17-17 times = 60-66-68-70-74 sts – knit the increased sts in the pattern as you go along. When the piece measures 45-48-50-50-52 cm bind off 7 sts at marker (bind off the the K st at marker + 3 sts each side of it) = 53-59-61-63-67 sts. Lay piece aside and knit second sleeve. YOKE Put the sleeves in on the same circular needles as Body where you bound off for armholes = 245-267-279-299-323 sts Put a marker in each transition between Body and sleeves = 4 markers. Knit 3-1-1-1-0 rows before beginning shaping. Read entire section before knitting: Raglan shaping: Dec at each side of all markers (= 8 decs) – see Decreasing tips above – every other row 21-23-24-25-27 times. Neck: When the piece measures 49-57-59-60-62 cm put 3-4-5-6-6 sts at each center front edge on st holders for the neck. Then bind off at each neck edge every other row: 2 sts 2-0-0-2-4 times and 1 st 2-6-6-4-2 times. After all shaping is complete 59-63-65-71-75 sts remain. Neckband: Pick up and knit approx. 10-16 sts at each side of neck on fronts (including sts on st holders) with 1 strand of each yarn and put all sts on smaller circular needles. K 1 row from wrong side, then K 1 row from right side, adjusting (inc/dec) to 83-83-91-103-111 sts on 2nd row. Then knit rib, keeping 3 sts in garter st at each side and beginning rib with K 1 (as seen from the right side). When the collar measures 20-22-22-24-24 cm bind off all sts in rib. ASSEMBLY Sew opening under the sleeve. Sew in zipper – start at lower edge. Fold the collar in half to wrong side and stitch in place, covering end of zipper. |
|||||||
Diagram explanations |
|||||||
|
|||||||
 |
|||||||
 |
|||||||
Have you finished this pattern?Tag your pictures with #dropspattern or submit them to the #dropsfan gallery. Do you need help with this pattern?You'll find 22 tutorial videos, a Comments/Questions area and more by visiting the pattern on garnstudio.com. © 1982-2026 DROPS Design A/S. We reserve all rights. This document, including all its sub-sections, has copyrights. Read more about what you can do with our patterns at the bottom of each pattern on our site. |
|||||||


With over 40 years in knitting and crochet design, DROPS Design offers one of the most extensive collections of free patterns on the internet - translated to 17 languages. As of today we count 324 catalogs and 12290 patterns - 12280 of which are translated into English (US/in).
We work hard to bring you the best knitting and crochet have to offer, inspiration and advice as well as great quality yarns at incredible prices! Would you like to use our patterns for other than personal use? You can read what you are allowed to do in the Copyright text at the bottom of all our patterns. Happy crafting!
Post a comment to pattern DROPS 85-13
We would love to hear what you have to say about this pattern!
If you want to leave a question, please make sure you select the correct category in the form below, to speed up the answering process. Required fields are marked *.