
Popular categories
Looking for a yarn?


Comments / Questions (195)
![]() Avot Laurence wrote:
Avot Laurence wrote:
Je suis en train de faire ce gilet pour le point c est un endroit un envers le rang avec les cartes vides c est tout endroit ? Il est indiqué que le diagramme est les rangs endroit du coup sur l envers c est les mailles comme elles se présentent ?
22.10.2021 - 18:10DROPS Design answered:
Bonjour Mame Avot. En travaillant allers retours, sur l’endroit vous tricotez les cases vides a l’endroit et les cases avec un carre a l’envers. Sur l’envers toutes les mailles du rang suivant sont tricotees a l’envers. Bon tricot !
25.10.2021 - 13:12
![]() Tamara wrote:
Tamara wrote:
Hallo, ich habe diese Jacke in XL gestrickt und bin eigentlich sehr zufrieden. Die Anleitung ist gut verständlich und sie passt auch :) Obwohl ich sie am Rumpf und den Armen ein paar cm länger gemacht habe, habe ich ca. 400 g Wolle übrig (Insgesamt habe ich nur 1000 g verbraucht). Ist das Muster wohl eigentlich als Patentmuster gedacht?
11.10.2021 - 17:11
![]() Sofie wrote:
Sofie wrote:
Hej! Ska arbetet (fram och bakstycke - första delen) stickas fram och tillbaka på rundsticka och sedan monteras/sys ihop eller är det meningen att en ska sticka arbetet runt på rundsticka fram till avmaskning för ärmar. Tack för er tid! Varm hälsning Sofie
24.09.2021 - 12:19DROPS Design answered:
Hej Sofie. Det ser ut som den första delen stickas fram och tillbaka från början (och sys ihop), men vill du hellre sticka den runt fram till delning så ska det gå fint att göra det också. Mvh DROPS Design
27.09.2021 - 08:53
![]() Ans wrote:
Ans wrote:
Kan ik de mouwen ook op een rondbreinaald breien ipv sokkenpennen
08.09.2021 - 19:52DROPS Design answered:
Dag Ans,
Jazeker, dat kan. Eventueel gebruik je de 'magic loop' techniek als je de rondbreinaald iets te lang is.
17.09.2021 - 11:01
![]() Alexandra wrote:
Alexandra wrote:
Hi I am at the neck where I have put 5 stitches at each centre front edge I just confused with where I go in the pattern So I have now 9 stitches on each front sides which includes the 3 rib stitches each side Do I leave these stitches and just work on rest of the stitches eg. the rest of the stitches on the front and back really not sure
11.07.2021 - 09:11DROPS Design answered:
Dear Alexandra, for the neck you slip the first 5 sts at the beg of next 2 row (= from RS and from WS) on a thread, then cast cast off at the begf of every row on each side 1 stitch 6 times (continue raglan as before). For neck edge, pick up the 5 sts from the thread, pick up 10-16 sts between these stitches and the next stitches on needle, knit all stitches on needle, pick up 10-16 sts before the 5 sts on a thread and knit the 5 sts on the thread, knit 1 row from WS adjusting the number of sts to91. Happy knitting!
12.07.2021 - 07:38
![]() Jooske wrote:
Jooske wrote:
Ik begrijp het afkanten van de hals niet. Ik brei de middelste maat. Volgens mijn berekening (279-192 (8x24raglan)=87. 87-65=22. ) zou ik in totaal 11 steken, waarvan 5 op een hulpdraad, dus 6 moeten afkanten aan iedere kant? Ik begrijp dan de beschrijving niet. En hoe minder ik dan? Is het anders, hoe en hoeveel minder ik dan voor de hals? Graag uw hulp.
04.06.2021 - 01:24
![]() Jooske wrote:
Jooske wrote:
Over de hals: ik begrijp het afkanten niet: (ik brei de middelste maat) 5 steken op een hulpdraad en dan?
04.06.2021 - 00:58
![]() Alexandra wrote:
Alexandra wrote:
Hi not sure I’m understanding the pattern symbols = K from RS, P from WS how do I. P WS symbols = P from RS, K from WS and P RS , K WS
26.05.2021 - 11:43DROPS Design answered:
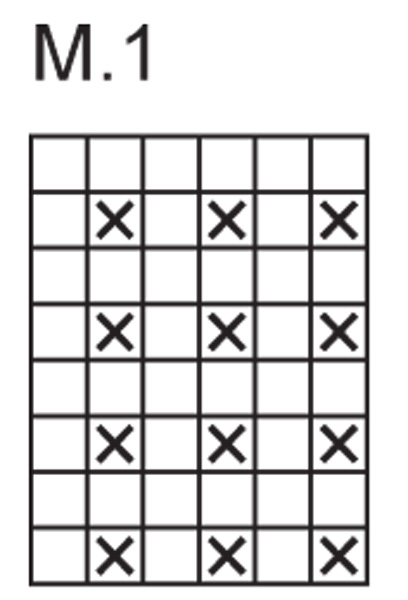
Dear Alexandra, if your first row in M.1 is worked from RS you will work: (P1, K1, P1, K1, P1, K1) - and on the 2nd row = from WS, you will purl all stitches. When working in the round (sleeves) work round 1 as before and knit all sts on 2nd round. Happy knitting!
26.05.2021 - 13:53
![]() Alex wrote:
Alex wrote:
What do u mean at the start when it says use one strand of alpaca and one strand Karisma is it just using both wools
23.05.2021 - 09:29DROPS Design answered:
Dear Alex, yes, use the two different type of yarn held together. Happy Knitting!
23.05.2021 - 10:41
![]() Liliane Lemarquand wrote:
Liliane Lemarquand wrote:
Bonsoir, je tricote le modèle Richard pour homme. Je suis à l'encolure. On me dit de mettre des mailles en attente de chaque côté et je ne comprends pas. Merci bcp
16.05.2021 - 21:26DROPS Design answered:
Bonjour Mme Lemarquand, tricotez les 3-4-5-6-6 premières m en début de rang sur l'endroit et mettez-les en attente sur un fil pour l'encolure (devant droit), terminez le rang, tournez, tricotez les 3-4-5-6-6 premières m du début du rang et mettez-les en attente sur un fil pour l'encolure (devant gauche), rabattez maintenant pour l'encolure de chaque côté tous les 2 rangs comme indiqué pour la taille. Pour le col, vous reprendrez les mailles en attente, relèverez les mailles dans celles rabattues pour le devant droit tricoterez les mailles sur l'aiguille, relèverez les mailles dans celles rabattues pour le devant gauche et reprendrez les mailles en attente. Bon tricot!
17.05.2021 - 09:42
|
|||||||
Richard |
|||||||
|
|
|||||||
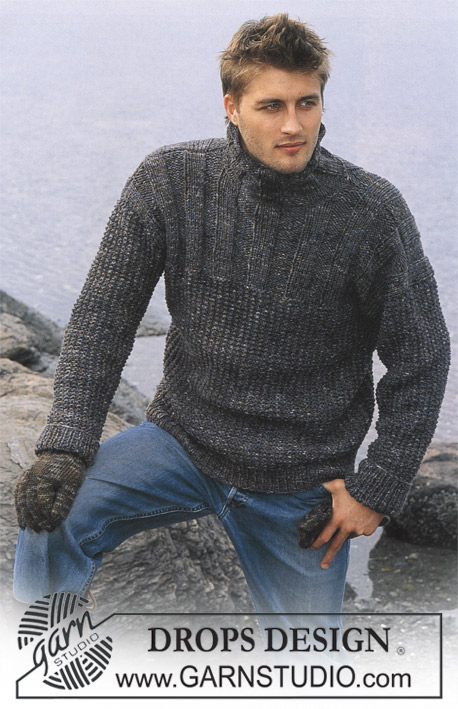
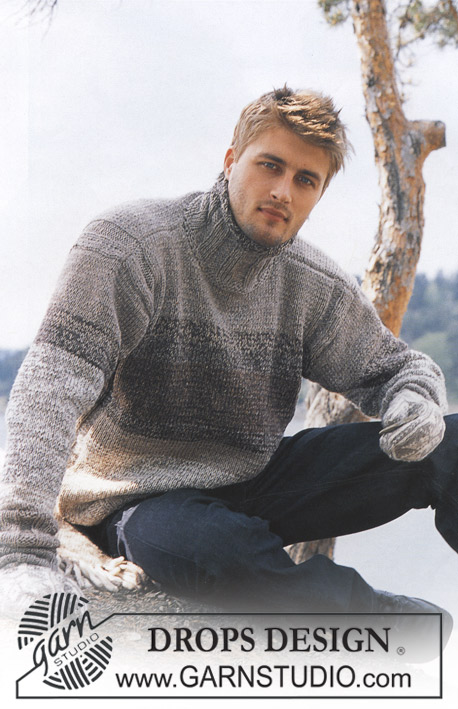
Knitted jacket for men, with raglan, high neck and zipper in DROPS Karisma and DROPS Alpaca
DROPS 85-13 |
|||||||
|
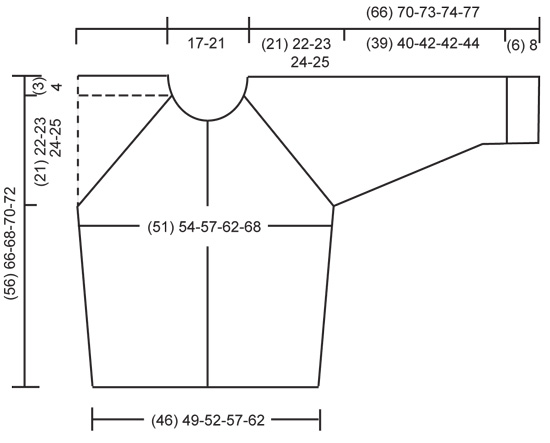
Gauge: 15 sts x 21 rows with 1 strand of each yarn on larger needles in stockinette st = 10 x 10 cm. Rib: *K 1, P 1*, repeat from *-*. Pattern: The diagrams are showing all rows seen from the right side. Decreasing tips (for raglan): All decs are made on the right side. On front- and back piece dec before the 3 sts before/after the marker, and on the sleeves dec right beside the marker. Start 2 sts before the marker on the sleeves and 5 sts before the marker on front and back, and work as follows: K 2 tog, 1 st in seed st, K 1, 1 st in seed st, slip 1 st as if to knit, K 1, psso. ___________________________________________________________________ BODY The cardigan are worked back and fort on circular needle. Cast on 137-147-155-171-187 sts on smaller circular needles with 1 strand Karisma + 1 strand Alpaca. Knit rib, keeping 3 sts in garter st at each side for front edges, and begin and end rib with K 1 (seen from the right side). When the piece measures 3-4-4-4-4 cm change to larger circular needles and Pattern 1, keeping 3 sts in garter st at each side for front edges. See that the K rib in the pattern is above the K rib in ribbing. Place a marker in the 36-38-40-44-48th st in from each side (it will be a K 1), there are 65-71-75-83-91 sts between markers on back. When the piece measures 10-12-12-12-12 cm inc 1 st at each side of both sts with markers. Inc every 5-6-6-6-6 cm a total of 4 times = 153-163-171-187-203 sts – knit the increased sts into the pattern as you go along. When the piece measures 32-40-41-42-43 cm bind off 7 sts at each side for armholes (= bind off the st with the marker + 3 sts each side of that st) = 67-73-77-85-93 sts on back and 36-38-40-44-48 sts on each front. Lay piece aside and knit the sleeves. SLEEVES Sleeves knitted in the round. Cast on 32-34-36-36-40 sts on smaller double-pointed needles with 1 strand Karisma + 1 strand Alpaca; join and place a marker at the join. Knit rib – start with K 1 at marker. When the piece measures 6-8-8-8-8 cm change to larger double-pointed needles and Pattern 1 – see that the K rib in the pattern is above the K rib in the ribbing. When the piece measures 10-14-10-14-10 cm inc 1 st each side of the K st at marker every 2.5-2-2.5-2-2.5 cm a total of 14-16-16-17-17 times = 60-66-68-70-74 sts – knit the increased sts in the pattern as you go along. When the piece measures 45-48-50-50-52 cm bind off 7 sts at marker (bind off the the K st at marker + 3 sts each side of it) = 53-59-61-63-67 sts. Lay piece aside and knit second sleeve. YOKE Put the sleeves in on the same circular needles as Body where you bound off for armholes = 245-267-279-299-323 sts Put a marker in each transition between Body and sleeves = 4 markers. Knit 3-1-1-1-0 rows before beginning shaping. Read entire section before knitting: Raglan shaping: Dec at each side of all markers (= 8 decs) – see Decreasing tips above – every other row 21-23-24-25-27 times. Neck: When the piece measures 49-57-59-60-62 cm put 3-4-5-6-6 sts at each center front edge on st holders for the neck. Then bind off at each neck edge every other row: 2 sts 2-0-0-2-4 times and 1 st 2-6-6-4-2 times. After all shaping is complete 59-63-65-71-75 sts remain. Neckband: Pick up and knit approx. 10-16 sts at each side of neck on fronts (including sts on st holders) with 1 strand of each yarn and put all sts on smaller circular needles. K 1 row from wrong side, then K 1 row from right side, adjusting (inc/dec) to 83-83-91-103-111 sts on 2nd row. Then knit rib, keeping 3 sts in garter st at each side and beginning rib with K 1 (as seen from the right side). When the collar measures 20-22-22-24-24 cm bind off all sts in rib. ASSEMBLY Sew opening under the sleeve. Sew in zipper – start at lower edge. Fold the collar in half to wrong side and stitch in place, covering end of zipper. |
|||||||
Diagram explanations |
|||||||
|
|||||||
 |
|||||||
 |
|||||||
Have you finished this pattern?Tag your pictures with #dropspattern or submit them to the #dropsfan gallery. Do you need help with this pattern?You'll find 22 tutorial videos, a Comments/Questions area and more by visiting the pattern on garnstudio.com. © 1982-2026 DROPS Design A/S. We reserve all rights. This document, including all its sub-sections, has copyrights. Read more about what you can do with our patterns at the bottom of each pattern on our site. |
|||||||


With over 40 years in knitting and crochet design, DROPS Design offers one of the most extensive collections of free patterns on the internet - translated to 17 languages. As of today we count 324 catalogs and 12290 patterns - 12280 of which are translated into English (US/in).
We work hard to bring you the best knitting and crochet have to offer, inspiration and advice as well as great quality yarns at incredible prices! Would you like to use our patterns for other than personal use? You can read what you are allowed to do in the Copyright text at the bottom of all our patterns. Happy crafting!
Post a comment to pattern DROPS 85-13
We would love to hear what you have to say about this pattern!
If you want to leave a question, please make sure you select the correct category in the form below, to speed up the answering process. Required fields are marked *.