
Popular categories
Looking for a yarn?


Comments / Questions (40)
![]() Feu-Follet wrote:
Feu-Follet wrote:
Merci pour ce joli modèle, simple et rapide. 2 jours pour moi. Je ne vois pas le soucis des trous des diminutions, c'est décoratif. Par contre, attention les petites tailles, en taille S et bonnet A, avec un échantillon respecté, il est trop grand pour moi. Ce serait à refaire, je commencerais à 29 mailles au lieu de 31, et ne ferais pas les dernières augmentations mais un rang simple, pour une forme moins pointue.
23.07.2025 - 13:57
![]() Kayla Ceballos wrote:
Kayla Ceballos wrote:
I am using a weight 4 yarn and 3mm crochet hook and everyhting is coming out so large. I am a size Small so i am following the small sizing but the size of cup is massive, am i doing something wrong?
19.05.2025 - 22:16DROPS Design answered:
Dear Mrs Ceballos, what about your tension? To get the finished measurements matching you should have 22 dc (US- crochet terminology) x 12 rows = 10x10 cm / 4"x4" - if you don't get this, try with another crochet hook size or another yarn if it's not the right one. Happy crocheting!
20.05.2025 - 10:19
![]() Isabelle wrote:
Isabelle wrote:
Bonjour, quelle doit être le diamètre des perles, svp ? Merci beaucoup
28.04.2024 - 12:22DROPS Design answered:
Bonjour Isabelle, elles faisaient environ 0,9-1 cm. Bon crochet!
29.04.2024 - 09:42
![]() Isabelle wrote:
Isabelle wrote:
Bonjour, je suis en train de faire le triangle. J’en suis au lien. Je dois le crocheter sur 40 cm ou bien ces 40 cm sont à mesurer depuis tout l’ouvrage. Sinon, je suis d’accord avec les crocheteuses, les trous lorsqu’on saute 2 brides sont affreux. J’ai modifié le modèle et j’ai fait des diminutions en crochetant 3 brides en un. Ça se voit, mais c’est moins vilain que ces trous. Je pourrai vous envoyer une photo si vous le souhaitez. . Bien cordialement
28.04.2024 - 08:29DROPS Design answered:
Bonjour Isabelle, le lien doit mesurer environ 40 cm de longueur totale dans la 1ère taille. Bon crochet!
29.04.2024 - 09:14
![]() Karen Gunther wrote:
Karen Gunther wrote:
What "p.e." means? I think it's a kind of crochet point, but I can't find it anywhwere.
20.08.2023 - 04:13DROPS Design answered:
Dear Karen, which language are you working in? For example, in Spanish, p.e is "punto enano" or slip stitch. Happy crocheting!
20.08.2023 - 17:08
![]() May wrote:
May wrote:
Hallo! Ich habe ein Problem bemerkt beim Häkeln des Körbchens, nämlich, dass beim Arbeiten kleine Lücken zwischen den Stäbchen entstehen, wodurch man leicht durch den Stoff hindurchsehen kann, was nicht gerade praktisch ist, wenn man das Top ohne BH tragen möchte... Irgendwelche Tipps, was ich machen könnte, um die Dichte irgendwie zu erhöhen, damit man nicht so sehr durch die Maschen sehen kann? Brauche ich dickeres Garn oder eine kleinere Nadel oder so?
17.07.2023 - 18:50DROPS Design answered:
Liebe May, diese Löcher entstehen wenn man die Stäbchen überspringt, wenn Sie kein Loch möchten, nehmen Sie am besten ab. Viel Spaß beim häkeln!
27.07.2023 - 11:06
![]() Lucia Battisti wrote:
Lucia Battisti wrote:
Buongiorno vorrei capire se le diminuzione devono essere eseguite due assieme perché mi rimane un buco grazie
06.06.2021 - 19:15DROPS Design answered:
Buonasera Lucia, si creerà un piccolo buco con le diminuzioni. Buon lavoro!
06.06.2021 - 19:37
![]() Red wrote:
Red wrote:
Welchen Durchmesser haben die Holzperlen?
23.08.2020 - 16:40Kat wrote:
The cup i am working doesnt form a triangle rather the middle part is arising or having "angles". The sides dont get in shape (or forming a triangle) it remain straight. How can i fix this? Thank you.
17.06.2018 - 20:57DROPS Design answered:
Dear Kat, make sure you first increase 2 sts in the middle of piece (4-5 times depending on the size), then decrease first 1 st in the middle of piece (skipping the middle stitch) 1 time and continue skipping the 2 middle sts in the middle of piece until 4 sts remains. Happy crocheting!
18.06.2018 - 09:15Katrin wrote:
In increasing the decrease of every row is quite confusing. skipping 3stitches leaves a little hole in the middle of a row no matter how tight my tension is. how must i decrease, am i doing correctly?
01.06.2018 - 17:13DROPS Design answered:
Dear Katrin, in the middle of piece you will skip 2 sts and this will create a small hole - that belongs to the pattern. If you rather don't want any hole, you can crochet the 3 middle dc tog (= 2 sts dec). Happy crocheting!
04.06.2018 - 08:09
|
|
DROPS 95-26 |
|
|
|
|
DROPS Crochet bikini top with tassels in Safran
DROPS 95-26 |
|
|
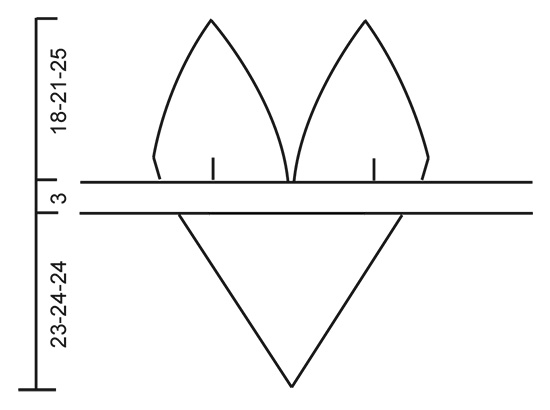
Crochet info: Turn each row with 3 ch. Increasing tips: Inc 2 dc by crocheting 3 dc in dc with marking thread. ---------------------------------------------------------------- Bikini top: Crochet each cup separately from bottom up. Cups are joined by crocheting together bottom edges. Cup: Ch 48-57-66 (includes 3 ch to turn with) using hook size 3mm/ C and Safran. 1st row: 1 dc in the 5th ch from the hook, *skip 1 ch, 1 dc in each of the next 2 ch*, repeat from *-* and finish with 1 dc in the last ch = 31-37-43 dc (the first dc = 3 ch). Insert a marker in the middle dc and let the marker follow the piece as you progress. Remaining rows: Crochet 1 dc in each dc – see Crochet info – at the same time inc 2 dc in the middle of the piece – see Increasing tips above – on the next 4-4-5 rows = 39-45-53 dc. Now start decreasing in the middle of the piece: on first row skip 1 dc in the middle of piece, on the following rows skip the middle 2 dc. Continue the dec until there are 4 dc left on row – piece measures approx 18-21-25 cm / 7"-8¼"-9¾". Crochet tie-string over the remaining 4 dc – 1 dc in each dc – until string measures approx 40 cm / 15¾", fasten off. Crochet one more cup. Joining together the cups: Crochet 1 dc in each of the dc at bottom edge on 1 cup and then 1 dc in each of the dc at bottom edge of the other cup = 62-74-86 dc. Crochet 2 rows with 1 dc in each dc, on the last row adjusting number of dc to 61-74-85 – do this by skipping the occasional dc. Change to crochet hook size 4mm / US G and crochet next row as follows: Size S: ch 5, skip 2 dc, 1 dc in next dc, *2 ch, skip 2 dc, 1 dc in next dc*, repeat from *-* to the end of row = 20 ch spaces. Turn the piece, crochet sl sts to the middle of first ch space, ch 5, 1 dc in next ch space, *2 ch, 1 dc in next ch space*, repeat from *-* to the end of row = 19 ch spaces. Size M: ch 5, skip 2 dc, 1 dc in next dc, *3 ch, skip 3 dc, 1 dc in next dc, ch 2, skip 2 dc, 1 dc in next dc*, repeat from *-* to the end of row = 21 ch spaces. Turn the piece, crochet sl sts to the middle of first ch space, ch 5, 1 dc in next ch space, *2 ch, 1 dc in next ch space, ch 3, 1 dc in next ch space*, repeat from *-* to the end of row = 20 ch spaces. Size L: ch 6, skip 3 dc, 1 dc in next dc, *3 ch, skip 3 dc, 1 dc in next dc*, repeat from *-* to the end of row = 21 ch spaces. Turn the piece, crochet sl sts to the middle of first ch space, ch 6, 1 dc in next ch space, *3 ch, 1 dc in next ch space*, repeat from *-* to the end of row = 20 ch spaces. All sizes: Continue like this (i.e. 1 less ch space per row) until there are 2 ch spaces left, fasten off. Crochet ch spaces around the triangular front pieces as follows, using crochet hook size 4mm / US G and starting at the top on the right side: 1 sc in the last dc-row before the ch spaces, ch 3, 1 sc in first ch space, *3 ch, 1 sc in next ch space*, repeat from *-* around the triangle and finish with 1 sc in first dc-row on the left side. Tie-strings for back: Crochet a tie-string form both sides of bikini top, using crochet hook size 3 mm/ C and starting in the lower row of dc as follows: 1 sl st and ch 3, 9 dc along the edge (2 dc in each dc). Turn the piece with 3 ch and crochet 1 dc in each dc. Continue until string measures approx 15-17-19 cm / 6"-6¾"-7½". Now dec 1 dc at the beginning of each row by skipping the first dc from previous row. Continue to decrease until there are 4 dc left on row and continue over these 4 dc until string measures approx 40-45-50 cm / 15¾"-17¾"-19¾". Fasten off and crochet a similar string the other side. Tassels: Insert tassels along the sides of triangular front piece. 1 tassel = 2 strands, each 35 cm / 13¾" long. Fold strands, pull loop through ch space and pull ends through loop. Put a bead on tassel and tie a knot approx 5 cm / 2" from the top. Insert a tassel in every other ch space on both sides. |
|
 |
|
Have you finished this pattern?Tag your pictures with #dropspattern or submit them to the #dropsfan gallery. Do you need help with this pattern?You'll find 4 tutorial videos, a Comments/Questions area and more by visiting the pattern on garnstudio.com. © 1982-2026 DROPS Design A/S. We reserve all rights. This document, including all its sub-sections, has copyrights. Read more about what you can do with our patterns at the bottom of each pattern on our site. |


With over 40 years in knitting and crochet design, DROPS Design offers one of the most extensive collections of free patterns on the internet - translated to 17 languages. As of today we count 325 catalogs and 12298 patterns - 12288 of which are translated into English (US/in).
We work hard to bring you the best knitting and crochet have to offer, inspiration and advice as well as great quality yarns at incredible prices! Would you like to use our patterns for other than personal use? You can read what you are allowed to do in the Copyright text at the bottom of all our patterns. Happy crafting!
Post a comment to pattern DROPS 95-26
We would love to hear what you have to say about this pattern!
If you want to leave a question, please make sure you select the correct category in the form below, to speed up the answering process. Required fields are marked *.