
Popular categories
Looking for a yarn?


Comments / Questions (59)
![]() DROPS Design NL wrote:
DROPS Design NL wrote:
Mijn laatste opmerking moet zijn: Dwz, meerder eerst voor de merkdraad, brei 1 nld, meerder na de merkdraad, brei 1 nld, en meerder weer voor de merkdraad (3 keer meerderen op beide schouders).
09.10.2008 - 10:59
![]() DROPS Design NL wrote:
DROPS Design NL wrote:
Dwz, meerder eerst voor de merkdraad, brei 1 nld, en meerder voor de merkdraad, brei 1 nld, en meerder weer na de merkdraad op beide schouders (3 keer meerderen op beide schouders). Is het nu duidelijker? Veel breiplezier. Gr. Tine
09.10.2008 - 10:57
![]() DROPS Design NL wrote:
DROPS Design NL wrote:
Meerderen voor/achter: meerder totaal 21-22-23-24 keer 2 steken in elke 4e nld. Dwz, maak 1 omslag aan beide kanten van de 4 middelste steken. Meerderen schouders: meerder totaal 3 x 1 steken afwisselend voor en na de merkdraad op de schouder in elke 2e nld. Maak hier ook een omslag.
09.10.2008 - 10:57
![]() DROPS Design NL wrote:
DROPS Design NL wrote:
Hoi Marijke. Ik zal proberen om het meerderen anders uit te leggen. Deze poncho wordt in het rond gebreid. Brei eerst de kraag. Wisset naar Vienna en pas het aantal steken aan. Plaats de 4 merkdraden zoals wordt beschreven. Je meerdert aan weerskanten van deze 4 draden: voor en achter = 2 draden en schouders = 2 draden. Je meerdert door 1 omslag te maken (zie Tips Meerderen aan het begin van het patroon).
09.10.2008 - 10:52
![]() Marijke wrote:
Marijke wrote:
Wat geweldig de patr. ik ben deze poncho begonnen maar ik snap het meerderen niet zou u dat wat anders uit kunnen leggen bij voorbaat hartelijk dank
06.10.2008 - 22:34
![]() Gun Aspnäs wrote:
Gun Aspnäs wrote:
Olkalisäykset aloitetaan heti sen jälkeen kuin merkkilangat on kiinnitetty työhön. Kun työn korkeus on 9 cm nämä lisäykset ovat jo valmiit ja sivukavennukset voidaan aloittaa.
10.08.2007 - 18:37
![]() Joanna Tedder wrote:
Joanna Tedder wrote:
Olisin kysynyt ponchon sivukavennuksista 9cm jälkeen (5x1), tehdäänkö niiden kanssa edelleen olkalisäyksiä (3x1)?
10.08.2007 - 00:52
![]() wrote:
wrote:
Helt riktigt. Vi har ändrat lite i mönstertexten för att göra det lite enklare. Mvh Lena
06.04.2006 - 10:37
![]() Niclas Ember wrote:
Niclas Ember wrote:
Jag undrar över sidavmasknigarna i "Vienna-delen" av den här ponchon. Det står att man ska maska av en maska i varje sida med jämna mellanrum. Betyder det att man ska minska en maska (sticka två tillsammans) eller är det något annat "knep" för att få den rundade formen på nerkanten av ponchon? Tack på förhand.
05.04.2006 - 20:59
|
|
Beach Wedding |
|
 |
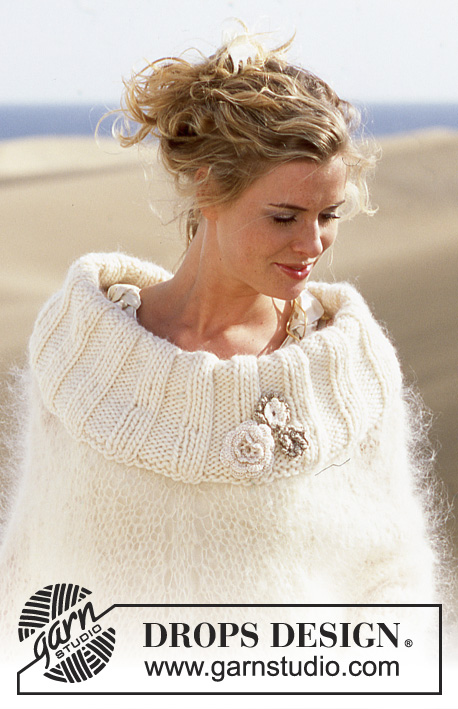 |
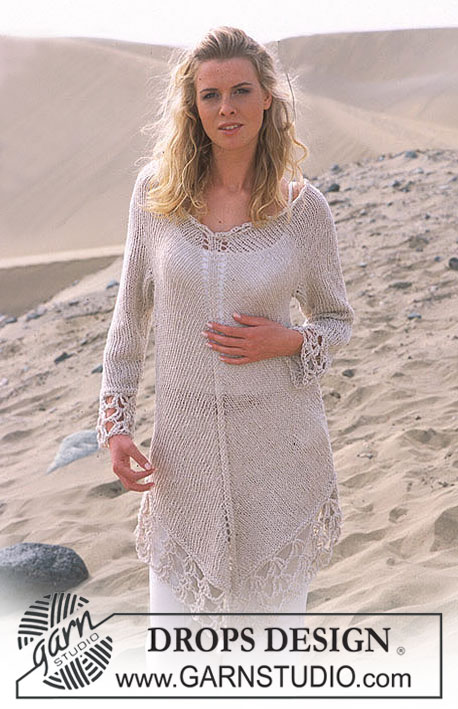
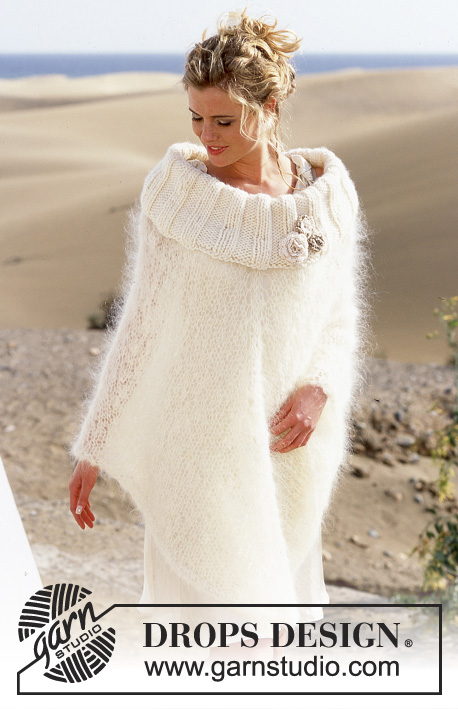
DROPS Poncho in Vienna or Melody and Snow, with crocheted flowers in Cotton Viscose
DROPS 89-25 |
|
|
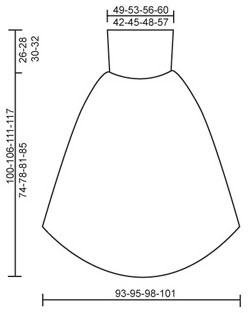
Gauge: Snow: 10 sts x 14 rows on smaller needles in stockinette st = 10 x 10 cm Vienna / Melody: 8 sts x 10 rows on larger needles in stockinette st = 10 x 10 cm Rib: * K 4, P 3 *, repeat * - *. Increasing tips (for front and back): Inc by making a yo at each side of the center 4 sts (in Size XL/XXL increase at each side of the center 3 sts) at center front and center back. Poncho: The poncho is knit from neck down. Loosely cast on 98-105-112-119 sts on smaller circular needles with Snow; join and place a marker at the join. P 1 row and then knit rib – see instructions above. When the piece measures 13-14-15-16 cm dec all K 4 to K 3 = 84-90-96-102 sts. Continue until piece measures 26-28-30-32 cm, then K 1 row, P 1 row. . Change to larger circular needles and Vienna or Melody and knit stockinette st, decreasing to 68-72-76-82 sts on the 1st row. On the next row put 4 markers in work as follows: * 1 marker (= shoulder), 17-18-19-20 sts, 1 marker (= center front or back) – in Size XL/XXL put the marker in the 21st st, 17-18-19-20 sts *, repeat * - *. Measure the work from here. Read entire next section before knitting: Inc center front and center back: Continue in stockinette st, and inc every 3 rows – see Increasing tips – a total of 21-22-23-24 times. Shoulder inc: Inc 1 st for each shoulder (alternately before and after the marker) every other row a total of 3 times. Side dec: When the piece measures 9-7-6-5 cm dec 1 st at each side (alternately before and after the marker) every 9-7-6-5 cm a total of 5-7-9-11 times. After all incs and decs are complete there are 148-152-156-162 sts. The poncho measures approx. 59-62-65-68 cm from neck and down along shoulders, and approx. 74-78-81-85 cm from neck and down center front. P 1 row (right side) and then bind off. So that the points will not roll, K 2 sts in each of the 2 sts at the center (in Size XL knit 2 sts in each st at each side of the center st) and bind off both sts. Crocheted flowers: Make 3 flowers for decoration on poncho. Large blossom: Ch 4 with natural Cotton Viscose and join into a ring with 1 sl st. 1st row: 1 sc in ring, * ch 2, 1 sc in ring *, repeat from * - * a total of 7 times and finish with ch 2 and 1 sl st in 1st sc at start of row = 8 ch-loops. 2nd row: ch 1, crochet as follows in each ch-loop: * 1 sc, 2 dc, 1 sc *, and finish with 1 sl st in first sc at start of row. Turn piece – blossom is completed from back side. 3rd row: ch 1, * 1 sc in sc from 1st row (crochet on back side of petal around sts from previous row, pull yarn tight), ch 3 *, repeat * - * a total of 8 times and finish with 1 sl st in 1st sc at start of row. 4th row: ch 1, crochet as follows in each ch-loop: * 1 sc, 4 dc, 1 sc *, and finish with 1 sl st in 1st sc at start of row. 5th row: ch 1, * 1 sc in sc from 3rd row (crochet on back side of the 2 petals around sts from previous row, pull yarn tight), ch 4 *, repeat * - * a total of 8 times and finish with 1 sl st in 1st sc at start of row. 6th row: ch 1, crochet as follows in each ch-loop: * 1 sc, 6 dc, 1 sc *, and finish with 1 sl st in 1st sc at start of row. Cut yarn and fasten. Medium blossom: Crochet a small blossom in natural Cotton Viscose as follows: Ch 4 and join into a ring with 1 sl st. 1st row: 1 sc in ring, * ch 5, 1 sc in ring *, repeat * - * a total of 15 times (the loops will fit tightly in the ring) and finish with ch 5 and 1 sl st in 1st sc at start of row = 16 ch-loops. Cut yarn and fasten. Then crochet a larger blossom in light beige Cotton Viscose as follows: Ch 5 and join into a ring with 1 sl st. 1st row: 1 sc in ring, * ch 10, 1 sc in ring *, repeat * - * a total of 19 times (the loops will fit tightly in the ring) and finish with ch 10 and 1 sl st in 1st sc at start of row = 20 ch-loops. Cut yarn and fasten. Lay the smaller natural blossom on the light beige blossom and sew together. Small blossom: Crochet the same as the larger blossom in the Medium blossom instructions. Sew flowers on the collar – see photo for placement. |
|
 |
|
Have you finished this pattern?Tag your pictures with #dropspattern or submit them to the #dropsfan gallery. Do you need help with this pattern?You'll find 16 tutorial videos, a Comments/Questions area and more by visiting the pattern on garnstudio.com. © 1982-2026 DROPS Design A/S. We reserve all rights. This document, including all its sub-sections, has copyrights. Read more about what you can do with our patterns at the bottom of each pattern on our site. |
|


With over 40 years in knitting and crochet design, DROPS Design offers one of the most extensive collections of free patterns on the internet - translated to 17 languages. As of today we count 324 catalogs and 12272 patterns - 12262 of which are translated into English (US/in).
We work hard to bring you the best knitting and crochet have to offer, inspiration and advice as well as great quality yarns at incredible prices! Would you like to use our patterns for other than personal use? You can read what you are allowed to do in the Copyright text at the bottom of all our patterns. Happy crafting!
Post a comment to pattern DROPS 89-25
We would love to hear what you have to say about this pattern!
If you want to leave a question, please make sure you select the correct category in the form below, to speed up the answering process. Required fields are marked *.