
Popular categories
Looking for a yarn?


Comments / Questions (59)
![]() Sandra Schniederjann wrote:
Sandra Schniederjann wrote:
Wird der Poncho am Anfang beim Kragen als Runde geschlossen?
13.10.2020 - 13:38DROPS Design answered:
Liebe Frau Schniederjann, der Poncho wird von oben nach unten in Runden gestrickt, dh vom Kragen schon. Viel Spaß beim stricken!
13.10.2020 - 16:10
![]() Angie wrote:
Angie wrote:
Ich verstehe die Zu- und Abnahmen leider immernoch nicht. Rechts und links neben den 4 mittleren Maschen? ich habe doch jeweils vorne und hinten nur eine Mittlere Masche... auch die Schulter Ab und Zunahmen....
01.10.2020 - 14:10DROPS Design answered:
Liebe Angie, es wird in der Mitte vom Vorder- + Rückenteil beiseitig von den 4 (oder nur 3) mitteleren Maschen zugenommen - und es wird auch für den Schultern 1 Masche zuerst vor der Markierung, dann nächstes Mal nach der Markieurng (und immer diese 2 Zunahmen wiederholen) zugenommen (= 1 Zunahme bei jedem Schulter). Dann wird es für die Seiten abgenommen (erstes Mal vor der Markierung, nächstes Mal nach der Markierung und die beiden Abnahme wiederholen). Viel Spaß beim stricken!
01.10.2020 - 16:05
![]() Jelena Ivanova wrote:
Jelena Ivanova wrote:
Dear Madam/Sir, I do not understand what it means Rib: * K 4, P 3 *, repeat * - *. could you send a knitting pattern please Kind Regards, Elena
09.08.2019 - 05:06DROPS Design answered:
Dear Mrs Ivanonva, when you work rib *K4, P3,* you will work alternately 4 knit stitches and 3 purl stitches, since you are working in the round, you will repeat this pattern in height, ie on next rounds work K over K and P over P. Happy knitting!
09.08.2019 - 08:27
![]() Yvonne Krause-Nielinger wrote:
Yvonne Krause-Nielinger wrote:
Hallo! Könnten Sie mir diesen wunderschönen Poncho auch fertig gestrickt liefern? Bin leider absolut unfähig was stricken angeht. Viele Grüße Yvonne Krause
02.07.2019 - 10:46
![]() Monica wrote:
Monica wrote:
Mi sono avvicinata alla maglieria dopo tanti anni e nel vostro sito ho trovato dei suggerimenti interessanti. Grazie
20.03.2019 - 22:30
![]() Monica wrote:
Monica wrote:
Ciao, sto cercando di realizzare questo bellissimo poncho, ma non capisco bene gli aumenti. Devo aumentare sempre prima e dopo il marcatore sulle spalle? E sul davanti devo aumentare solo una maglia alla volta? Grazie se mi risponderete. Monica .
20.03.2019 - 22:29DROPS Design answered:
Buongiorno Monica. Sulle spalle alterna gli aumenti una volta prima e una volta dopo il marcatore. Al centro sul davanti e sul dietro, aumenta facendo 1 maglia gettata prima delle 4 maglie centrali (3 maglie centrali per la taglia più grande) e 1 maglia gettata dopo le 4 maglie centrali (3 maglie centrali nella taglia più grande). Buon lavoro!
21.03.2019 - 08:29
![]() Lucinda wrote:
Lucinda wrote:
Thank you so much for your assistance. :)
19.03.2019 - 23:10
![]() Lucinda wrote:
Lucinda wrote:
Hello, Just about to finish. Will I purl the last row except for knitting the two stitches in the centre stitches and then next row cast off in knit stitches or purl please? Lucinda.
19.03.2019 - 04:37DROPS Design answered:
Dear Lucinda, you first purl one row over all sts (including the middle sts), then cast off on next row by knitting all sts (just knit the 2 middle sts twice while casting off). Happy knitting!
19.03.2019 - 10:37
![]() Lucinda wrote:
Lucinda wrote:
Thank you. When I increase for the centre front and centre back do I increase before the centre 4 stitches then knit 4 and increase after them, giving 6 stitches? On the shoulder increase is it increase before each shoulder marker in one row and in the second row after that increase after each shoulder marker?
28.10.2018 - 07:22DROPS Design answered:
Dear Lucinda, you should always increase before and after the 4 stitch (not six, or more). As for the shoulder, you are right, at one time you should increase before the markers, and the next time after them. Happy Knitting!
29.10.2018 - 00:30
![]() Lucinda wrote:
Lucinda wrote:
Hello, How many 50 g balls of Melody yarn are needed for the poncho please? The pattern says 200 g for the M size but that doesn't seem much.Thanks, Lucinda.
18.10.2018 - 05:48DROPS Design answered:
Dear Lucinda, the amount given in the pattern is corect. Do not forget that the Melody yarn is extremely light, and there is about 140 meters in one ball. I hope this helps. Happy Crafting!
18.10.2018 - 07:42
|
|
Beach Wedding |
|
 |
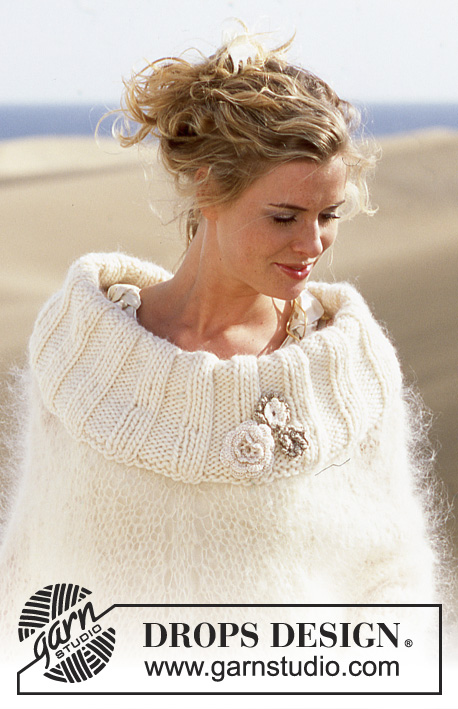 |
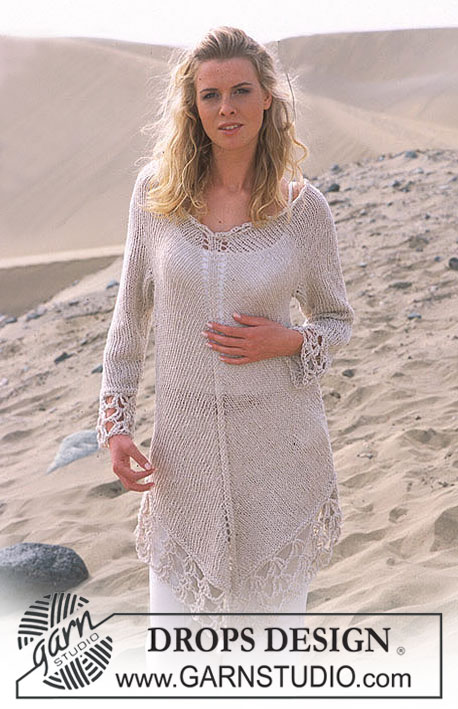
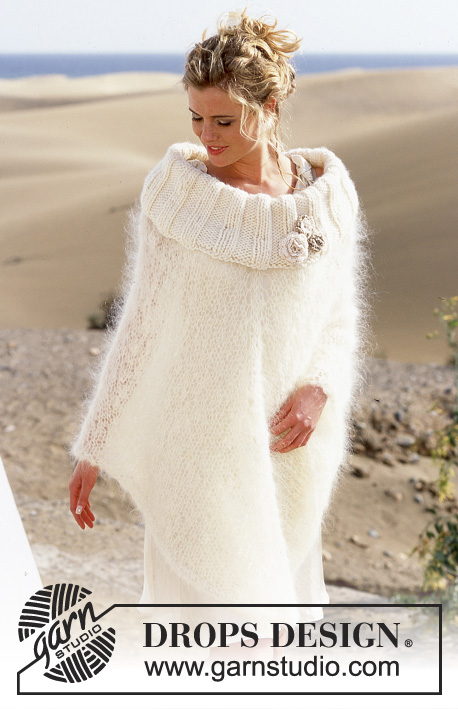
DROPS Poncho in Vienna or Melody and Snow, with crocheted flowers in Cotton Viscose
DROPS 89-25 |
|
|
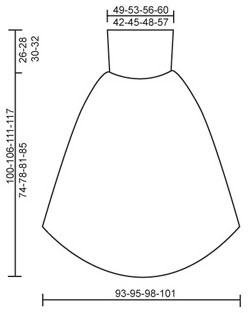
Gauge: Snow: 10 sts x 14 rows on smaller needles in stockinette st = 10 x 10 cm Vienna / Melody: 8 sts x 10 rows on larger needles in stockinette st = 10 x 10 cm Rib: * K 4, P 3 *, repeat * - *. Increasing tips (for front and back): Inc by making a yo at each side of the center 4 sts (in Size XL/XXL increase at each side of the center 3 sts) at center front and center back. Poncho: The poncho is knit from neck down. Loosely cast on 98-105-112-119 sts on smaller circular needles with Snow; join and place a marker at the join. P 1 row and then knit rib – see instructions above. When the piece measures 13-14-15-16 cm dec all K 4 to K 3 = 84-90-96-102 sts. Continue until piece measures 26-28-30-32 cm, then K 1 row, P 1 row. . Change to larger circular needles and Vienna or Melody and knit stockinette st, decreasing to 68-72-76-82 sts on the 1st row. On the next row put 4 markers in work as follows: * 1 marker (= shoulder), 17-18-19-20 sts, 1 marker (= center front or back) – in Size XL/XXL put the marker in the 21st st, 17-18-19-20 sts *, repeat * - *. Measure the work from here. Read entire next section before knitting: Inc center front and center back: Continue in stockinette st, and inc every 3 rows – see Increasing tips – a total of 21-22-23-24 times. Shoulder inc: Inc 1 st for each shoulder (alternately before and after the marker) every other row a total of 3 times. Side dec: When the piece measures 9-7-6-5 cm dec 1 st at each side (alternately before and after the marker) every 9-7-6-5 cm a total of 5-7-9-11 times. After all incs and decs are complete there are 148-152-156-162 sts. The poncho measures approx. 59-62-65-68 cm from neck and down along shoulders, and approx. 74-78-81-85 cm from neck and down center front. P 1 row (right side) and then bind off. So that the points will not roll, K 2 sts in each of the 2 sts at the center (in Size XL knit 2 sts in each st at each side of the center st) and bind off both sts. Crocheted flowers: Make 3 flowers for decoration on poncho. Large blossom: Ch 4 with natural Cotton Viscose and join into a ring with 1 sl st. 1st row: 1 sc in ring, * ch 2, 1 sc in ring *, repeat from * - * a total of 7 times and finish with ch 2 and 1 sl st in 1st sc at start of row = 8 ch-loops. 2nd row: ch 1, crochet as follows in each ch-loop: * 1 sc, 2 dc, 1 sc *, and finish with 1 sl st in first sc at start of row. Turn piece – blossom is completed from back side. 3rd row: ch 1, * 1 sc in sc from 1st row (crochet on back side of petal around sts from previous row, pull yarn tight), ch 3 *, repeat * - * a total of 8 times and finish with 1 sl st in 1st sc at start of row. 4th row: ch 1, crochet as follows in each ch-loop: * 1 sc, 4 dc, 1 sc *, and finish with 1 sl st in 1st sc at start of row. 5th row: ch 1, * 1 sc in sc from 3rd row (crochet on back side of the 2 petals around sts from previous row, pull yarn tight), ch 4 *, repeat * - * a total of 8 times and finish with 1 sl st in 1st sc at start of row. 6th row: ch 1, crochet as follows in each ch-loop: * 1 sc, 6 dc, 1 sc *, and finish with 1 sl st in 1st sc at start of row. Cut yarn and fasten. Medium blossom: Crochet a small blossom in natural Cotton Viscose as follows: Ch 4 and join into a ring with 1 sl st. 1st row: 1 sc in ring, * ch 5, 1 sc in ring *, repeat * - * a total of 15 times (the loops will fit tightly in the ring) and finish with ch 5 and 1 sl st in 1st sc at start of row = 16 ch-loops. Cut yarn and fasten. Then crochet a larger blossom in light beige Cotton Viscose as follows: Ch 5 and join into a ring with 1 sl st. 1st row: 1 sc in ring, * ch 10, 1 sc in ring *, repeat * - * a total of 19 times (the loops will fit tightly in the ring) and finish with ch 10 and 1 sl st in 1st sc at start of row = 20 ch-loops. Cut yarn and fasten. Lay the smaller natural blossom on the light beige blossom and sew together. Small blossom: Crochet the same as the larger blossom in the Medium blossom instructions. Sew flowers on the collar – see photo for placement. |
|
 |
|
Have you finished this pattern?Tag your pictures with #dropspattern or submit them to the #dropsfan gallery. Do you need help with this pattern?You'll find 16 tutorial videos, a Comments/Questions area and more by visiting the pattern on garnstudio.com. © 1982-2026 DROPS Design A/S. We reserve all rights. This document, including all its sub-sections, has copyrights. Read more about what you can do with our patterns at the bottom of each pattern on our site. |
|


With over 40 years in knitting and crochet design, DROPS Design offers one of the most extensive collections of free patterns on the internet - translated to 17 languages. As of today we count 324 catalogs and 12272 patterns - 12262 of which are translated into English (US/in).
We work hard to bring you the best knitting and crochet have to offer, inspiration and advice as well as great quality yarns at incredible prices! Would you like to use our patterns for other than personal use? You can read what you are allowed to do in the Copyright text at the bottom of all our patterns. Happy crafting!
Post a comment to pattern DROPS 89-25
We would love to hear what you have to say about this pattern!
If you want to leave a question, please make sure you select the correct category in the form below, to speed up the answering process. Required fields are marked *.