
Popular categories
Looking for a yarn?


Comments / Questions (7)
![]() Kiki wrote:
Kiki wrote:
Ik begrijp de afstand van de bovenste twee knoopsgaten niet. De bovenste op de hals, daarna pas op 8 cm, de rest op afstand 7.5 cm bij maat L. Dan komen de knopen ongelijk uit lijkt me.
25.04.2026 - 09:35
![]() Pernilla wrote:
Pernilla wrote:
Tillägg till tidigare inlägg; Eller rättare sagt så lutar ökningen varannan gång till vänster sen höger på ärmen (på rätsidan: ökning åt vänster(första m) sen sista maskan höger, avigsidan: ökning åt vänster(första m) sen sista maskan höger).Ska det vara så? Mvh Pernilla
02.03.2026 - 11:26DROPS Design answered:
Hei Pernille. Se vårt forrige svar til deg. mvh DROPS Design
23.03.2026 - 10:37
![]() Pernilla wrote:
Pernilla wrote:
Hej. Har lite funderingar, stämmer lutningen på ökningarna på ärmarna (när man sätter ihop fram/bakstycke- och ärmmaskor)? Enligt mönstret så blir lutningen kompatibel med fram/bakstycke och inte ärmarna, alltså de lutar in mot ärmarna, men det kanske ska vara så? Tack på förhand. Med vänlig hälsning, Pernilla.
02.03.2026 - 10:57DROPS Design answered:
Hei Pernille. Ta en titt på hjelpevideoene som er lagt til denne oppskriften, der ser du hvordan økningene skal vende. Klikk på Videor til høyre eller under bildet. mvh DROPS Design
23.03.2026 - 10:36
![]() Cornelia wrote:
Cornelia wrote:
Was ist ein Rollrand? Sie schreiben 3Reihen glatt rechts und in Klammer, d.h. Links in der Rückseite und rechts in der Hinreihe🤔
15.12.2025 - 16:05DROPS Design answered:
Liebe Cornelia, am Ende der Halskante wird man 3 Reihen Glattrechts stricken (so ja genau rechts bei den Hinreihen und links bei den Rückreihen), dann abketten, so wird sich die Kante einrollen. Viel Spaß beim Stricken!
16.12.2025 - 08:52
![]() Aniek wrote:
Aniek wrote:
Ik begrijp het niet dat men 1 ribbelsteek moet breien. Hoe werkt dat? Onderaan pagina 4. De sluiting is toch breder dan 1 steek. Mijn eerste keer Europese schouder en begrijp het maar half dit gedeelte. Hoeveel steken is de sluiting aan beide kanten?
26.10.2025 - 09:24DROPS Design answered:
Dag Aniek,
Deze ene ribbelsteek is de kantsteek. Op het einde worden steken opgenomen voor de biezen binnen deze kant steek. De bies wordt dus op het einde gebreid en niet tijdens het breien van de panden.
26.10.2025 - 11:57
![]() Kinou wrote:
Kinou wrote:
Bonsoir, merci pour ce magnifique modèle ! Encore un :) je voudrais juste savoir si le modèle présenté est celui en Alpaca ou en Flora. Soit le grenat soit le rouge :) je trouve cette couleur superbe et ne voudrais pas me tromper en le commandant. Merci d’avance
27.09.2025 - 19:29DROPS Design answered:
Bonsoir Mme Kinou, le modele presente est en Alpaca, no 3650. Bon tricot!
27.09.2025 - 21:23
![]() Halina wrote:
Halina wrote:
Bardzo dziękuję za ten wzór . Taki model szukałam na Waszej stronie z europejskimi ale nie opadającymi ramionami.
21.09.2025 - 22:40
|
||||||||||||||||||||||
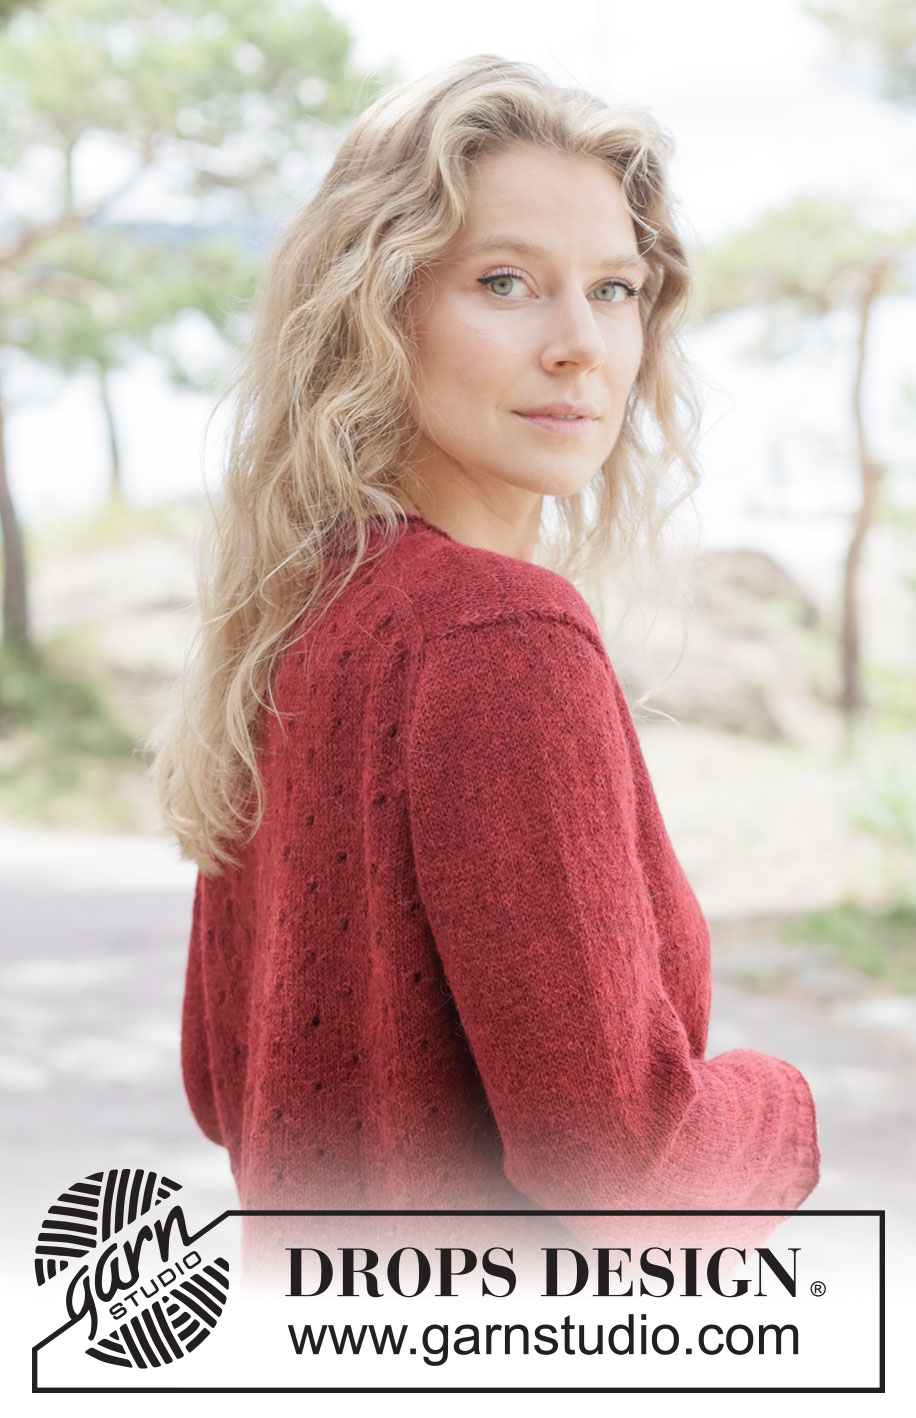
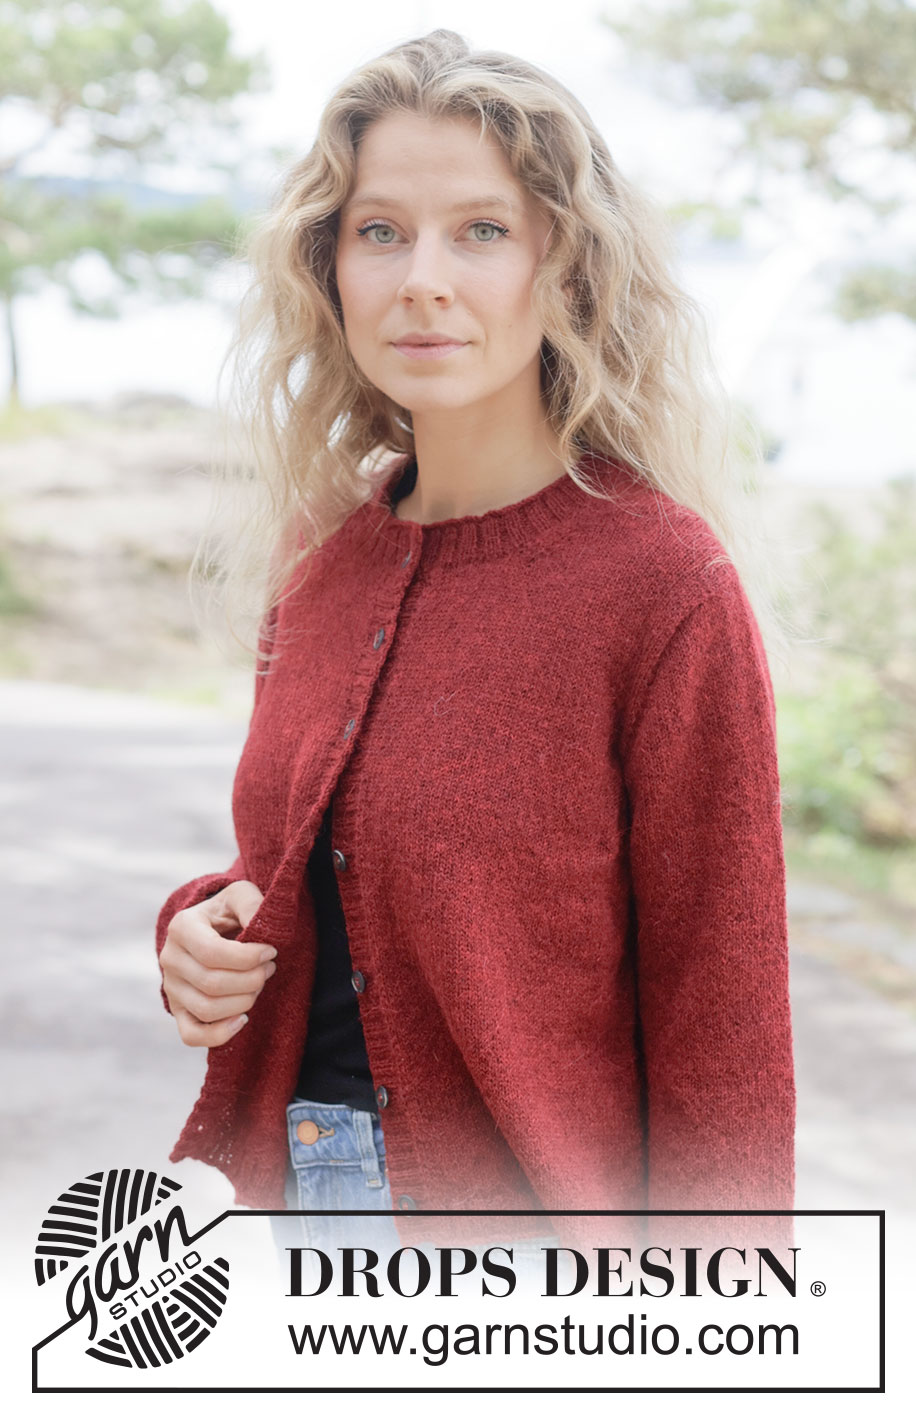
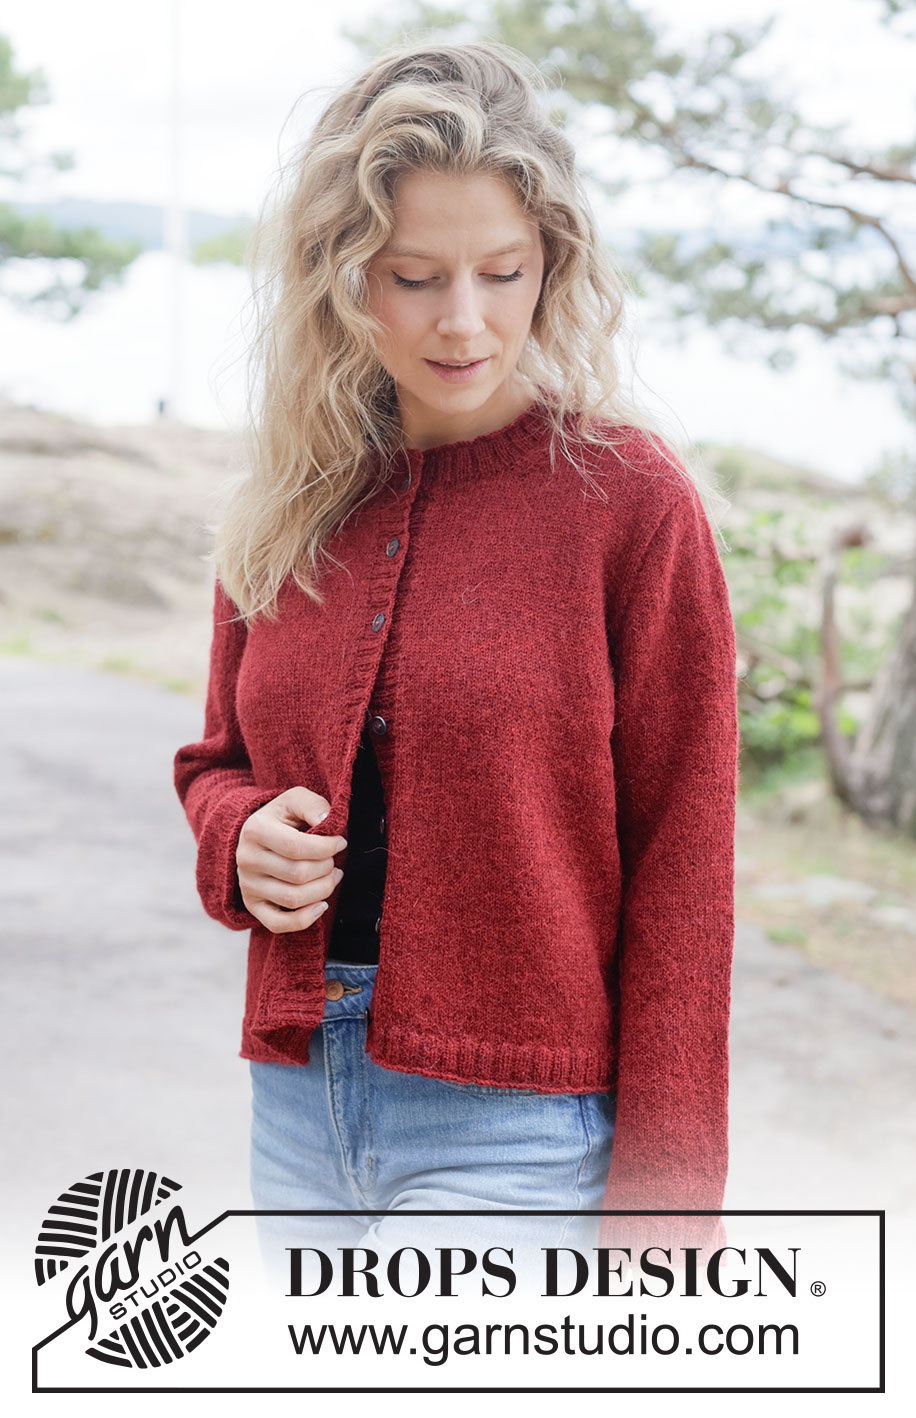
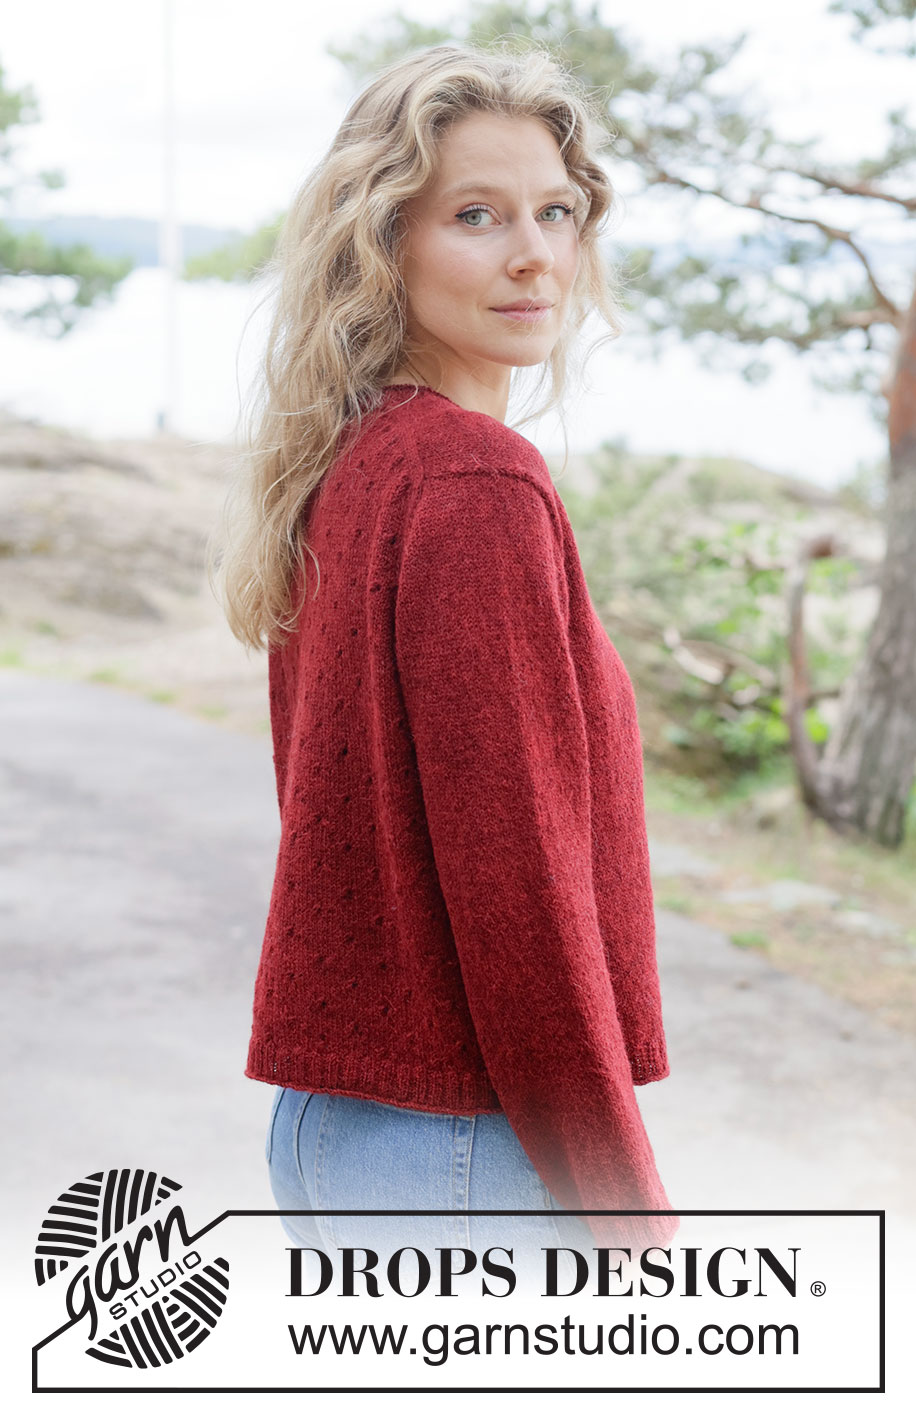
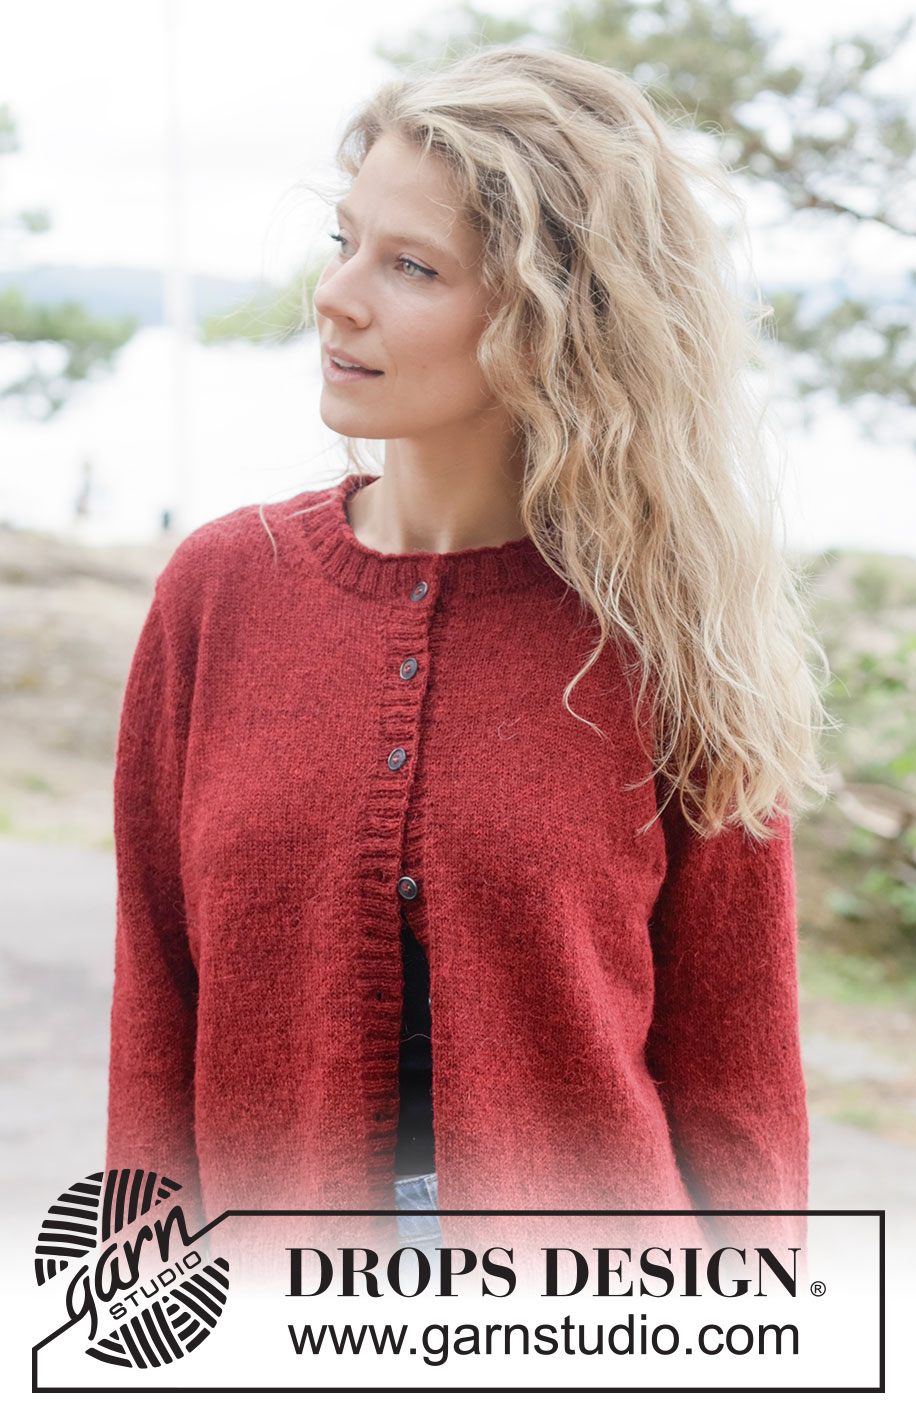
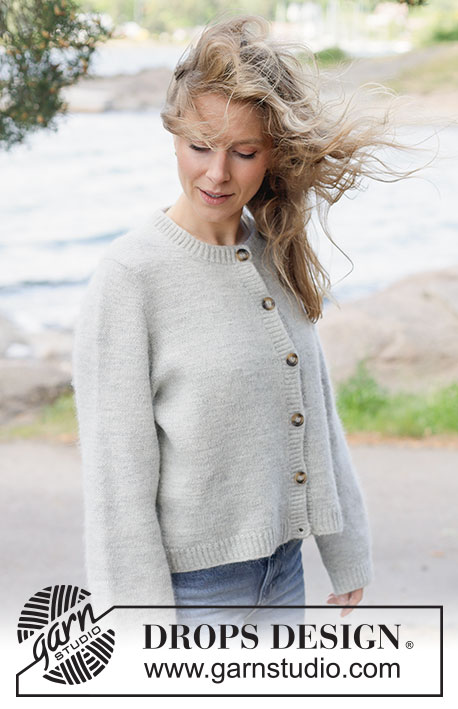
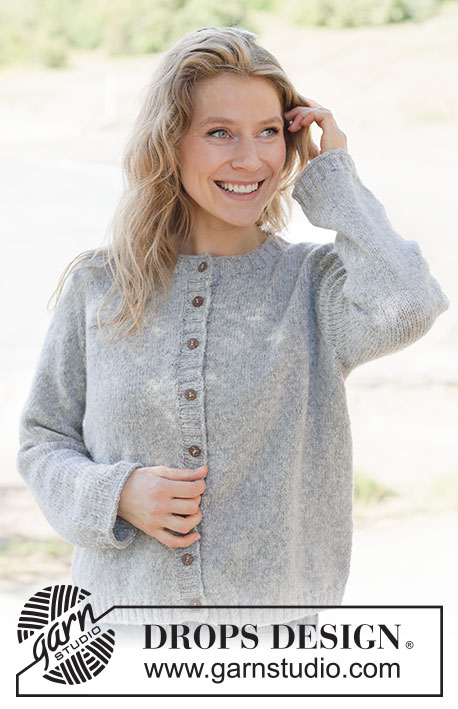
Spiced Cranberry Cardigan#spicedcranberrycardigan |
||||||||||||||||||||||
 |
 |
|||||||||||||||||||||
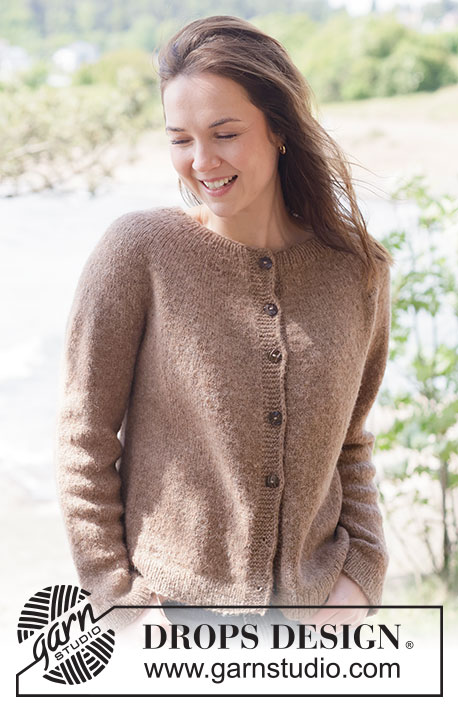
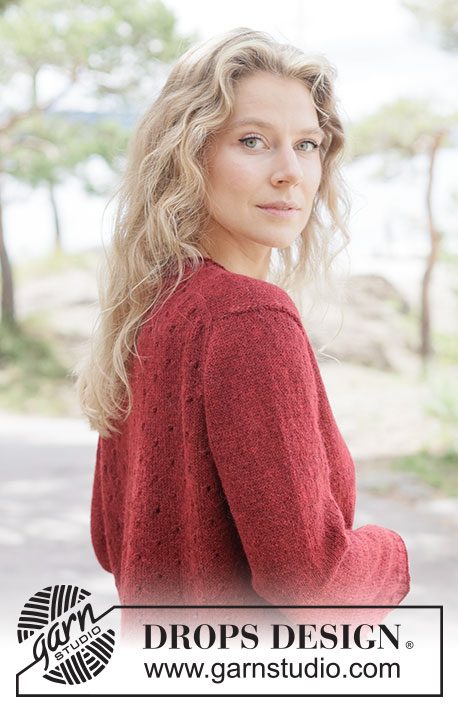
Knitted jacket in DROPS Alpaca or DROPS Flora. The piece is worked top down in stockinette stitch, with European yoke, lace pattern on back piece and rolled edges. Sizes XS - XXXL.
DROPS 264-11 |
||||||||||||||||||||||
|
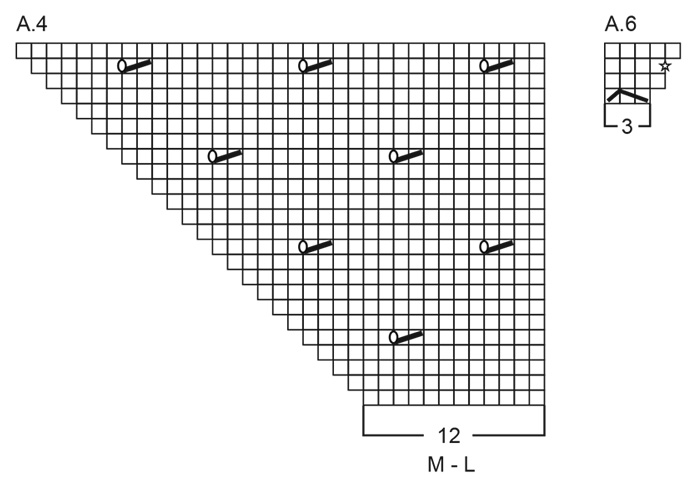
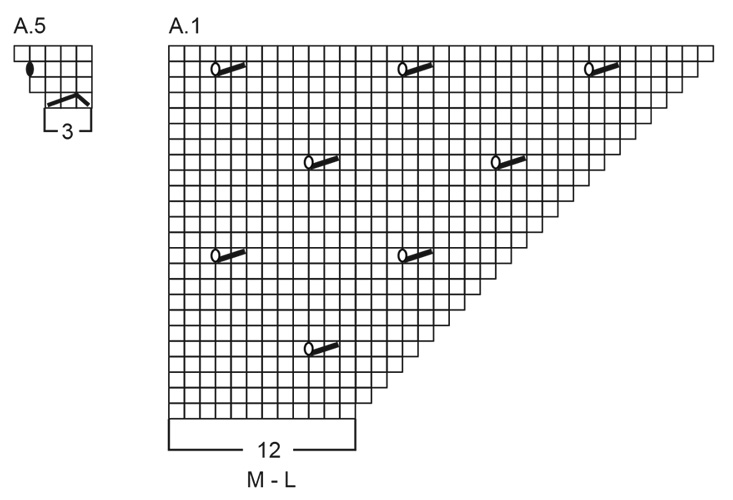
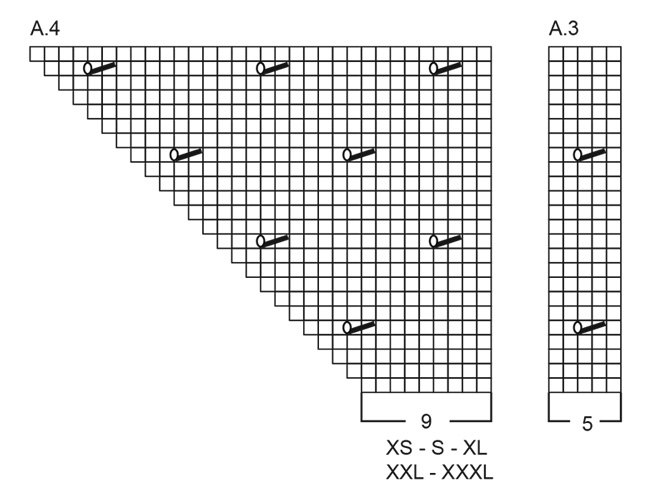
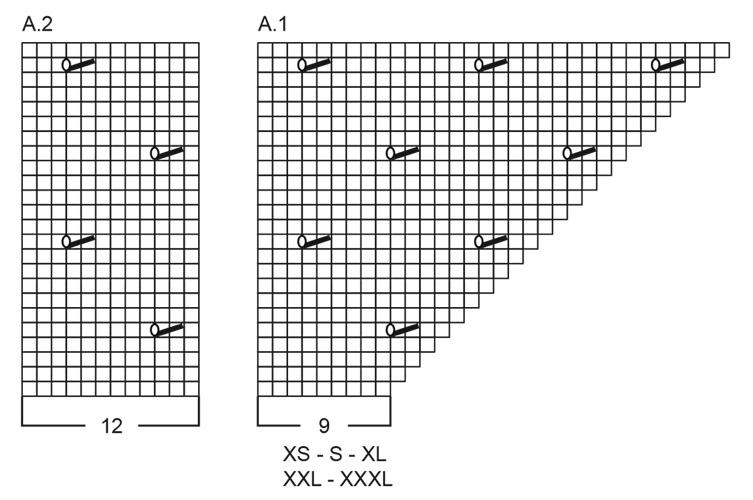
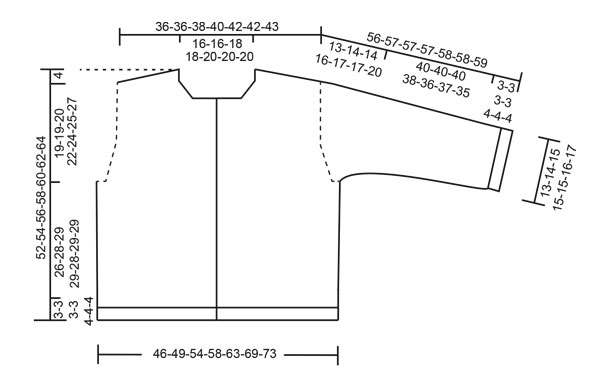
------------------------------------------------------- EXPLANATIONS FOR THE PATTERN: ------------------------------------------------------- PATTERN: See diagrams A.1 to A.6. Choose diagram for your size (applies to A.1 and A.4). The diagrams are read from right to left when working from right side and left to right when working from wrong side. INCREASE TIP-1: INCREASE 1 STITCH TOWARDS THE LEFT - from RIGHT SIDE: Use left needle to pick up yarn between 2 stitches from row below, pick up yarn from the front and knit in the stitch loop that is on the back of the needle. INCREASE 1 STITCH TOWARDS THE RIGHT - from RIGHT SIDE: Use left needle to pick up yarn between 2 stitches from row below, pick up yarn from the back and knit in the stitch loop that is on the front side of the needle. INCREASE TIP-2: INCREASE 1 STITCH TOWARDS THE RIGHT - from WRONG SIDE: Use left needle to pick up yarn between 2 stitches from row below, pick up yarn from the back and purl in the stitch loop that is on the front side of the needle. INCREASE 1 STITCH TOWARDS THE LEFT - from WRONG SIDE: Use left needle to pick up yarn between 2 stitches from row below, pick up yarn from the front and purl in the stitch loop that is on the back side of the needle. GARTER STITCH (worked back and forth): Knit all rows, from both the right and wrong side. 1 ridge in height = knit 2 rows. SLEEVE TIP: When knitting up stitches under the sleeve, you can get a small hole in the transition between stitches on the body and sleeve. This hole can be closed by picking up the strand between 2 stitches and working this strand twisted together with the first stitch between body and sleeve. DECREASE TIP: Decrease 1 stitch on each side of the marker-thread as follows: Work until there are 4 stitches left before the marker-thread, knit 2 together, knit 4 (marker-thread sits between these 4 stitches), slip 1 stitch knit-wise, knit 1 and pass the slipped stitch over the knitted stitch (2 stitches decreased). BUTTONHOLES: Work the buttonholes on the right band from the right side, working in a purled section as follows: ROW 1 (right side): Purl 2 together, make 1 yarn over. ROW 2 (wrong side): Work the band as before, knit the yarn over to leave a hole. Work 6-6-6-6-6-6-6 button holes evenly spaced when the band measures 1½ cm = ½". The top buttonhole is worked 6-7-7-8-8-7-8 cm = 2⅜"-2¾"-2¾"-3⅛"-3⅛"-2¾"-3⅛" from the neckline, the bottom buttonhole 3-3-3-3-4-4-4 cm = 1⅛"-1⅛"-1⅛"-1⅛"-1½"-1½"-1½" from the bottom edge. The remaining 4-4-4-4-4-4-4 buttonholes are worked with approx. 7-7-7½-7½-7½-8-8 cm = 2¾"-2¾"-2⅞"-2⅞"-2⅞"-3⅛"-3⅛" between each one. The last buttonhole is worked on the neck. ------------------------------------------------------- START THE PIECE HERE: ------------------------------------------------------- JACKET – SHORT OVERVIEW OF THE PIECE. The pattern uses both long and short needles; start with the length which fits the number of stitches and change when necessary. Work according to points 1 – 5. 1 BACK PIECE: Cast on stitches for the back of the neck. Work the back piece back and forth, increasing stitches on each side until the shoulder stitch count has been achieved. The back piece has slightly diagonal shoulder. 2 FRONT PIECE: Start by knitting up stitches along one back shoulder, working downwards and increasing for the neckline. Repeat on the other shoulder. 3 YOKE: Join the front and back pieces, working first 1 front piece, knitting up stitches for the sleeve along the side of the front piece, working the back piece, knitting up stitches for the sleeve along the side of the second front piece, then working this front piece. The yoke is continued back and forth across all stitches, from mid-front. 4 INCREASE FOR BODY AND SLEEVES: While working the yoke, you increase stitches first for the sleeves then for both the body and sleeves. 5 BODY AND SLEEVES: When the yoke is finished, it is divided and the body is continued back and forth while the sleeves wait. Then the sleeves are worked top down in the round. Stitches are knitted up around the neckline and the neck is worked back and forth to finish. If there is a «0» in your chosen size, skip the information and go straight to the next instruction. BACK PIECE: Cast on 43-43-49-49-55-55-55 stitches with circular needle size 3 MM = US 2.5 and 1 strand DROPS Alpaca or 1 strand DROPS Flora. ROW 1 (wrong side): Purl. ROW 2 (right side): Read INCREASE TIP-1. Knit 4, increase 1 stitch towards the left, work A.1, then A.2 1-1-1-1-2-2-2 times, work A.3, A.4, increase 1 stitch towards the right, knit 4. ROW 3 (wrong side): Read INCREASE TIP-2. Purl 4, increase 1 stitch towards the right, work A.4, A.3, A.2 1-1-1-1-2-2-2 times, then A.1, increase 1 stitch towards the left, purl 4. Work ROWS 2 and 3 a total of 13-13-13-14-14-14-15 times (26-26-26-28-28-28-30 rows worked) – the lace pattern continues as shown in the diagrams; make sure the lines of holes are continued all the way. After the final increase there are 95-95-101-105-111-111-115 stitches. Remember to maintain the knitting gauge. Cut the strand, place the stitches on a stitch holder. RIGHT FRONT PIECE: Find the right back shoulder as follows: Lay the back piece flat, right side up, with the stitch holder towards you; right side of piece = right shoulder. Start from the right side by the armhole on the right back shoulder and knit up 1 stitch in the outermost stitch (edge stitch), then knit up 1 stitch in each worked row inside the outermost stitch towards the neck (= 26-26-26-28-28-28-30 stitches) = 27-27-27-29-29-29-31 shoulder-stitches. Insert 1 marker by the neckline. All length measurements for the front piece are taken from this marker. Work stockinette stitch (with the first row from the wrong side) until the piece measures 5-5-6-7-7-8-8 cm = 2"-2"-2⅜"-2¾"-2¾"-3⅛"-3⅛" from the marker. Now increase for the neckline as follows: ROW 1 (right side): Knit until there are 7 stitches left on the row, work the first row in A.5, knit 4 (1 increased stitch). ROW 2 (wrong side): Purl. ROW 3 (right side): Knit until there are 8 stitches left, work the third row in A.5 (increasing just before the last 4 stitches on the row), knit 4 (1 increased stitch). ROW 4 (wrong side): Purl. Work ROWS 1 to 4 a total of 4-4-4-4-5-5-5 times (16-16-16-16-20-20-20 rows worked) = 35-35-35-37-39-39-41 stitches. At the end of the next row from the right side, cast on 12-12-15-15-16-16-16 stitches for the neckline = 47-47-50-52-55-55-57 stitches. Purl back from the wrong side, with the first stitch mid-front worked in GARTER STITCH – read explanation above. The increases for the neckline are finished. The piece measures approx. 10-10-11-12-13-14-14 cm = 4"-4"-4⅜"-4¾"-5⅛"-5½"-5½" from the marker. Part of the neckline will be on the back piece; length in front approx. 8-8-9-9-10-11-11 cm = 3⅛"-3⅛"-3½"-3½"-4"-4⅜"-4⅜", length at back 2-2-2-3-3-3-3 cm = ¾"-¾"-¾"-1⅛"-1⅛"-1⅛"-1⅛". Work stockinette stitch back and forth, with 1 garter stitch mid-front until the piece measures 11-11-12-13-14-15-15 cm = 4⅜"-4⅜"-4¾"-5⅛"-5½"-6"-6" from the marker. Cut the strand, place the stitches on a stitch holder and work the left front piece. LEFT FRONT PIECE: Start from the right side by the neckline on the left back shoulder and knit up 1 stitch in each worked row inside the outermost stitch towards the armhole (26-26-26-28-28-28-30 stitches), then knit up 1 stitch in the outermost stitch by the armhole (edge stitch) = 27-27-27-29-29-29-31 shoulder-stitches. Insert 1 marker by the neckline. All length measurements for the front piece are taken from this marker. Work stockinette stitch (with the first row from the wrong side) until the piece measures 5-5-6-7-7-8-8 cm = 2"-2"-2⅜"-2¾"-2¾"-3⅛"-3⅛" from the marker. Now increase for the neckline as follows: ROW 1 (right side): Knit 4, work the first row in A.6, knit to end of row (1 increased stitch). ROW 2 (wrong side): Purl. ROW 3 (right side): Knit 4, work the third row in A.6, knit to end of row (1 increased stitch). ROW 4 (wrong side): Purl. Work ROWS 1 to 4 a total of 4-4-4-4-5-5-5 times (16-16-16-16-20-20-20 rows worked) = 35-35-35-37-39-39-41 stitches. At the end of the next row from the wrong side, cast on 12-12-15-15-16-16-16 stitches for the neckline = 47-47-50-52-55-55-57 stitches. The increases for the neckline are finished. The piece measures approx. 10-10-11-12-13-14-14 cm = 4"-4"-4⅜"-4¾"-5⅛"-5½"-5½" from the marker. Part of the neckline will be on the back piece; length in front approx. 8-8-9-9-10-11-11 cm = 3⅛"-3⅛"-3½"-3½"-4"-4⅜"-4⅜", length at back 2-2-2-3-3-3-3 cm = ¾"-¾"-¾"-1⅛"-1⅛"-1⅛"-1⅛". Work stockinette stitch back and forth, with 1 garter stitch mid-front until the front piece measures 11-11-12-13-14-15-15 cm = 4⅜"-4⅜"-4¾"-5⅛"-5½"-6"-6" from the marker, finishing after a row from the wrong side. The front and back pieces are now joined and stitches are knitted up for the sleeves (the front pieces are continued in stockinette stitch, the back piece in the established pattern): ROW 1 (right side): Start from the right side on the left front piece, work 1 garter stitch, knit until there are 2 stitches left on this front piece, slip 1 stitch, knit 1 and pass the slipped stitch over (= 1 stitch decreased), insert 1 marker, knit up 28-28-30-34-36-38-40 stitches along the side of the left front piece (= sleeve-stitches, which are knitted up inside the outermost stitch), insert 1 marker, knit together the first 2 stitches on the back piece (= 1 stitch decreased), continue the lace pattern on the back piece (making sure the lines of holes are continued correctly) until there are 2 stitches left on the back piece, slip 1 stitch, knit 1 and pass the slipped stitch over (= 1 stitch decreased), insert 1 marker, knit up 28-28-30-34-36-38-40 stitches along the side of the right front piece (= sleeve-stitches, knitted up inside the outermost stitch), insert 1 marker, knit together the first 2 stitches on the right front piece (= 1 stitch decreased), knit until there is 1 stitch left on the front piece, work 1 garter stitch = 241-241-257-273-289-293-305 stitches. ROW 2 (wrong side): Work 1 garter stitch, purl to the first marker, move the marker onto the right needle, increase 1 stitch towards the left, purl to the next marker, increase 1 stitch towards the right, move the marker onto the right needle, continue the pattern across the back piece (i.e., purl) to the next marker, move the marker onto the right needle, increase 1 stitch towards the left, purl to the next marker, increase 1 stitch towards the right, move the marker onto the right needle, purl until there is 1 stitch left on the row, work 1 garter stitch = 245-245-261-277-293-297-309 stitches. ROW 3 (right side): Work as before to the first marker, move the marker onto the right needle, increase 1 stitch towards the left, knit to the next marker, increase 1 stitch towards the right, move the marker onto the right needle, continue the pattern on the back piece to the next marker, move the marker onto the right needle, increase 1 stitch towards the left, knit to the next marker, increase 1 stitch towards the right, move the marker onto the right needle, work as before to the end of the row = 249-249-265-281-297-301-313 stitches. ROW 4 (wrong side): Work as before to the first marker, move the marker onto the right needle, increase 1 stitch towards the left, purl to the next marker, increase 1 stitch towards the right, move the marker onto the right needle, continue the pattern across the back piece (i.e., purl) to the next marker, move the marker onto the right needle, increase 1 stitch towards the left, purl to the next marker, increase 1 stitch towards the right, move the marker onto the right needle, work as before to end of row = 253-253-269-285-301-305-317 stitches. ROW 5 (right side): Work as before to the first marker, move the marker onto the right needle, increase 1 stitch towards the left, knit to the next marker, increase 1 stitch towards the right, move the marker onto the right needle, continue the pattern on the back piece to the next marker, move the marker onto the right needle, increase 1 stitch towards the left, knit to the next marker, increase 1 stitch towards the right, move the marker onto the right needle, work as before to the end of the row = 257-257-273-289-305-309-321 stitches. ROW 6 (wrong side): Purl with 1 garter stitch on each side and without increasing. AFTER ROW 6: Work ROWS 5 and 6, 10-7-5-6-5-0-2 more times (20-14-10-12-10-0-4 rows worked). A total of 14-11-9-10-9-4-6 increases in height on the sleeves. There are 56-50-48-54-54-46-52 stitches on each sleeve, 46-46-49-51-54-54-56 stitches on each front piece and 93-93-99-103-109-109-113 stitches on the back piece = 297-285-293-313-325-309-329 stitches. Now increase on both the body and sleeves; increasing on the body in the same way as by the neck but increasing 3 stitches before the marker so there are 3 stitches between the increases on the body and sleeve (the increased stitches are worked in stockinette stitch on the sleeves/front pieces and into the pattern on the back piece): ROW 1 (right side): Work as before until there are 6 stitches left on the front piece before the first marker, work the first row in A.5, knit 3, move the marker onto the right needle, increase 1 stitch towards the left, knit to the next marker, increase 1 stitch towards the right, move the marker onto the right needle, knit 3, work the first row in A.6, continue the pattern across the back piece until there are 6 stitches left before the next marker, work the first row in A.5, knit 3, move the marker onto the right needle, increase 1 stitch towards the left, knit to the next marker, increase 1 stitch towards the right, move the marker onto the right needle, knit 3, work the first row in A.6, work as before to the end of the row (= 8 increased stitches, increasing 1 stitch on each side of 3 stitches in each transition between the body and sleeves). ROW 2 (wrong side): Purl with 1 garter stitch on each side. ROW 3 (right side): Work as before until there are 7 stitches left on the front piece before the first marker, work the third row in A.5 (increasing before the 3 stitches), knit 3, move the marker onto the right needle, increase 1 stitch towards the left, knit to the next marker, increase 1 stitch towards the right, move the marker onto the right needle, knit 3, work the third row in A.6, continue the pattern across the back piece until there are 7 stitches left before the next marker, work the third row in A.5, knit 3, move the marker onto the right needle, increase 1 stitch towards the left, knit to the next marker, increase 1 stitch towards the right, move the marker onto the right needle, knit 3, work the third row in A.6, work as before to the end of the row (= 8 increased stitches). ROW 4 (wrong side): Purl with 1 garter stitch on each side. Work ROWS 1 to 4 a total of 4 4-6-8-8-10-12-14 times (16-24-32-32-40-48-56 rows worked) = 361-381-421-441-485-501-553 stitches. A.5 and A.6 are finished. Now increase as follows: ROW 1 (right side): Work as before until there are 3 stitches left on the front piece before the first marker, knit 3, move the marker onto the right needle, increase 1 stitch towards the left, knit to the next marker, increase 1 stitch towards the right, move the marker onto the right needle, knit 3, increase 1 stitch towards the left, continue the pattern across the back piece until there are 3 stitches left before the next marker, knit 3, move the marker onto the right needle, increase 1 stitch towards the left, knit to the next marker, increase 1 stitch towards the right, move the marker onto the right needle, knit 3, increase 1 stitch towards the left, work as before to the end of the row (= 8 increased stitches, increasing 1 stitch on each side of 3 stitches in each transition between the body and sleeves). ROW 2 (wrong side): Purl with 1 garter stitch on each side. Work ROWS 1 and 2 a total of 2-2-0-2-1-3-1 times (4-4-0-4-2-6-2 rows worked). A total of 24-25-25-28-30-31-35 increases in height on the sleeves and 10-14-16-18-21-27-29 increases in height on the body = 76-78-80-90-96-100-110 stitches on each sleeve, 56-60-65-69-75-81-85 stitches on each front piece and 113-121-131-139-151-163-171 stitches on the back piece = 377-397-421-457-493-525-561 stitches. The sleeves measure approx. 13-14-14-16-17-17-20 cm = 5⅛"-5½"-5½"-6¼"-6¾"-6¾"-8". If the jacket is folded double at the shoulder, the piece measures approx. 19-19-20-22-24-25-27 cm = 7½"-7½"-8"-8¾"-9½"-9¾"-10⅝" from the top of the shoulder down the armhole. If the piece is shorter than this, continue working to the correct length without further increases. Now divide for the body and sleeves. DIVIDE FOR BODY AND SLEEVES: Work 56-60-65-69-75-81-85 stitches as before (= front piece), place the next 76-78-80-90-96-100-110 stitches on a thread for the sleeve, cast on 6-8-10-12-14-16-18 stitches (mid-under the sleeve), work the next 113-121-131-139-151-163-171 stitches in pattern as before (= back piece), place the next 76-78-80-90-96-100-110 stitches on a thread for the sleeve, cast on 6-8-10-12-14-16-18 stitches (mid-under the sleeve), work the last 56-60-65-69-75-81-85 stitches as before (= front piece). The body and sleeves are finished separately. BODY: = 237-257-281-301-329-357-377 stitches. Insert 1 marker in the middle of the 6-8-10-12-14-16-18 stitches cast on under each sleeve. Continue with stockinette stitch and 1 garter stitch mid-front on each front piece and continue the pattern on the back piece (work the pattern as far as it will go towards the markers on each side, the stitches which do not fit into the pattern are worked in stockinette stitch). Work until the body measures approx. 26-28-29-29-28-29-29 cm = 10¼"-11"-11⅜"-11⅜"-11"-11⅜"-11⅜" from the division, adjusting so you have worked at least 3 or 5 rows of stockinette stitch after the last row of holes). On the next row from the right side, begin the rib, AT THE SAME TIME increase 43-51-51-55-59-67-71 stitches evenly on the row as follows: Change to circular needle size 2.5 MM = US 1.5, work 1 garter stitch, then rib (knit 2, purl 2 – remember to increase) until there are 3 stitches left, knit 2, work 1 garter stitch = 280-308-332-356-388-424-448 stitches. When the rib measures 3-3-3-3-4-4-4 cm = 1⅛"-1⅛"-1⅛"-1⅛"-1½"-1½"-1½", with the next row from the wrong side, work 3 rows of stockinette stitch across all stitches (purl from wrong side, knit from right side = rolled edge). Change to circular needle size 3 MM = US 2.5 and bind off slightly loosely with knit from the right side. The jacket measures approx. 52-54-56-58-60-62-64 cm = 20½"-21¼"-22"-22¾"-23⅝"-24⅜"-25¼" from the top of the shoulder. SLEEVES: Place the 76-78-80-90-96-100-110 sleeve-stitches from one thread on circular needle size 3 MM = US 2.5 and knit up 1 stitch in each of the 6-8-10-12-14-16-18 stitches cast on under the sleeve – read SLEEVE TIP = 82-96-90-102-110-116-128 stitches. Insert a marker-thread in the middle of the 6-8-10-12-14-16-18 stitches under the sleeve- the round starts by the marker-thread. Work stockinette stitch in the round. AT THE SAME TIME, when the sleeve measures 1 cm = ⅜" from the division, decrease mid-under the sleeve – read DECREASE TIP as follows: Decrease 2 stitches every 2nd round 2-3-3-4-4-5-5 times, then decrease 2 stitches every 3-3-3-4-2½-2½-1½ cm = 1⅛"-1⅛"-1⅛"-1½"-1"-1"-½" a total of 4-4-4-8-11-11-16 times = 70-72-76-78-80-84-86 stitches. Continue working until the sleeve measures 40-40-40-38-36-37-35 cm = 15¾"-15¾"-15¾"-15"-14¼"-14½"-13¾" from the division. Change to double pointed needles size 2.5 MM = US 1.5. Work rib (knit 2, purl 2), AT THE SAME TIME increase 10-12-12-14-16-16-14 stitches evenly on the first round = 80-84-88-92-96-100-100 stitches. When the rib measures 3-3-3-3-4-4-4 cm = 1⅛"-1⅛"-1⅛"-1⅛"-1½"-1½"-1½", work 3 rounds of stockinette stitch (= rolled edge). Bind off slightly loosely with knit. The sleeve measures approx. 43-43-43-41-40-41-39 cm = 17"-17"-17"-16⅛"-15¾"-16⅛"-15¼" from the division. LEFT BAND: Use circular needle size 3 MM = US 2.5. Start from the right side on the left front piece and knit up 136-140-144-152-156-156-164 stitches inside 1 edge stitch (approx. 31 stitches per 10 cm = 4" – the stitch count should be divisible by 4). Work as follows from the wrong side: 1 garter stitch, rib (purl 2, knit 2) until there are 3 stitches left, purl 2 and 1 garter stitch. Continue this rib until the band measures 3 cm = 1⅛". Bind off with rib. RIGHT BAND: Knit up stitches and work in the same way as the left band until the right band measures 1 to 1½ cm = ⅜" to ½". Work 6 BUTTONHOLES – read explanation above, evenly along the band. Finish the band and bind off in the same way as the left band. NECK: Use circular needle size 2.5 MM = US 1.5. Start from the right side, mid-front and knit up approx. 132-136-144-148-164-168-168 stitches around the neck, inside 1 edge stitch (make sure you knit up 1 stitch in each band-stitch and that the stitch count is divisible by 4). Work the first row as follows from the wrong side: 1 garter stitch, rib (purl 2, knit 2) until there are 3 stitches left, purl 1 and work 1 garter stitch. Continue this rib. After 1-1½ cm = ⅜"-½", work 1 buttonhole above the others on the left band. Continue working until the neck measures 3-3-3-4-4-4-4 cm = 1⅛"-1⅛"-1⅛"-1½"-1½"-1½"-1½", with the next row from thew wrong side. Work 3 rows of stockinette stitch across all stitches (= rolled edge). Change to circular needle size 3 MM = US 2.5. Bind off slightly loosely with knit from the right side. ASSEMBLY: Sew the buttons onto the left band. |
||||||||||||||||||||||
Diagram explanations |
||||||||||||||||||||||
|
||||||||||||||||||||||
 |
||||||||||||||||||||||
 |
||||||||||||||||||||||
 |
||||||||||||||||||||||
 |
||||||||||||||||||||||
 |
||||||||||||||||||||||
Have you finished this pattern?Tag your pictures with #dropspattern #spicedcranberrycardigan or submit them to the #dropsfan gallery. Do you need help with this pattern?You'll find 39 tutorial videos, a Comments/Questions area and more by visiting the pattern on garnstudio.com. © 1982-2026 DROPS Design A/S. We reserve all rights. This document, including all its sub-sections, has copyrights. Read more about what you can do with our patterns at the bottom of each pattern on our site. |
||||||||||||||||||||||


With over 40 years in knitting and crochet design, DROPS Design offers one of the most extensive collections of free patterns on the internet - translated to 17 languages. As of today we count 324 catalogs and 12290 patterns - 12280 of which are translated into English (US/in).
We work hard to bring you the best knitting and crochet have to offer, inspiration and advice as well as great quality yarns at incredible prices! Would you like to use our patterns for other than personal use? You can read what you are allowed to do in the Copyright text at the bottom of all our patterns. Happy crafting!
Post a comment to pattern DROPS 264-11
We would love to hear what you have to say about this pattern!
If you want to leave a question, please make sure you select the correct category in the form below, to speed up the answering process. Required fields are marked *.