
Popular categories
Looking for a yarn?


Comments / Questions (7)
![]() Valerie wrote:
Valerie wrote:
Thanks. Somehow eventhough i did that( 2 DC tog) I still end up with 70 st! I just decreased 2dc tog on each side of the market each row X3 ..almost done! Did it with cotton fair from Premier yarn..hard to find drops yarn here in Canada..
15.05.2026 - 17:34
![]() Valerie wrote:
Valerie wrote:
Isn't there a mistake for size XL when doing sleeves ..you say: start with 1 slip stitch in 5th ch under 1 sleeve .3ch.1dc in next 2 ch .2 DC in last ch .DC in next 58 DC then 2 DC in 1st ch and 1 DC in last 3 ch = 66 ? There are 2 DC increase so final count should be 68 no?
14.05.2026 - 02:45DROPS Design answered:
Dear Valerie, note that you shouldn't work 2 dc on each side of the 58 sts for sleeves but 2 dc together in the same stitch, so that there is no increase just 1 dc as final count. Happy crocheting!
15.05.2026 - 08:42
![]() Valerie wrote:
Valerie wrote:
Thanks 👌
07.05.2026 - 16:29
![]() Valerie wrote:
Valerie wrote:
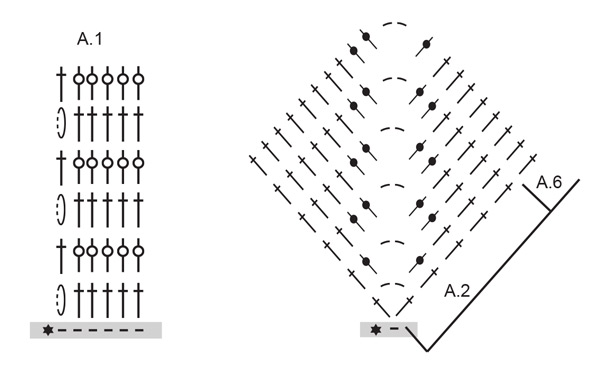
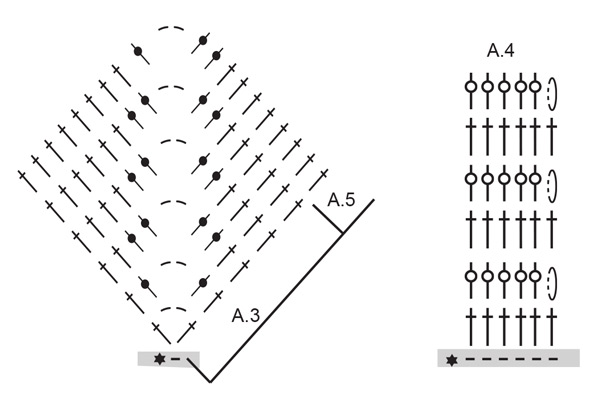
At the stage where you start crocheting : A5 above A3 and A6 above A2: what is the sequence? A5 then A6 then A5 then A6? Or A6 then A5 ..A6 ..A5?
06.05.2026 - 16:43DROPS Design answered:
Dear Valerie, as you worked from RS: A.2, A.3, A.2, A.3 you will work from RS: A.6, A.5, A.6, A.5 - and from WS: A.5, A.6, A.5, A.6. Happy crocheting!
06.05.2026 - 17:18
![]() Valerie wrote:
Valerie wrote:
About the sizing of this cardi : is there easy space= if I'm 119 cm for bust should I choose size XL or stay with the size L ?
05.05.2026 - 21:03DROPS Design answered:
Hi Valerie, If you would like the cardigan to be loose fitting, we would suggest working size XL. Regards, Drops Team.
06.05.2026 - 05:57
![]() Malene wrote:
Malene wrote:
Cardiganen er lt for stor i bryst og ryg og ærmerne kunne måske godt have haft lidt mere plads. Udtagning passer ikke rigtig, har fuldt opskrift L
27.08.2025 - 23:58
![]() Antonia Merz-Wieser wrote:
Antonia Merz-Wieser wrote:
Grüezi Ich möchte die Jacke in Grösse XXXL häkeln. Im Schnittmuster komme ich für Hals + Ärmel auf andere Masse. Können Sie das bitte kontrollieren? Freundliche Grüsse und besten Dank Antonia Merz
06.08.2025 - 18:03DROPS Design answered:
Liebe Frau Merz-Wieser, sollte Ihre Maschenprobe stimmen, dann sollten Sie die richtigen Maßnahmen wie bei der Skizze bekommen. Die 104 Stäbchen minus 6 Blenden-Maschen sind 98 der 1. Reihe messen ca 61 cm minus die Schulter (6 cm x 4) durch 2 geteilt (Vorder/Rückenteil) = ca 19 cm. Viel Spaß beim Häkeln!
07.08.2025 - 07:42
|
||||||||||||||||||||||
Blue Coast Cardi#bluecoastcardigan |
||||||||||||||||||||||
 |
 |
|||||||||||||||||||||
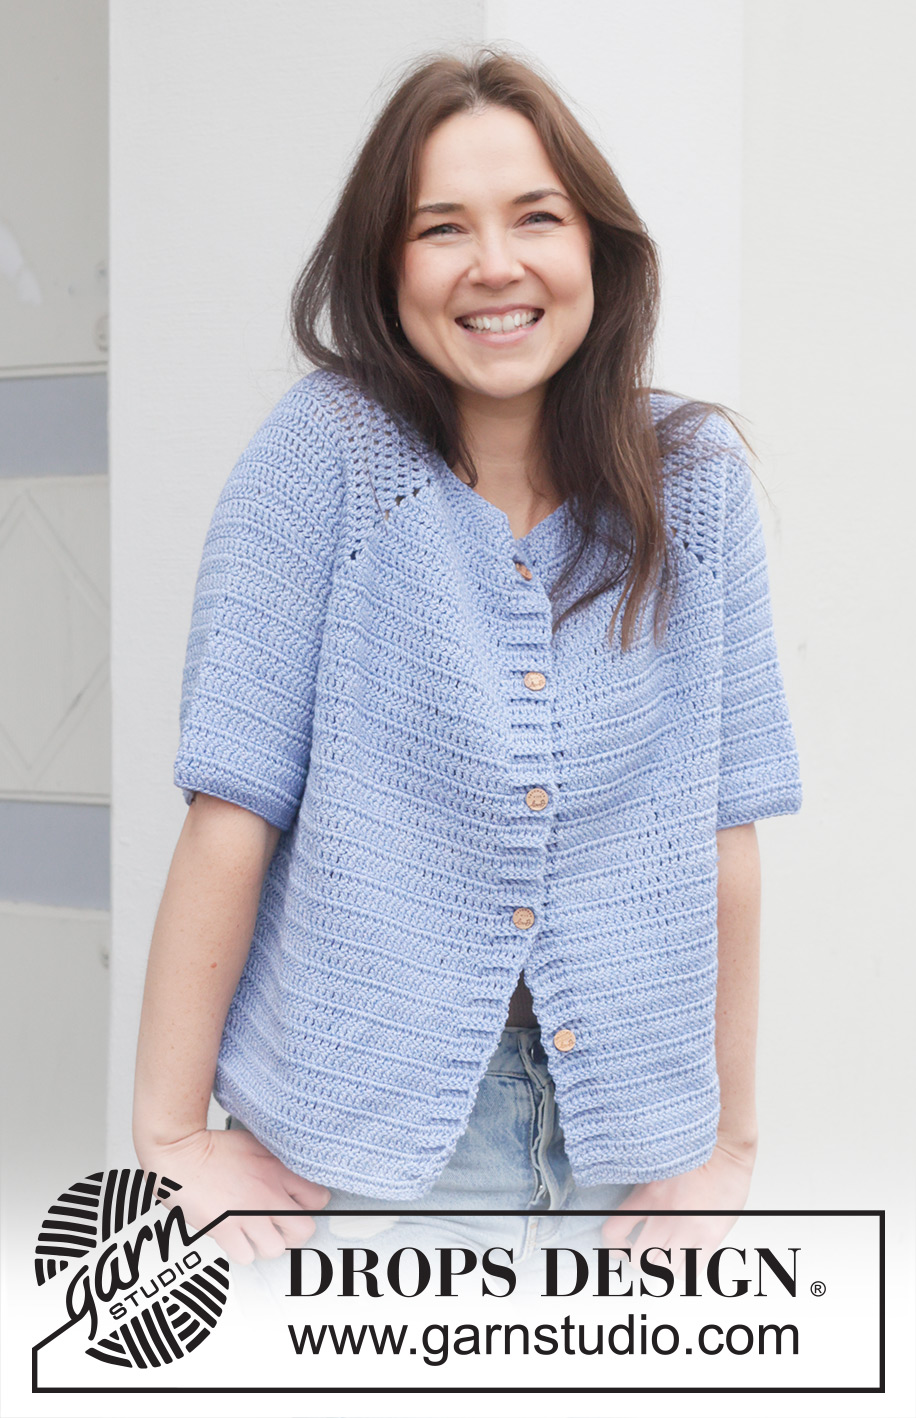
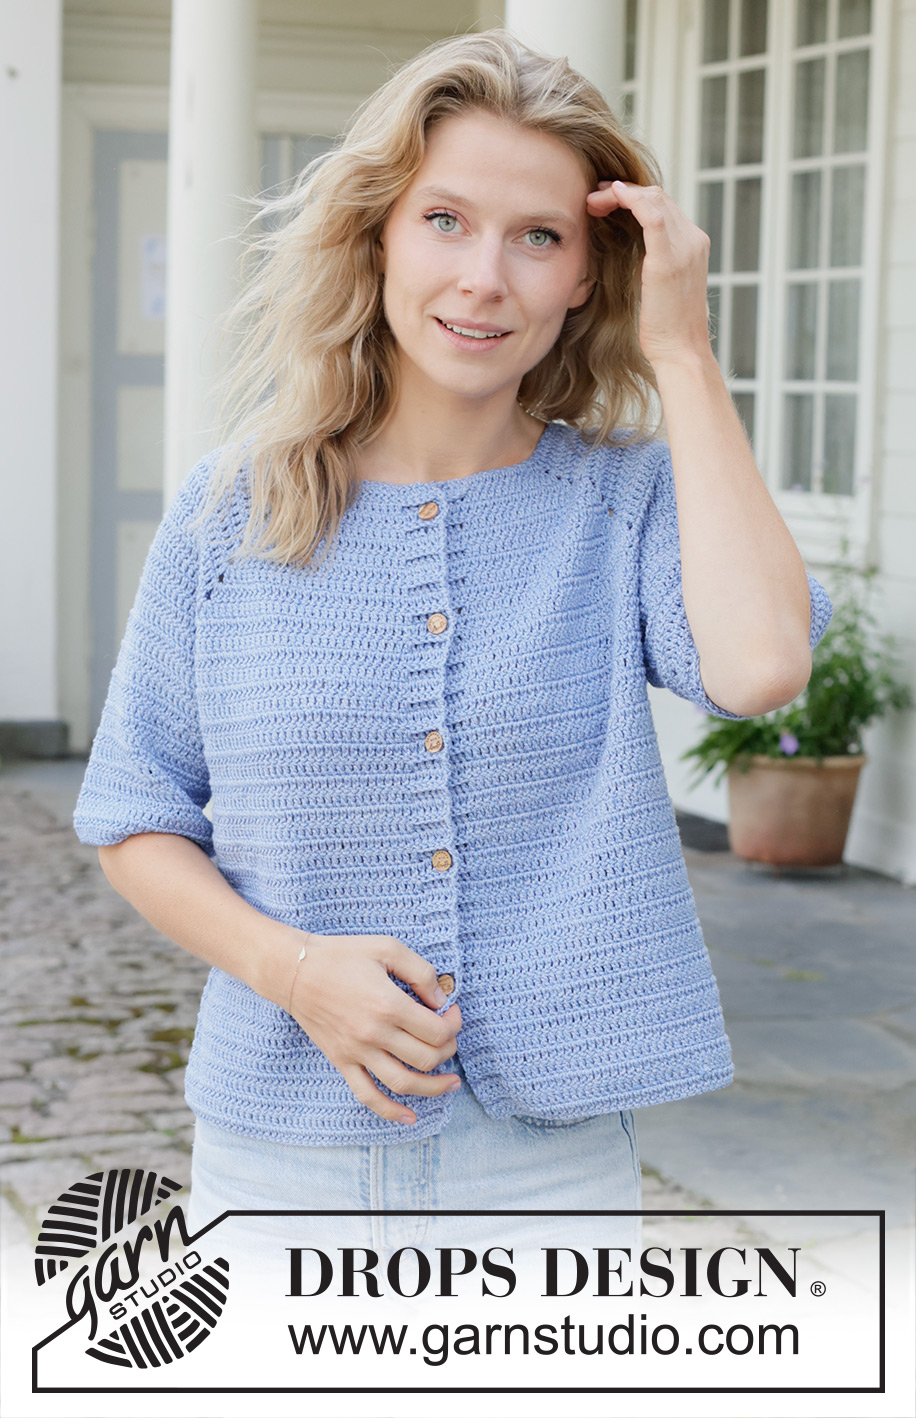
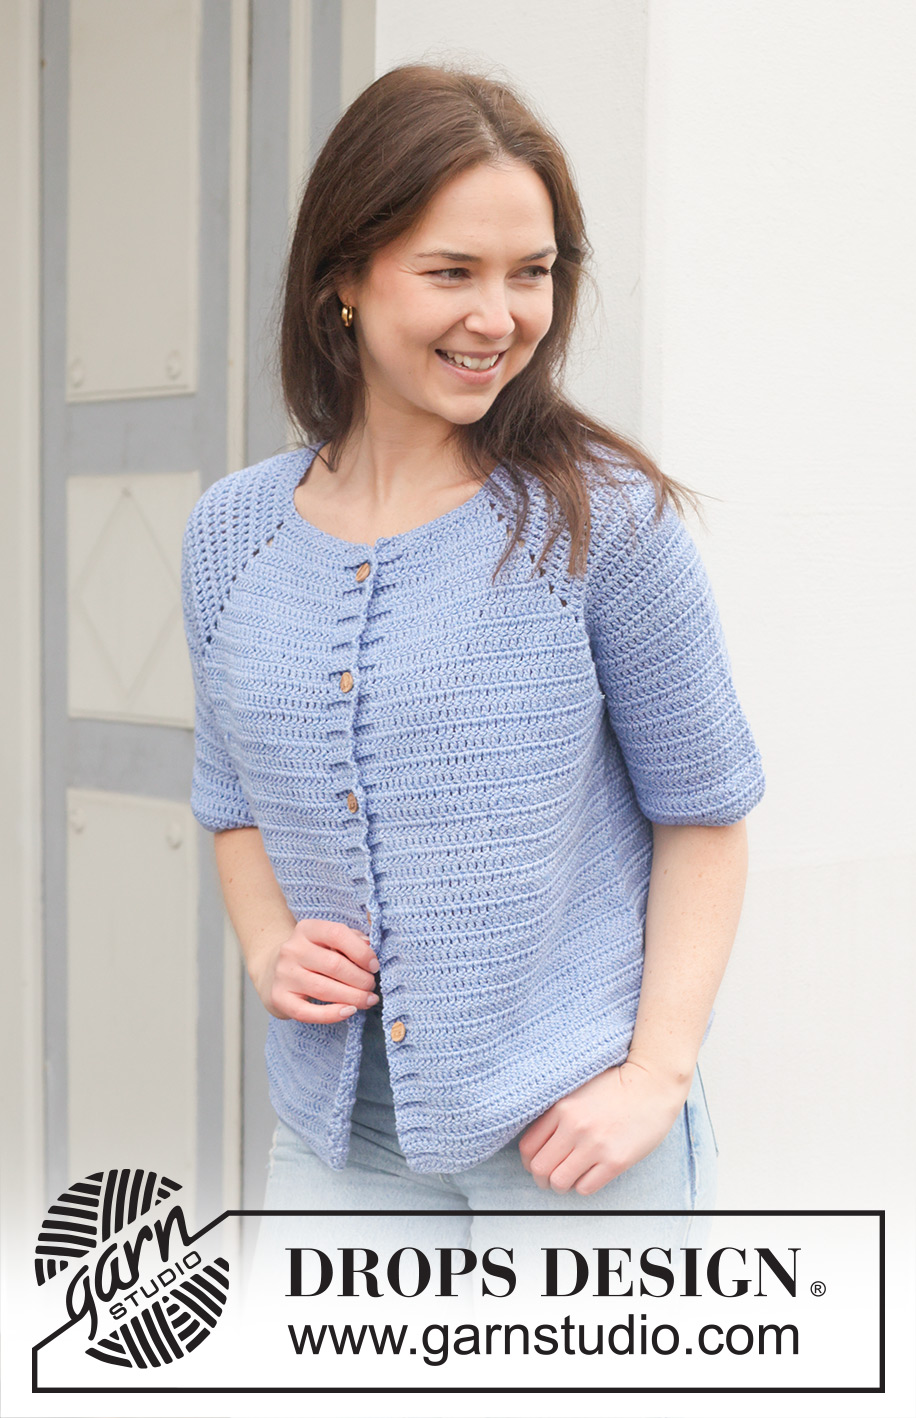
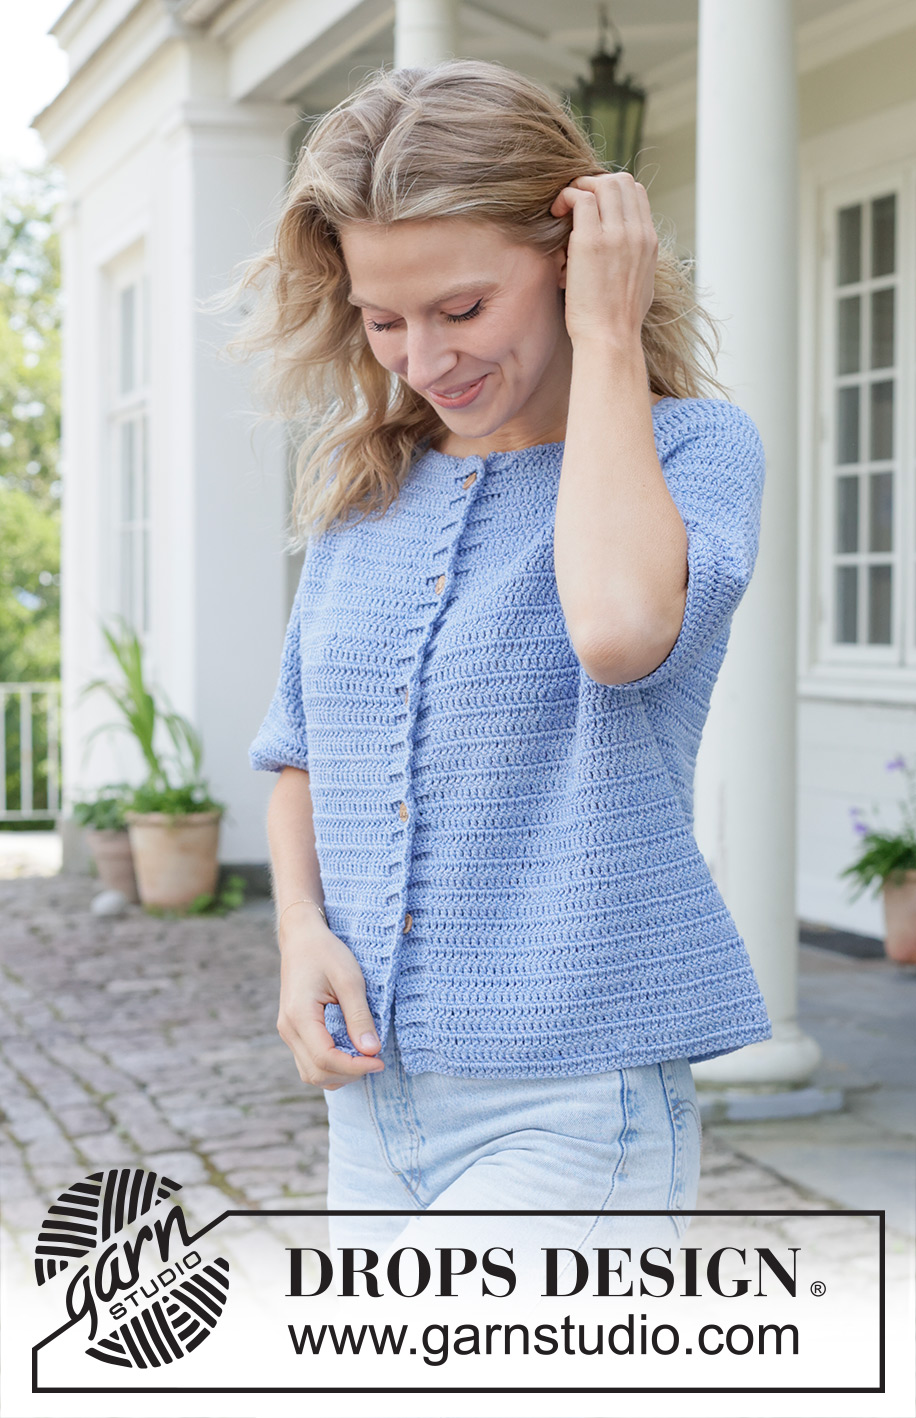
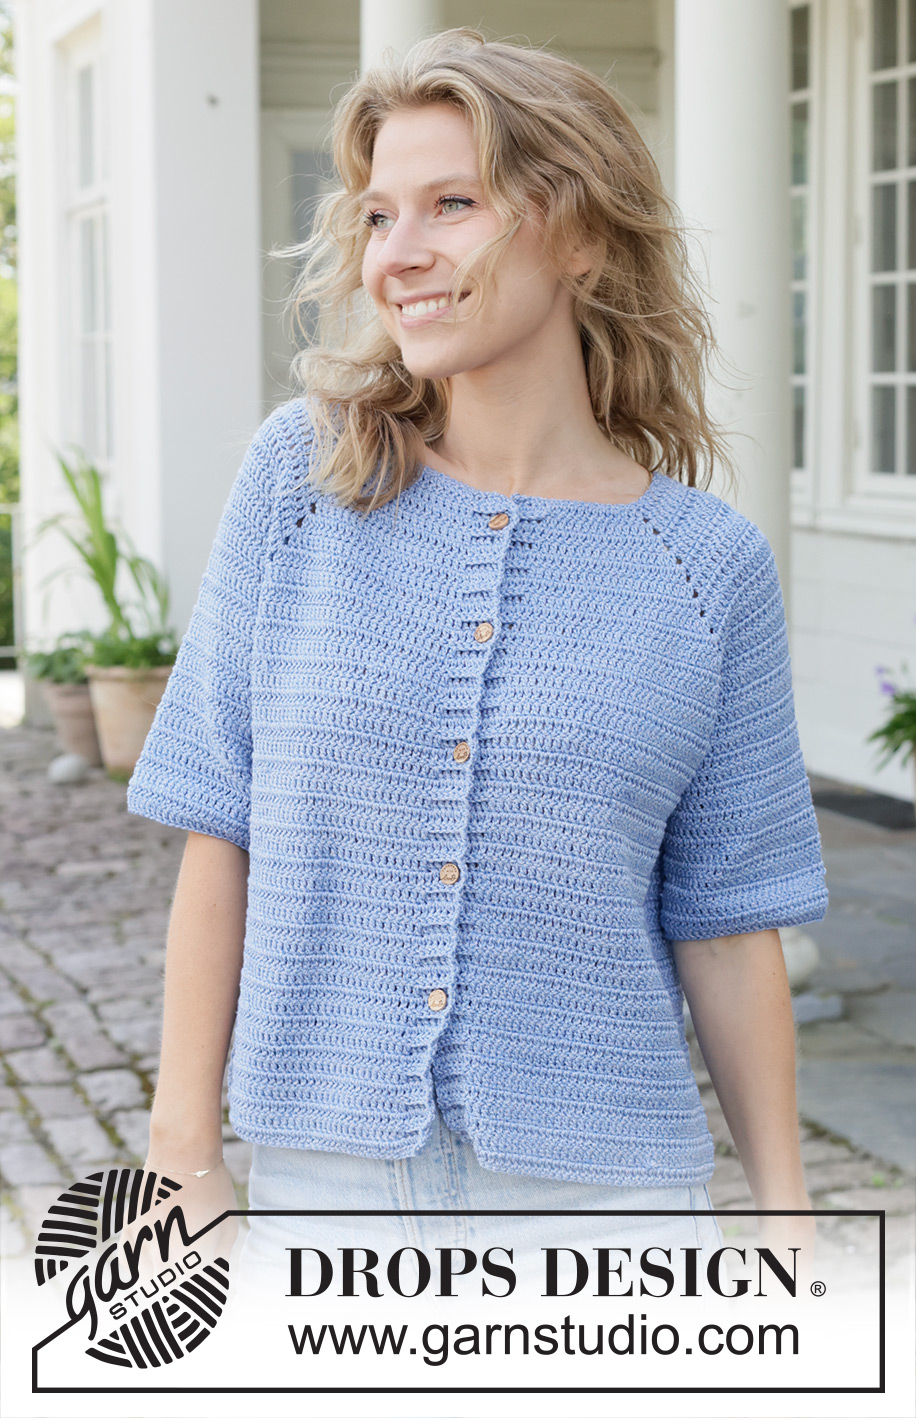
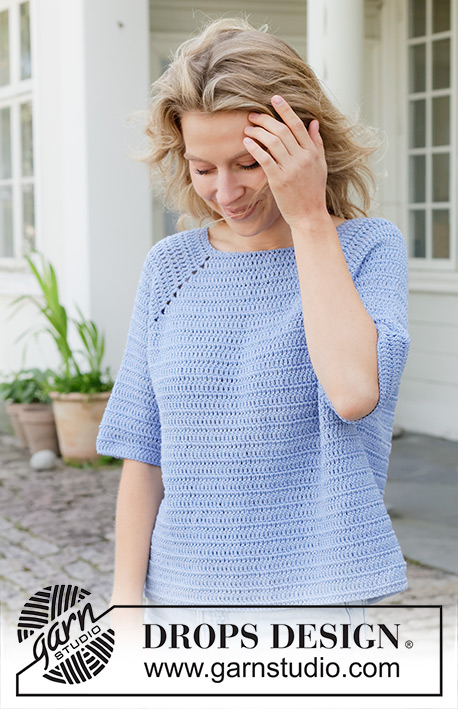
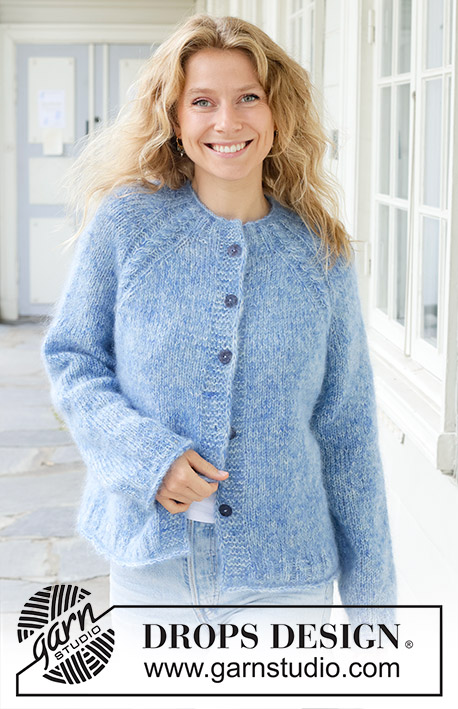
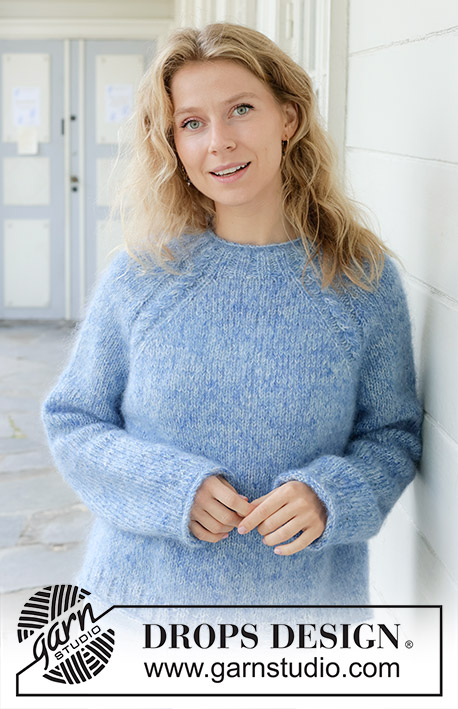
Crocheted jacket in DROPS Cotton Merino. The piece is worked top down with raglan, bands and short sleeves. Sizes S - XXXL.
DROPS 259-33 |
||||||||||||||||||||||
|
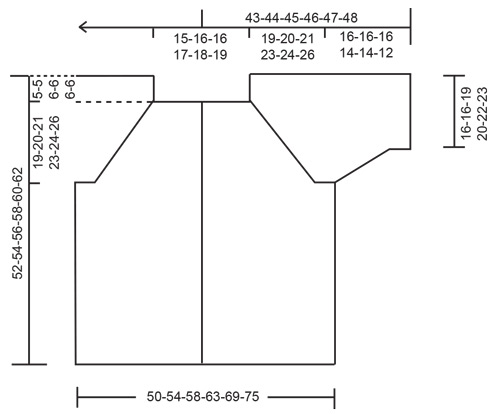
------------------------------------------------------- EXPLANATIONS FOR THE PATTERN: ------------------------------------------------------- PATTERN: See diagrams A.1 to A.6. The diagrams are read from right to left from the right side and left to right from the wrong side. CHAIN STITCH: If you work outermost on the hook the chain stitch will often be too tight; 1 chain stitch should be as long as 1 double crochet is wide. 2 DOUBLE CROCHETS TOGETHER: To close a hole, work as follows around each chain-space (applies to the yoke) or in the outermost chain stitch (applies to the sleeve): * Make 1 yarn over, insert the hook round the chain-space/in the chain stitch, pick up the strand, make 1 yarn over and pull it through the first 2 loops on the hook *, work from *-* 1 more time in the same stitch (3 loops on the hook), make 1 yarn over and pull it through all 3 loops (= 1 stitch). CROCHET INFORMATION (for sleeves): Each round begins with 3 chain stitches, which replace the first double crochet. At the end of the round work 1 slip stitch in the 3rd chain stitch at the beginning of the round, then turn so the next round is from the other side. Rounds are worked alternately from the right and wrong side. DECREASE TIP: Decrease at the beginning of the round/row as follows: Work the first double crochet as before (i.e., 3 chain stitches which replace this double crochet), work the next 2 double crochets together as follows: * Make 1 yarn over, insert the hook through the next stitch, pick up the strand, make 1 yarn over and pull it through the first 2 loops on the hook *, work from *-* 1 more time (3 loops on the hook), make 1 yarn over and pull it through all 3 loops (= 1 stitch decreased). Work as before until there are 3 double crochets left on the round/row, decrease 1 double crochet in the same way and work 1 double crochet in the last double crochet (= 2 stitches decreased). ------------------------------------------------------- START THE PIECE HERE: ------------------------------------------------------- JACKET – SHORT OVERVIEW OF THE PIECE. The yoke is worked back and forth, from mid front and top down. When the yoke is finished, it is divided for the body and sleeves and the is body continued back and forth, while the sleeves wait. The sleeves are worked in the round, alternately from the right and wrong side. An edge is worked around the neckline to finish. If there is a «0» in your chosen size, skip the information and go straight to the next instruction. YOKE: Use DROPS Cotton Merino and crochet hook size 4.5 MM = US 7. Work 92-96-100-104-108-112 CHAIN STITCHES – read description above. The whole piece is worked with double crochet, alternately from the right and wrong side - read PATTERN. Work the first row as follows from the wrong side: A.1 across the first 6 chain stitches (= band), work 1 double crochet in each of the next 11-12-12-13-14-15 chain stitches (= right front piece), A.2 in the next chain stitch (= raglan), 1 double crochet in each of the next 16-16-18-18-18-18 chain stitches (= sleeve), A.3 in the next chain stitch (= raglan), 1 double crochet in each of the next 22-24-24-26-28-30 chain stitches (= back piece), A.2 in the next chain stitch (= raglan), 1 double crochet in each of the next 16-16-18-18-18-18 chain stitches (= sleeve), A.3 in the next chain stitch (= raglan), 1 double crochet in each of the next 11-12-12-13-14-15 chain stitches (= left front piece), A.4 across the last 6 chain stitches (= band). After the first row there are 2 bands (= 6 stitches on each), 84-88-92-96-100-104 double crochets and 4 chain-spaces. Continue back and forth until A.2 and A.3 are finished in height – continuing the bands as before. There are 140-144-148-152-156-160 double crochets and 4 chain-spaces + 6 band-stitches on each side; 32-32-34-34-34-34 double crochets on each sleeve, 38-40-40-42-44-46 on the back piece and 25-26-26-27-28-29 on each front piece (including the bands). Remember to maintain the crochet gauge. Now work A.5 above A.3 and A.6 above A.2 a total of 9-10-11-12-13-15 times in height = a total of 14-15-16-17-18-20 rows worked from the beginning of the piece. There are 248-264-280-296-312-340 double crochets and 4 chain-spaces + 6 band-stitches on each side; 50-52-56-58-60-64 double crochets on each sleeve, 74-80-84-90-96-106 on the back piece and 43-46-48-51-54-59 on each front piece, including the bands. Work 1 row with 1 double crochet in each double crochet and the bands as before and to close the spaces work 2 DOUBLE CROCHETS TOGETHER – read description above, around each chain-space = 264-280-296-312-328-356 double crochets including the bands. The piece measures approx. 19-20-21-23-24-26 cm = 7½"-8"-8¼"-9"-9½"-10¼" mid-back. Now divide for the body and sleeves. DIVIDE FOR BODY AND SLEEVES: Work the band as before, 1 double crochet in each of the next 38-41-43-46-49-54 double crochets (= front piece), skip 50-52-56-58-60-64 double crochets (= sleeve), work 4-4-6-8-12-12 chain stitches (under the sleeve), 1 double crochet in each of the next 76-82-86-92-98-108 double crochets (= back piece), skip 50-52-56-58-60-64 double crochets (= sleeve), work 4-4-6-8-12-12 chain stitches (under the sleeve), 1 double crochet in each of the next 38-41-43-46-49-54 double crochets and the band as before (= front piece). The body is finished while the sleeves wait. BODY: = 172-184-196-212-232-252 stitches. Continue back and forth with 1 double crochet in each double crochet/chain stitch and the bands as before until the jacket measures 47-49-50-52-54-56 cm = 18½"-19¼"-19¾"-20½"-21¼"-22" mid-back and 52-54-56-58-60-62 cm = 20½"-21¼"-22"-22¾"-23⅝"-24⅜" from top of shoulder. SLEEVES: Begin either from the right or wrong side to maintain the textured pattern from the yoke. Start with 1 slip stitch in the 3rd-3rd-4th-5th-7th-7th chain stitch cast on under one sleeve (approx. mid-under sleeve), work 3 chain stitches (equivalent to first double crochet), 1 double crochet in each of the next 0-0-1-2-4-4 chain stitches, work 2 double crochets together in the last chain stitch, 1 double crochet in each of the skipped 50-52-56-58-60-64 double crochets on the sleeve, work 2 double crochets together in the first chain stitch, 1 double crochet in each of the last 1-1-2-3-5-5 chain stitches under the sleeve = 54-56-62-66-72-76 double crochets. Read CROCHET INFORMATION in the explanations above and finish the round with 1 slip stitch in the 3rd chain stitch at the beginning of the round. Insert a marker at the beginning of the round (mid-under sleeve). Continue with double crochets as before, in the round but alternately from the right and wrong side. When the sleeve measures 2 cm =¾", decrease 1 double crochet on each side of the marker under the sleeve – read DECREASE TIP. Decrease like this every 8-8-0-0-0-0 cm = 3⅛"-3⅛"-0"-0"-0"-0" a total of 2-2-1-1-1-1 times = 50-52-60-64-70-74 double crochets. Work until the sleeve measures 16-16-16-14-14-12 cm = 6¼"-6¼"-6¼"-5½"-5½"-4¾" from the division. Cut and fasten the strand. NECKLINE: Use crochet hook size 4.5 MM = US 7. Work 1 slip stitch outermost on the right band, work 1 chain stitch, * skip 1 chain stitch on the cast-on edge, work 1 single crochet in the next chain stitch, work 1 chain stitch *, work from *-* along the neckline. Finish with 1 slip stitch in the last chain stitch on the left band. Cut and fasten the strand. ASSEMBLY: Sew the buttons onto the left band; they are buttoned between 2 double crochets on the right band. The first button is positioned 2 cm =¾" down from the neckline, the last button 10 cm = 4" above the bottom edge and the remaining buttons positioned evenly between these 2. |
||||||||||||||||||||||
Diagram explanations |
||||||||||||||||||||||
|
||||||||||||||||||||||
 |
||||||||||||||||||||||
 |
||||||||||||||||||||||
 |
||||||||||||||||||||||
Have you finished this pattern?Tag your pictures with #dropspattern #bluecoastcardigan or submit them to the #dropsfan gallery. Do you need help with this pattern?You'll find 11 tutorial videos, a Comments/Questions area and more by visiting the pattern on garnstudio.com. © 1982-2026 DROPS Design A/S. We reserve all rights. This document, including all its sub-sections, has copyrights. Read more about what you can do with our patterns at the bottom of each pattern on our site. |
||||||||||||||||||||||


With over 40 years in knitting and crochet design, DROPS Design offers one of the most extensive collections of free patterns on the internet - translated to 17 languages. As of today we count 325 catalogs and 12298 patterns - 12288 of which are translated into English (US/in).
We work hard to bring you the best knitting and crochet have to offer, inspiration and advice as well as great quality yarns at incredible prices! Would you like to use our patterns for other than personal use? You can read what you are allowed to do in the Copyright text at the bottom of all our patterns. Happy crafting!
Post a comment to pattern DROPS 259-33
We would love to hear what you have to say about this pattern!
If you want to leave a question, please make sure you select the correct category in the form below, to speed up the answering process. Required fields are marked *.