
Popular categories
Looking for a yarn?


Comments / Questions (209)
![]() Daria wrote:
Daria wrote:
Przerabiam pierwszy rząd karczku dla rozmiaru M. Wedlug wzoru powinnam łącznie dodać 8 oczek na reglan i 8 oczek ze schematów a2 i a4 oraz zamknąć łącznie 18 oczek ze schematu a3. Zostają mi 142 oczka, a powinnam mieć 160, czyli tyle oczek ile miałabym nie odejmując oczek ze schematu a3. Co robię nie tak, jak powinnam przerobić ten rząd, żeby wyszło mi 160 oczek?
03.05.2026 - 01:49
![]() Chantal M wrote:
Chantal M wrote:
Bonjour, je réalise ce modèle en taille L et dès le début il y a des erreurs dans les explications. Je n\\\'ose pas aller plus loin que le col : 144 + 8 mailles relevéees = 160 m selon vos calculs. Pour moi ça fait 152 mailles. Alors si c\\\'est faux depuis le début comment savoir si la suite est bonne ? Merci
28.04.2026 - 17:51DROPS Design answered:
Bonjour Chantal, notez qu'en même temps que vous tricotez ce 1er tour en relevant 8 m (mailles des raglans), vous augmentez en même temps chaque chaque A.2 et chaque A.4, autrement dit 1 m de chaque côté des mailles des raglans et vous obtenez ainsi bien 144+8 m relevées + 8 jetés (A.2 et A.4) = 160 mailles. Bonne continuation!
29.04.2026 - 07:49
![]() Birgitte wrote:
Birgitte wrote:
Hvordan er inndelingen etter halskanten. Hvor mange masker skal jeg ha på forstykket,erme og bakstykket?
11.04.2026 - 21:35DROPS Design answered:
Hei Birgitte, Du sier ikke hvilken størrelsen du strikker så vi kan ikke gi deg eksakte antall masker på hvert stykke. Men du kan telle masker mellom de rette raglan-maskene for å få antall masker på stykkene. Hilsen Drops Team.
13.04.2026 - 07:36
![]() Beata wrote:
Beata wrote:
Wzór ładny ale bardzo źle rozpisany. Należy dobrze się wczytać bo każdy szczegół ma tu znaczenie. Trzeba pamiętać że po przerobieniu karczka wg opisu w momencie przerabiania trzeba pamiętać że jak przerabiamy A3 to jak już go przerobimy należy przerobić 3 pierwsze oczka schematu A.3. Dużo czasu mi zajęło rozszyfrowanie tego wzoru. Jednak polecam spróbować
30.03.2026 - 21:01
![]() Dana wrote:
Dana wrote:
Hej drops, på mønstre der er lidt avanceret og forvirrende som den her anbefaler jeg er der bliver lavet videoer/tutorials til hvordan der skal tages ud i kraven fx. Og hvordan man strikker videre derfra indtil man kommer til at skulle dele op til forstykke og bagstykke og ærmerne. Ville utroligt gerne strikke denne yderst smukke bluse meen forstår ikke noget i opskriften uden videoforklaringer på det.
01.03.2026 - 22:35
![]() Viktoria wrote:
Viktoria wrote:
Stickar 255-1 men förstår inte hur jag ska göra på första varvet sedan jag fått 144 maskor. Hur ska jag kunna sticka omslagen räta då jag hamnar på A3 och ska lyfta och sticka två maskor ihop?.
01.03.2026 - 15:25DROPS Design answered:
Hei Viktoria. Vi skal hjelpe deg så godt vi kan, men fint om du kan opplyse hvilken str. du strikker og hvilket omslag / hvilken omgang i diagrammet tenker du på? (Når oket strikkes og det økes plukkes det opp 1 maske fra omgangen under. I A.2 lages det et omslag og deretter strikkes det 2 masker vrang). mvh DROPS Design
23.03.2026 - 10:31
![]() Stella wrote:
Stella wrote:
Hi, I’m struggling with the yoke. From having 144 stitches to ending up with 160, I need a total increase of 16 in this round. To ‘work A3 (8 stitch counts) in the next 24 stitches’ meaning I will decrease 3 stitches for 24. If I follow this instruction, in total I will only gain 2 for the entire round. Do I ignore and not slip over the knitted stitches? If I do not slip over and follow the rest, I will ad 16. But that seems wrong. Will you please explain?Many thanks.
25.02.2026 - 23:37
![]() Bente wrote:
Bente wrote:
Skal det økes for raglan på hver omgang eller annen hver...?
16.02.2026 - 19:42DROPS Design answered:
Hei Bente, Du øker til raglan 2, hver omgang. Hilsen Drops Team.
18.02.2026 - 07:07
![]() Jolanta wrote:
Jolanta wrote:
Robię rozmiar M wzór 255-1. Przerobiłam karczek 4 razy na wysokość.Mam 408 oczek i jak dalej przerabiam schematy.
12.02.2026 - 22:29DROPS Design answered:
Witaj Jolu, schematy przerabiasz jak wcześniej, zaczynając od początku. Jedyna różnica jest taka, że teraz będziemy dodawać oczka tylko na przód i tył; dodawanie oczek na rękawy jest zakończone. Przerobić jeszcze 2 powtórzenia schematów na wysokość, z dodawaniem oczek zgodnie ze schematami A.2 i A.4 na przodzie i tyle; dalej przerabiać schematy na rękawach, ale bez dodawania oczek. Pozdrawiamy!
13.02.2026 - 08:28
![]() Giusi wrote:
Giusi wrote:
Salve, vorrei fare questo progetto ma sono alle prime armi. Cosa intende quando dice di prendere una maglia precedente? Non sono previsti ferri accorciati per il collo anatomico?
12.02.2026 - 14:56DROPS Design answered:
Buonasera Giusi, in quel punto deve sollevare una maglia del giro precedente. In questo modello non sono previsti ferri accorciati per modellare il collo. Buon lavoro!
26.04.2026 - 13:47
|
|||||||||||||||||||
Winter Pearl Sweater#winterpearlsweater |
|||||||||||||||||||
 |
 |
||||||||||||||||||
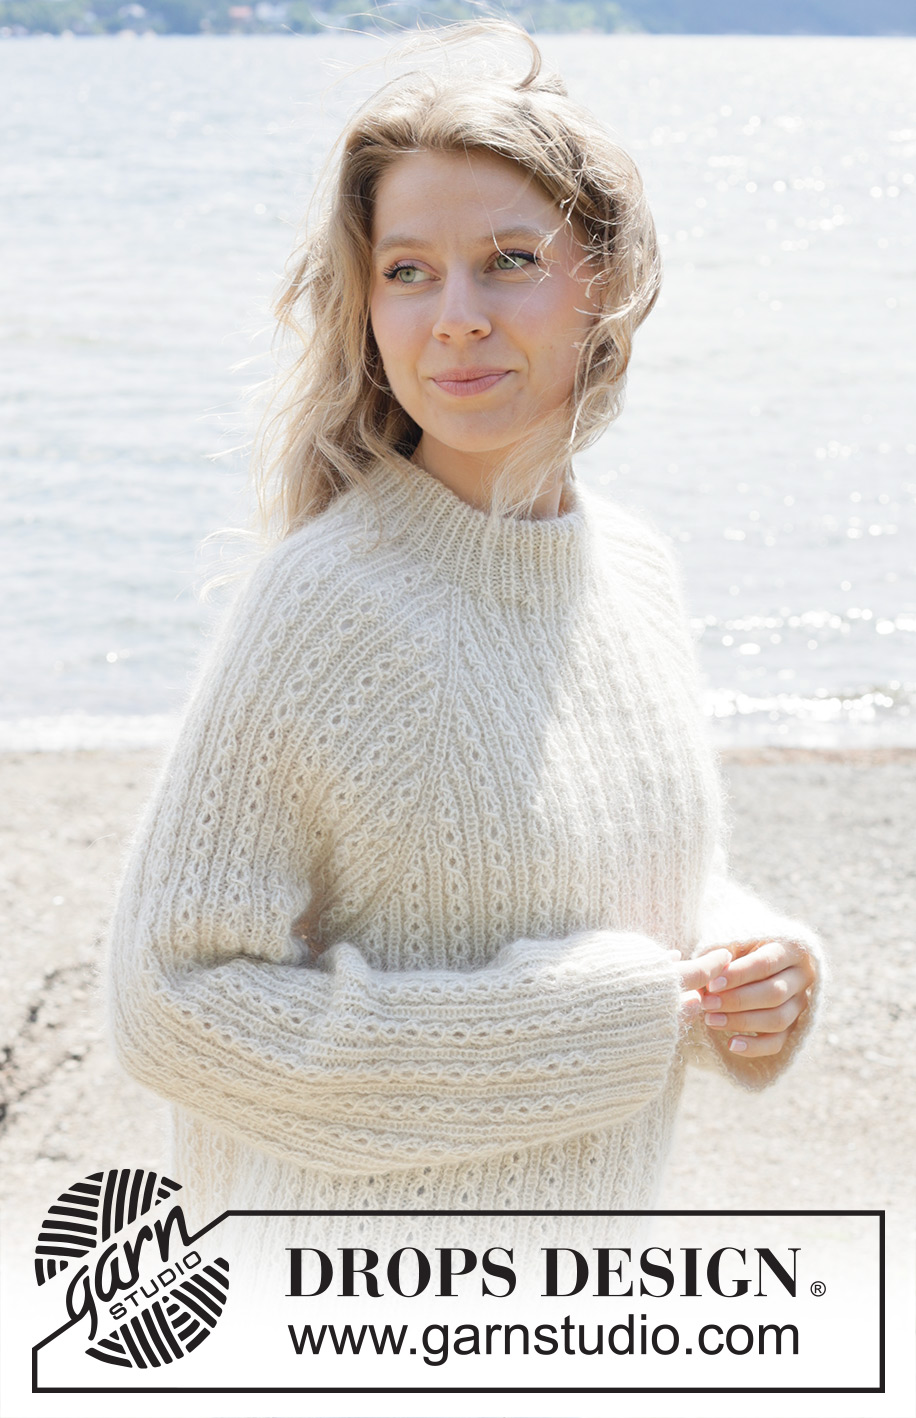
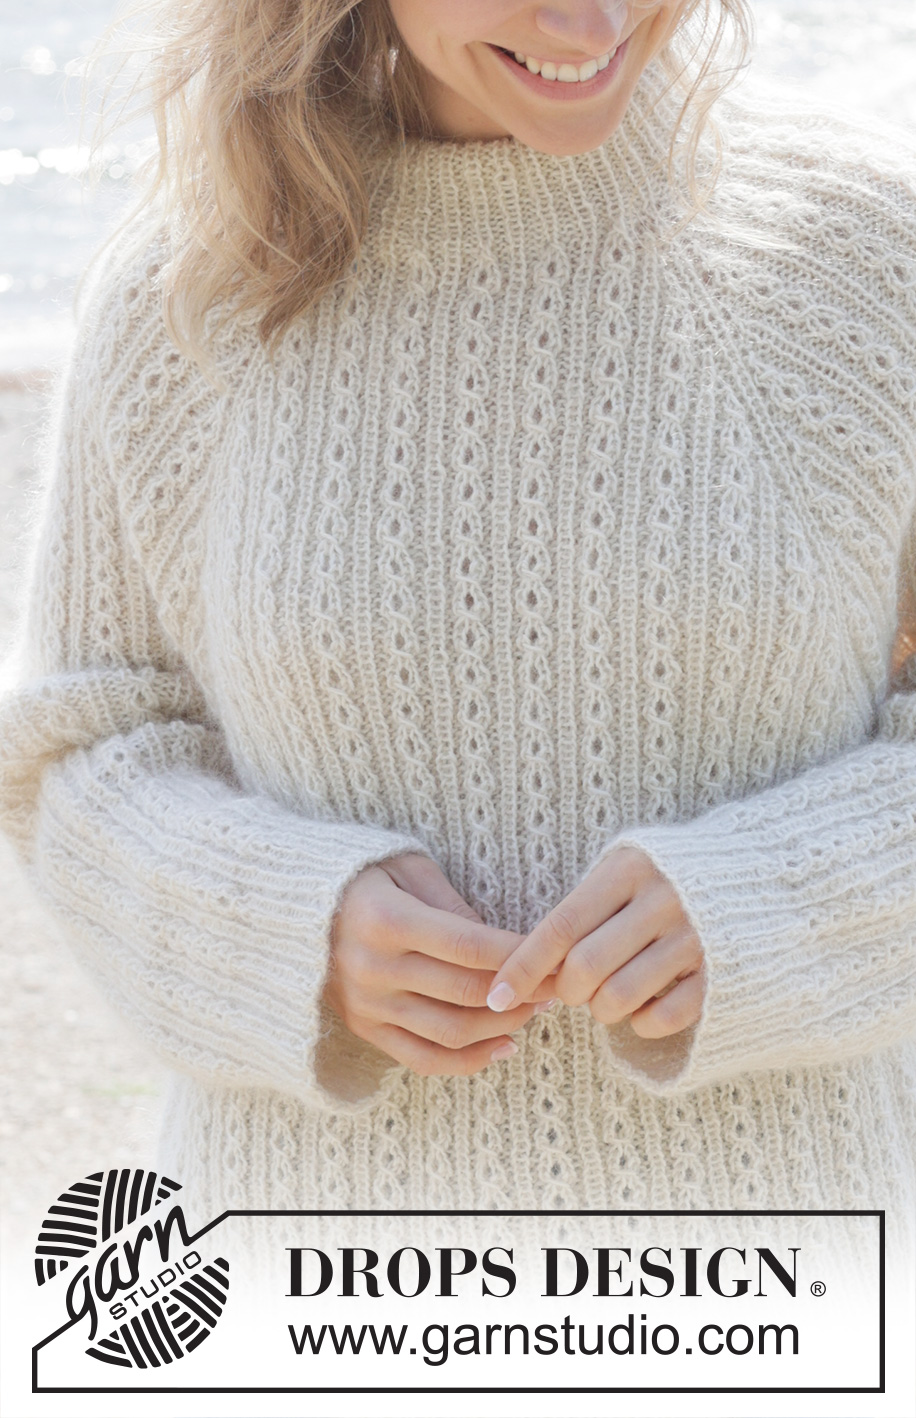
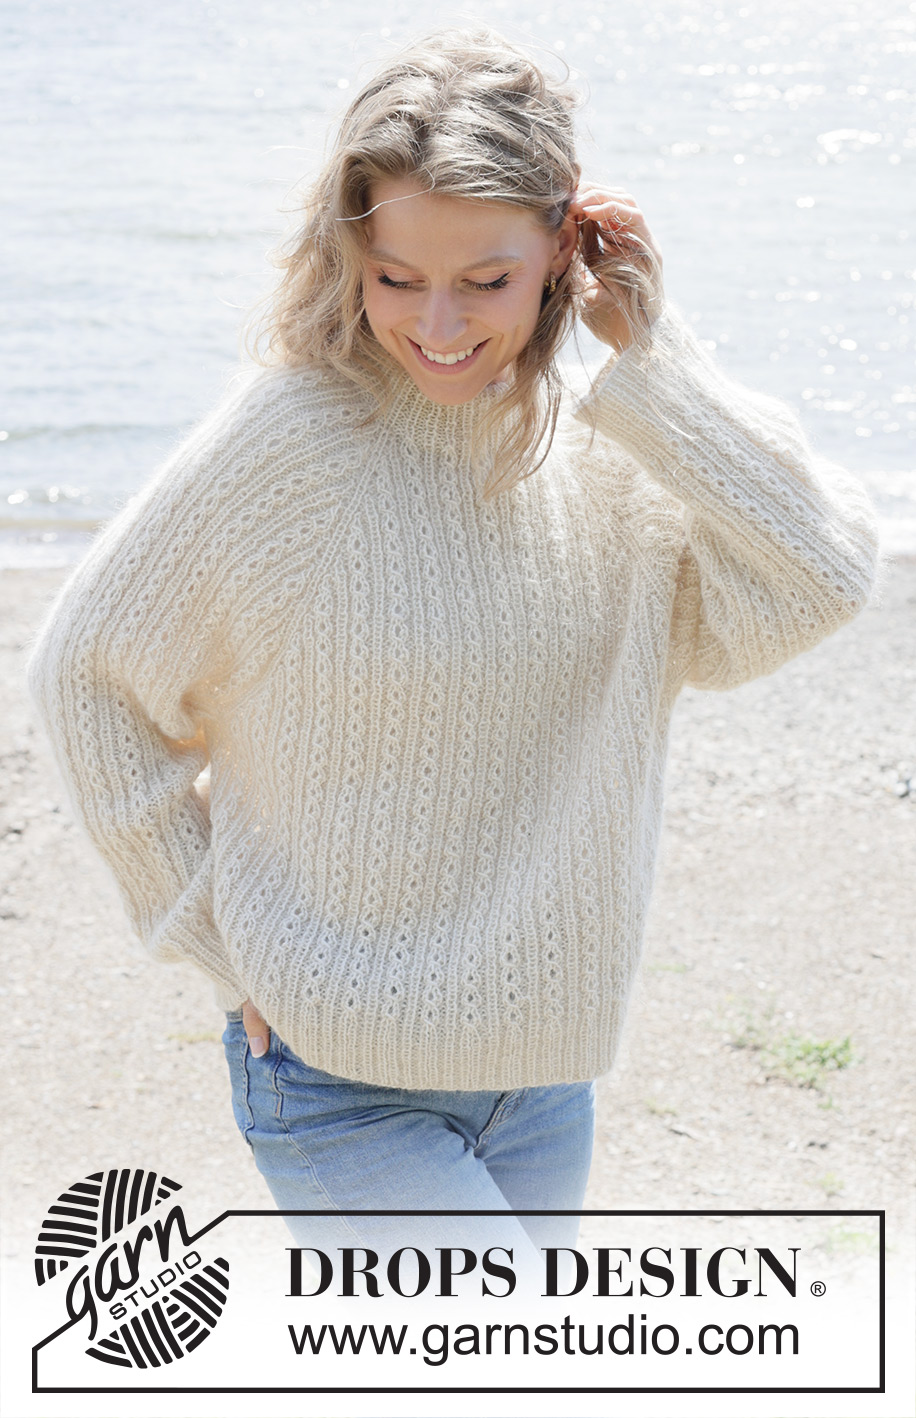
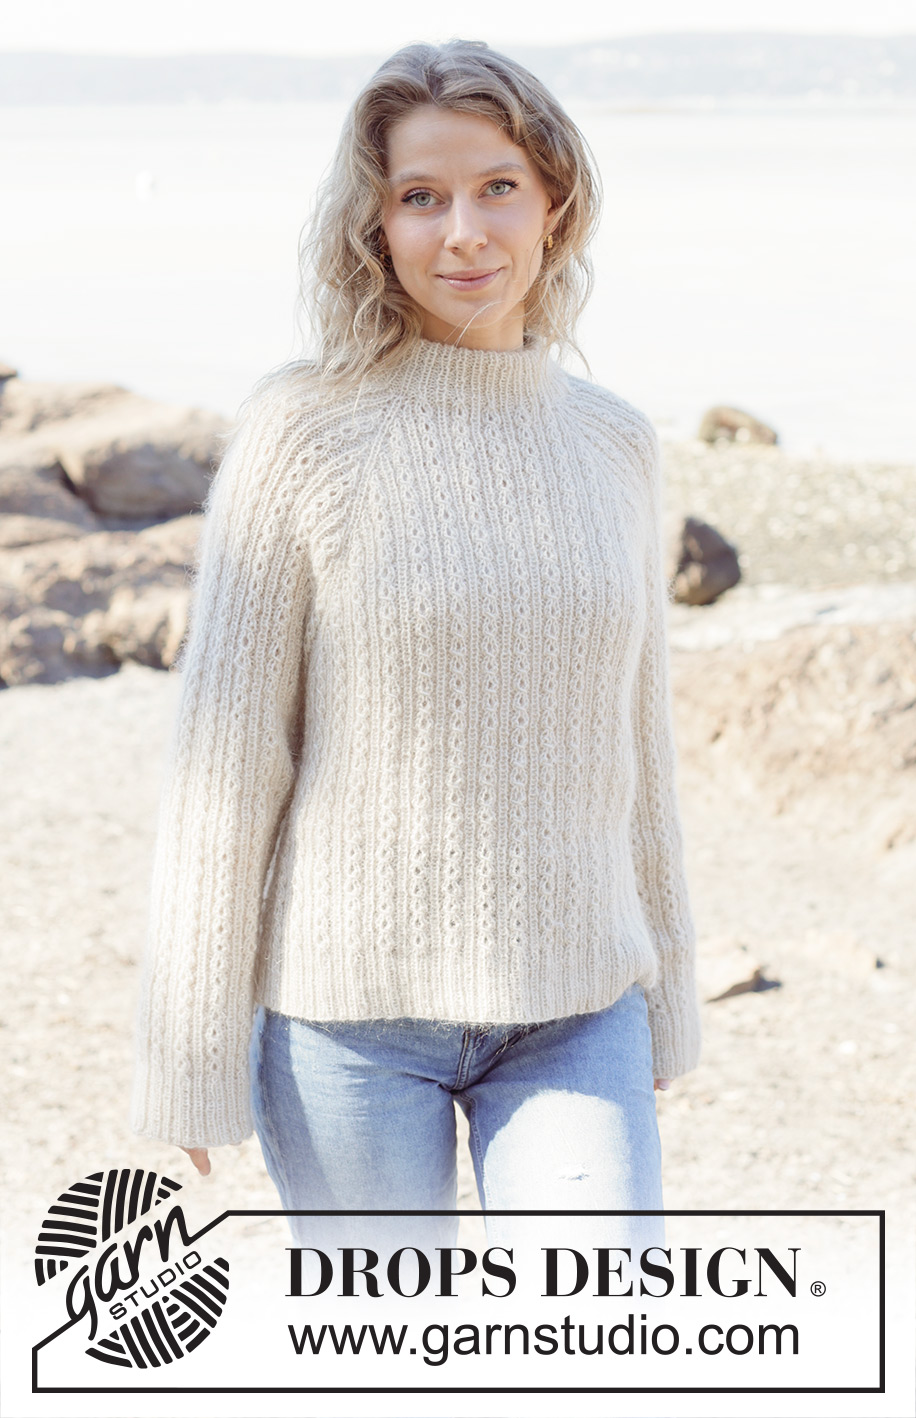
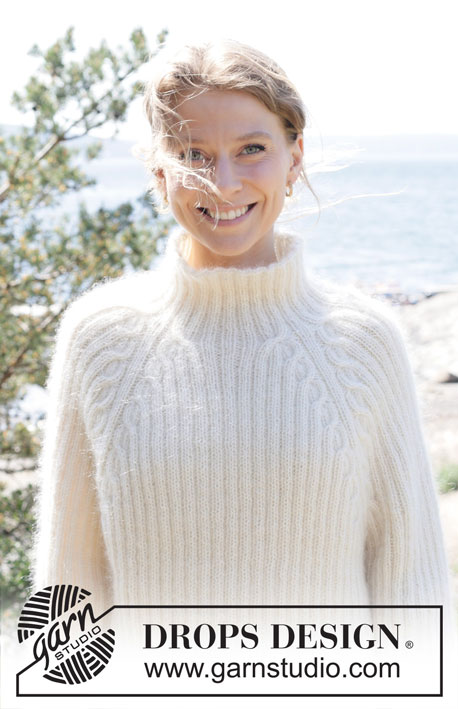
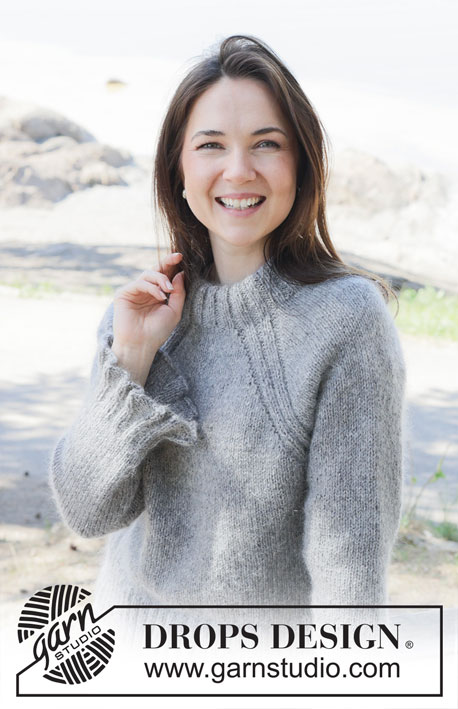
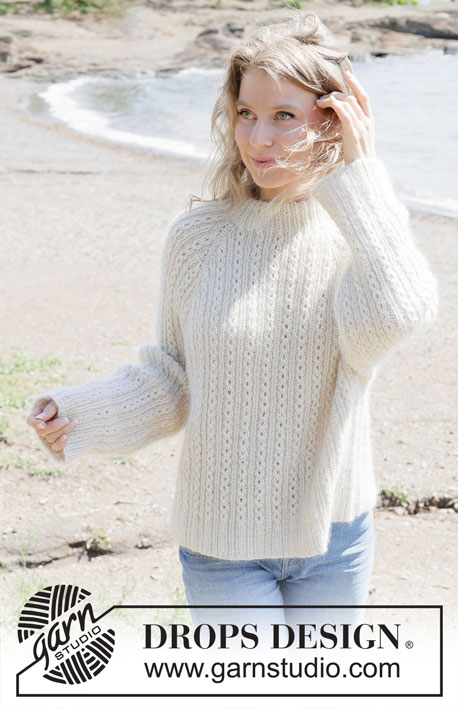
Knitted sweater in DROPS Alpaca and DROPS Kid-Silk. The piece is worked top down with double neck, raglan and cables. Sizes S - XXXL.
DROPS 255-1 |
|||||||||||||||||||
|
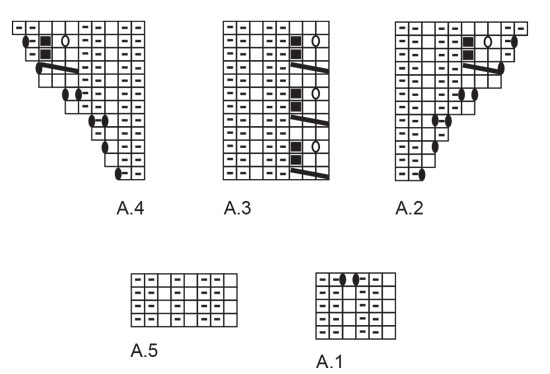
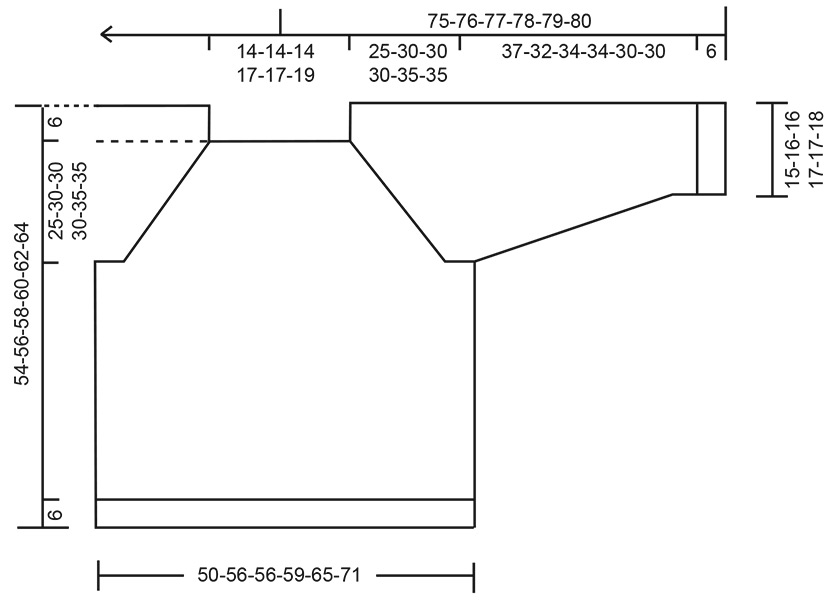
------------------------------------------------------- EXPLANATIONS FOR THE PATTERN: ------------------------------------------------------- PATTERN: See diagrams A.1 to A.5. A.3 is always counted as 8 stitches. RAGLAN: Increase for raglan before/after 1 purled + 1 knitted + 1 purled stitch (= raglan-line). The increased stitches are worked into the pattern. The increases are marked in the diagrams. DECREASE TIP (for sleeves): Decrease by purling 2 together on each side of 1 knitted stitch (= 2 decreased stitches). The stitches which do not fit into a complete cable are knitted. ----------------------------------------------------- START THE PIECE HERE: ------------------------------------------------------- SWEATER – SHORT OVERVIEW OF THE PIECE: The pattern uses both long and short needles; start with the length which fits the number of stitches and change when necessary. The neck and yoke are worked in the round with circular needle, top down and from the right back shoulder. When the yoke is finished, it is divided for the body and sleeves and the body continued in the round, while the sleeves wait. The sleeves are worked top down, in the round. The neck is folded double and fastened to the inside. DOUBLE NECK: Cast on 108-108-108-120-120-132 stitches with circular needle size 3 MM = US 2.5 and 1 strand of each quality (= 2 strands). Work rib according to A.1 in the round. Repeat the first 4 rounds of A.1 until the rib measures 9-9-9-11-11-11 cm = 3½"-3½"-3½"-4⅜"-4⅜"-4⅜"; the neck is later folded double. Change to circular needle size 4.5 MM = US 7 and work the last round in A.1 (yarn overs knitted twisted on the next round) = 144-144-144-160-160-176 stitches. Insert 1 marker after the first 52-52-52-57-57-61 stitches (approx. mid-front); the piece is measured from here. YOKE: Continue in the round as follows: Pick up 1 stitch from the previous round (all picked-up stitches are purled twisted), knit 1 ( = raglan-line), pick up 1 stitch from the previous round, work A.2, A.3 across the next 24 stitches, work the first 3 stitches in A.3, A.4 (= sleeve), pick up 1 stitch from the previous round, knit 1 (= raglan-line), pick up 1 stitch from the previous round, work A.2, A.3 across the next 32-32-32-40-40-48 stitches, work the first 3 stitches in A.3, A.4 (= front piece), pick up 1 stitch from the previous round, knit 1 (= raglan-line), pick up 1 stitch from the previous round, work A.2, A.3 across the next 24 stitches, work the first 3 stitches in A.3, work A.4 (= sleeve) pick up 1 stitch from the previous round, knit 1 (= raglan-line), pick up 1 stitch from the previous round, work A.2, A.3 across the next 32-32-32-40-40-48 stitches, work the first 3 stitches in A.3, A.4 (= back piece). NOTE! Make sure the pattern matches the rib. The increases for raglan are marked in the diagrams, you have picked up 8 extra stitches = 160-160-160-176-176-192 stitches. RAGLAN: Increase as shown in the diagrams, increasing on each side of 1 purled + 1 knitted + 1 purled stitch in each raglan-line. Each time A.2 and A.4 are finished in height, there is room for 2 more repeats of A.3 in width. Continue with pattern and increases until A.2, A.3 and A.4 have been worked a total of 3-4-4-4-5-5 times in height. There are 344-408-408-424-488-504 stitches. Now increase only on the front and back pieces; the increases on the sleeves are finished. Work 2 more repeats in height with increases as shown in A.2 and A.4 on the front and back pieces, continuing the pattern on the sleeves without further increases. There are 408-472-472-488-552-568 stitches. Continue working without further increases until the yoke measures 25-30-30-30-35-35 cm = 9¾"-11¾"-11¾"-11¾"-13¾"-13¾" from the marker mid-front. DIVIDE FOR BODY AND SLEEVES: Work the next round as follows: Work the first 2 stitches (belong to back piece), place the next 81-97-97-97-113-113 stitches on a thread for the sleeve, cast on 13-13-13-13-13-21 stitches (in side under sleeve), work 123-139-139-147-163-171 stitches (front piece), place the next 81-97-97-97-113-113 stitches on a thread for the sleeve, cast on 13-13-13-13-13-21 stitches (in side under sleeve), work the remaining 121-137-137-145-161-169 stitches (back piece). BODY: = 272-304-304-320-352-384 stitches. Continue the pattern in the round until the piece measures 42-44-46-48-50-52 cm = 16½"-17¼"-18"-19"-19¾"-20½" from the marker mid-front. Change to circular needle size 3 MM = US 2.5 and work rib according to A.5 for 6 cm = 2⅜", make sure you have knit 1, purl 1, knit 1 across the cables and knit over knit and purl over purl otherwise. Bind off. The sweater measures approx. 48-50-52-54-56-58 cm = 19"-19¾"-20½"-21¼"-22"-22¾" from the marker and 54-56-58-60-62-64 cm = 21¼"-22"-22¾"-23⅝"-24⅜"-25¼" from the shoulder. SLEEVES: Place the 81-97-97-97-113-113 sleeve-stitches from the thread on one side of the piece on circular needle size 4.5 MM = US 7 and knit up 1 stitch in each of the 13-13-13-13-13-21 stitches cast on under the sleeve + 1 extra stitch on each side = 96-112-112-112-128-136 stitches. Insert a marker-thread mid-under sleeve. Continue the pattern from the yoke, in the round. When the sleeve measures 4 cm = 1½", decrease 2 stitches under the sleeve – read DECREASE TIP. Decrease like this every 4-2-2-2½-1-1 cm = 1½"-¾"-¾"-1"-⅜"-⅜" a total of 8-14-13-11-18-20 times = 80-84-86-90-92-96 stitches. Continue working until the sleeve measures 37-32-34-34-30-30 cm = 14½"-12½"-13⅜"-13⅜"-11¾"-11¾". Change to double pointed needles size 3 MM = US 2.5. Work rib as shown in A.5 for 6 cm = 2⅜", make sure you have knit 1, purl 1, knit 1 across the cables and knit over knit and purl over purl otherwise. Bind off. The sleeve measures approx. 43-38-40-40-36-36 cm = 17"-15"-15¾"-15¾"-14¼"-14¼" from the division. ASSEMBLY: Fold the neck double to the inside and sew down. Make sure the seam is elastic to avoid the neck being tight. |
|||||||||||||||||||
Diagram explanations |
|||||||||||||||||||
|
|||||||||||||||||||
 |
|||||||||||||||||||
 |
|||||||||||||||||||
Have you finished this pattern?Tag your pictures with #dropspattern #winterpearlsweater or submit them to the #dropsfan gallery. Do you need help with this pattern?You'll find 23 tutorial videos, a Comments/Questions area and more by visiting the pattern on garnstudio.com. © 1982-2026 DROPS Design A/S. We reserve all rights. This document, including all its sub-sections, has copyrights. Read more about what you can do with our patterns at the bottom of each pattern on our site. |
|||||||||||||||||||


With over 40 years in knitting and crochet design, DROPS Design offers one of the most extensive collections of free patterns on the internet - translated to 17 languages. As of today we count 324 catalogs and 12291 patterns - 12281 of which are translated into English (US/in).
We work hard to bring you the best knitting and crochet have to offer, inspiration and advice as well as great quality yarns at incredible prices! Would you like to use our patterns for other than personal use? You can read what you are allowed to do in the Copyright text at the bottom of all our patterns. Happy crafting!
Post a comment to pattern DROPS 255-1
We would love to hear what you have to say about this pattern!
If you want to leave a question, please make sure you select the correct category in the form below, to speed up the answering process. Required fields are marked *.