
Popular categories
Looking for a yarn?


Comments / Questions (15)
![]() Broeckhoven Gonda wrote:
Broeckhoven Gonda wrote:
De achterkant van het werk sluit met knopen. Is het zonder knoopsgaten en worden de delen met de knopen op elkaar genaaid? groetjes, Gonda,n
22.07.2025 - 11:10DROPS Design answered:
Dag Gonda,
Het is zonder knoopsgaten, maar de knopen worden tussen de stokjes op de linker bies vastgeknoopt.
22.07.2025 - 21:22
![]() Nicole wrote:
Nicole wrote:
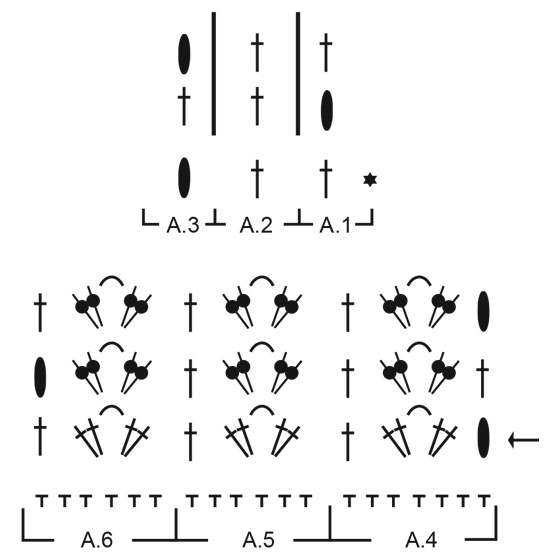
Ich bin Anfänger und verstehe das Diagramm nicht. A1 bedeutet 3 Luftmaschen und ein Stäbchen in ein Stäbchen der Vorreihe? A2 2 Stäbchen in 2 Stäbchen der Vorreihe? Kann mir jemand A1 - A3 in Worte übersetzen?
01.07.2025 - 21:51DROPS Design answered:
Liebe Nicole, das Diagram A.1 häkeln Sie am Anfang einer Hin-reihe, dann wiederholen Sie das Diagram A.2 und enden Sie mit das Diagram A.3; bei den Rückreihen beginnen Sie mit das Diagram A.3, wiederholen Sie das Diagram A.2 und enden Sie mit das Diagram A.1. So wird man häkeln: 1 Stäbchen in jeder Masche und am Anfang jeder Reihe wird man das 1. Stäbchen mit 3 Luftmaschen ersetzen. Viel Spaß beim Häkeln!
02.07.2025 - 16:21
![]() Karin wrote:
Karin wrote:
Hej! Är nybörjare på att läsa mönster på virkning. I virkinformationen står det att i början av varje varv ersätts första st med 3 luftmaskor. I mönstret, framstycke, står det att man ska avsluta med A3., men i diagrammet står det att symbolen betyder virka 3 luftmaskor i början av varvet. Jag förstår tyvärr inte. Hoppas få en förklaring så att jag förstår.
03.08.2024 - 08:22DROPS Design answered:
Hej Karin, första varvet är redan virkat och visar endast hur nästa ska virkas. Du starter i højre side med 3 lm osv... når du virkar tilbage starter du i venstre side med 3 lm osv :)
06.08.2024 - 14:08
![]() Anna wrote:
Anna wrote:
Hej, Kan man droppe knapperne og bare lave 2x forstykket for så at sætte dem sammen?
20.06.2024 - 15:33DROPS Design answered:
Hej Anna, ja hvis du ikke hækler en for lille størrelse :)
25.06.2024 - 12:31
![]() Evelyne wrote:
Evelyne wrote:
Pour le modèle R-753, je ne comprends pas les diagrammes A4-A5 et A6. On ne sait pas exactement dans quelle maille faire les deux bridés dans la même maille. Doit-on passer des mailles ? Ex A4: dans la 1e maille, on fait les 3 ml puis faut-il passer une maille avant de faire les 2 brides dans une maille ? Où faut-il faire les 2 ml ? Au dessus des brides ? Si oui, comment ? Serait-il possible de dire quoi faire dans chaque maille svp? Car là ce n’est pas clair du tout. Merci.
15.06.2024 - 02:00DROPS Design answered:
Bon jour Evelyne, tout à, vous allez sauter des mailles pour crocheter le groupe de brides dans une maille, soit: A.4 = 3 ml, *sautez 2 ms, 2 brides dans la m suivante, 2 ml, 2 brides dans la même maille que les 2 brides précédentes, sautez 2 ms, 1 b dans la m suivante*, puis répétez de *à* pour A.5 et terminez par A.6 comme A.5 (sur l'endroit). Bon crochet!
17.06.2024 - 08:07
![]() Diana wrote:
Diana wrote:
Er der ikke et billede af ryggen nogen steder?
24.02.2024 - 23:47DROPS Design answered:
Hej Diana, vi skal se efter, hvis vi har så skal vi nok lægge det ud :)
01.03.2024 - 14:29
![]() Angèle wrote:
Angèle wrote:
Bonjour, Pour le modèle 211-8 qu'entendez -vous par 'ajuster après un rang sur l'endroit ' Merci pour votre réponse.
20.06.2023 - 14:50DROPS Design answered:
Bonjour Angèle, ajustez la hauteur indiquée pour votre taille de sorte que le dernier rang tricoté soit un rang sur l'endroit, autrement dit, tricotez les côtes sur un peu moins ou un peu plus de 9 cm en fonction de votre propre tension, tant que le dernier rang est un rang sur l'endroit. Bon crochet!
20.06.2023 - 15:34
![]() Bianca Vink wrote:
Bianca Vink wrote:
Ik snap niet veel van dit patroon ik heb de eerste toer gedaan maar hoe dan.
09.06.2023 - 13:52DROPS Design answered:
Dag Bianca,
Na de eerste toer begin je met de telpatronen. Je haakt eerst A.1 over de eerste steek, dat is dus 3 lossen omdat het op het begin van de toer is. Vervolgens haak je A.2, waarbij je het telpatroon dus steeds in de breedte herhaalt totdat je nog 1 steek over hebt op de toer. Deze haak je in A.3. De telpatronen lees je van onder naar boven en van rechts naar links. De toer met een ster ernaast haak je niet.
Voor meer informatie kun je ook de video's bekijken en de stap voor stap instructies lezen over de verschillende technieken die in dit patroon gebruikt worden.
10.06.2023 - 18:26
![]() Claudia wrote:
Claudia wrote:
Buongiorno, è possibile avere lo stesso modello lavorato ai ferri? Grazie
16.05.2022 - 14:43DROPS Design answered:
Buonasera Claudia, questo modello è stato progettato per essere lavorato all'uncinetto, non può essere trasformato in un modello ai ferri. Provi a navigare tra i modelli del nostro sito per trovarne tanti altri lavorati ai ferri. Buon lavoro!
17.05.2022 - 18:59
![]() Raquel wrote:
Raquel wrote:
Hola se podría hacer este top en dos piezas para no tener que ponerle botones. Habría que hacer dos piezas iguales siguiendo el patrón del delantero y coser??. Gracias
16.04.2022 - 08:32DROPS Design answered:
Hola Raquel, se pueden hacer 2 piezas (delantero y espalda) y coser. Se trabaja igual hasta el escote y la línea del escote se comienza 2 cm antes que la línea del escote en la espalda.
17.04.2022 - 11:56
|
|||||||||||||||||||||||||
Pink Pacific#pinkpacifictop |
|||||||||||||||||||||||||
 |
 |
||||||||||||||||||||||||
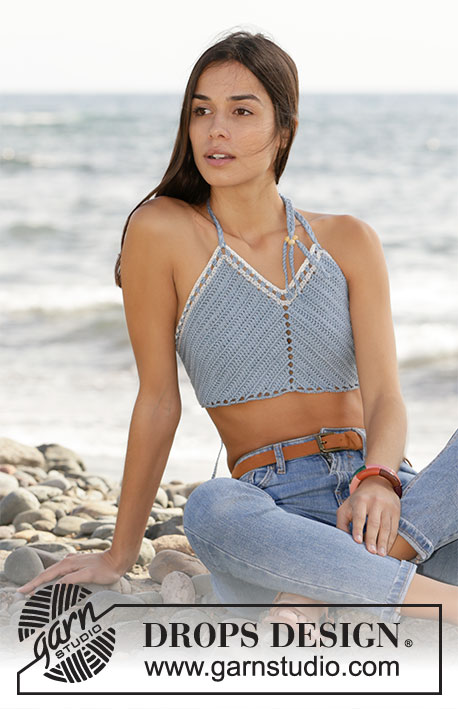
Crocheted top in DROPS Muskat. Piece is crocheted in double crochets with edge in fan pattern. Size: S - XXXL
DROPS 211-8 |
|||||||||||||||||||||||||
|
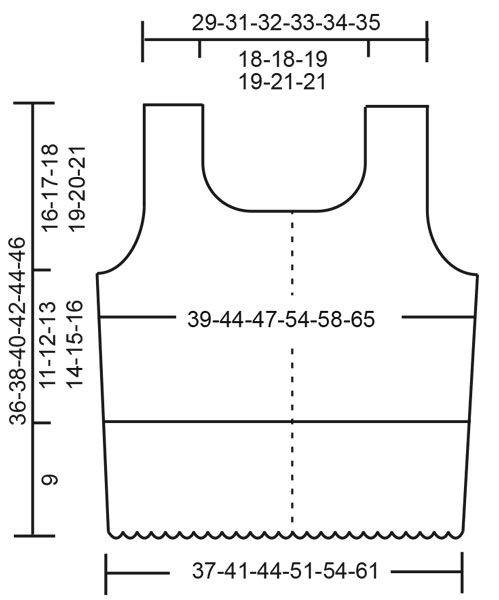
---------------------------------------------------------- EXPLANATION FOR THE PATTERN: ---------------------------------------------------------- CROCHET TIP FOR CHAIN STITCHES: If you work at the end of crochet hook the chain stitch will often be too tight. 1 chain stitch should be just as long as 1 single crochet/double crochet is wide. PATTERN: See diagrams A.1 to A.6. CROCHET INFORMATION (applies to A.1, A.3, A.4 and A.6): At beginning of every row with double crochets, replace first double crochet with 3 chain stitches. INCREASE TIP (applies to sides on front piece and back pieces): Increase 1 double by working 2 doubles in same stitch. DECREASE TIP-1 (applies to armholes): At the beginning of row: Replace number of double crochets to decrease with 1 slip stitch. At end of row: Do not work over stitches to be decreased. DECREASE TIP-2 (applies to neck): Work 1 double crochet in each of the next 2 stitches but wait with last yarn over and pull through on both these double crochets, work 1 double crochet in the next stitch and pull last yarn over through all 4 loops on hook (= 2 double crochets decreased). DECREASE TIP-3 (applies to neck): * Make 1 yarn over, insert hook in next stitch, get yarn, make 1 yarn over and pull yarn through the 2 first loops on hook *, repeat from *-* 1 more time, make 1 yarn over and pull yarn through all 3 loops on hook (= 1 double crochet decreased). ---------------------------------------------------------- START THE PIECE HERE: ---------------------------------------------------------- TOP - SHORT OVERVIEW OF THE PIECE: Piece is worked back and forth in parts. First work front piece and both back piece, bottom up in double crochets. Then work an edge in fan pattern on front piece and on both back piece, top down. Sew top together on shoulders and in the sides and sew buttons on to back piece. FRONT PIECE: Work 69-75-81-93-99-111 chain stitches on hook size 4 mm = US 6 with Muskat - read CROCHET TIP FOR CHAIN STITCHES. Turn and work 1 double crochet in 4th chain stitch from hook (= 2 double crochets), work 1 double crochet in every chain stitch the rest of row = 67-73-79-91-97-109 double crochets on row. Read CROCHET INFORMATION and work in the A.1 to A.3 as follows: Work A.1 over the first stitch, work A.2 until 1 stitch remains on row, finish with A.3 over the last stitch. Continue pattern back and forth like this. REMEMBER THE CROCHET GAUGE! AT THE SAME TIME when piece measures 4-3-3-3-3-3 cm = 1¼"-1⅛"-1⅛"-1⅛"-1⅛"-1⅛", increase 1 double crochet in each side – read INCREASE TIP. Increase like this every 4-3-3-3-3-3 cm = 1¼"-1⅛"-1⅛"-1⅛"-1⅛"-1⅛" 2-3-3-3-4-4 times in each side = 71-79-85-97-105-117 double crochets. When piece measures 11-12-13-14-15-16 cm = 4⅜"-4¾"-5⅛"-5½"-6"-6¼", bind off for armholes in each side – read DECREASE TIP-1 and work as explained below: Continue with double crochets and decrease for armholes in each side on every row like this: Bind off 3 double crochets 1-1-1-2-3-5 times, 2 double crochets 2-3-4-5-5-5 times and 1 double crochet 2-3-3-3-3-2 times = 53-55-57-59-61-63 double crochets remain. When piece measures 17-19-20-22-23-25 cm = 6¾"-7½"-8"-8¾"-9"-9¾", decrease for neck - read DECREASE TIP-2 and DECREASE TIP-3 and work as explained below: Work shoulder over the first 19-20-20-21-21-22 double crochets on row (there should be 15-15-17-17-19-19 double crochets in the middle for neck). Then decrease 2 double crochets on every row towards the neck 3 times in total, and 1 double crochet on every row towards the neck 3 times in total = 10-11-11-12-12-13 double crochets remain on shoulder. Continue to work until piece measures 27-29-31-33-35-37 cm = 10⅝"-11⅜"-12¼"-13"-13¾"-14½". Cut and fasten the yarn. Work the other shoulder the same way. LEFT BACK PIECE (when garment is worn): Work 40-45-46-52-57-63 chain stitches on hook size 4 mm = US 6 with Muskat. Turn and work 1 double crochet in 4th chain stitch from hook (= 2 double crochets), work 1 double crochet in every chain stitch the rest of row = 38-43-44-50-55-61 double crochets on row. Then work A.1 to A.3 as follows: Work A.1 over the first stitch, work A.2 until 1 stitch remains on row, finish with A.3 over the last stitch. Continue pattern back and forth like this. AT THE SAME TIME when piece measures 4-3-3-3-3-3 cm = 1¼"-1⅛"-1⅛"-1⅛"-1⅛"-1⅛", increase 1 double crochet in the side – remember INCREASE TIP. Increase like this every 4-3-3-3-3-3 cm = 1¼"-1⅛"-1⅛"-1⅛"-1⅛"-1⅛" 2-3-3-3-4-4 times in the side = 40-46-47-53-59-65 double crochets. When piece measures 11-12-13-14-15-16 cm = 4⅜"-4¾"-5⅛"-5½"-6"-6¼", bind off for armholes in the side – read DECREASE TIP-1 and work as explained below: Continue with double crochets and decrease for armholes in the side on every row like this: Decrease 3 double crochets 1-1-1-2-3-5 times, 2 double crochets 2-3-4-5-5-5 times and 1 double crochet 2-3-3-3-3-2 times = 31-34-33-34-37-38 double crochets. When piece measures 19-21-22-24-25-27 cm = 7½"-8¼"-8¾"-9½"-9¾"-10⅝", decrease for neck - read DECREASE TIP-2 and DECREASE TIP-3 and work as explained below: Work shoulder over the first 19-20-20-21-21-22 double crochets from the side (there should be 12-14-13-13-16-16 double crochets for neck towards mid front). Then decrease 2 double crochets on every row towards the neck 3 times in total, and 1 double crochet on every row towards the neck 3 times in total = 10-11-11-12-12-13 double crochets remain on shoulder. Continue to work until piece measures 27-29-31-33-35-37 cm = 10⅝"-11⅜"-12¼"-13"-13¾"-14½". Cut and fasten the yarn. RIGHT BACK PIECE (when garment is worn): Work the same way as left back piece, but make sure that increases in the side, decrease for armhole and decrease for neck is in the opposite side to left back piece. EDGE WITH FAN PATTERN ON FRONT PIECE: Work edge top down. Begin from wrong side and work 1 single crochet in every chain stitch cast on at the bottom of front piece = 67-73-79-91-97-109 single crochets. Then work A.4 to A.6 as follows: Work A.4 over the first 7 stitches, work A.5 until 6 stitches remain on row (= 9-10-11-13-14-16 repetitions of 6 stitches), and finish with A.6 over last 6 stitches. Continue pattern back and forth for 9 cm = 3½", adjust after a row from right side. Cut and fasten the yarn. Front piece measures approx. 36-38-40-42-44-46 cm = 14¼"-15"-15¾"-16½"-17¼"-18" from top and down. EDGE WITH FAN PATTERN ON LEFT BACK PIECE: Work edge top down. Begin from wrong side (i.e. from mid front) and work 1 single crochet in every chain stitch cast on at the bottom of left back piece = 38-43-44-50-55-61 single crochets. Then work A.4 to A.6 as follows from right side (i.e. from the side): Work A.4 over the first 7 stitches, work A.5 until 13-12-13-13-12-12 stitches remain on row (= 3-4-4-5-6-7 repetitions of 6 stitches), work A.6 over the next 6 stitches, and finish with 1 double crochet in each of the 7-6-7-7-6-6 last stitches (= band). Continue pattern back and forth for 9 cm = 3½", adjust after a row from right side. Cut and fasten the yarn. Back piece measures approx. 36-38-40-42-44-46 cm = 14¼"-15"-15¾"-16½"-17¼"-18" from top and down. EDGE WITH FAN PATTERN ON RIGHT BACK PIECE: Work edge top down. Begin from wrong side (i.e. from the side) and work 1 single crochet in every chain stitch cast on at the bottom of right back piece = 38-43-44-50-55-61 single crochets. Then work A.4 to A.6 as follows from right side (i.e. from mid back): Work 1 double crochet in each of the first 7-6-7-7-6-6 stitches (= band), work A.4 over the next 7 stitches, work A.5 until 6 stitches remain on row (= 3-4-4-5-6-7 repetitions of 6 stitches), and finish with A.6 over last 6 stitches. Continue pattern back and forth for 9 cm = 3½", adjust after a row from right side. Cut and fasten the yarn. Back piece measures approx. 36-38-40-42-44-46 cm = 14¼"-15"-15¾"-16½"-17¼"-18" from top and down. ASSEMBLY: Sew the shoulder seams edge to edge with neat little stitches. Sew side seams the same way. Sew 5-5-5-6-6-6 buttons evenly onto band on right back piece - top button should be approx. 1 cm = ⅜" from neck edge and bottom button approx. 2 cm = ¾" from bottom edge, button between double crochets on left band. |
|||||||||||||||||||||||||
Diagram explanations |
|||||||||||||||||||||||||
|
|||||||||||||||||||||||||
 |
|||||||||||||||||||||||||
 |
|||||||||||||||||||||||||
Have you finished this pattern?Tag your pictures with #dropspattern #pinkpacifictop or submit them to the #dropsfan gallery. Do you need help with this pattern?You'll find 13 tutorial videos, a Comments/Questions area and more by visiting the pattern on garnstudio.com. © 1982-2026 DROPS Design A/S. We reserve all rights. This document, including all its sub-sections, has copyrights. Read more about what you can do with our patterns at the bottom of each pattern on our site. |
|||||||||||||||||||||||||


With over 40 years in knitting and crochet design, DROPS Design offers one of the most extensive collections of free patterns on the internet - translated to 17 languages. As of today we count 324 catalogs and 12290 patterns - 12280 of which are translated into English (US/in).
We work hard to bring you the best knitting and crochet have to offer, inspiration and advice as well as great quality yarns at incredible prices! Would you like to use our patterns for other than personal use? You can read what you are allowed to do in the Copyright text at the bottom of all our patterns. Happy crafting!
Post a comment to pattern DROPS 211-8
We would love to hear what you have to say about this pattern!
If you want to leave a question, please make sure you select the correct category in the form below, to speed up the answering process. Required fields are marked *.