
Popular categories
Looking for a yarn?


Comments / Questions (68)
![]() Maggie wrote:
Maggie wrote:
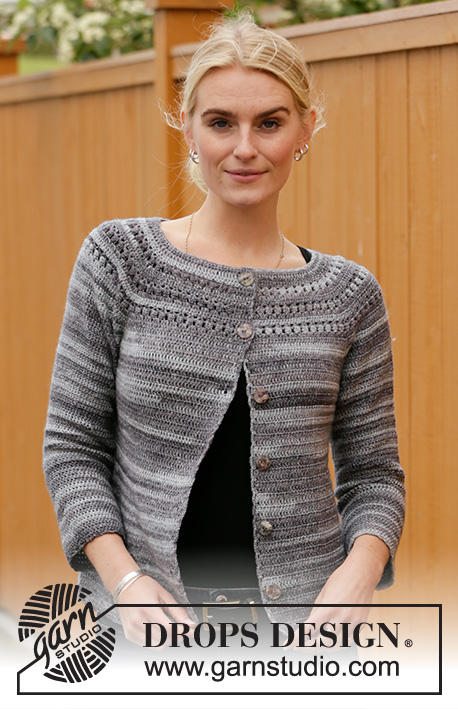
Dear Drops , I am very confused with the second round of 'V' stitches. I seem to run short of stitches and I am confused as to the pattern on the yoke for size 'L'. starting with '... A.1 as before, but work as follows over A.2a and A.3: ...' Can you explain it to me please. Cracked Pepper Jacket Many thanks
08.02.2021 - 12:12DROPS Design answered:
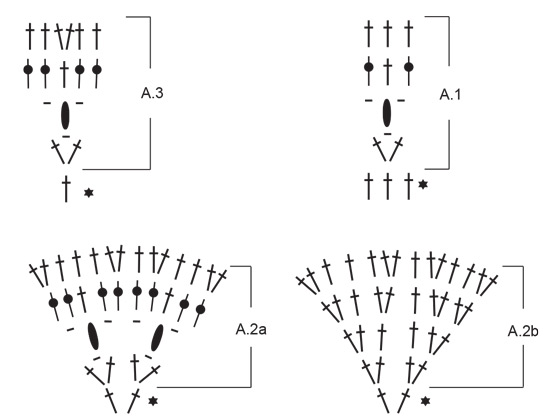
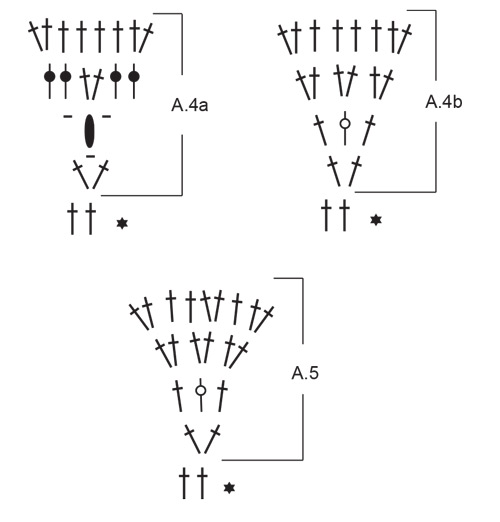
Dear Maggie, after you have worked A.1-A.2a-A.3 in height, you will now continue working A.1 but over the 14 sts in last row on each A.2a you will work: A.1a over the first 6 sts (= 2 repeats), A.2 over the middle 2 sts (= 1 repeat) and A.1a over the next 6 sts (= 2 repeats). And there are 6 sts on last row in each A.3, over these 6 sts, you will work 2 repeats of A.1. Hope this helps. Happy crocheting!
08.02.2021 - 14:58
![]() Clara wrote:
Clara wrote:
Buongiorno, volevo sapere al momento di separare il davanti e il dietro dalle maniche nelle istruzioni indicare di saltare 66 maglie taglia M x le maniche, queste maglie devo essere chiuse o messe in sospeso a parte?grazie mille Clara
01.02.2021 - 14:19DROPS Design answered:
Buonasera Clara, deve semplicemente non lavorare quelle maglie e avviare nuove maglie per il sottomanica e proseguire con l'altro lato del corpo. Buon lavoro!
01.02.2021 - 19:33
![]() Célia wrote:
Célia wrote:
Hello. I’m about to start the yoke row A1and am a little nervous as I’ve never crocheted from a diagram before. I’ve read your tutorials so is this what I do ? Start from the right, second line, 2 treble crochets in 1 stich - do I then repeat this all the way along the row, or jump to A2 row 1 and then A2a, A2b and so on? Sorry if this is obvious. Thank you
12.12.2020 - 18:21DROPS Design answered:
Dear Celia, you have to repeat A.1 in width over a given number of stitches, this means you first work A.1, then A.2, then A.1, then A.3 etc... A.1 is worked over 3 sts; *skip 1 stitch, 1 tr, 1 ch, 1 tr in next st, 1 tr*, repeat from *-* the number of times explained in the pattern. then work first row in A.2a as shown in diagram, etc.. on next round, work 2nd round in each diagram over the first row. read more here. Happy crocheting!
14.12.2020 - 08:24
![]() Jean Simpson wrote:
Jean Simpson wrote:
Hello I'm making the medium size version of the FA-437 - cracked pepper jumper and am stuck with the yoke. I have 209 stitches after working pattern A1/A2/A3 for 4 rows and after working A1/A4a I have 265 stitches. Is this correct? If so, when I do the next 4 rows I have too many stitches, even when doing A4b only once . Many thanks Jean
05.12.2020 - 20:24DROPS Design answered:
Dear Mrs Simpson, in size M you crochet A.4a a total of 4 times in the round (= over the 4 previous repeats of A.2) and you will increase 6 sts in each A.4a (= 24 sts increased on first repeat in height = 233 sts, after 2nd repeat of A.4a there are 257 sts, then work A.4b (you inc 6 sts x 4 = 24 sts ) = 284 sts. Hope this will help. Happy crocheting!
07.12.2020 - 08:14
![]() Jose wrote:
Jose wrote:
Beste drops team, heel erg bedankt , voor jullie uitleg, ga er mee aan de slag
26.11.2020 - 15:46
![]() Jose wrote:
Jose wrote:
Beste drops team, Hoe komen jullie op 5 cm bij eerste drie toeren? Zie ook proeflapje? Kan toch niet ? Kom op 3,5 cm uit bij haaknld 4. Gr jose
25.11.2020 - 10:14DROPS Design answered:
Dag Jose,
Voordat je begint met de telpatronen heb je ook al een aantal toeren gehaakt zoals aangegeven bij de paragraaf over de PAS. Na de eerste 3 toeren van het telpatroon meet het werk ongeveer 5 cm vanaf het opzetten.
26.11.2020 - 09:34
![]() Kristina Pedersen wrote:
Kristina Pedersen wrote:
Jeg hækler i str. L og er kommet dertil hvor jeg har hæklet diagram 1 gang og har 224 masker. Jeg har forsøgt næste omgang - hæklet A1 og diagram A2a osv. Nu er jeg færdig med diagram igen det måler ca 9 cm men jeg har alt for mange masker.
30.10.2020 - 14:32
![]() Alessandra wrote:
Alessandra wrote:
Buongiorno, sto seguendo le indicazioni per la taglia S e sono arrivata ad avere 200 maglie nello sprone. Lo schema poi dice di procedere con A1 e lavorare le due maglie centrali di A2a seguendo il diagramma A4a. Non capisco però cosa devo fare quando arrivo sulle maglie che ho già lavorato secondo lo schema A3. Devo semplicemente lavorare sulle 6 maglie ottenute delle nuove maglie alte? Grazie
19.09.2020 - 22:16DROPS Design answered:
Buongiorno Alessandra, si esatto, deve semplicemente continuare a lavorare A.1 per tutto il giro tranne per le 2 maglie centrali di ogni ripetizione di A.2. Buon lavoro!
25.09.2020 - 09:20
![]() Trine M wrote:
Trine M wrote:
Hej. Jeg hækler str M og er nået til at hækle diagram A1 og A4a (den første række). A1 går over 3 masker fra forrige omgang. Er det korrekt læst at A4a dækker over 2 masker fra forrige omgang så jeg hækler ned i hver anden maske fra forrige omgang?
21.08.2020 - 12:13DROPS Design answered:
Hej Trine, Ja A.4a hækles i hver 2. maske fra første række. God fornøjelse!
27.08.2020 - 13:41
![]() Jacqueline wrote:
Jacqueline wrote:
Ik haak dit patroon in maat S en ben bij de toer waar je A1 haakt en A5 over A4. De beschrijving zegt: '3 stokjes, A5 over de volgende 2 stokjes en 3 stokjes'. In de 2e toer van A1 waarbij je steeds 4 stokjes samenhaakt, moet je dus ineens afwijken met de 3 stokjes, A5 en weer 3 stokjes. Klopt dat? Op de foto's zie ik dat niet.
09.08.2020 - 16:17DROPS Design answered:
Dag Jacqueline,
Ja, je haakt inderdaad 3 stokjes, dan A5 en dan weer 3 stokjes over A.4 in de eerste toer. Als het goed is kun je in de 2e toer het patroon van A.1 weer oppakken, zodat het doorloopt.
21.08.2020 - 13:18
|
|||||||||||||||||||
Cracked Pepper#crackedpeppersweater |
|||||||||||||||||||
 |
 |
||||||||||||||||||
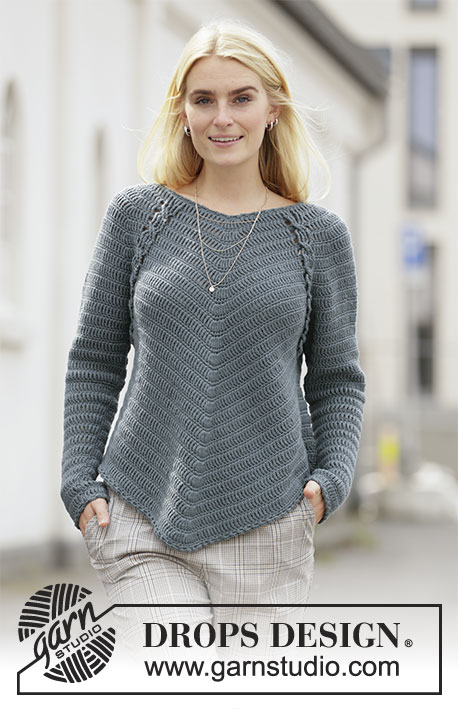
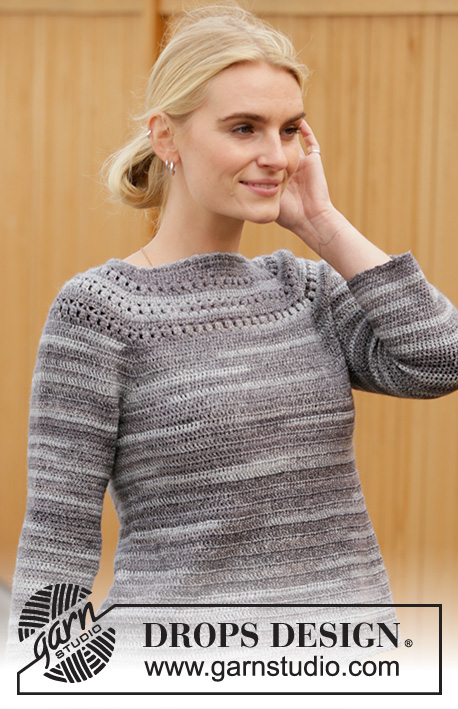
Crocheted sweater in DROPS Fabel. Piece is crocheted top down with lace pattern and raglan. Size: S - XXXL
DROPS 207-44 |
|||||||||||||||||||
|
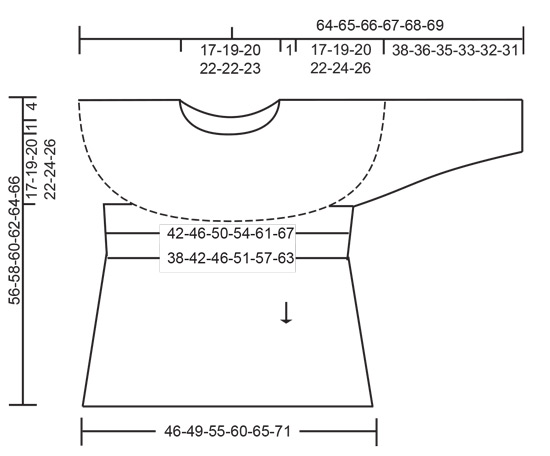
---------------------------------------------------------- EXPLANATION FOR THE PATTERN: ---------------------------------------------------------- CHAIN STITCH: If you work at the end of crochet hook the chain stitch will often be too tight 1 chain stitch should be just as long as 1 double crochet is wide. PATTERN: Diagrams A.1 to A.5. CROCHET INFO: Begin round with 3 chain stitches (replace first double crochet) and finish round with 1 slip stitch in 3rd chain stitch. Work sweater in the round but turn the piece on every round. I.e. work 1 round from right side and 1 round from wrong side the entire piece. INCREASE/DECREASE TIP: To calculate how to increase/decrease evenly, use the total number of stitches to be increased/decreased over (e.g. 24 stitches) and divide stitches by number of increases/decreases to be done (e.g. 3) = 8. To increase evenly in this example work 2 double crochets in every 8th double crochet. To decrease evenly in this example work every 7th and 8th double crochet together. Decrease 1 double crochet by working 2 double crochets together as follows: Work 1 double crochet in/around first stitch, but wait with last pull through, work 1 double crochet in/around next double crochet/stitch, but on last pull through pull yarn through all 3 loops on hook. ---------------------------------------------------------- START THE PIECE HERE: ---------------------------------------------------------- SWEATER: Work top down. Work in the round but on every round turn piece mid back. Work an edge around the neck, sleeves and along bottom edge of sweater. YOKE: Work 120-129-132-141-141-147 chain stitches on hook size 3.5 mm = US E/4 with Fabel - read CHAIN STITCH, and form a ring with 1 slip stitch in first chain stitch. Beginning of round = mid back. READ CROCHET INFO and work 1 double crochet in every chain stitch on round = 120-129-132-141-141-147 double crochets. Turn and work next round from wrong side as follows: Work 1 double crochet in each of the first 19-21-22-24-24-26 double crochets, * work 2 double crochets in next double crochet, 1 double crochet in next double crochet *, repeat from *-* over the next 22 double crochets (= total 11 double crochets increased), 1 double crochet in each of the next 38-43-44-49-49-51 double crochets, repeat from *-* over the next 22 double crochets (= 11 double crochets increased), 1 double crochet in each of the last 19-21-22-24-24-26 double crochets = 142-151-154-163-163-169 double crochets. On next round insert marker threads in piece, while working move the marker threads upwards to make it easier to see where every repetition begins and ends. Work as follows from right side: Work A.1 over the first 21-24-24-27-27-27 double crochets (= 7-8-8-9-9-9 repetitions) (=half back piece). Insert 1 marker thread and work A.2a over the next 2 double crochets (= 1 repetition) and insert 1 marker thread. Work A.1 over the next 12 double crochets (= 4 repetitions). Insert 1 marker thread and work A.3 over 1 double crochet (= 1 repetition) and insert 1 marker thread here. Work A.1 over the next 12 double crochets (= 4 repetitions). Insert 1 marker thread and work A.2a over the next 2 double crochets (= 1 repetition) and insert 1 marker thread (= sleeve). Work A.1 over the next 42-45-48-51-51-57 double crochets (= 14-15-16-17-17-19 repetitions) (= front piece). Insert 1 marker thread and work A.2a over the next 2 double crochets (= 1 repetition) and insert 1 marker thread. Work A.1 over the next 12 double crochets (= 4 repetitions). Insert 1 marker thread and work A.3 over 1 double crochet (= 1 repetition) and insert 1 marker thread. Work A.1 over the next 12 double crochets (= 4 repetitions). Insert 1 marker thread and work A.2a over the next 2 double crochets (= 1 repetition) and insert 1 marker thread (= sleeve). Work A.1 over the last 21-24-24-27-27-27 double crochets (= 7-8-8-9-9-9 repetitions) (= half back piece). REMEMBER THE CROCHET GAUGE! SIZE S AND M: When A.1 to A.3 have been worked 1 time vertically, there are 200-209 double crochets on round. SIZE L, XL AND XXL: On last round in A.1 to A.3 increase 6-6-6 double crochets evenly over stitches in diagram A.1 on front piece – read INCREASE/DECREASE TIP and 6-0-12 double crochets evenly over stitches in diagram A.1 on back piece (= 12-6-18 double crochets increased in total). When A.1 to A.3 have been worked 1 time vertically, there are 224-227-239 double crochets on round. SIZE XXXL: On last round in A.1 to A.3 increase 3 double crochets evenly over stitches in diagram A.1 on back piece – read INCREASE/DECREASE TIP. When A.1 to A.3 have been worked 1 time vertically, there are 230 double crochets on round. ALL SIZES: There are 200-209-224-227-239-230 double crochets in total after last round in diagrams and piece measures approx. 5 cm = 2" in all sizes. SIZE L, XL, XXL AND XXXL: Work A.1 as before, but work as follows over A.2a and A.3: Work diagram A.2a over the 2 middle double crochets in every repetition of A.2a 1-1-2-2 more times vertically (i.e. A.2a is worked 2-2-3-3 times in total vertically), over the remaining stitches work A.1 (i.e. work 2 repetitions of A.1 over every A.3 on sleeves and work 2 repetitions of A.1 on each side of A.2a). When A.2a is done there are 272-275-335-326 double crochets on last round. Piece measures approx. 8-8-12-12 cm = 3⅛"-3⅛"-4¾"-4¾". SIZE XXXL: Work diagram A.2b over the middle 2 double crochets in every repetition of A.2a 1 time in total vertically, work double crochets over the remaining stitches. When A.2b has been worked, there are 374 double crochets on last round. Piece measures approx. 15 cm = 6". ALL SIZES: There 200-209-272-275-335-374 double crochets in total on round and piece measures approx. 5-5-8-8-12-15 cm = 2"-2"-3⅛"-3⅛"-4¾"-6". SIZE S, M, L AND XL: Work A.1 as before but now work A.4a over the middle 2 double crochets in every repetition of A.2 2-2-1-1 time in total vertically, work the remaining stitches in A.1. I.e. over every A.2 work as follows: Work A.1 over 6 double crochets (= 2 repetitions), A.4a over 2 double crochets (= 1 repetition) and A.1 over 6 double crochets (= 2 repetitions). Every time A.4a is repeated vertically work 8 repetitions more of A.1 on round. SIZE M, L AND XL: Work diagram A.4b over the middle 2 double crochets in every repetition of A.4a a total of 1-1-2 times vertically, work double crochets over the remaining stitches. SIZE XXL AND XXXL: Work diagram A.4b over the middle 2 double crochets in every repetition of A.2 2-2 times in total vertically, work double crochets over the remaining stitches. ALL SIZES: When A.4 is done there are 248-281-320-347-383-422 double crochets on round. Piece measures approx. 12-15-15-18-19-22 cm = 4¾"-6"-6"-7"-7½"-8¾". Work diagram A.5 over the middle 2 double crochets in every repetition of A.4 1 time in total vertically, work double crochets over the remaining stitches. I.e. over every A.4 work as follows: Work 3 double crochets, A.5 over the next 2 double crochets (= 1 repetition) and 3 double crochets. When A.5 is done there are 276-309-348-375-411-450 double crochets on round. Piece measures approx. 15-18-18-21-22-25 cm = 6"-7"-7"-8¼"-8¾"-9¾". Continue with double crochets over all stitch until piece measures 17-19-20-22-24-26 cm = 6¾"-7½"-8"-8¾"-9½"-10¼" in total. Now divide for body and sleeves as follows: Work 1 double crochet in each of the first 39-45-48-54-61-66 stitches (= half back piece), skip the next 57-66-75-81-84-90 double crochets (= sleeve), work 12 chain stitches (= under sleeve), work 1 double crochet in each of the next 84-87-102-105-121-138 stitches (= front piece), skip the next 57-66-75-81-84-90 double crochets (= sleeve), work 12 chain stitches (= under sleeve), work 1 double crochet in each of the last 39-45-48-54-61-66 stitches (= half back piece). BODY: = 186-201-222-237-267-294 stitches. Work 1 double crochet in every double crochet/chain stitch until finished measurements and turn piece on every round as on yoke. When piece measures 3.5 cm = 1¼" from where body was divided from sleeves, decrease on every 4th round as follows: Decrease 6 double crochets evenly 3-3-3-2-2-2 times in total and then 3 double crochets 0-0-1-0-1-1 time in total = 168-183-201-225-252-279 stitches. When piece measures 14 cm = 5½" from where sleeve was divided from body, increase on every 4th round follows: 15 double crochets evenly 0-0-1-1-0-0 times in total, 9 double crochets evenly 3-3-3-2-4-3 times in total, and 6 double crochets evenly 1-1-0-1-0-1 time in total = 201-216-243-264-288-312 stitches. Continue by working double crochets until piece measures 34-34-35-35-35-35 cm = 13⅜"-13⅜"-13¾"-13¾"-13¾"-13¾" from where body was divided from sleeves. Piece measures approx. 51-53-55-57-59-61 cm = 20"-21"-21⅝"-22½"-23¼"-24" from neck edge. Then work an edge around the bottom edge as follows from right side: * Work 4 chain stitches, skip approx. 1 cm = ⅜" and work 1 double crochet in next double crochet *, work from *-* the entire round. Cut and fasten the yarn. SLEEVE: Worked top down. Work in the round but turn piece after every round as on yoke and body. Beg by working mid under sleeve as follows: Begin round in the 6th chain stitch of the 12 chain stitches worked under sleeve on body, then work 1 double crochet in every chain stitch/double crochet the entire round = 69-78-87-93-96-102 double crochets. Continue to work double crochets in the round and turn for every round. When sleeve measures 3.5 cm = 1¼", decrease evenly on every 4th round as follows: Decrease 6 double crochets 0-1-3-5-6-6 times in total and 3 double crochets 5-6-4-2-0-0 times in total = 54-54-57-57-60-66 double crochets. Continue with double crochets until piece measures 38-36-35-33-32-31 cm = 15"-14¼"-13¾"-13"-12½"-12¼" from where sleeve was divided from body (shorter measurements in the larger sizes because of wider neck and longer yoke). Then work an edge around the bottom edge as follows from right side: Work 1 chain stitch, * 1 double crochet in first/next double crochet, 4 chain stitches, skip approx. 1 cm = ⅜" *, work from *-* around the entire sleeve and finish with 1 slip stitch in first double crochet at beginning of round. Cut and fasten the yarn. Work the other sleeve the same way. NECK EDGE: Work in the round, back and in the forth over chain stitch row in neck as follows: ROUND 1 (= from wrong side): Begin mid back, fasten strand with 1 slip stitch in first stitch, work 1 half double crochet between every double crochet over chain stitch row in neck (replace first half double crochet with 2 chain stitches) = approx. 120-129-132-141-141-147 half double crochets. ROUND 2 (from right side): Work 1 double crochet in every half double crochet (first double crochet on row replaced with 1 chain stitch) = approx. 120-129-132-141-141-147 double crochets. Cut and fasten the yarn. |
|||||||||||||||||||
Diagram explanations |
|||||||||||||||||||
|
|||||||||||||||||||
 |
|||||||||||||||||||
 |
|||||||||||||||||||
 |
|||||||||||||||||||
Have you finished this pattern?Tag your pictures with #dropspattern #crackedpeppersweater or submit them to the #dropsfan gallery. Do you need help with this pattern?You'll find 12 tutorial videos, a Comments/Questions area and more by visiting the pattern on garnstudio.com. © 1982-2026 DROPS Design A/S. We reserve all rights. This document, including all its sub-sections, has copyrights. Read more about what you can do with our patterns at the bottom of each pattern on our site. |
|||||||||||||||||||


With over 40 years in knitting and crochet design, DROPS Design offers one of the most extensive collections of free patterns on the internet - translated to 17 languages. As of today we count 324 catalogs and 12291 patterns - 12281 of which are translated into English (US/in).
We work hard to bring you the best knitting and crochet have to offer, inspiration and advice as well as great quality yarns at incredible prices! Would you like to use our patterns for other than personal use? You can read what you are allowed to do in the Copyright text at the bottom of all our patterns. Happy crafting!
Post a comment to pattern DROPS 207-44
We would love to hear what you have to say about this pattern!
If you want to leave a question, please make sure you select the correct category in the form below, to speed up the answering process. Required fields are marked *.