
Popular categories
Looking for a yarn?


Comments / Questions (192)
![]() Christelle wrote:
Christelle wrote:
Bonjour, Le dos se crochète tout en bride en augmentant 10 fois au total alors que le devant se crochète 5 fois tous les rangs puis 5 fois tous les 2 rangs. Pourvez vous me confirmer que le dos est différent du devant en forme?
13.09.2025 - 05:51DROPS Design answered:
Bonjour Christelle, les augmentations du devant et du dos se font effectivement à un rythme différent pour terminer par le même nombre de mailles: 71 en taille M. Bon crochet!
15.09.2025 - 07:35
![]() Mahsa wrote:
Mahsa wrote:
Hi, I am knitting size S, it says to continue knitting after pattern A3 until it reaches 14 cm, but after pattern A3, a total of 13 rows have been knitted, which is about 14 cm according to the knitting scale. But the increase is not finished yet and now I have 53 stiches, what should I do?
12.09.2025 - 12:24
![]() Joy wrote:
Joy wrote:
I can not figure out the graphs. Do you have a written version of them. I bought this pattern on pintrest not knowing there was a free one on this site
21.08.2025 - 19:35DROPS Design answered:
Dear Joy, all of our patterns are free here on this website. The online version of the pattern is the only version available; if you have any problems understanding our charts you can read this lesson. Happy crochetting!
25.08.2025 - 01:25
![]() Bryony wrote:
Bryony wrote:
Hi, I'm struggling to understand where to put the increases in for the beginning of the front section. Im making the small size. How do you make 3 increases when you presumably have to do the same on both ends of the row?
12.08.2025 - 19:55DROPS Design answered:
Hi Bryony, Yes, you increase on both sides of the piece, increasing 1 treble crochet at each end of the row (See Increase tip-1). You increase 2 stitches every row x 3 (6 increased stitches), then every 2nd row x 5 (10 increased stitches). A total of 16 increased stitches , leaving you with 65 stitches on the row. Hope this helps. Regards, Drops team.
13.08.2025 - 06:44
![]() Jojo R wrote:
Jojo R wrote:
Bonjour Je ne comprends pas les augmentations pour la taille S. S'agit il de faire une augmentation dans la première maille + 1 bride dans l'arceau +3 mailles l'air + une bride dans l'arceau etc.. ? Pour le 2ème rang s'agit il de faire une augmentation dans la première bride +2 brides dans l'arceau +2 mailles en l'air +1 maille serrée +2 mailles en l'air etc.. ? Merci pour votre réponse 12.07.2025 - 19:25
17.07.2025 - 17:18DROPS Design answered:
Bonjour Jojo, 1er rang: seules les brides, vous crochetez 2 brides dans la premiere et la derniere bride (2 brides augmentees). 2eme rang: vous augmentez les brides comme avant et commencez a crocheter les diagrammes A.1a, A.1b et A.1c comme dans les explications pour votre taille. Vous n'augmentez que les brides sur deux cotes du devant, il n'y a pas d'augmentations en point fantaisie. Bon crochet!
18.07.2025 - 09:05
![]() Lorna S wrote:
Lorna S wrote:
Hi, I have made this top as well as the Country Belle well and absolutely love them. The only issue I have had with both of them is working in the round (when doing the body) and turning I have a gap between the the three chain stitches and my next treble which looks quite obvious. Are there any tips on reducing this gap? Thank you, Lorna
18.06.2025 - 10:32DROPS Design answered:
Dear Lorna, you can try considering the 3 chains at the beg of the rounds are not replacing first stitch, so just as shown in this video for example. Happy crocheting!
19.06.2025 - 10:06
![]() Françoise wrote:
Françoise wrote:
Bonjour, pour pouvoir poursuivre, pourriez vous m'expliquer comment on fait le volant : comment fait on pour crocheter en allers et retours au-dessus des rangs de la bretelle (20cm). Merci pour votre aide.
29.05.2025 - 17:32DROPS Design answered:
Bonjour Françoise, votre bretelle mesure 20, 22 ou 24 cm (cf taille), en commençant sur l'envers, au début de ces 20, 22 ou 24 cm, crochetez 1 bride dans le 1er rang, puis (1 maille en l'air, 1 bride autour du même rang ou du rang suivant (en fonction de votre tension et du nombre d'arceaux demandé pour votre taille), répétez de *à* tout le long de ces 20, 22 ou 24 cm et terminez par 1 bride dans le dernier rang, vous devez avoir 26, 28 ou 30 arceaux d'1 maille en l'air. Bon crochet!
30.05.2025 - 09:08
![]() Ingrid Johansson wrote:
Ingrid Johansson wrote:
Tänk om varven voro numererade så mycket enklareOm man räknar uppifrån mönstret så är varv 6 * är redan virkat? Är det varv 1 och nästa varv 1 stolpe 3 luftmaskor 1 stolpe 2 luftmaskor osv var 2??I så fall läser jag mönstret nerifrån och upp?
17.05.2025 - 20:30
![]() Ingela Blad wrote:
Ingela Blad wrote:
Jättefin top! Ska mönstret börja nerifrån 1A från höger till vänster? Vad händer mellan A.1a och A. 1b? Det finns inget tecken ovanför de två stolparna från föregående varv vi övergången mellan A.1a och A1b? Tacksam för svar!
17.05.2025 - 12:23DROPS Design answered:
Hej Ingela, toppen virkas uppifrån och ner. A.1a virkas nerifrån från höger till vänster över 10 stolpar, sedan över A.1b över 30 stolpar (samma mönster) :)
21.05.2025 - 14:19
![]() Jacqueline Kraft wrote:
Jacqueline Kraft wrote:
Merci, ok, à la fin du 1er rang du volant, on a 1ml, 1bride correspondant au 26 ème arceau et ensuite on fait juste une bride sans ml après la bride du 26 ème arceau ?
08.05.2025 - 09:59DROPS Design answered:
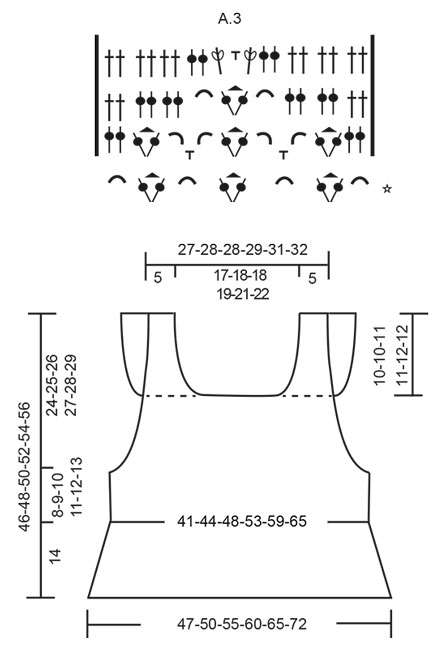
Bonjour Mme Kraft, tout à fait, ainsi vous avez 26 arceaux + 1 bride de chaque côté, et vous crochetez ainsi A.5a/A.5c au début/à la fin des rangs et A.5b au milieu. Comme on le voit dans le diagramme (au rang avec la flèche), vous avez 2 brides côte à côte. Bon crochet!
08.05.2025 - 13:26
|
|||||||||||||||||||||||||||||||||||||||||||
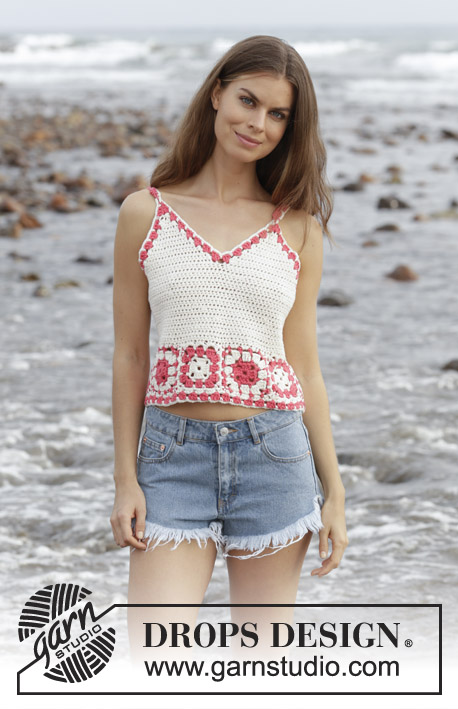
California Dream#californiadreamtop |
|||||||||||||||||||||||||||||||||||||||||||
 |
 |
||||||||||||||||||||||||||||||||||||||||||
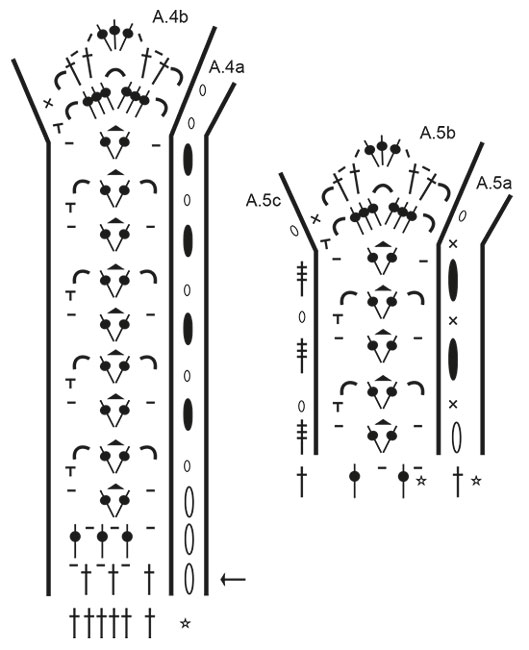
Crocheted top with lace pattern and flounce. Size: S - XXXL Piece is crocheted in DROPS Cotton Merino.
DROPS 190-21 |
|||||||||||||||||||||||||||||||||||||||||||
|
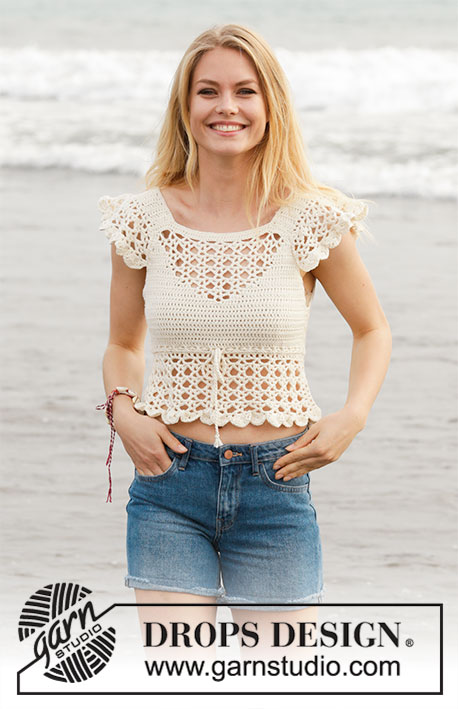
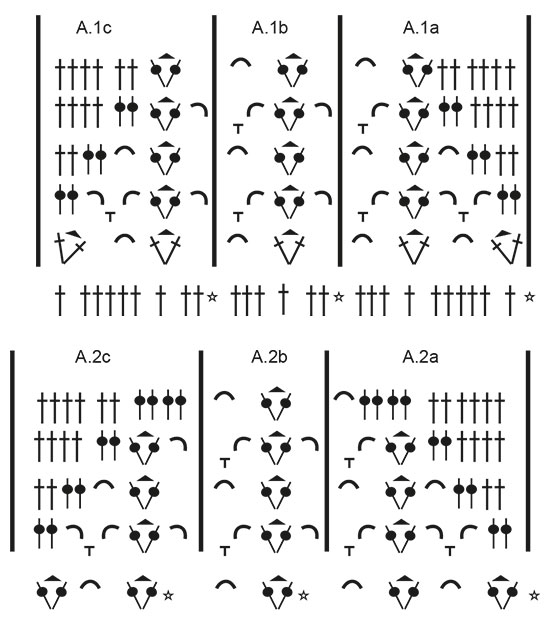
INFORMATION FOR PATTERN: PATTERN: See diagrams A.1 to A.5. INCREASE TIP-1: Increase 1 double crochet by working 2 double crochets in same stitch. CROCHET TIP-1 (applies to body but not diagram): Replace first double crochet at beginning of every row with 3 chain stitches. CROCHET TIP-2 (applies to body but not diagram): When working in the round, replace first treble with 3 chain stitches, finish round with 1 slip stitch in 3rd chain stitch at beginning of round. DECREASE TIP: Decrease by working 2 double crochets together. INCREASE TIP-2 (evenly): To calculate how to increase evenly, use the total number of double crochets on row (e.g. 146 double crochets) and divide double crochets by number of increases to be done (e.g. 22) = 6.6. In this example increase by working 2 double crochets in same double crochet alternately approx. every 6th and 7th double crochet. ---------------------------------------------------------- TOP: Piece is worked back and forth, top down, work front and back piece separately down to armhole, then work in the round over both parts. Then work straps from bottom up and then work flounces back and forth on straps, fasten flounce to front/back piece. FRONT PIECE: Work 51-53-53-55-57-59 chain stitches (including 3 chain stitches to turn with) on hook size 5 mm / H/8 with Cotton Merino. Switch to hook size 4 mm / G/6, turn and work 1 double crochet in 4th chain stitch from hook (= 2 double crochets), work 1 double crochet in each of the next 47-49-49-51-53-55 chain stitches = 49-51-51-53-55-57 double crochets. On next row begin increase in each side of piece AT THE SAME TIME work pattern as follows: Increase 1 double crochet in each side of piece (= 2 double crochets increased) - read INCREASE TIP-1. Increase like this every row 3-5-8-13-14-15 times in total, and then every other row 5-5-3-0-0-0 times in total = 65-71-73-79-83-87 double crochets on last row. Work next row as follows, begin from right side: Read CROCHET TIP-1 – work 1 double crochet in each of the first 0-1-1-2-3-4 double crochets, A.1a over the next 10 double crochets, repeat A.1b over the next 30 double crochets (= 5 times in total in width), A.1c over the next 9 double crochets and 1 double crochet in each of the last 0-1-1-2-3-4 double crochets. Continue until A.1 has been work 1 time vertically. REMEMBER THE CROCHET GAUGE! Then work as follows, begin from wrong side: Work 1 double crochet in every double crochet until 1 double crochet remains before first chain space, work A.2c, repeat A.2b 3 times in total in width, A.2a and 1 double crochet in every double crochet the entire row. Continue until A.2 has been worked vertically. Then work as follows, begin from wrong side: Work 1 double crochet in every double crochet until first chain space, work A.3 and 1 double crochet in every double crochet the rest of row. Continue until A.3 has been worked vertically. Now work 1 double crochet in every stitch until piece measures 14-15-15-16-16-17 cm / 5 ½"-5⅞"-5⅞"-6 ¼"-6 ¼"-6⅝". Fasten off, turn. Put piece aside. BACK PIECE: Work 51-53-53-55-57-59 chain stitches (including 3 chain stitches to turn with) on hook size 5 mm / H/8 with Cotton Merino. Switch to hook size 4 mm / G/6, turn and work 1 double crochet in 4th chain stitch from hook (= 2 double crochets), work 1 double crochet in each of the next 47-49-49-51-53-55 chain stitches = 49-51-51-53-55-57 double crochets. Then work 1 double crochet in every double crochet - AT THE SAME TIME increase 1 double crochet in each side of piece - remember INCREASE TIP-1. Increase like this every row 8-10-11-13-14-15 times in total = 65-71-73-79-83-87 double crochets on last row. When piece measures 14-15-15-16-16-17 cm / 5 ½"-5⅞"-5⅞"-6 ¼"-6 ¼"-6⅝" (adjust according to front piece), fasten off, turn. BODY: Now work the two parts together as follows: Work 4-4-7-8-12-15 chain stitches for armhole, 1 double crochet in each of the 65-71-73-79-83-87 double crochets from back piece, work 8-8-14-16-24-30 chain stitches for armhole, 1 double crochet in each of the 65-71-73-79-83-87 double crochets from front piece, work 4-4-7-8-12-15 chain stitches for armhole and finish with 1 slip stitch in first chain stitch at beginning of round. Then work piece in the round, continue with 1 double in every double/chain stitch = 146-158-174-190-214-234 double crochets. When working in the round, turn after every round to work alternately from right side and wrong side. This is so that the texture is the same on the entire top - read CROCHET TIP-2. Insert 1 marker thread in each side, in the middle of the 8-8-14-16-24-30 chain stitches. NOW MEASURE THE PIECE FROM HERE! Continue like this until piece measures 8-9-10-11-12-13 cm / 3⅛"-3½"-4"-4⅜"-4¾"-5⅛". Now work in the round according to diagram A.4 while at the same time increasing on first round (round marked with arrow in diagram) as follows: Work A.4b 28-30-33-36-39-43 times in total on round – A.4a shows how rounds begin and end and is worked in addition to A.4b – AT THE SAME TIME increase 11-11-12-13-10-12 chain spaces (= 1 double crochet + 1 chain stitch) evenly – read INCREASE TIP-2 = 84-90-99-108-117-129 chain spaces (= 1 double crochet + 1 chain stitch). Continue in the round, i.e. always work pattern from right side. When A.4 is done vertically, fasten off. STRAPS: Now work a strap back and forth in cast-on edge on front piece over the first 8-9-9-9-10-10 double crochets. Work 1 double crochet in every double crochet until strap measures 10-10-11-11-12-12 cm / 4"-4"-4⅜"-4⅜"-4¾"-4¾". Fasten off. Work 1 strap over the first 8-9-9-9-10-10 double crochets in the other side the same way. Work straps the same way on back piece. Sew tog straps on shoulder. FLOUNCE: Work back and forth over every row on strap (= 20-20-22-22-24-24 cm / 7⅞"-7⅞"-8⅝"-8⅝"-9⅜"-9⅜"). Begin from wrong side and work 1 double crochet in first row, * 1 chain stitch, 1 double crochet around row *, work from *-* along the entire strap – adjust so that there are 26-26-28-28-30-30 chain spaces (= 1 chain stitch + 1 double crochet) on this row, finish with 1 double crochet in last row = 1 double crochet in each side and 26-26-28-28-30-30 chain spaces (= 1 chain stitch + 1 double crochet). Turn and work as follows from right side: A.5a, A.5b 13-13-14-14-15-15 times in total in width, finish with A.5c. Continue this pattern until A.5 is done vertically, fasten off. Work flounce on the other strap the same way. NECK EDGE: Work 1 single crochet in every double crochet/2 single crochets along every double crochet row along the entire neck. SLEEVE EDGE: Work 1 single crochet in every double crochet/2 single crochets along every double crochet row along armhole – start right after flounce, work along armhole and to the flounce. Place flounce edge to edge to this sleeve edge (on both front and back piece) and fasten with small, neat stitches. Work the other sleeve edge the same way and fasten flounce. TIE: Cut 3 lengths of 3 metres each with Cotton Merino. Twine the strands tog until they resist, fold them double so that they twine again. Make a knot at each end. Baste the yarn up and down through first row with eyelet holes - start mid front. Tie a bow at the front. |
|||||||||||||||||||||||||||||||||||||||||||
Diagram explanations |
|||||||||||||||||||||||||||||||||||||||||||
|
|||||||||||||||||||||||||||||||||||||||||||
 |
|||||||||||||||||||||||||||||||||||||||||||
 |
|||||||||||||||||||||||||||||||||||||||||||
 |
|||||||||||||||||||||||||||||||||||||||||||
Have you finished this pattern?Tag your pictures with #dropspattern #californiadreamtop or submit them to the #dropsfan gallery. Do you need help with this pattern?You'll find 10 tutorial videos, a Comments/Questions area and more by visiting the pattern on garnstudio.com. © 1982-2026 DROPS Design A/S. We reserve all rights. This document, including all its sub-sections, has copyrights. Read more about what you can do with our patterns at the bottom of each pattern on our site. |
|||||||||||||||||||||||||||||||||||||||||||


With over 40 years in knitting and crochet design, DROPS Design offers one of the most extensive collections of free patterns on the internet - translated to 17 languages. As of today we count 324 catalogs and 12278 patterns - 12268 of which are translated into English (US/in).
We work hard to bring you the best knitting and crochet have to offer, inspiration and advice as well as great quality yarns at incredible prices! Would you like to use our patterns for other than personal use? You can read what you are allowed to do in the Copyright text at the bottom of all our patterns. Happy crafting!
Post a comment to pattern DROPS 190-21
We would love to hear what you have to say about this pattern!
If you want to leave a question, please make sure you select the correct category in the form below, to speed up the answering process. Required fields are marked *.