
Popular categories
Looking for a yarn?


Comments / Questions (36)
![]() Anna-maija Hirvelä wrote:
Anna-maija Hirvelä wrote:
Olen yrittänyt aloittaa monta kertaa kyseistä kaunista villatakkia siinä onnistumatta. Silmukat vain eivät ensimmäisen ketjusilmukkakerroksen jälkeen täsmää :( Tavoitteena koko S.
29.09.2017 - 11:10
![]() Kine wrote:
Kine wrote:
I oppskriften (mønster 1) står det at fastmasker skal hekles i fremre ledd, mens videoen viser i begge ledd. Hva skal jeg følge?
12.07.2017 - 11:06DROPS Design answered:
Hej Kine, du skal følge opskriften, videoen er generel information, men for at få møsteret som på billedet må du følge opskrften. God fornøjelse!
12.07.2017 - 12:04
![]() Lena wrote:
Lena wrote:
Ik had mijn vraag onder het verkeerde kopje gezet. Begrijp ik het goed dat ik de pas net zo hoog moet haken als op afmeting die op de zijkant van de mouw aangegeven staat? Ik kom er niet helemaal uit omdat er van boven naar beneden wordt gehaakt. En het meerderen gebeurt dat per toer of gelijk bij de 2e toer alle meerderingen haken wat betreft de pas. Wil zo graag verder maar blijf al steken in toer 2 goede kant dat.
10.05.2017 - 23:13DROPS Design answered:
Hoi Lena, Alle toeren van de pas staan beschreven in de tekst. Het opzetten en de eerste twee toeren staan in de eerste alinea onder 'PAS' beschreven. In de tweede toer meerder je verdeeld over de toer (in helft voorpand, achterpand, en dan in helft voorpand). Het is belangrijk dat de stekenverhouding ook in de hoogte klopt. In de derde alinea ga je verder met de derde toer en je meerdert steeds op de goede (de kant van de stokjes) kant naast A.1 Als de pas klaar is kun je de hoogte van het armsgat controleren. Hopelijk kun je zo verder.
12.05.2017 - 13:37
![]() Sherry Craig wrote:
Sherry Craig wrote:
I made this using the drops air and it is absolutely my favorite thing to wear-- it is light and airy while providing just the right amount of warmth--mine is slightly longer than the original version
29.01.2017 - 02:11
![]() Priscilla wrote:
Priscilla wrote:
Helaas heb ik geen idee waar de raglan precies komt (weet niet eens wat het is)! Kan iemand me vertellen waar ik precies moet meerderen? Niet voor de eerste a1..wel erna?
29.05.2016 - 21:48DROPS Design answered:
Hoi Priscilla. De raglan is de schuine lijn tussen panden en mouwen (Je ziet ook op de foto). Je haakt A.1 in totaal 6 keer op de toer. de eerste en laatste A.1 zijn langs de voorpanden (zie foto) en horen niet bij de raglan. Je meerdert zoals beschreven in het patroon aan elke kant van de overige 4 A.1's in elke toer aan de goede kant. Je volgt de beschrijving van hoe je meerdert in het patroon.
30.05.2016 - 13:21
![]() Lykke Nørding wrote:
Lykke Nørding wrote:
Et spørgsmål mere til udt til raglan: hvis der tages tre m ud på hver side af A1, bliver forkanten ikke lige som på fotoet, da maskeantallet jo øges ved hver række af stm. Hvordan skal man håndtere dette?
28.04.2016 - 23:03DROPS Design answered:
Hej Lykke. Som jeg ser det, tager du kun ud ved overgangene paa aermerne og ikke langs A.1 ved forkanten.
18.05.2016 - 16:35
![]() Lykke Nørding wrote:
Lykke Nørding wrote:
Ovennævnte kommentar er ment som et spørgsmål :-)
28.04.2016 - 22:54
![]() Lykke Nørding wrote:
Lykke Nørding wrote:
Hej :-) Jeg har problemer med at forstå hvordan man tager ud til raglan i denne opskrift. Kan I venligst præcisere det lidt tydeligere end i opskriften? Jeg hækler carciganen i str XL. "Tag tre dbl-stm ud på hvor side af A1 totalt 1 gang" står der i opskriften. Betyder det at man tager tre dbl-stm ud på hver side af A1 på hele rækken? Hvad sker der mellem de to A1 der kun er adskilt af to dbl-stm? Venlig hilsen Lykke
28.04.2016 - 22:52DROPS Design answered:
Hej Lykke. Du tager ud paa hver side af de 4x A.1 som markerer overgangene mellem baerestk og aermer = 12 nye masker (se hvordan du tager ud i UDTAGNINGSTIPS. Du tager saa ogsaa ud ved de 2 dbl-stm (aermet). Saa efter förste udtagning har du her 8 dbl-stm i stedet for 2. Herefter tager du 2 masker ud som beskrevet 5 gange.
18.05.2016 - 16:34
![]() Deborah Greensill wrote:
Deborah Greensill wrote:
Hello I'm trying hard to understand the pattern but am confused about the raglan increases. Does it mean increase either side of A1 for the next three rows? It's not very clear. Thanks in anticipation of your reply.
24.03.2016 - 22:39DROPS Design answered:
Dear Mrs Greensill, inc for raglan will be worked on each side of each A.1 (= before each A.1 and after each A.1) - see increase tip-1. You will inc every other row (= every dtr row): 3 dtr on each side of each A.1 (= 6 dtr inc/A.1 = 24 dtr inc on this row) 1 time, then 2 dtr on each side of each A.1 a total of 3-5 times (see size) and then 1 dtr on each side of each A.1 a total of 0-2 times (see size). Happy crocheting!
25.03.2016 - 10:31
![]() Heike wrote:
Heike wrote:
Hallo, leider komme ich mit der Anleitung für diese wunderschöne Jacke nicht so ganz zurecht. Bei den ersten Raglanzunahmen soll man in der kleinsten Größe beidseits von A1 jeweils drei Doppelstäbchen zunehmen. Ich habe aber zwischen den beiden A1-Stücken nur insgesamt zwei Doppelstäbchen. Muss ich dann insgesamt vier Doppelstäbchen aus der festen Masche über dem ersten Doppelstäbchen häkeln? Das würde dann zum Zunahmetipp widersprechen. Danke für die Hilfe im Voraus!
17.03.2016 - 18:41DROPS Design answered:
Liebe Heike, haben Sie gesehen, dass zu dieser Stelle der ZUNAHMETIPP-1 gehört? Er ist etwas weiter unten in der Liste, das ist vielleicht etwas verwirrend.
21.03.2016 - 11:15
|
|||||||||||||
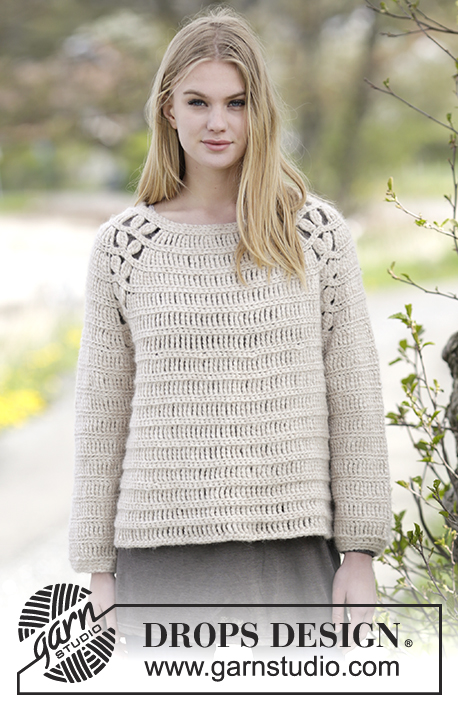
Priscilla Cardigan |
|||||||||||||
|
|
|||||||||||||
Crochet DROPS jacket with raglan and lace pattern in ”Air”. The piece is worked top down. Size: S - XXXL.
DROPS Extra 0-1182 |
|||||||||||||
|
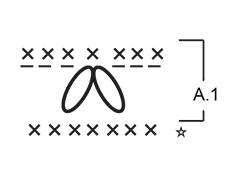
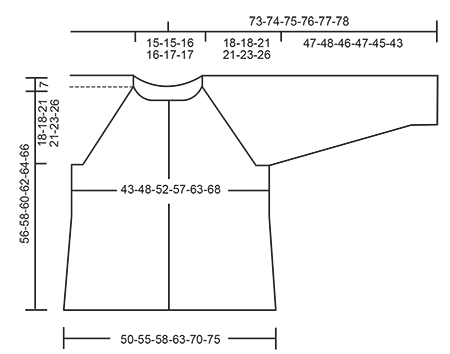
CROCHET INFO: Replace first sc at beg of every sc row with 1 ch. Replace first tr at beg of every tr row with 4 ch. Replace first dtr at beg of every dtr row with 5 ch. CROCHET TIP: If the crochet gauge vertically is not high enough switch all tr with dtr. INCREASE TIP-2: Inc 1 tr by working 2 tr in same st. In size XXL and XXXL it is necessary to inc 2 tr in same st some places. Work by making 3 tr in same st. PATTERN-1: ROW 1 (= WS): Work 1 sc in front loop of every tr. ROW 2 (= RS): Work 1 tr in back loop of every sc. Repeat rows 1 to 2 until finished measurements. PATTERN-2: ROUND 1: Work 1 tr in back loop of every sc. ROUND 2: Work 1 sc in back loop of every tr. Repeat rounds 1 to 2 until finished measurements. INCREASE TIP-1: Inc 3 tr before A.1 on BODY as follows: Work as before until 3 sc remain before A.1, work 2 tr in each of the next 3 sc. Inc 3 tr after A.1 on BODY as follows: Work 2 tr in each of the next 3 sc after A.1. Inc 3 tr before A.1 on SLEEVE as follows: Work 4 tr in 1 sc before A.1. Inc 3 tr after A.1 on SLEEVE as follows: Work 4 tr in 1st sc after A.1 Inc 2 tr before A.1 as follows: Work as before until 2 sc remain before A.1, work 2 tr in each of the next 2 sc. Inc 2 tr after A.1 as follows: Work 2 tr in each of the next 2 sc after A.1. Inc 1 tr before A.1 as follows: Work as before until 1 sc remain before A.1, work 2 tr in sc. Inc 1 tr after A.1 as follows: Work 2 tr in first sc after A.1. DECREASE TIP: Work 1 tr/sc but wait with last pull through (= 2 sts on hook), then work next tr/sc but on last pull through, pull yarn through all sts on hook = 1 sc/tr dec. PATTERN: See diagram A.1. Work A.1 as follows: ROW 1: Work ch 3, skip 1 sc, * work 1 tr in back loop of next sc but wait with last pull through (= 2 sts on hook), work 2 tr in same st the same way *, skip 3 sc, repeat from *-* 1 time, pull yarn through all 7 sts on hook, ch 3, skip 1 sc. ROW 2: Work 1 sc in each of the first ch 3, 1 sc in next st, 1 sc in each of the next 3 ch. ---------------------------------------------------------- JACKET: Worked top down, back and forth from mid front. YOKE: Work 86-86-90-90-94-94 ch (includes 5 band sts in each side of piece) on hook size 6 mm / J/10 with Air. Work next row as follows: Work 1 sc in 2nd ch from hook - READ CROCHET INFO, 1 sc in every ch = 86-86-90-90-94-94 sc. Then work as follows from RS: Work all tr in back loop of sc, and READ CROCHET TIP. Work 1 tr in each of the first 5 sc (= band), A.1 - see explanation above - over the next 7 sc, 1 tr in each of the next 4-4-5-5-6-6 sc AT THE SAME TIME inc 1-3-3-5-7-9 tr evenly - READ INCREASE TIP-2 – (= left front piece), A.1 over the next 7 sc, 1 tr in each of the next 2 sc, A.1 over the next 7 sc (= left sleeve), 1 tr in each of the next 22-22-24-24-26-26 sc AT THE SAME TIME inc 2-6-6-10-14-18 tr evenly (= back piece), A.1 over the next 7 sc, 1 tr in each of the next 2 sc, A.1 over the next 7 sc, (= right sleeve), 1 tr in each of the next 4-4-5-5-6-6 sc AT THE SAME TIME inc 1-3-3-5-7-9 tr evenly, A.1 over the next 7 sc, finish with 1 tr in each of the last 5 sc (= right front piece). Work PATTERN-1 over tr and A.1 over A.1 as before. On first row in pattern-1 there are 90-98-102-110-122-130 sc (includes A.1). Repeat pattern-1 and A.1 vertically until finished measurements. REMEMBER THE CROCHET GAUGE! On next row (= tr row) inc for raglan on every row from RS (i.e. every row with tr) on each side of A.1 – READ INCREASE TIP-1 – as follows: Inc 3 tr on each side of A.1 1 time in total, then inc 2 tr on each side of A.1 3-4-4-5-5-5 times in total, then 1 tr on each side of A.1 1-0-1-0-1-2 times in total (= 170-186-198-214-234-250 sts in total). On next row (= from WS with sc) work as follows: Work all sc in front loop of every tr. Work 1 sc in each of the first 5 tr (= band), A.1 as before, 1 sc in each of the next 15-18-20-23-27-30 tr, work 8 ch, insert 1 marker in 4th ch, skip: A.1 + 22-24-26-28-30-32 tr + A.1 (= sleeve), work 1 sc in each of the next 44-50-54-60-68-74 tr, work 8 ch, insert 1 marker in 4th ch, skip: A.1 + 22-24-26-28-30-32 tr + A.1 (= sleeve), 1 sc in each of the next 15-18-20-23-27-30 tr, A.1 as before, finish with 1 sc in each of the last 5 tr (= band) = 98-110-118-130-146-158 sc (includes A.1) and 16 ch. Move the markers upwards when working. Insert 1 marker in piece, NOW MEASURE PIECE FROM HERE. BODY: Work next row (= from RS) as follows: Pattern-1 over the first 5 sc (= band), A.1 as before, pattern-1 over the next 90-102-110-122-138-150 sts (i.e. work 1 tr in every ch under sleeve), A.1 as before, finish with pattern-1 over the last 5 sc (= band). On next row there are 114-126-134-146-162-174 sc on row (includes A.1). Work pattern-1 and A.1 over body as before. When piece measures 6 cm / 2⅜", adjust so that next row is with tr, inc 1 tr on each side of each marker in the side (= 4 sts inc), repeat inc every 8 cm / 3⅛" 3 more times. On next row with sc there are 130-142-150-162-178-190 sc on row (includes A.1). When piece measures 38-40-39-41-41-40 cm / 15"-15¾"-15¼"-16⅛"-16⅛"-15¾" from marker, adjust so that last row is with sc, fasten off. SLEEVE: = A.1 + 22-24-26-28-30-32 tr + A.1. Insert 1 marker in piece, NOW MEASURE PIECE FROM HERE. Sleeve is worked in the round, top down. Beg by working mid under sleeve as follows: Work 1 sc in the 5th ch of the 8 ch worked in armhole on body, work 1 sc in each of the next ch 3, work last round of A.1 (= sc) over A.1, 1 sc in back loop of the next 22-24-26-28-30-32 tr, last round of A.1 over A.1, before working 1 sc in each of the remaining 4 ch under sleeve = 44-46-48-50-52-54 sc. Insert 1 marker mid under sleeve, move the marker when working. Then work piece with PATTERN-2 - see explanation above. When sleeve measures 4 cm / 1½", dec 1 sc/dc on each side of marker - READ DECREASE TIP. Repeat dec every 5-4-4-4-4-3 cm / 2"-1½"-1½"-1½"-1½"-1" 7-8-8-9-9-10 more times = 28-28-30-30-32-32 sc/tr. Work until piece measures 46-47-45-46-44-42 cm / 18"-18½"-17¾"-18"-17¼"-16½" – adjust so that last round is with sc. Work 2 round with 1 sc in back loop of every sc (= 3 round in total with sc at the bottom of sleeve). Fasten off. Work the other sleeve the same way. NECK EDGE: Beg mid front and work as follows from RS: 1 sc in back loop of every sc while AT THE SAME TIME dec 4-4-5-5-6-6 sc evenly = 82-82-85-85-88-88 sc. Turn piece and work from WS. 1 sc in front loop of every sc while AT THE SAME TIME dec 4-4-5-5-6-6 sc evenly = 78-78-80-80-82-82 sc. Fasten off. ASSEMBLY: Sew the buttons on to left band. Sew on first button in 2nd sc row from neck (= approx. 2 cm / ¾" down from neck), then sew them approx. 7 cm / 2¾" apart. Button through sc rows. |
|||||||||||||
Diagram explanations |
|||||||||||||
|
|||||||||||||
 |
|||||||||||||
 |
|||||||||||||
Have you finished this pattern?Tag your pictures with #dropspattern or submit them to the #dropsfan gallery. Do you need help with this pattern?You'll find 11 tutorial videos, a Comments/Questions area and more by visiting the pattern on garnstudio.com. © 1982-2026 DROPS Design A/S. We reserve all rights. This document, including all its sub-sections, has copyrights. Read more about what you can do with our patterns at the bottom of each pattern on our site. |
|||||||||||||


With over 40 years in knitting and crochet design, DROPS Design offers one of the most extensive collections of free patterns on the internet - translated to 17 languages. As of today we count 324 catalogs and 12290 patterns - 12280 of which are translated into English (US/in).
We work hard to bring you the best knitting and crochet have to offer, inspiration and advice as well as great quality yarns at incredible prices! Would you like to use our patterns for other than personal use? You can read what you are allowed to do in the Copyright text at the bottom of all our patterns. Happy crafting!
Post a comment to pattern DROPS Extra 0-1182
We would love to hear what you have to say about this pattern!
If you want to leave a question, please make sure you select the correct category in the form below, to speed up the answering process. Required fields are marked *.