
Popular categories
Looking for a yarn?


Comments / Questions (120)
![]() Henni wrote:
Henni wrote:
Hei! Hihansuun joustinneule näyttää kuvassa samalta 2n 1o neuleelta kuin paidan helmassa, mutta hihan ohjeessa lukee että tämä olisi 1n 1o. Voiko ohjeessa olla tuossa kohtaa virhe? Kiitos vastauksessanne!
14.10.2018 - 16:37DROPS Design answered:
Hei, ohjeessa ei ole virhettä. Joustinneuleen nurjat raidat kapenevat oikeiden silmukoiden välissä, joten nurjien silmukoiden määrä voi olla vaikea erottaa, niitä on kuitenkin helmassa kaksi ja hihansuussa vain yksi.
17.10.2018 - 17:54
![]() Mia wrote:
Mia wrote:
Hei! Voinko neuloa helmineuletta ohjeen mallineuleen sijaan, vai muuttaako se mittoja (leveyttä)? Kiitos ja hyvää kevättä!
15.05.2018 - 17:39
![]() Torhild Kaald wrote:
Torhild Kaald wrote:
Hei! Det hadde vært fint med flere bilder av genseren hvis man er usikker på hva instruksjonene sier :)
11.04.2018 - 21:12
![]() Erna Vestergaard wrote:
Erna Vestergaard wrote:
Hej . Ja nu skriver jeg igen , jeg skulle vist have stillet det som spørgsmål. Nu sidder jeg og kigger på billedet , og jeg forstår ikke hvordan der kommer struktur på skulderen . Jeg kan ikke se det i opskriften nogen steder . Hilsen Erna
07.02.2018 - 18:18DROPS Design answered:
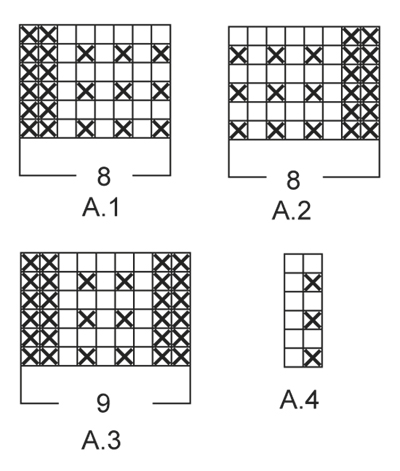
Hei Erna. Når du har kommet så langt at du skal strikke A.9 over A.1 og A.2, må du også lese ØKETIPS (de nye maskene strikkes fortløpende inn i diagram A.4 = struktur ytterst på skuldrene). God Fornøyelse!
09.02.2018 - 10:37
![]() Erna Vestergaard wrote:
Erna Vestergaard wrote:
Jeg er igang med trøjen men der er noget jeg ikke helt forstår , når man laver den forflytning burde mønsteret på skulderen ikke være retstrik. Som jeg ser det ligner det , det mønster som er i forflytningen
06.02.2018 - 17:24
![]() HANNE ELENA RØRBECH wrote:
HANNE ELENA RØRBECH wrote:
Er det muligt af få et billede af den nederste ribbort og kanten der går lodret op i siden. Jeg har strikket i ca. 50 år og er enig med Jette der skriver: det er den mest uforståelige opskrift jeg endnu har set.
04.12.2017 - 11:04DROPS Design answered:
Hej Hanne, det er vi da kede af at høre! Ribben består af 1 ret og 2 vrang men de yderste 8 m i hver side strikkes efter A.1 og A.2. God fornøjelse!
05.12.2017 - 12:31
![]() Miclo wrote:
Miclo wrote:
Inutile de répondre à mes précédentes questions : le titre "faux raglan " a fait tilt . Il serait judicieux de mettre des photos de devant ou de dos ou un gros plan : c'est pus parlant . Je vais pouvoir continuer ce très beau pull
24.11.2017 - 19:32
![]() Miclo wrote:
Miclo wrote:
Ne manque -t-il pas une suite dans les explications du décalage de A3 ? Quel point faire sur les nouvelles malles à droite et à gauche ? A quoi servent ces décalages ? Merci pour ces précisions .
24.11.2017 - 15:42DROPS Design answered:
Bonjour Mme Miclo, on décale A.3 (on augmente 1 m à 1 m lis du bord de chaque côté et ces augmentations se tricotent en A.4 - voir AUGMENTATIONS) et on diminue 1 m après le 1er A.3 et avant le 2ème A.3. On répète ceci 17-24 fois (cf taille) pour décaler le point fantaisie A.3 vers le milieu de l'ouvrage. Bon tricot!
27.11.2017 - 08:47Catherine wrote:
Hello, I love this pattern, but most of the time I find it difficult to understand descriptions in English. Is there any chance that you could translate it in Russian?
10.11.2017 - 01:37DROPS Design answered:
Dear Catherine, we are not planning to have our patterns in russian yet, but for any for any further assistance, remember you can contact your DROPS Store in Russia, even per mail or telephone. Happy knitting!
10.11.2017 - 08:04
![]() Elisabeth wrote:
Elisabeth wrote:
Bonjour je souhaite tricoter le modèle Sigrid, mais le fil Drop AIR est en rupture de stock. Puis je le réaliser en Alpaca Silk Brushed qui est un fil de même groupe Est ce que je dois doubler le fil pour obtenir le même rendu ? merci d'avance
08.11.2017 - 15:31DROPS Design answered:
Bonjour Elisabeth, il faut calculer le métrage nécessaire pour connaître le nombre de pelotes nécessaire dans la qualité alternative choisie - vous trouverez ici comment faire les ajustements. Rappelez-vous que des laines de textures différentes donneront un résultat différent, DROPS Nepal peut être ici plus adapté. N'hésitez pas à demander conseil à votre magasin DROPS, même par mail ou téléphone. Bon tricot!
08.11.2017 - 16:07
|
|||||||
Sigrid#sigridsweater |
|||||||
|
|
|||||||
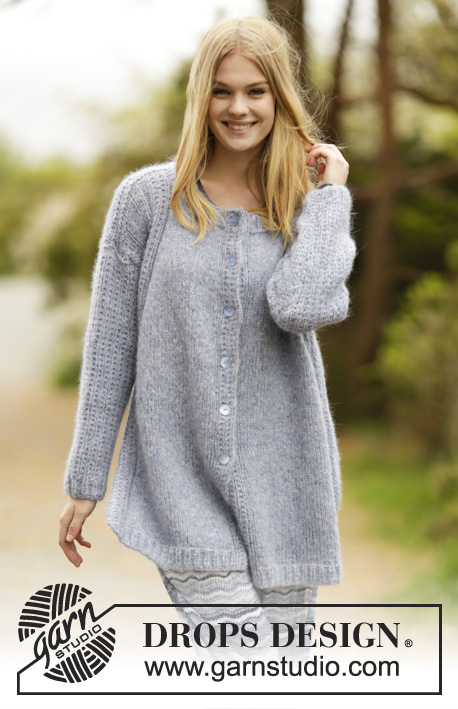
Knitted DROPS jumper with false raglan, vent and textured pattern on shoulders and sleeves in ”Air”. Size: S - XXXL.
DROPS 166-18 |
|||||||
|
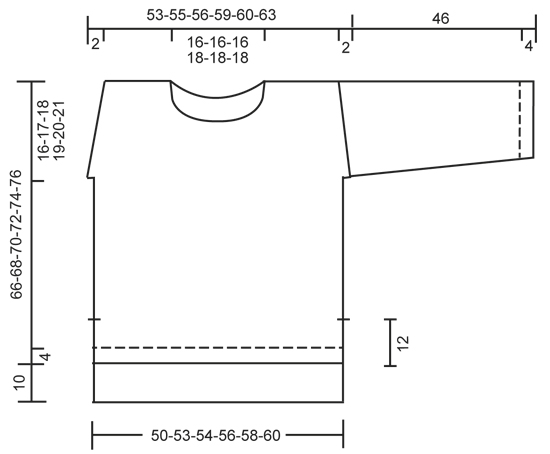
GARTER ST (back and forth): K all rows. 1 ridge = K2 rows. PATTERN: See diagrams A.1 to A.4. The diagrams show all rows in pattern seen from RS. INCREASE TIP: Inc 1 st by making 1 YO. On next row work YOs twisted, i.e. work in the back loop of st instead of front to avoid holes. NOTE: Work the inc sts gradually in diagram A.4. DECREASE TIP: Dec 1 sts as follows: All dec are done from RS! Dec as follows after A.3: K 2 tog. Dec as follows before A.3: Work until 2 sts before A.3, slip 1 st as if to K, K 1, psso. ---------------------------------------------------------- JUMPER: Worked back and forth on circular needle and sewn tog when finished. Front piece is shorter than back piece. BACK PIECE: Cast on 95-98-101-107-113-116 sts on circular needle size 5 mm / US 8 with Air. Work rib as follows: A.1 (= 8 sts), K 1, * P 2, K 1 *, repeat from *-* until 8 sts remain on row, A.2 (= 8 sts). Continue like this back and forth until piece measures 4 cm / 1½". On next row from RS switch to circular needle size 5.5 mm / US 9 and work as follows: A.1, stockinette st over the next 79-82-85-91-97-100 sts, AT THE SAME TIME dec 15-14-15-17-21-20 sts evenly, A.2 = 80-84-86-90-92-96 sts on needle in total. Continue in stockinette st, work A.1 and A.2 in each side as before until piece measures 22 cm / 8¾" in all sizes. REMEMBER THE KNITTING GAUGE At the end of the next 2 rows cast on 2 new sts (marks vent) = 84-88-90-94-96-100 sts. Now work A.3 (= 9 sts) over A.1 and A.2. i.e. inside 1 edge st in GARTER ST - see explanation above - in each side. When piece measures 26-24-24-23-23-23 cm / 10¼"-9½"-9½"-9"-9"-9", beg displacement of A.3 towards mid back. Work 1 edge st in garter st, inc 1 st - READ INCREASE TIP, A.3, dec 1 st - READ DECREASE TIP, stockinette st until 2 sts remain before next A.3, dec 1 st, A.3, inc 1 st, 1 edge st in garter st. Repeat displacement of A.3 every 4th row 17-19-20-21-22-24 more times. NOTE: Inc is always inside 1 edge st in garter st in each side. AT THE SAME TIME when piece measures 60-61-62-63-64-65 cm / 23⅝"-24"-24⅜"-24¾"-25¼"-25½", cast on 1 new st at the end of the next 2 rows for armholes = 86-90-92-96-98-102 sts. Continue pattern as before inside 1 edge st in garter st and 1 st in stockinette st in each side. When piece measures 74-76-78-80-82-84 cm / 29⅛"-30"-30¾"-31½"-32¼"-33", bind off the middle 24-24-24-26-26-26 sts for neck and finish each shoulder separately. On next row from the neck, bind off 1 st = 30-32-33-34-35-37 sts remain on each shoulder. When piece measures 76-78-80-82-84-86 cm / 30"-30¾"-31½"-32¼"-33"-33⅞", work 1 ridge over all sts. Bind off. Work the other shoulder the same way. FRONT PIECE: Cast on and work as back piece. When piece measures 12 cm / 4¾", work as follows: At the end of the next 2 rows cast on 2 new sts (marks vent) = 84-88-90-94-96-100 sts. Now work A.3 (= 9 sts) over A.1 and A.2. and work 1 edge st in garter st - see explanation above - in each side. When piece measures 16-14-14-13-13-13 cm / 6¼"-5½"-5½"-5"-5"-5", beg displacement of A.3 towards mid front as on back piece. AT THE SAME TIME when piece measures 50-51-52-53-54-55 cm / 19¾"-20"-20½"-21"-21¼"-21⅝", cast on 1 new st at the end of the next 2 rows for armholes = 86-90-92-96-98-102 sts. Continue pattern inside 1 edge st in garter st and 1 st in stockinette st in each side. When piece measures 54-56-58-59-61-63 cm / 21¼"-22"-22¾"-23¼"-24"-24¾", slip the middle 14-14-14-16-16-16 sts on a stitch holder and finish each shoulder separately. Then bind off sts on every row from neck as follows: 3 sts 1 time, 2 sts 1 time and 1 st 1 time = 30-32-33-34-35-37 sts remain for shoulder. Work edge st towards neck in garter st. When piece measures 66-68-70-72-74-76 cm / 26"-26¾"-27½"-28⅜"-29⅛"-30", work 1 ridge over all sts. Bind off. Work the other shoulder the same way. SLEEVE: Worked back and forth on circular needle. Cast on 39-41-43-43-43-45 sts on circular needle size 5 mm / US 8 with Air. Work rib as follows: 1 edge st in garter st, K 1, * P 1, K 1 *, repeat from *-* until 1 st remains, 1 edge st in garter st. When rib measures 4 cm / 1½", switch to circular needle size 5.5 mm / US 9 and continue pattern as follows: 1 edge st in garter st, work last st in A.4, repeat A.4 until 1 st remains, 1 edge st in garter st. When piece measures 10 cm / 4", inc 1 st inside 1 edge st in garter st in each side. Work the inc sts in the pattern A.4. Repeat inc every 5½-4½-4½-3½-3-3 cm / 2¼"-1¾"-1¾"-1¼"-1"-1" 6-7-7-9-11-11 more times = 53-57-59-63-67-69 sts. When sleeve measures 46 cm / 18" in all sizes, work a sleeve cap with short rows as follows from RS: Work until 8-9-9-10-11-12 sts remain, turn and work until 8-9-9-10-11-12 sts remain, turn and work until 17-19-19-21-22-23 sts remain, turn and work until 17-19-19-21-22-23 sts remain. Turn and work all sts on needle, turn and work over all sts. Bind off with K from RS. Make another sleeve. ASSEMBLY: Sew the shoulder seams tog. Sew sleeves to body inside 1 edge st in garter st. Sew underarm seams and side seams in one inside 1 edge st in garter st but leave 12 cm / 4¾" for vent at the bottom of body (i.e. 22 cm / 8¾" on back piece and 12 cm / 4¾" on front piece). NECK EDGE: Beg from mid back and pick up approx. 120-130 sts (includes sts on stitch holder) on circular needle size 5 mm / US 8. K 1 round while adjusting the no of sts to 75-75-75-84-84-84. Then work rib (= K 1/P 2) for 3 cm / 1". Bind off with K over K and P over P. |
|||||||
Diagram explanations |
|||||||
|
|||||||
 |
|||||||
 |
|||||||
Have you finished this pattern?Tag your pictures with #dropspattern #sigridsweater or submit them to the #dropsfan gallery. Do you need help with this pattern?You'll find 30 tutorial videos, a Comments/Questions area and more by visiting the pattern on garnstudio.com. © 1982-2026 DROPS Design A/S. We reserve all rights. This document, including all its sub-sections, has copyrights. Read more about what you can do with our patterns at the bottom of each pattern on our site. |
|||||||


With over 40 years in knitting and crochet design, DROPS Design offers one of the most extensive collections of free patterns on the internet - translated to 17 languages. As of today we count 324 catalogs and 12285 patterns - 12275 of which are translated into English (US/in).
We work hard to bring you the best knitting and crochet have to offer, inspiration and advice as well as great quality yarns at incredible prices! Would you like to use our patterns for other than personal use? You can read what you are allowed to do in the Copyright text at the bottom of all our patterns. Happy crafting!
Post a comment to pattern DROPS 166-18
We would love to hear what you have to say about this pattern!
If you want to leave a question, please make sure you select the correct category in the form below, to speed up the answering process. Required fields are marked *.