
Popular categories
Looking for a yarn?


Comments / Questions (127)
![]() Debbie wrote:
Debbie wrote:
Can you make a you tube video showing how this is made?
20.05.2015 - 01:53DROPS Design answered:
Dear Debbie, you will find videos related to the sts used under tab "videos", you can work either following diagram or written pattern. Should you need any further assistance, you are welcome to ask your question here or to contact your DROPS store. Happy crocheting!
20.05.2015 - 10:02
![]() Judi Ames wrote:
Judi Ames wrote:
For Ruth, to put it more clearly, at end of first row, you turn, chain 3 (= first stitch) for turning chain...after the ch stitch do 2 more stitches, then stitch in ch-sp, ch 3 and continue...I was wondering why I had no turning chain and the rows were getting wider, too...does this help?
07.05.2015 - 22:35
![]() Lia wrote:
Lia wrote:
Ik ben met het voorpand bezig .Moet ik 3 stokjes in de 3 lossen tussen de tussen de stokjes in de hoek maken of in het eerst losse boogje? Keer de tweede toer 1st. in de eerst 3losse maar er zijn toch gen losse alleen 3 stokjes ? Moet je om een om aan het begin van de toer 3 stokjes haken of alleen maar boogjes?
30.04.2015 - 20:32
![]() Vivian wrote:
Vivian wrote:
Thx for the response about the sleeves! I woke up this morning and reread the instructions and understand them completely now!
27.04.2015 - 17:03
![]() Vivian wrote:
Vivian wrote:
I have the question about the increase every sixth round on the back panel. I think I understand what the instructions say…every 6th round you would have a DC ch3 DC all in the same ch sp on either side of the corners as you go round equaling 8 extra DC & ch3 per sixth round? BUT, I do not see that in the picture, which makes me question whether I understand clearly.
27.04.2015 - 17:01DROPS Design answered:
Dear Vivian, diagram shows only first 4 rounds, increase starts on round 5, then every 6th round where you will work 1 dc + 3ch +1dc +3 ch in same ch-space each side of each corner (= 2 dc more per side = 8 dc inc per inc round). Happy crocheting!
27.04.2015 - 17:14
![]() Vivian wrote:
Vivian wrote:
I am totally lost on the directions for the sleeves. Is there any possibility I could get a simplified explanation on dec the sleeves? I just don't understand the way it is written. Also, when I enlarge the picture of the back piece, I don't see where the inc are in the example? I don't think I did that part right :( , all I did was put in one extra DC, but I am plowing ahead anyhow. thx!
27.04.2015 - 07:06DROPS Design answered:
Dear Vivian, mid under sleeve replace 1 dc+3 ch that way: work next dc in next ch-space but wait with last pull through (2 sts on hook, work next dc in next ch space and on last pull through, pull yarn through all sts on hook. For any individual assistance, remember you can get help from your DROPS store. Happy crocheting!
27.04.2015 - 11:42
![]() Ruth wrote:
Ruth wrote:
Nope, sorry, still don't understand what you do at the turn after the first row...any chance of a picture? To clarify - I finish the first row with 3ch, 3 tr in ch-loop in the corner, I turn and then....what??!!
26.04.2015 - 23:22DROPS Design answered:
Dear Ruth, on 2nd row start with 3 ch (= 1st tr), 1 tr in each of the first 2 tr, then repeat *1 tr in ch-space, 3 ch* to the end of row and finish with 1 tr in the last ch-space, 1 tr in each of the last 3 tr. On 3rd row, turn and work 3 ch, 1 tr in each of the next 2 tr, *3 ch, 1 tr in next ch-space*, repeat to the end of row and finish with 1 tr in each of the last 3 tr. Repeat then row 2 and 3. Happy crocheting!
27.04.2015 - 14:19
![]() Ruth wrote:
Ruth wrote:
Nope, sorry, still don't understand what you do at the turn after the first row...any chance of a picture?
26.04.2015 - 23:10
![]() Ruth wrote:
Ruth wrote:
I am struggling to understand what happens at the corners when you turn on the frontpiece. A close up picture might help - the pattern makes no sense to me and I am so close! After severalf restarts I have done the main body and arms and it's looking good, but I can't figure out the turns. Help!.
24.04.2015 - 22:44DROPS Design answered:
Dear Ruth, when you work only on front piece, crochet 3 tr in 1st ch-loop in the corner, then repeat *3 ch, 1 tr around ch-loop*, finish with 3ch, 3 tr in ch-loop in the corner. And continue then repeating row 2 and 3 - remember to replace 1st tr with 3 ch at the beg of row. Happy crocheting!
25.04.2015 - 10:19
![]() Lelel Mas wrote:
Lelel Mas wrote:
En el delantero, como se continua el patrón sin que salgan aumentos, si se trabaja un punto alto en cada arco aumenta igual que antes.
01.04.2015 - 09:34DROPS Design answered:
Hola Lelel, gracias por escribir. Repasando el patrón he encontrado una corrección del delantero sin actualizar en español. Ahora está actualizado. Sentimos las molestias y esperamos que la corrección te ayude a realizar el delantero.
05.04.2015 - 12:12
|
||||||||||||||||||||||
Around the World#aroundtheworldcardigan |
||||||||||||||||||||||
 |
 |
|||||||||||||||||||||
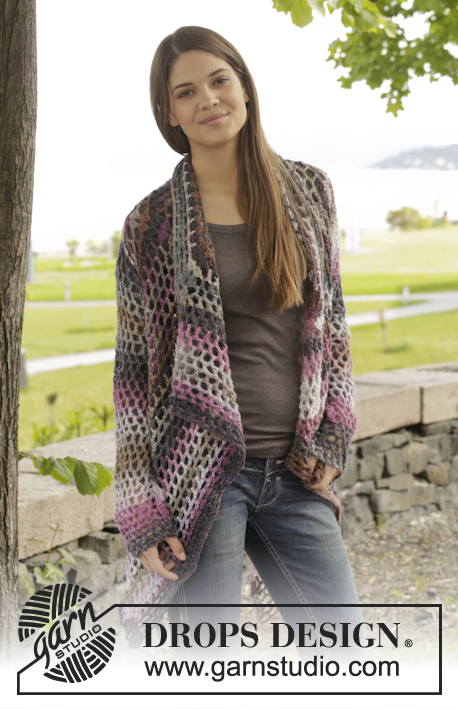
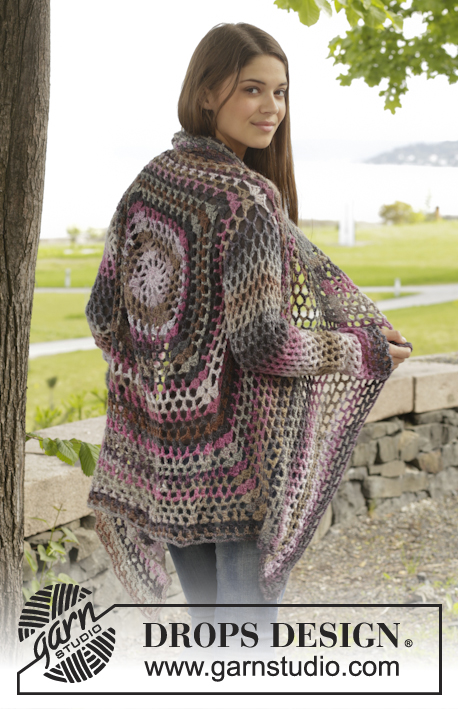
Crochet DROPS jacket with lace pattern in ”Big Delight”. Size: S - XXXL
DROPS 156-42 |
||||||||||||||||||||||
|
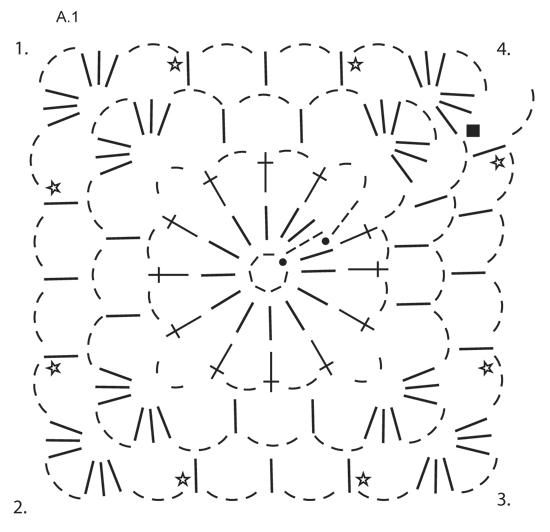
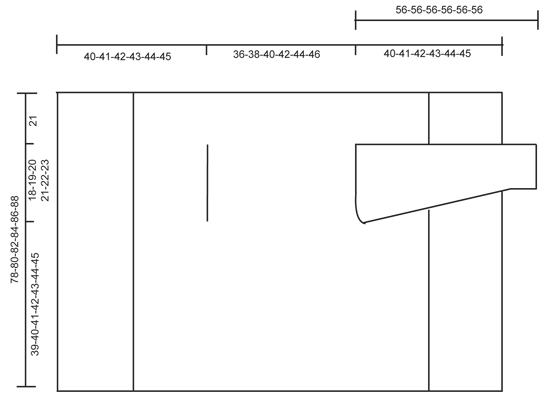
PATTERN: See diagram A.1. DECREASE TIP (applies to sleeves): Dec 1 repetition (= 1 dc + 3 ch) by not working ch, but work 2 dc into 1 dc as follows: Work 1 dc but wait with last pull through (= 2 strands on hook), then work next dc but on last pull through, pull yarn through all sts on hook. ---------------------------------------------------------- BODY: Worked in the round from mid back on the back. Work 6 ch on hook size 5 mm / H/8 with Big Delight and form a ring with 1 sl st in first ch. Work according to diagram A.1, i.e. work as follows: ROUND 1: Work ch 3, 13 dc in ch-ring, finish with 1 sl st in 3rd ch from beg of round. ROUND 2: ch 5, skip 1 dc, 1 dc in next dc, * ch 2, 1 dc in next dc *, repeat from *-* the entire round, finish with 2 ch = 12 dc + 2 ch. ROUND 3: Now work the circle into a square, i.e. work as follows: Work 3 dc + 3 ch + 3 dc (= corner) in first ch-space, ch 3, 1 dc in next ch-space, ch 3, 1 dc in next ch-space, ch 3, * 3 dc + 3 ch + 3 dc (= corner) in next ch-space, ch 3, 1 dc in next ch-space, ch 3, 1 dc in next ch-space, 3 ch *, repeat from *-* 3 times in total, 1 dc in next ch-space (= last 2 ch from previous round), 3 ch. ROUND 4: Work 3 dc + 3 ch + 3 dc (= corner) in first ch-space, * ch 3, 1 dc in next ch-space, ch 3, 1 dc in next ch-space, ch 3, 1 dc in next ch-space, ch 3, 3 dc + 3 ch + 3 dc (= corner) in next ch-space *, repeat from *-* 3 times in total, ch 3, 1 dc in next ch-space, ch 3, 1 dc in next ch-space, ch 3, 1 dc in next ch-space, ch 3, 1 dc in next ch-space, 3 ch. REMEMBER THE CROCHET GAUGE! Repeat 4th round with inc, i.e. work 1 dc + 3 ch more between each corner on every round (= 4 inc per round) AT THE SAME TIME on every 6th round inc 1 dc + 3 ch extra on each side of each corner – see star in diagram (= 8 extra inc per round). Continue like this until square measures 36-38-40-42-44-46 cm x 36-38-40-42-44-46 cm / 14¼"-15"-15¾"-16½"-17¼"-18" x 14¼"-15"-15¾"-16½"-17¼"-18". Now work armhole as follows: Work as before until first corner, work 3 dc + 3 ch + 3 dc in ch-space in the corner. Now work ch until the middle of next side (i.e. in the middle between 1st and 2nd corner) as follows: Work 1 ch for every ch/dc skipped. Then work pattern as before until the middle between 3rd and 4th corner. Now work ch until beg of round as follows: Work 1 ch for every ch/dc skipped. On next round work pattern and inc as before over all sts, also in ch for armholes. Continue like this until square measures 78-80-82-84-86-88 cmx 78-80-82-84-86-88 cm / 30¾"-31½"-32¼"-33"-33⅞"-34⅝" x 30¾"-31½"-32¼"-33"-33⅞"-34⅝" (i.e. 21 cm / 8¼" in all sizes from armhole). Fasten off. FRONT PIECE: Now work back and forth between first and second corner. NOTE! Work front piece without inc. 1st ROW: Work from first corner as follows: 3 dc in ch-space in the corner, * ch 3, 1 dc in ch-space *, repeat from *-* ending with 3 ch and 3 dc in the corner. 2nd ROW: Turn and work like this: 1 dc in each of the first 3 dc, * 1 dc in the ch-space, 3 ch *, repeat from *-* ending with 1 dc in the last ch-space and 1 dc in each of the 3 dc. 3rd ROW: Turn and work like this: 1 dc in each of the first 3 dc, * ch 3, 1 dc in the ch-space *, repeat from *-* and end with 3 ch and 1 dc in each of the last 3 dc. Continue repeating 2nd and 3rd row. Continue working like this until 19-20-21-22-23-24 cm / 7½"-8"-8¼"-8¾"-9"-9½" have been worked back and forth, fasten off. Repeat on the other side, now work back and forth from third to fourth corner. Finally work a round around the entire square, work pattern as before but in ch-space in each corner work 6 dc. Fasten off. SLEEVE: Work in the round, top down from armhole, beg from mid under sleeve from RS. ROUND 1: Work 6 ch (= 1 dc + 3 ch), * 1 dc in next ch-space, 3 ch *, repeat from *-* 16-17-18-19-20-21 times in total, finish with 1 sl st in 3rd ch. ROUND 2: Work ch 5, * 1 dc in next ch-space, 3 ch *, repeat from *-* 16-17-18-19-20-21 times in total, work ch 1, finish with 1 sl st in 3rd ch at beg of round. Repeat 1st and 2nd ROUND - AT THE SAME TIME dec 1 dc + 3 ch at beg of 4th-6th-6th-8th-8th-6th round by working 2 dc tog – READ DECREASE TIP – mid under sleeve. Repeat dec every 6th-6th-6th-4th-4th-4th round = 12-12-13-13-14-14 dc. Repeat round without dec until sleeve measures approx. 56 cm / 22" in all sizes. Fasten off. Work another sleeve. |
||||||||||||||||||||||
Diagram explanations |
||||||||||||||||||||||
|
||||||||||||||||||||||
 |
||||||||||||||||||||||
 |
||||||||||||||||||||||
Have you finished this pattern?Tag your pictures with #dropspattern #aroundtheworldcardigan or submit them to the #dropsfan gallery. Do you need help with this pattern?You'll find 7 tutorial videos, a Comments/Questions area and more by visiting the pattern on garnstudio.com. © 1982-2026 DROPS Design A/S. We reserve all rights. This document, including all its sub-sections, has copyrights. Read more about what you can do with our patterns at the bottom of each pattern on our site. |
||||||||||||||||||||||


With over 40 years in knitting and crochet design, DROPS Design offers one of the most extensive collections of free patterns on the internet - translated to 17 languages. As of today we count 324 catalogs and 12290 patterns - 12280 of which are translated into English (US/in).
We work hard to bring you the best knitting and crochet have to offer, inspiration and advice as well as great quality yarns at incredible prices! Would you like to use our patterns for other than personal use? You can read what you are allowed to do in the Copyright text at the bottom of all our patterns. Happy crafting!
Post a comment to pattern DROPS 156-42
We would love to hear what you have to say about this pattern!
If you want to leave a question, please make sure you select the correct category in the form below, to speed up the answering process. Required fields are marked *.