
Looking for a yarn?


Comments / Questions (128)
![]() María wrote:
María wrote:
No consigo entender cómo son las disminuciones de la manga, me refiero a en qué vueltas hay que disminuir, porque lo primero lo entiendo, cuando dice al inicio de la 4°, 6°, 6°, 8°, 8 °, 6° ,he interpretado que es disminuir el la vuelta 4, 10, 16, 24, 32 y 38. Pero cuando pone repetir cada 6,6,6,4,4,4, no sé si lo hago bien. He acabado haciendo 12 disminuciones en 38 vueltas y me sale una manga muy estrecha. Gracias de antemano
24.10.2022 - 02:34DROPS Design answered:
Hola María, dependiendo de la talla, trabajas al inicio de cada 4ª vuelta (vuelta 4, vuelta 8, vuelta 12...), 6ª vuelta (vuelta 6, vuelta 12, vuelta 18...) u 8ª vuelta (vuelta 8, vuelta 16, vuelta 24...). El orden de los números para cada talla es igual al resto del patrón.
30.10.2022 - 20:57
![]() Ana wrote:
Ana wrote:
Corrijo: En una fila donde hay 8 puntos altos en cada lado antes de hacer la sisa, das 20 cadenas, y saltas 4 puntos altos, y continúas con el patrón hasta la siguiente sisa, tendrás en los lados donde no hay sisa, 9 puntos altos, y en la vuelta siguiente, tendrás que tener 10 puntos altos en total en cada lado.
03.08.2022 - 14:34
![]() Ana wrote:
Ana wrote:
Y en las sisas, si os saltáis por ejemplo 4 puntos altos, en la siguiente fila, tiene que haber 5 puntos altos con sus respectivas 3 cadenas en las cadenas de la sisa. Tenéis que tener el mismo número de "puntos altos y 3 cadenas" en cada lado. Y que la fila en la que vayáis a hacer la sisa tenga un número par de puntos altos, así es más fácil centrarla.
03.08.2022 - 14:09
![]() Ana wrote:
Ana wrote:
En la foto, se ve que no está tejida en espiral a partir de la 3ª fila, ni se ve ningún aumento extra cada 6ª fila. Y en el diagrama donde vienen las medidas, la parte de encima de la sisa mide 21 cm ,pero la parte de debajo de las sisas mide entre 39 y 45 cm. O sea, que después de hacer la sisa hay que tejer 21 cm en redondo, y después sólo del lado 1 al 4 de ida y vuelta hasta el largo deseado. y finalmente tejer los lados separadamente hasta el ancho deseado.
03.08.2022 - 13:49
![]() Anne Thrane wrote:
Anne Thrane wrote:
Lige et spørgsmål til udtagninger. Skal første ekstra udtagning være på 4. omgang og herefter på hver 6. som tegnet i diagrammet, eller er det først på den 6. omgang der skal laves den første ekstra udtagning?
21.03.2021 - 17:01DROPS Design answered:
Hej Anne, du hækler først de 4 omgange som er beskrevet i opskriften, så gentager du 4.omgang og tager ud 4 gange på hver omgang. Når du hækler 6.omgang tager du yderligere ud (ialt 8 udtagninger) og det gør du igen på 12.omgang og så videre på hver 6.. God fornøjelse!
23.03.2021 - 13:46
![]() Heidi wrote:
Heidi wrote:
Ich versteh nicht wie ich den ärmelausschnitt häkeln soll. Können Sie mir da helfen?
01.07.2020 - 23:20DROPS Design answered:
Liebe Heidi, die Runde wie zuvor bis 1. Ecke häkeln, dann überspringen Sie die M. von der Ecke bis zur die Hälfte der nächsten Seite (zählen Sie wieviele M. Sie überspringen sollen, soviele Lm häkeln Sie für die Armausschnitt), dann häkeln Sie weiter von der Mitte dieser Seite bis zur Ecke wie zuvor, die untere Seite genauso wie zuvor, dann nur die Hälfe der nächsten Seite (= wie bei 1. Armausschnitt = genauso viele M) + Lm wie bei der 1. Armausschnitt, dann in der letzten Ecke wie zuvor und bis zur Ende der Reihen wie zuvor. Bei der nächsten Runden häkeln Sie wie zuvor, in den Luftmaschenbogen als ob Sie "normal" gehäkelt hätten. Viel Spaß beim stricken!
02.07.2020 - 08:48
![]() Dana Brunovská wrote:
Dana Brunovská wrote:
Opakujeme 4. kruhovou řadu s přidáváním, tj. v každé kruhové řadě háčkujeme mezi každými dvěma rohy o 1 DS + 3 řo více (= v jedné kruhové řadě přidáme celkem 4x) a SOUČASNĚ v každé 6. kruhové řadě přidáme navíc ještě 1 DS + 3 řo na každé straně každého rohu – viz hvězdička ve schématu (= 8 přidání - ja to pridavanie v kazdom 6. riadku nevidim na fotografii - naozaj ste to tak robili ? vdaka za odpoved
26.04.2018 - 19:44
![]() Rabia Rehman wrote:
Rabia Rehman wrote:
Thank you so much for the reply. I understand how to do armholes, I have to make ch stitch until the middle of 1 corner & 2corner. My questions are: First, how many ch stitch should I do for medium jacket. Secondly, when we will start round1 then how many dc groups should I do in armhole ch space.
17.04.2018 - 16:38DROPS Design answered:
Dear Mrs Rehman, the number of chains you will crochet for armhole is the same as the number of sts you will skip. Count how many sts you have from corner to middle of side and crochet this number of chain for armhole. On next round after chains, crochet pattern in the chain-spaces as before, check previous rows to have the correct number of sts (+ inc in the corner). Happy crocheting!
18.04.2018 - 08:57Rabia REHMAN wrote:
Can you please explain me how to crochet armholes? I honestly cannot get the pattern. Thank you
14.04.2018 - 01:44DROPS Design answered:
Dear Rabia, the armholes is worked from a corner downwards up to aprox. the middle of the side. You work a chain stitch row which depends on your size and then it's fastened off with a dc (sc) I hope this helps.
14.04.2018 - 13:11
![]() Pamela Velasquez wrote:
Pamela Velasquez wrote:
I understand the first row of the sleeve but when attaching your yarn to the armhole on the sweater to start the sleeve do you attach to a chain 3 space or dc on the armhole?
04.04.2018 - 13:27DROPS Design answered:
Dear Mrs Velasquez, you will join the yarn mid under arm in a ch-space. Happy crocheting!
04.04.2018 - 16:04
|
||||||||||||||||||||||
Around the World#aroundtheworldcardigan |
||||||||||||||||||||||
 |
 |
|||||||||||||||||||||
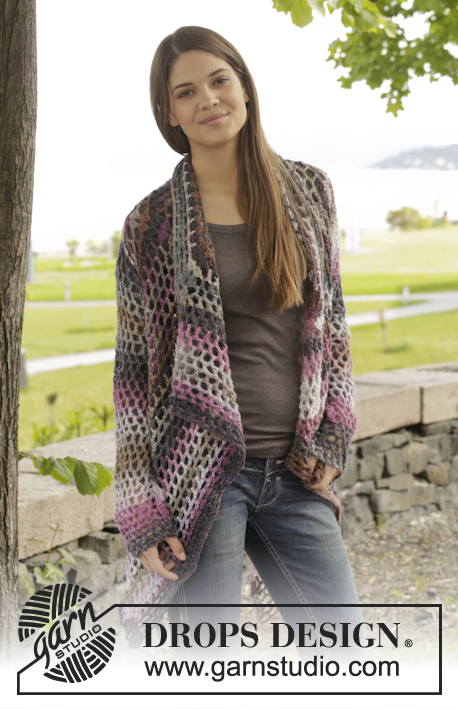
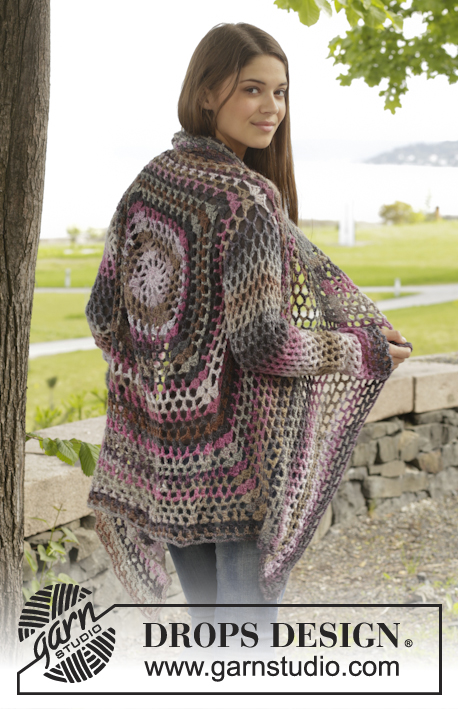
Crochet DROPS jacket with lace pattern in ”Big Delight”. Size: S - XXXL
DROPS 156-42 |
||||||||||||||||||||||
|
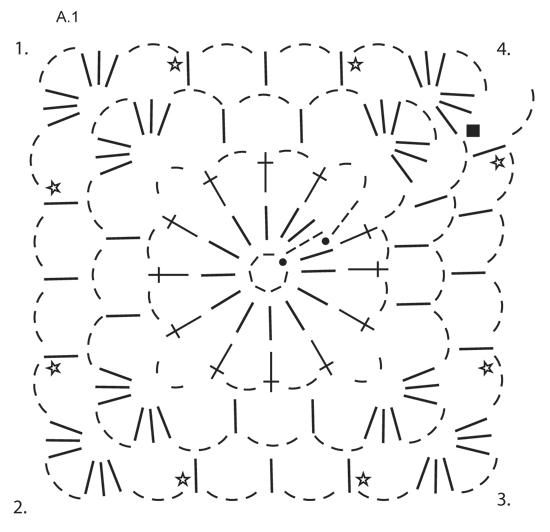
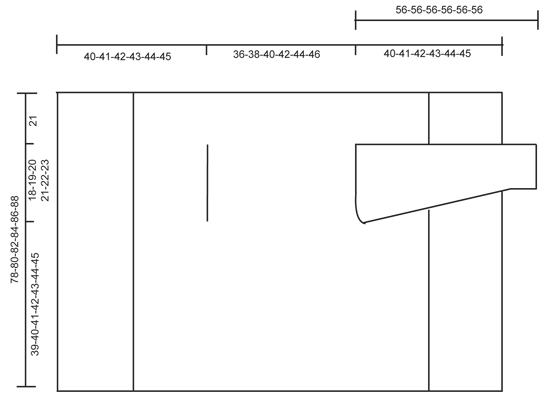
PATTERN: See diagram A.1. DECREASE TIP (applies to sleeves): Dec 1 repetition (= 1 dc + 3 ch) by not working ch, but work 2 dc into 1 dc as follows: Work 1 dc but wait with last pull through (= 2 strands on hook), then work next dc but on last pull through, pull yarn through all sts on hook. ---------------------------------------------------------- BODY: Worked in the round from mid back on the back. Work 6 ch on hook size 5 mm / H/8 with Big Delight and form a ring with 1 sl st in first ch. Work according to diagram A.1, i.e. work as follows: ROUND 1: Work ch 3, 13 dc in ch-ring, finish with 1 sl st in 3rd ch from beg of round. ROUND 2: ch 5, skip 1 dc, 1 dc in next dc, * ch 2, 1 dc in next dc *, repeat from *-* the entire round, finish with 2 ch = 12 dc + 2 ch. ROUND 3: Now work the circle into a square, i.e. work as follows: Work 3 dc + 3 ch + 3 dc (= corner) in first ch-space, ch 3, 1 dc in next ch-space, ch 3, 1 dc in next ch-space, ch 3, * 3 dc + 3 ch + 3 dc (= corner) in next ch-space, ch 3, 1 dc in next ch-space, ch 3, 1 dc in next ch-space, 3 ch *, repeat from *-* 3 times in total, 1 dc in next ch-space (= last 2 ch from previous round), 3 ch. ROUND 4: Work 3 dc + 3 ch + 3 dc (= corner) in first ch-space, * ch 3, 1 dc in next ch-space, ch 3, 1 dc in next ch-space, ch 3, 1 dc in next ch-space, ch 3, 3 dc + 3 ch + 3 dc (= corner) in next ch-space *, repeat from *-* 3 times in total, ch 3, 1 dc in next ch-space, ch 3, 1 dc in next ch-space, ch 3, 1 dc in next ch-space, ch 3, 1 dc in next ch-space, 3 ch. REMEMBER THE CROCHET GAUGE! Repeat 4th round with inc, i.e. work 1 dc + 3 ch more between each corner on every round (= 4 inc per round) AT THE SAME TIME on every 6th round inc 1 dc + 3 ch extra on each side of each corner – see star in diagram (= 8 extra inc per round). Continue like this until square measures 36-38-40-42-44-46 cm x 36-38-40-42-44-46 cm / 14¼''-15''-15¾''-16½''-17¼''-18'' x 14¼''-15''-15¾''-16½''-17¼''-18''. Now work armhole as follows: Work as before until first corner, work 3 dc + 3 ch + 3 dc in ch-space in the corner. Now work ch until the middle of next side (i.e. in the middle between 1st and 2nd corner) as follows: Work 1 ch for every ch/dc skipped. Then work pattern as before until the middle between 3rd and 4th corner. Now work ch until beg of round as follows: Work 1 ch for every ch/dc skipped. On next round work pattern and inc as before over all sts, also in ch for armholes. Continue like this until square measures 78-80-82-84-86-88 cmx 78-80-82-84-86-88 cm / 30¾''-31½''-32¼''-33''-33 7/8''-34 5/8'' x 30¾''-31½''-32¼''-33''-33 7/8''-34 5/8'' (i.e. 21 cm / 8 1/4'' in all sizes from armhole). Fasten off. FRONT PIECE: Now work back and forth between first and second corner. NOTE! Work front piece without inc. 1st ROW: Work from first corner as follows: 3 dc in ch-space in the corner, * ch 3, 1 dc in ch-space *, repeat from *-* ending with 3 ch and 3 dc in the corner. 2nd ROW: Turn and work like this: 1 dc in each of the first 3 dc, * 1 dc in the ch-space, 3 ch *, repeat from *-* ending with 1 dc in the last ch-space and 1 dc in each of the 3 dc. 3rd ROW: Turn and work like this: 1 dc in each of the first 3 dc, * ch 3, 1 dc in the ch-space *, repeat from *-* and end with 3 ch and 1 dc in each of the last 3 dc. Continue repeating 2nd and 3rd row. Continue working like this until 19-20-21-22-23-24 cm / 7½''-8''-8¼''-8¾''-9''-9½'' have been worked back and forth, fasten off. Repeat on the other side, now work back and forth from third to fourth corner. Finally work a round around the entire square, work pattern as before but in ch-space in each corner work 6 dc. Fasten off. SLEEVE: Work in the round, top down from armhole, beg from mid under sleeve from RS. ROUND 1: Work 6 ch (= 1 dc + 3 ch), * 1 dc in next ch-space, 3 ch *, repeat from *-* 16-17-18-19-20-21 times in total, finish with 1 sl st in 3rd ch. ROUND 2: Work ch 5, * 1 dc in next ch-space, 3 ch *, repeat from *-* 16-17-18-19-20-21 times in total, work ch 1, finish with 1 sl st in 3rd ch at beg of round. Repeat 1st and 2nd ROUND - AT THE SAME TIME dec 1 dc + 3 ch at beg of 4th-6th-6th-8th-8th-6th round by working 2 dc tog – READ DECREASE TIP – mid under sleeve. Repeat dec every 6th-6th-6th-4th-4th-4th round = 12-12-13-13-14-14 dc. Repeat round without dec until sleeve measures approx. 56 cm / 22'' in all sizes. Fasten off. Work another sleeve. |
||||||||||||||||||||||
Diagram explanations |
||||||||||||||||||||||
|
||||||||||||||||||||||
|
||||||||||||||||||||||
|
||||||||||||||||||||||
Have you finished this pattern?Tag your pictures with #dropspattern #aroundtheworldcardigan or submit them to the #dropsfan gallery. Do you need help with this pattern?You'll find 7 tutorial videos, a Comments/Questions area and more by visiting the pattern on garnstudio.com. © 1982-2025 DROPS Design A/S. We reserve all rights. This document, including all its sub-sections, has copyrights. Read more about what you can do with our patterns at the bottom of each pattern on our site. |
||||||||||||||||||||||


With over 40 years in knitting and crochet design, DROPS Design offers one of the most extensive collections of free patterns on the internet - translated to 17 languages. As of today we count 314 catalogs and 11822 patterns - 11812 of which are translated into English (US/in).
We work hard to bring you the best knitting and crochet have to offer, inspiration and advice as well as great quality yarns at incredible prices! Would you like to use our patterns for other than personal use? You can read what you are allowed to do in the Copyright text at the bottom of all our patterns. Happy crafting!
Post a comment to pattern DROPS 156-42
We would love to hear what you have to say about this pattern!
If you want to leave a question, please make sure you select the correct category in the form below, to speed up the answering process. Required fields are marked *.