
Popular categories
Looking for a yarn?


Comments / Questions (127)
![]() Jenna Patton wrote:
Jenna Patton wrote:
I have finished all rounds including making the chains for the arm hole. My question is when I start the next round do I default back to the previous round, or do I continue the pattern on the chain? (I hope the way I worded this makes sense)
17.07.2015 - 09:30DROPS Design answered:
Dear Mrs Patton, on next round after you have crocheted the chains for the armholes, crochet in the chain so that you have 2 holes (created by skipping sts and making ch) that create the armholes Happy crocheting!
27.07.2015 - 14:24
![]() Judi Ames wrote:
Judi Ames wrote:
Hi! I've finished the main part and am now starting the sleeves. On the second row, it says, after the repeats, to 'work ch 1, then finish with a sl st'. But, each of the repeats ends ch 3. So, does that mean the last one is 4 chains? Has something been left out or did I just misunderstand?
16.07.2015 - 20:23DROPS Design answered:
Dear Mrs Ames, at the end of round 2, finish with 1 sl st in the 3rd of the 5 ch at beg of round, then repeat round 1 & 2, ie on next round (= round 1) start with 6 ch (= 1 tr + 3 ch). Happy crocheting!
27.07.2015 - 14:10
![]() Beatriz wrote:
Beatriz wrote:
Yo también he comenzado la labor. Según patrón, explicación y dibujo es un cuadro en espiral. Lo que no entiendo es cómo se hacen los aumentos. Entendí que tras la cuarta vuelta a los lados de cada esquina se hacen dos puntos altos y así aumenta el cuadrado hasta llegar a los centímetros correspondiente. Gracias.
18.06.2015 - 09:48DROPS Design answered:
Hola Beatriz, después de la 4ª vta trabajar en cada lado, entre las 2 esquinas 1 p.a. + 3 p.de cad. y en cada 6ª vta a ambos lados de cada esquina 1 p.a.+ 3 p.de cad extra (total 8 aum en la vta)
24.06.2015 - 10:19Alexia wrote:
Hola. Acabo de empezar la labor; el cuadro no se cierra con p.e en cada vuelta sino que directamente se hace el primer p.a de la primera esquina de la vuelta siguiente, cierto? Y al terminar cada vuelta tendré siempre un p. a más que la anterior, verdad? No se si me he explicado bien. Espero que me lo puedan aclarar. Muchas gracias de antemano!
17.06.2015 - 13:59DROPS Design answered:
Hola Alexia, el cuadrado se trabaja en espiral sin terminar cada vta con p.e. y efectivamente para continuar la espiral hay un pt más que en la vta anterior.
24.06.2015 - 09:55
![]() Rebecca Lackey wrote:
Rebecca Lackey wrote:
Now im confused reading other questions, up to round 6 you have 6 dc in corners, row 6 then gets 8 dc? then 7 thru 11 gets 6dc ? , then row 12 get the 8 again .
12.06.2015 - 17:07DROPS Design answered:
Dear Mrs Lackey, you should have 6 dc in each corner (= 3 dc, 3 ch, 3 dc) when working in the round, but every 6th round you work 1 dc + 3 ch more on each side of each corner (see star in diagram), ie 8 extra dc per round. Happy crocheting!
13.06.2015 - 10:24
![]() Amily Skelton wrote:
Amily Skelton wrote:
Hello, I am really confused about how to make the arm hole. What do you mean by this: Work 1 ch for every ch/dc skipped. Then work pattern as before until the middle between 3rd and 4th corner. Now work ch until beg of round as follows: Work 1 ch for every ch/dc skipped. On next round work pattern and inc as before over all sts, also in ch for armholes. Im confused about the 1 ch for every ch/dc skipped. Where am I skipping and what chain are you talking about? thank you!
09.06.2015 - 08:46DROPS Design answered:
Dear Mrs Skelton, to shape armholes, you will skip some sts and replace these sts with ch (so that you will create a hole) - count the nummber of sts (ch+dc) you have to skip and crochet this number of ch. On next round, work as before in pattern around in sts as in the ch to keep the same pattern as before. Happy crocheting!
09.06.2015 - 08:56
![]() Amily Skelton wrote:
Amily Skelton wrote:
What does "every sixth" round mean? does it mean everytime I hit a sixth round: 1,2,3,4,5,6 then on the six I would increase or is it like a multiple of six? I'm sorry that I'm getting confused but I would really appreciate any clarification. Thank you!
08.06.2015 - 02:44DROPS Design answered:
Dear Mrs Skelton, that's correct, when inc every 6th row, you work 5 row without inc then on next row = 6th row will be an increase row. Happy crocheting!
08.06.2015 - 09:05
![]() Marieke wrote:
Marieke wrote:
Jammer dat m'n vraag niet wordt beantwoord. Heb t uitgehaald en ga iets anders maken! Zie overigens dat ik niet de enige ben met deze vraag.
27.05.2015 - 16:39Jackie wrote:
On doing row 3, you end up with an extra "dc 3ch" on the final side. Surely this is'nt right cos the square wouldn't be square
24.05.2015 - 17:56DROPS Design answered:
Dear Jackie, pattern is correct, follow step by step the written pattern and/or the diagram. Happy crocheting!
26.05.2015 - 13:58Hilare Yeates wrote:
Can you Please tell me what size the small would fit, I was wondering about this for a 9 yr old
20.05.2015 - 03:00DROPS Design answered:
Dear Mrs Yeates, you will find at the bottom of the pattern a measurement chart with all measurements in cm for each side taken flat from side to side. Compare these to a similar garment and make adjustements - or you can find also a nice jacket in our patterns for children. Happy crocheting!
20.05.2015 - 10:05
|
||||||||||||||||||||||
Around the World#aroundtheworldcardigan |
||||||||||||||||||||||
 |
 |
|||||||||||||||||||||
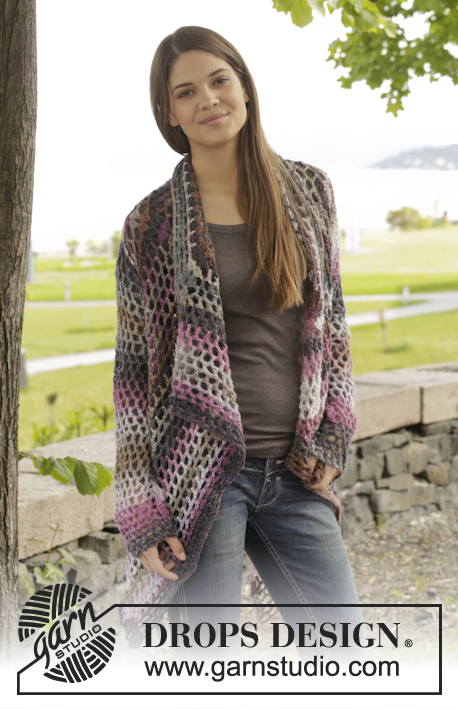
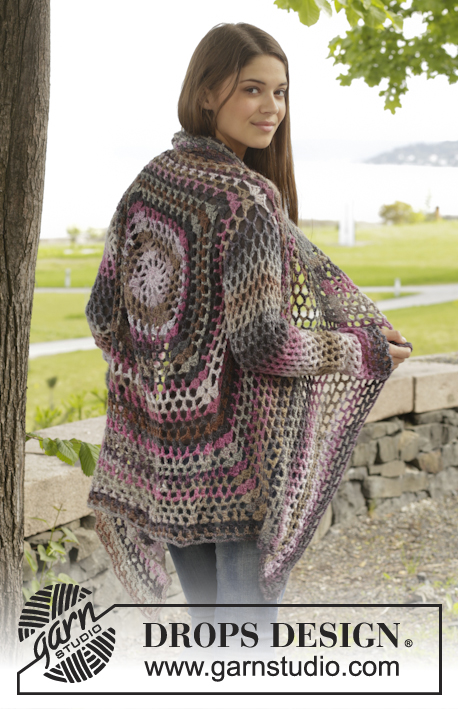
Crochet DROPS jacket with lace pattern in ”Big Delight”. Size: S - XXXL
DROPS 156-42 |
||||||||||||||||||||||
|
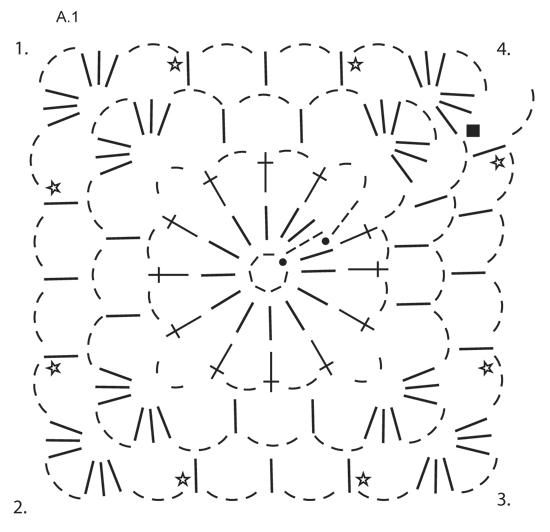
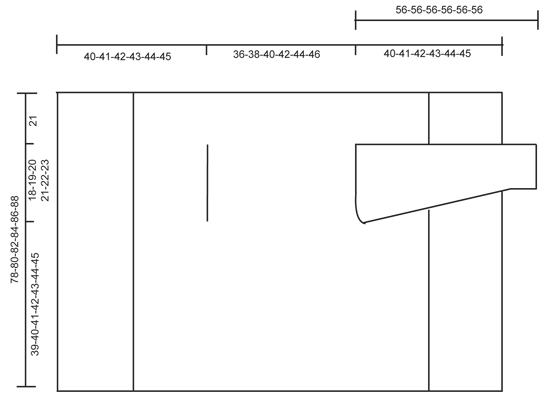
PATTERN: See diagram A.1. DECREASE TIP (applies to sleeves): Dec 1 repetition (= 1 dc + 3 ch) by not working ch, but work 2 dc into 1 dc as follows: Work 1 dc but wait with last pull through (= 2 strands on hook), then work next dc but on last pull through, pull yarn through all sts on hook. ---------------------------------------------------------- BODY: Worked in the round from mid back on the back. Work 6 ch on hook size 5 mm / H/8 with Big Delight and form a ring with 1 sl st in first ch. Work according to diagram A.1, i.e. work as follows: ROUND 1: Work ch 3, 13 dc in ch-ring, finish with 1 sl st in 3rd ch from beg of round. ROUND 2: ch 5, skip 1 dc, 1 dc in next dc, * ch 2, 1 dc in next dc *, repeat from *-* the entire round, finish with 2 ch = 12 dc + 2 ch. ROUND 3: Now work the circle into a square, i.e. work as follows: Work 3 dc + 3 ch + 3 dc (= corner) in first ch-space, ch 3, 1 dc in next ch-space, ch 3, 1 dc in next ch-space, ch 3, * 3 dc + 3 ch + 3 dc (= corner) in next ch-space, ch 3, 1 dc in next ch-space, ch 3, 1 dc in next ch-space, 3 ch *, repeat from *-* 3 times in total, 1 dc in next ch-space (= last 2 ch from previous round), 3 ch. ROUND 4: Work 3 dc + 3 ch + 3 dc (= corner) in first ch-space, * ch 3, 1 dc in next ch-space, ch 3, 1 dc in next ch-space, ch 3, 1 dc in next ch-space, ch 3, 3 dc + 3 ch + 3 dc (= corner) in next ch-space *, repeat from *-* 3 times in total, ch 3, 1 dc in next ch-space, ch 3, 1 dc in next ch-space, ch 3, 1 dc in next ch-space, ch 3, 1 dc in next ch-space, 3 ch. REMEMBER THE CROCHET GAUGE! Repeat 4th round with inc, i.e. work 1 dc + 3 ch more between each corner on every round (= 4 inc per round) AT THE SAME TIME on every 6th round inc 1 dc + 3 ch extra on each side of each corner – see star in diagram (= 8 extra inc per round). Continue like this until square measures 36-38-40-42-44-46 cm x 36-38-40-42-44-46 cm / 14¼"-15"-15¾"-16½"-17¼"-18" x 14¼"-15"-15¾"-16½"-17¼"-18". Now work armhole as follows: Work as before until first corner, work 3 dc + 3 ch + 3 dc in ch-space in the corner. Now work ch until the middle of next side (i.e. in the middle between 1st and 2nd corner) as follows: Work 1 ch for every ch/dc skipped. Then work pattern as before until the middle between 3rd and 4th corner. Now work ch until beg of round as follows: Work 1 ch for every ch/dc skipped. On next round work pattern and inc as before over all sts, also in ch for armholes. Continue like this until square measures 78-80-82-84-86-88 cmx 78-80-82-84-86-88 cm / 30¾"-31½"-32¼"-33"-33⅞"-34⅝" x 30¾"-31½"-32¼"-33"-33⅞"-34⅝" (i.e. 21 cm / 8¼" in all sizes from armhole). Fasten off. FRONT PIECE: Now work back and forth between first and second corner. NOTE! Work front piece without inc. 1st ROW: Work from first corner as follows: 3 dc in ch-space in the corner, * ch 3, 1 dc in ch-space *, repeat from *-* ending with 3 ch and 3 dc in the corner. 2nd ROW: Turn and work like this: 1 dc in each of the first 3 dc, * 1 dc in the ch-space, 3 ch *, repeat from *-* ending with 1 dc in the last ch-space and 1 dc in each of the 3 dc. 3rd ROW: Turn and work like this: 1 dc in each of the first 3 dc, * ch 3, 1 dc in the ch-space *, repeat from *-* and end with 3 ch and 1 dc in each of the last 3 dc. Continue repeating 2nd and 3rd row. Continue working like this until 19-20-21-22-23-24 cm / 7½"-8"-8¼"-8¾"-9"-9½" have been worked back and forth, fasten off. Repeat on the other side, now work back and forth from third to fourth corner. Finally work a round around the entire square, work pattern as before but in ch-space in each corner work 6 dc. Fasten off. SLEEVE: Work in the round, top down from armhole, beg from mid under sleeve from RS. ROUND 1: Work 6 ch (= 1 dc + 3 ch), * 1 dc in next ch-space, 3 ch *, repeat from *-* 16-17-18-19-20-21 times in total, finish with 1 sl st in 3rd ch. ROUND 2: Work ch 5, * 1 dc in next ch-space, 3 ch *, repeat from *-* 16-17-18-19-20-21 times in total, work ch 1, finish with 1 sl st in 3rd ch at beg of round. Repeat 1st and 2nd ROUND - AT THE SAME TIME dec 1 dc + 3 ch at beg of 4th-6th-6th-8th-8th-6th round by working 2 dc tog – READ DECREASE TIP – mid under sleeve. Repeat dec every 6th-6th-6th-4th-4th-4th round = 12-12-13-13-14-14 dc. Repeat round without dec until sleeve measures approx. 56 cm / 22" in all sizes. Fasten off. Work another sleeve. |
||||||||||||||||||||||
Diagram explanations |
||||||||||||||||||||||
|
||||||||||||||||||||||
 |
||||||||||||||||||||||
 |
||||||||||||||||||||||
Have you finished this pattern?Tag your pictures with #dropspattern #aroundtheworldcardigan or submit them to the #dropsfan gallery. Do you need help with this pattern?You'll find 7 tutorial videos, a Comments/Questions area and more by visiting the pattern on garnstudio.com. © 1982-2026 DROPS Design A/S. We reserve all rights. This document, including all its sub-sections, has copyrights. Read more about what you can do with our patterns at the bottom of each pattern on our site. |
||||||||||||||||||||||


With over 40 years in knitting and crochet design, DROPS Design offers one of the most extensive collections of free patterns on the internet - translated to 17 languages. As of today we count 324 catalogs and 12290 patterns - 12280 of which are translated into English (US/in).
We work hard to bring you the best knitting and crochet have to offer, inspiration and advice as well as great quality yarns at incredible prices! Would you like to use our patterns for other than personal use? You can read what you are allowed to do in the Copyright text at the bottom of all our patterns. Happy crafting!
Post a comment to pattern DROPS 156-42
We would love to hear what you have to say about this pattern!
If you want to leave a question, please make sure you select the correct category in the form below, to speed up the answering process. Required fields are marked *.