
Popular categories
Looking for a yarn?


Comments / Questions (317)
Anon. wrote:
Sorry, my mistake, don't start from the right side. I read the pattern wrong, it actually says repeat 3 more times, so in total 4 times. lol soz, my bad. :)
06.10.2014 - 09:59Anon. wrote:
I had difficulty with placing the markers as there is clearly something wrong, but i figured out if you begin the row from the right side the markers will be symmetrical, and don't count the first pattern group as one.
06.10.2014 - 09:43
![]() Michaela wrote:
Michaela wrote:
Dobrý den, prosím o opravu. K tomuto svetru je přidělen návod na pletení ponožek. Děkuji. Michaela
05.10.2014 - 12:47DROPS Design answered:
Dobrý den, děkujeme za upozornění - opraveno!
07.10.2014 - 12:23
![]() Melanie wrote:
Melanie wrote:
Ich bin bei den Vorderteilen angekommen, dazu 2 Fragen. 1. Die Platzierung der Marker ergibt, wie bereits von anderen bemerkt, ein unsymmetrisches Bild. Ich habe das geändert und nun unten 1 Strahl zwischen den Vorderteilen und im Nackenbereich 2 plus jeweils einen halben Srahl Abstand. Ist das richtig so? 2. Nehme ich in jeder Reihe Stäbchen zu oder nur in jeder 2. Reihe? Danke!
04.10.2014 - 13:24DROPS Design answered:
Liebe Melanie, ich werde Ihren Hinweis weiterleiten, dann wird das noch mal überprüft, ich kann anhand der Zahlen zwischen den Markierern nicht direkt einen Fehler erkennen. Der mittlere Strahl am Rücken müsste jedenfalls mittig nach unten zeigen, daran kann man sich orientieren. Haben Sie die Markierer in der Rück-R angebracht? Die Zunahmen arbeiten Sie weiter in jeder R.
06.10.2014 - 09:34
![]() Lijniebeer wrote:
Lijniebeer wrote:
Ik heb een vraag over het begin bij de mouwen moeten de stokjesgroepen ook gehaakt of overgeslagen worden
04.10.2014 - 13:13DROPS Design answered:
Als u de 86 stokjes gelijkmatig verdeeld over de armsgaten, krijgt u het mooiste resultaat, er staat niet specifiek beschreven in welke steken u wel en niet haakt.
09.10.2014 - 16:02
![]() Hilda wrote:
Hilda wrote:
Ik heb een vraagje moet je toer 8 ook met een hv sluiten. Want ik begrijp niet hoe je anders aan 6 toeren rond en 18 toeren heen en weer komt. bedankt
01.10.2014 - 19:25DROPS Design answered:
Hoi Hilda. Ja, je eindigt elke toer met 1 hv in de 3e l van het begin van de toer (zie INFORMATIE VOOR HET HAKEN). Veel haakplezier verder.
03.10.2014 - 16:08
![]() Åsa L wrote:
Åsa L wrote:
Hej!Jag får inte ihop mönstret när ja kommer till varv27. Har vänt på arbetet vid nytt varv och virkat 22st 1 mönstergrupp och 22 st. Sedan ska jag hoppa över 2 stolpgrupper o 2 mönstergrupper men jag har en mönstergrupp framför mig i arbetet... Sedan står det längre nerVarv 25-29: öka endast jämna varv men i beskrivningen ovanför står detpå varv 27 att jag ska öka som förut o göra 22 st.
29.09.2014 - 19:50DROPS Design answered:
Hej Åsa, Det var ett fel i L/XL i den svenska. Det skall stå: VARV 29-52: Virka mönster som förut..... Lycka till!
08.10.2014 - 10:22
![]() Åsa L wrote:
Åsa L wrote:
Hej!Jag får inte ihop mönstret när ja kommer till varv27. Har vänt på arbetet vid nytt varv och virkat 22st 1 mönstergrupp och 22 st. Sedan ska jag hoppa över 2 stolpgrupper o 2 mönstergrupper men jag har en mönstergrupp framför mig i arbetet... Sedan står det längre nerVarv 25-29: öka endast jämna varv men i beskrivningen ovanför står detpå varv 27 att jag ska öka som förut o göra 22 st.
29.09.2014 - 19:50
![]() Cath wrote:
Cath wrote:
I think there is a mistake in the pattern for positioning the markers. If you follow the instructions, the markers 1-2 and 3-4 are not symetrical. I added a 33dc and a pattern group btw 2-3 to make it so. But now I am afraid that the number of dc needed for the front piece don't match.
29.09.2014 - 05:45DROPS Design answered:
Dear Cath, make sure you have placed markers from WS. Happy crocheting!
29.09.2014 - 10:17
![]() Josephine wrote:
Josephine wrote:
Ik vind de maten die aanfegeven zijn te klein. Ik heb dames maat 50 maar xxxl was echt veel te klein. Dit terwijl mijn stekenverhouding helemaal juist was volgens het patroon. Gelukkig was dit patroon makkelijk 2 maten te vergroten.
27.09.2014 - 09:49DROPS Design answered:
Hoi Josephine. Onderaan het patroon staan de afmetingen in cm per maat. Je kan hier eerst kijken om te zien welke maat het beste bij jou past.
29.09.2014 - 14:07
|
|
Winter Solstice#wintersolsticecardigan |
|
 |
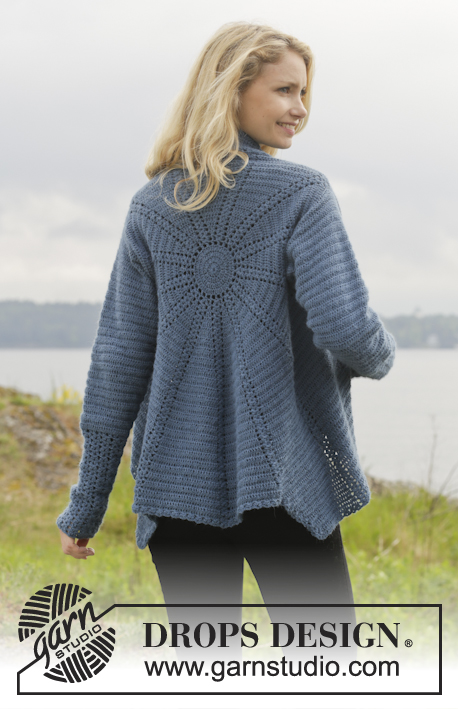 |
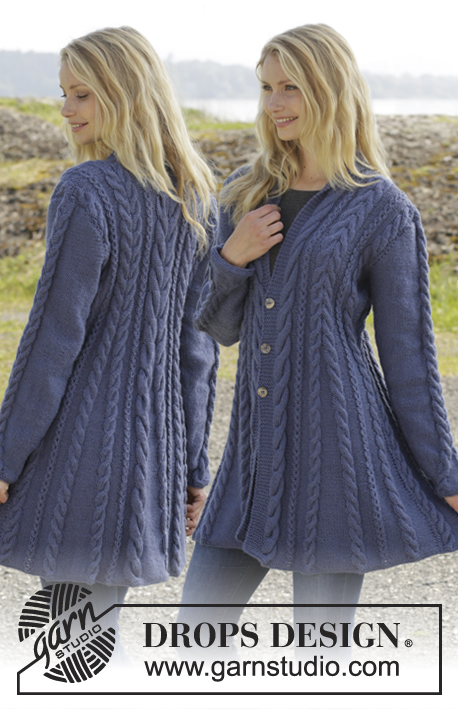
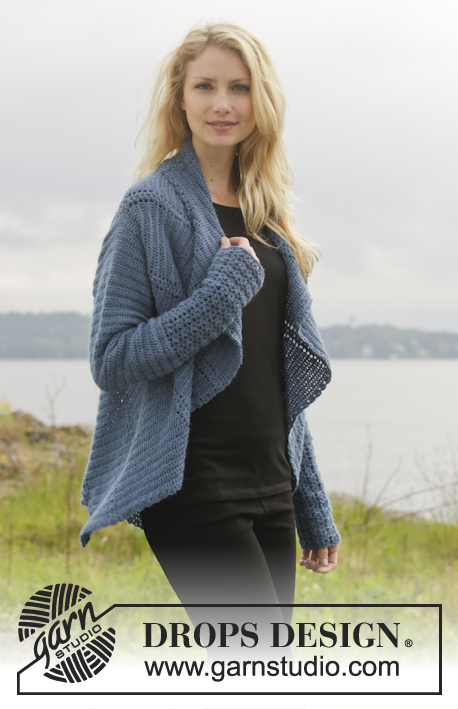
Crochet DROPS jacket worked in a circle in "Alpaca". Size: S - XXXL.
DROPS 158-10 |
|
|
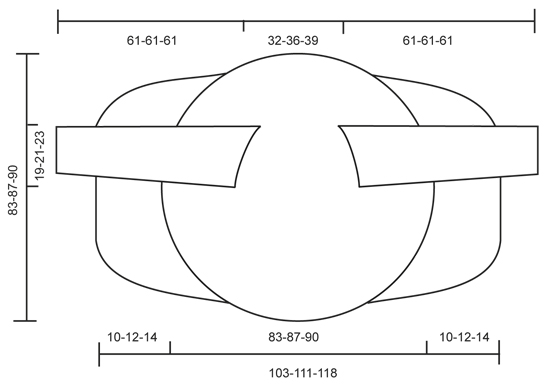
CROCHET INFO: Beg every round/row with 3 ch that replace 1st dc and finish every round/row with 1 sl st in 3rd ch from beg of round/row. PATTERN GROUP: Each pattern group consists of: ch 1, 2 dc WORKED TOG - see explanation below, ch 2, 2 dc worked tog and 1 ch. DC WORKED TOG: * Make 1 YO, insert hook in ch-space, get yarn, make a YO, pull through 2 of the sts on hook *, repeat from *-* one more time, make 1 YO and pull yarn through all 3 sts on hook. CROCHET 3 dc TOG: Work 3 dc into 1 dc at beg of row as follows: Work 2 ch (= replace 1 dc), work 1 dc, but wait with last pull through (= 2 strands on hook), then work next dc but on last pull through, pull yarn through all sts on hook. DECREASE TIP (applies to sleeves): Dec at beg of row by working 1 sl st over the dc to be dec. Dec at end of row by working until 1 dc to be dec remains, turn piece. -------------------------------------------------------- CIRCLE: Work 5 ch on hook size 3.5 mm/E with Alpaca and form a ring with 1 sl st in first ch. READ CROCHET INFO. ROUND 1: Work 13 dc in ch-ring. ROUND 2: Work * 2 dc in every dc*, repeat from *-* the entire round = 26 dc. ROUND 3: Work * 2 dc in first dc, then 1 dc in next dc *, repeat from *-* the entire round = 39 dc. ROUND 4: Work * 2 dc in first dc, then 1 dc in each of the next 2 dc *, repeat from *-* the entire round = 52 dc. ROUND 5: Work * 1 dc in next dc, then ch 2, skip 1 dc *, repeat from *-* the entire round = 26 ch-spaces and 26 dc. REMEMBER THE CROCHET GAUGE! ROUND 6: In first dc work PATTERN GROUP - see explanation above, * 1 dc in next dc, 1 pattern group in next dc *, repeat from *-* until 1 dc remains, 1 dc in last dc = 13 pattern groups with 1 dc between each. Then work piece back and forth. Work every row tog at the end of row with 1 sl st in first st on row. Turn piece. ROW 7 (= from WS): 2 dc in first dc, * 1 pattern group in next pattern group, 2 dc in next dc (= dc-group) *, repeat from *-* until 1 pattern group from previous row remains, 1 pattern group = 13 pattern groups with 13 dc-groups between each. Turn piece. ROW 8: 1 pattern groups in first pattern group, * 2 dc in first dc, 1 dc in each of the next dc in dc-group, 1 pattern group in next pattern group *, repeat from *-* until 1 dc-group remains, 2 dc in first dc, 1 dc in each of the next dc in dc-group = 13 groups with 3 dc between each. Turn piece. ROW 9: 2 dc in first dc, 1 dc in each of the next dc in dc-group, * 1 pattern group in pattern group, 2 dc in first dc of dc-group, 1 dc in each of the next dc *, repeat from *-* until 1 pattern group from previous row remains, 1 pattern group = 13 groups with 4 dc between each. Turn piece. Then repeat 8th and 9th row until 6 rounds + 18-20-22 rows have been worked (= 19-21-23 dc between every pattern group) = 247-273-299 dc and 13 pattern group. Piece measures approx. 20-22-23 cm / 8"-8¾"-9" from middle and outwards. Now work armholes as follows in the different sizes: SIZE S/M: ROW 25 (= from WS): Inc in every groups with dc as before. Work 20 dc, 1 pattern group, 20 dc, work 50 loose ch (= right armhole), skip 2 dc-groups and 2 pattern groups. Then work dc-groups and pattern groups as before over the next 114 dc, work 50 loose ch (= left armhole), skip 2 dc-groups and 2 pattern groups, work as before the rest of row, finish with 1 sl st in first dc on row = 180 dc and 100 ch. Turn piece. ROW 26: Continue with pattern and inc as before but work first ch-row (= left armhole) as follows: 10 dc, skip ch 1, 11 dc, skip ch 1, 1 pattern group, skip ch 1, 11 dc, skip ch 1, 10 dc, skip ch 1, 1 pattern group and skip 1 ch. I next ch-row (= right armhole) work the same way but in opposite order, i.e. beg by skipping ch 1, 1 pattern group and finish with dc = 273 dc. ROW 27-50: Work pattern as before but now inc only on even numbered rows until 50 rows have been worked in total = 429 dc (33 dc in every dc-group). Piece measures approx. 42 cm / 16½" from middle and outwards. Fasten off. SIZE L/XL: ROW 27 (= from WS): Inc in every groups with dc as before. Work 22 dc, 1 pattern group, 22 dc, work 54 loose ch (= right armhole), skip 2 dc-groups and 2 pattern groups. Then work pattern as before over the next 126 dc, work 54 loose ch (= left armhole), skip 2 dc-groups and 2 pattern groups, work as before the rest of row, finish with 1 sl st in first dc on row = 198 dc and 108 ch. Turn piece. ROW 28: Continue with pattern and inc as before but work first ch-row (= left armhole) as follows: 11 dc, skip ch 1, 12 dc, skip ch 1, 1 pattern group, skip ch 1, 12 dc, skip ch 1, 11 dc, skip ch 1, 1 pattern group and skip 1 ch. I second ch-row (= right armhole) work the same way but in opposite order, i.e. beg by skipping ch 1, 1 pattern group and finish with dc = 299 dc. ROW 29-52: Work pattern as before but now inc only on even numbered rows until 52 rows have been worked in total = 455 dc (35 dc in every dc-group). Piece measures approx. 43 cm / 17" from middle and outwards. Fasten off. SIZE XXL/XXXL: ROW 29 (= from WS): Inc in every groups with dc as before. Work 24 dc, 1 pattern group, 24 dc, work 58 loose ch (= right armhole), skip 2 dc-groups and 2 pattern groups. Then work pattern as before over the next 138 dc, work 58 loose ch (= left armhole), skip 2 dc-groups and 2 pattern groups, work as before the rest of row, finish with 1 sl st in first pattern group on row = 216 dc and 116 ch. Turn piece. ROW 30: Continue with pattern and inc as before but work first ch-row (= left armhole) as follows: 12 dc, skip ch 1, 13 dc, skip ch 1, 1 pattern group, skip ch 1, 13 dc, skip ch 1, 12 dc, skip ch 1, 1 pattern group and skip 1 ch. I second ch-row (= right armhole) work the same way but in opposite order, i.e. beg by skipping ch 1, 1 pattern group and finish with dc = 325 dc. ROW 31-54: Work pattern as before but now inc only on even numbered rows until 54 rows have been worked in total = 481 dc and 37 dc in every dc-group. Piece measures approx. 45 cm / 17¾" from middle and outwards. Fasten off. ALL SIZES: Insert 4 markers in the piece as follows from WS: Work 16-17-18, insert 1st marker here, work 17-18-19 dc, * 1 pattern group, 33-35-37 dc *, repeat from *-* 3 more times, insert 2nd marker here (1st-2nd marker = right front piece). Work 1 pattern group, 33-35-37 dc, 1 pattern group, 33-35-37 dc and 1 pattern group, insert 3rd marker here. * Work 33-35-37 dc, 1 pattern group *, repeat from *-* 3 more times, 17-18-19 dc, insert 4th marker. (3rd-4th marker = left front piece). Work the rest of row. Sts between 1st and 4th marker are up towards neck. Cut the yarn and fasten. RIGHT FRONT PIECE: Now work right front piece between 1st and 2nd marker, beg from 2nd marker (i.e. from RS) = 149-158-167 dc and 4 pattern groups. Continue inc on every row in dc-groups as before BUT do not inc in dc-groups in each side of front piece - AT THE SAME TIME dec 2 dc at beg of every row by CROCHET 3 dc TOG - see explanation above. Continue to work until 12-14-16 rows have been worked over front piece. Cut the yarn and fasten. LEFT FRONT PIECE: Work left front piece between 3rd and 4th marker the same way as right front piece, beg from 4th marker (i.e. from RS). SLEEVES: Work back and forth from armhole and down, work every row tog with 1 sl st at the end of row. Use hook size 3.5 mm and Alpaca. Beg by working 86-94-102 dc around the opening for sleeve, beg of row should be under sleeve. Then work 3 rows with 1 dc in every dc. Continue with 1 dc in every dc - AT THE SAME TIME dec in the different sizes as follows: READ DECREASE TIP! SIZE S/M: Dec 1 st in each side of piece every other row 4 times and then every 3rd row 12 times (= 16 times in total) = 54 dc. SIZE L/XL: Dec 1 st in each side of piece alternately every 3rd and 2nd row 18 times in total = 58 dc. SIZE XXL/XXXL: Dec 1 st in each side of piece every other row 17 times and then every 3rd row 4 times (= 21 times in total) = 60 dc. Then work pattern groups as follows: ROW 1: 2 dc, 1 ch * work the next 2 dc tog, 1 ch *, repeat from *-* and finish with 2 dc. ROW 2: Work 2 dc, * in next ch work 1 pattern group, skip 1 ch *, repeat from *-*, and finish with 1 dc in each of the last 2 dc. Turn piece. ROW 3: Work 2 dc, 1 pattern group in each of the next pattern groups until 2 dc remain, work 1 dc in each of these. Turn piece. Repeat 3rd row until piece measures approx. 61 cm / 24" in all sizes. Fasten off. CROCHET EDGE: Work 1 round with around the entire jacket as follows: * 1 pattern group, skip 2 dc/1 row *, repeat from *-* the entire round. |
|
 |
|
Have you finished this pattern?Tag your pictures with #dropspattern #wintersolsticecardigan or submit them to the #dropsfan gallery. Do you need help with this pattern?You'll find 8 tutorial videos, a Comments/Questions area and more by visiting the pattern on garnstudio.com. © 1982-2026 DROPS Design A/S. We reserve all rights. This document, including all its sub-sections, has copyrights. Read more about what you can do with our patterns at the bottom of each pattern on our site. |
|


With over 40 years in knitting and crochet design, DROPS Design offers one of the most extensive collections of free patterns on the internet - translated to 17 languages. As of today we count 324 catalogs and 12290 patterns - 12280 of which are translated into English (US/in).
We work hard to bring you the best knitting and crochet have to offer, inspiration and advice as well as great quality yarns at incredible prices! Would you like to use our patterns for other than personal use? You can read what you are allowed to do in the Copyright text at the bottom of all our patterns. Happy crafting!
Post a comment to pattern DROPS 158-10
We would love to hear what you have to say about this pattern!
If you want to leave a question, please make sure you select the correct category in the form below, to speed up the answering process. Required fields are marked *.