
Popular categories
Looking for a yarn?


Comments / Questions (93)
Ekaterina wrote:
Dear DROPS Design! I need to specify the following: side of the Right Front piece: I work 1 dc on row 2 in the side, then no dc in the side on row 3, then I crochet 1 dc on row 4 but it turns out very long. Then I need to beg row 5 and I have 2 dc (1 dc in the side+1 dc from A1D) in which dc I should crochet the beg of row 5? Help me, please!
12.06.2014 - 00:50DROPS Design answered:
Dear Ekaterina, you dec on the side of right front piece at the end of 1st row worked after division (towards the side), ending with 1 sc/dc, turn and work next row. At the end of next row towards the side, leave the last sc/dc unworked and continue in pattern and dec for neckline as stated. Happy crocheting!
12.06.2014 - 09:00Ekaterina wrote:
Dear DROPS Design, could you help me with A2B the beg of row4: should I skip 5 dc and crochet ch3 in the 5th dc? How is it possible?
10.06.2014 - 17:43DROPS Design answered:
Dear Ekaterina, crochet sl sts in the first 5 dc, then ch 3 (= 1st dc), 2 dc in next sts, then 1 sc in next ch-space. Happy crocheting!
11.06.2014 - 09:47Ekaterina wrote:
Dear DROPS Design, for size "s" how it is possible to continue with 1 sc/dc in each side if it is said work pattern until 0 sc/dc remain?
06.06.2014 - 00:17DROPS Design answered:
Dear Ekaterina, you had 6 sc/dc on each side for body, ie 3 sc/dc for front piece/3 sc/dc for back piece. Skip firt the 2 sc/dc, ie work 1 sc/dc, then repeat pattern and finish with 1 sc/dc. On next row, skip the first sc/dc, start with pattern and finish with pattern leaving last sc/dc unworked. Happy crocheting!
06.06.2014 - 09:09Ekaterina wrote:
Dear DROPS Design! Unfortunately I still have problems with Back Piece: I work size "s" , how should I have 0 sc/dc remain on row? I beg with 1 dc and 2 sc left at the right side? Then continue pattern of the 2 row, should I crochet A1A,A1D and then 1dc in each side?
03.06.2014 - 21:40DROPS Design answered:
Dear Ekaterina, continue as row before until there are not sc/dc left on the sides, ie work A.1B 5 times and A.1C (decrease for amrholes). Happy crocheting!
04.06.2014 - 09:00Ekaterina wrote:
Dear DROPS Design! Could you help me with Back Piece: should I crochet A.1A and A1D after turning piece or not?
31.05.2014 - 20:50DROPS Design answered:
Dear Ekaterina, yes you are correct, A.1A and A.D are beg/end of rows. Happy crocheting!
03.06.2014 - 09:34Ekaterina wrote:
Dear DROPS Design! I'm very grateful for your help!
15.05.2014 - 12:29Ekaterina wrote:
Dear DROPS Design! Should I crochet with 2 sts more in each side until piece measures 35 cm?
14.05.2014 - 19:37DROPS Design answered:
Dear Ekaterina, you increase only 1 time 4 sts, and continue then as before but you will then 2 more sc/dc on each side. Happy crocheting!
15.05.2014 - 13:43Ekaterina wrote:
Dear DROPS Design! Now I'm working in size S. My piece is 15 cm and I need to clarify: after first inc I have 6 sc/dc in each side, after the second inc- 8sc/dc? What does it mean - "continue as before with 2 sc/dc more in each side"? Should I add 2 sc/dc more to 8 sc/dc in each side and have 10 sc/dc in total?
14.05.2014 - 18:04DROPS Design answered:
Dear Ekaterina, between A.1C and A.1B on one side then between A.1C and A.1B on other side you should have 4 sc/dc (excluding the sc/dc relevant to the pattern), you will then inc 1 st before + 1 st after marker on the sides, you will have then 6 sc/dc between A.1C & A.1B on both sides. And continue with the 6 sc/dc without further inc. (Just 1 inc row). Happy crocheting!
15.05.2014 - 13:40Ekaterina wrote:
Dear DROPS Design! Now I'm working in size S. My piece is 15 cm and I need to clarify: after first inc I have 6 sc/dc in each side, after the second inc- 8sc/dc? What does it mean - "continue as before with 2 sc/dc more in each side"? Should I add 2 sc/dc more to 8 sc/dc in each side and have 10 sc/dc in total?
14.05.2014 - 13:50DROPS Design answered:
Dear Ekaterina, you inc only 1 time at the sides, on this inc row you inc 4 sts: 1 before + 1 after each marker. You had 4 sc/dc on each side, you will now have 6 sc/dc on each side, ie the inc are incorporated in the sc/dc on the sides and not into pattern. Happy crocheting!
14.05.2014 - 14:21Ekaterina wrote:
Dear DROPS Design! Could you help me with increasing? VEST part: What is the total number of sc/dc that I should have after all inc in each side?
14.05.2014 - 00:40DROPS Design answered:
Dear Ekaterina, before dividing for armhole, you increase only once 1 stitch (sc/dc) before + 1 st after marker, you that you will have 2 sts more for the sides between pattern, ie 12 sc/dc in size M on both sides. Happy crocheting!
14.05.2014 - 08:21
|
|||||||||||||
Delphine#delphinevest |
|||||||||||||
|
|
|||||||||||||
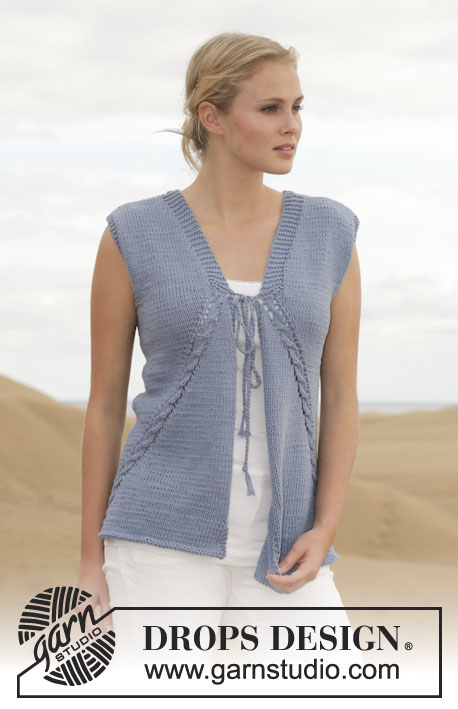
Crochet DROPS vest with fan pattern in ”Muskat”. Size: S - XXXL.
DROPS 153-27 |
|||||||||||||
|
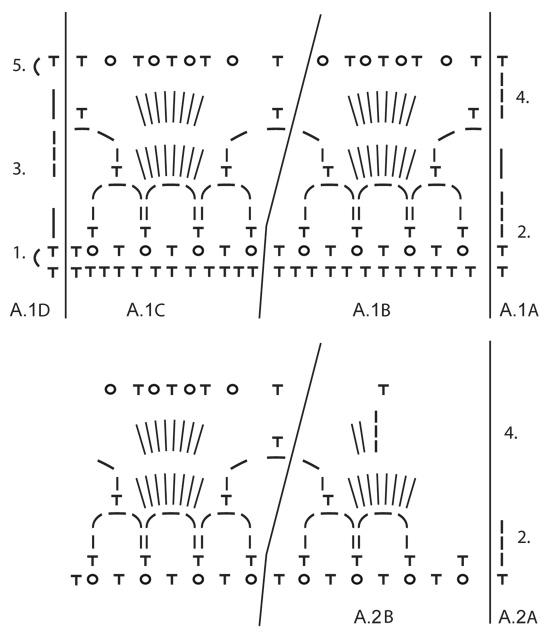
PATTERN: See diagrams A.1 and A.2. In A.1 start to work on the row marked with 1st in the diagram. Repeat rows 2 to 5. In A.2 start to work on the row marked with 2nd in the diagram. SIDE: In the side work dc/sc as shown in diagrams A.1A and A.1D. I.e. Work sc on row 1 and 5 in diagram, work row 2, 3 and 4 with dc. Marker is in the middle of st in each side. -------------------------------------------------------- VEST: Work 155-167-183-199-227-247 LOOSE ch on hook size 4 mm / G/6 with Muskat. Turn piece. Skip 1st ch, then work 1 sc in every ch the entire row = 154-166-182-198-226-246 sc. Insert 1 marker after 39-42-46-50-57-62 sc in from each side (back piece = 76-82-90-98-112-122 sc). Then work as follows (beg on 1st row in diagram): A.1A, repeat A.1B 2-2-2-2-3-3 times, A.1C, 4-10-18-26-16-26 sc/dc in the SIDE - see explanation above -, repeat A.1B 5-5-5-5-7-7 times, A.1C, 4-10-18-26-16-26 sc/dc in the SIDE – see explanation above, repeat A.1B 2-2-2-2-3-3 times, A.1C and A.1D. Continue to work like this until piece measures approx. 15-15-16-16-17-17 cm / 6"-6"-6¼"-6¼"-6¾"-6¾". Now inc 1 sc/dc in each side on each side of each marker one time. Inc by working 2 sc/dc in 1 sc/dc on each side of each marker (= 4 sc/dc inc in total). Continue as before with 2 sc/dc more in each side. Continue like this until piece measures approx. 35-36-37-38-39-40 cm / 13¾"-14¼"-14½"-15"-15¼"-15¾", stop after one whole repetition vertically. Cut the yarn. Now divide the piece and finish each part separately. BACK PIECE: = 3-6-10-14-9-14 sc/dc in each side. Beg by working inside 2-3-7-11-6-11 sc/dc. Work 1-3-3-3-3-3 sc/dc, repeat A.1B 5-5-5-5-7-7 times, A.1C and 1-3-3-3-3-3 sc/dc (2-3-7-11-6-11 sc/dc remain on row), turn piece. Work pattern as before until 0-1-1-1-1-1 sc/dc remain, turn piece. Work pattern as before until 0-1-1-1-1-1 sc/dc remain, turn piece. Work pattern as before until 0-1-1-1-1-1 sc/dc remain, turn piece. Work pattern as before until 0-1-1-1-1-1 sc/dc remain. There are now 1 sc/dc in each side. Continue back and forth with pattern as before and 1 sc/dc in each side. When piece measures approx. 50-52-54-56-58-60 cm / 19¾"-20½"-21¼"-22"-22¾"-23⅝" (stop after whole repetition vertically), divide the piece for neck and finish each shoulder separately. RIGHT SHOULDER: Beg in the side. Work over 1 sc/dc in the side, A.1B 1-1-1-1-2-2 times, A.1C and 1 sc/dc. Continue like this until repetition has been worked vertically. Piece measures approx. 54-56-58-60-62-64 cm / 21¼"-22"-22¾"-23⅝"-24⅜"-25¼". LEFT SHOULDER: Work as right but reversed, (i.e. 2 repetitions mid back = neck). RIGHT FRONT PIECE: = 3-6-10-14-9-14 sc/dc in the side.Start mid front and work as follows: A.1A, repeat A.1B 2-2-2-2-3-3 times, A.1C and 1-3-3-3-3-3 sc/dc (2-3-7-11-6-11 sc/dc remain in the side). Turn piece. Work pattern as before. Turn piece. Work pattern as before until 0-1-1-1-1-1 sc/dc remain in the side, turn piece. Work pattern as before, turn piece. Work pattern as before until 0-1-1-1-1-1 sc/dc remain in the side, turn piece. Work pattern as before. There are now 1 sc/dc in the side. Continue back and forth with pattern as before. AT THE SAME TIME when 1 repetition has been worked vertically after piece was divided, dec for neck. Work as follows from RS: A.2 A, A.2 B, A.1B 1-1-1-1-2-2 times, A.1C, A.1D. When all bind off for armhole and neck are done, work as follows - from mid front: A.1A, A.1B 1-1-1-1-2-2 times, A.1C and A.1D. Continue like this until piece measures approx. 54-56-58-60-62-64 cm / 21¼"-22"-22¾"-23⅝"-24⅜"-25¼" (adjust according to back piece to work the no of repetitions on front piece vertically as on back piece). Fasten off. LEFT FRONT PIECE: Work as right front piece but reversed. ASSEMBLY: Sew the shoulder seams. Sew edge to edge with small stitches to avoid a chunky seam. ARMHOLE EDGE: Work an edge around the armhole as follows: ROUND 1: Beg mid under sleeve. Work ch 1, then work sc around the armhole, finish with 1 sl st in ch from beg of round. ROUND 2: Work ch 3, then work 1 dc in every sc the entire round, finish with 1 sl st in 3rd ch from beg of round. Fasten off. Work the same way around the other armhole. EDGE AROUND BODY: Work an edge around the body. Beg at the bottom of right front piece, work up along front piece, around the neck, down along left front piece and along bottom edge. Work as follows: ROUND 1: Work ch 1, then work sc around the body, finish with 1 sl st in ch from beg of round. ROUND 2: ch 1, then work 1 sc in every sc, finish with 1 sl st in ch from beg of round. ROUND 3: ch 1, then work 1 sc in first sc, * ch 3, then work 1 dc in the first of the ch 3, skip 2 sc, 1 sc in next sc *, repeat from *-* and finish with 1 sl st in ch from beg of round. Fasten off. ASSEMBLY: Sew 2 buttons on left front piece, the top button directly below neck dec and the other approx. 6 cm / 2½" from first button. Button between dc in edge on right front piece. |
|||||||||||||
Diagram explanations |
|||||||||||||
|
|||||||||||||
 |
|||||||||||||
 |
|||||||||||||
Have you finished this pattern?Tag your pictures with #dropspattern #delphinevest or submit them to the #dropsfan gallery. Do you need help with this pattern?You'll find 6 tutorial videos, a Comments/Questions area and more by visiting the pattern on garnstudio.com. © 1982-2026 DROPS Design A/S. We reserve all rights. This document, including all its sub-sections, has copyrights. Read more about what you can do with our patterns at the bottom of each pattern on our site. |
|||||||||||||


With over 40 years in knitting and crochet design, DROPS Design offers one of the most extensive collections of free patterns on the internet - translated to 17 languages. As of today we count 325 catalogs and 12298 patterns - 12288 of which are translated into English (US/in).
We work hard to bring you the best knitting and crochet have to offer, inspiration and advice as well as great quality yarns at incredible prices! Would you like to use our patterns for other than personal use? You can read what you are allowed to do in the Copyright text at the bottom of all our patterns. Happy crafting!
Post a comment to pattern DROPS 153-27
We would love to hear what you have to say about this pattern!
If you want to leave a question, please make sure you select the correct category in the form below, to speed up the answering process. Required fields are marked *.