
Popular categories
Looking for a yarn?


Comments / Questions (93)
![]() Ellen wrote:
Ellen wrote:
Good day. Can you please help me with the following pattern 15327. I'm starting over as the pattern for XL did not workout... I'm trying L now. The back piece stated: =3-6-10-14-9-14 sc/dc in each side. I'm working on 10 for Large but not sure what "in each side" means? I'm a bit confused about how to follow the pattern for the back piece. Can you please help me? Kind regards. Thank you.
29.09.2023 - 11:22DROPS Design answered:
Dear Ellen on the previous pattern for body you worked 26 sc/dc on the sides; back piece starts and ends with 14 of these sts on each side (the last 14 sc/dc on one side and the first 14 sc/dc on the other side). Happy crocheting!
02.10.2023 - 08:40
![]() Ellen wrote:
Ellen wrote:
Good day, Can you please help me with the back piece pattern of the Drops 15327. I'm new to this type of pattern. And really struggle to get the back piece pattern to work out. Thank you
01.09.2023 - 19:30DROPS Design answered:
Dear Ellen, could you please specify which part of the back piece is giving you trouble? You work something similar to short rows, where you work the pattern until some stitches of the row are left and turn the piece, so you will be leaving some stitches at the end of the rows unworked. Happy crocheting!
03.09.2023 - 19:28
![]() Ellen Imrie wrote:
Ellen Imrie wrote:
Hi. I'm struggling to understand the diagram it's my first time trying to work on diagram. Can you please explain the second and third rows to me? Thank you. It seems like the number of chains for the bust 106cm size is incorrect? In the end I've made it 195 chains instead of 199 chains in order for the pattern to work out from the 3rd row. Thank you
16.08.2023 - 09:59DROPS Design answered:
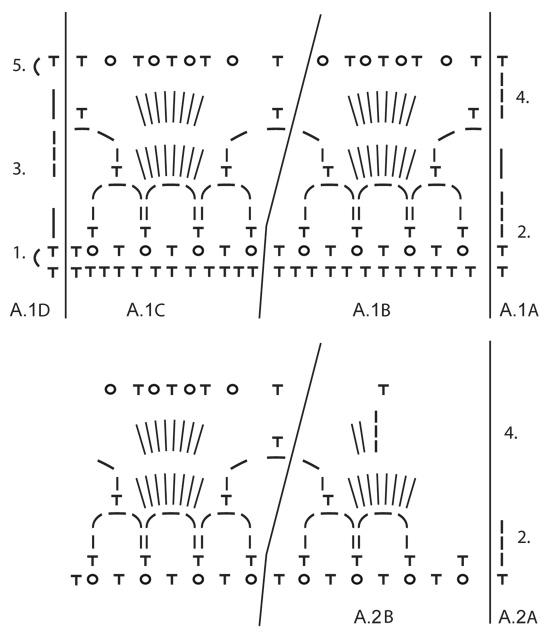
Dear Mrs Imrie, you start with 199 chains and work the 198 stitches from first row as follows: A.1A (= 1 dc), repeat A.1B a total of 2 times (= 12 sts 2 times = 24 sts), work A.1C (= 12 sts), then work 26 dc/tr (UK-English), work A.1B a total of 5 times (= 12 x 5=60 sts), A.1C (= 12 sts), 26 dc/tr, A.1B x 2 times (24 sts), A.1C (= 12 sts), A.1D (= 1 st)= 1+24+12+26+60+12+26+24+12+1=198 sts. On 2nd row there are 3 chain-space in each A.1B/A.1C = 9 ch-spaces on each front piece and 18 ch-spaces on back piece. Hope it can help. Happy crocheting!
16.08.2023 - 14:30
![]() Andrea wrote:
Andrea wrote:
Ich habe genau nach Anleitung für Größe L gehäkelt. Jetzt bin ich mit dem linken Vorderteil noch nicht fertig, und auch die Umrandung fehlt noch. Die 350g Muskat Baumwollgarn reichen nicht aus!!!! Ich muss jetzt nochmal ein Knäuel nachbestellen und wiederum über 5 € Versandkosten bezahlen. Das ärgert mich schon sehr😖. Gibt es eine Möglichkeit, die Versandkosten zu sparen? VG Andrea
06.06.2023 - 12:04DROPS Design answered:
Liebe Andrea, es tut uns leid, daß Sie nicht genügend Garne hatten, stimmt Ihre Maschenprobe in der Breite sowie in der Höhe? Wenden Sie sich bitte direkt an Ihrem DROPS Händler, dort kann man Ihnen weiterhelfen. Danke im voraus für Ihr Veständnis.
06.06.2023 - 14:07
![]() Ingrid wrote:
Ingrid wrote:
Hoeveel minderingen moet ik maken aan de halszijde van het linker en rechtervoorpand en hoe doe ik dat?
09.05.2023 - 09:42DROPS Design answered:
Dag Ingrid,
De minderingen zijn verwerkt in A.2. Je kunt dus gewoon het telpatroon blijven volgen.
11.05.2023 - 20:57
![]() Ingrid wrote:
Ingrid wrote:
Ik kom bij lange na niet uit met de hoeveelheid voorgeschreven garen; veel te weinig.
05.05.2023 - 13:34
![]() Ingrid wrote:
Ingrid wrote:
Ik snap de eerste toer van het telpatroon A1 al niet. Als ik 1x A.1.a, 3x A.1.b, 1x A.1.c, 16 vasten voor de zijkant, 3 x A.1.b, A.1.c en A.1.d haak, kom ik absoluut niet uit met het aantal steken (ik houd er nog veel over in die toer). Overigens is het voor maat XXL. Kunt u mij verdere uitleg geven?
03.05.2023 - 17:21DROPS Design answered:
Dag Ingrid,
Heb je gezien dat er niet in elke steek van de vorige toer gehaakt wordt. Dus de picot haak je over 2 vasten en daartussen steeds 1 vaste boven 1 vaste van de vorige toer.
08.05.2023 - 21:21
![]() DANIELA wrote:
DANIELA wrote:
SCUSATEMI CHE VI DISTURBO OGNI TANTO OVVERO SEMPRE, MA QUESTO MODELLO è ESTIVO O AUTUNNO? PERCHE VEDO SCRITTO UNCINETTO N 4.00 MM
19.04.2023 - 19:26DROPS Design answered:
Buonasera Daniela, è un modello lavorato in cotone con l'uncinetto n° 4 mm. Si ricordi di scrivere in minuscolo la prossima volta. Buon lavoro!
20.04.2023 - 21:14
![]() Isa wrote:
Isa wrote:
Liebes Team, ich stehe irgendwie total auf der Leitung. Ich habe jetzt die Reihe feste Maschen gehäkelt und die Markierer links jnd rechts platziert. Nun ist mir nur nicht ganz klar, ob ich die Arbeit über die ganze Länge häkele, oder nur mit dem Rückenteil beginne. Nach 16 cm nehme ich dann 2 Maschen beidseitig zu und nach insgesamt 38 cm (bei Gr. XL) teile ich erst in Rückenteil und Seitenteile, oder ? Beim Rückenteil steht dann z.B. 3 fM/Stb. Was muss ich da nun häkeln? fM oder Stb ?
31.05.2022 - 21:11DROPS Design answered:
Liebe Isa, die Jacke beginnen Sie mit dem Rumpfteil, dh rechtes Vorderteil + Rückenteil und linkes Vorderteil stricken Sie in einem Teil bis Armlöcher, dann häkeln Sie jedes Teil separat. Sie häkeln die Diagramme: A.1A, 2 x A.1B , A.1C (= Vorderteil), 26 fm/Stb (= Seite), 5 x A.1B, A.1C (= Rückenteil), 26 fm/Stb (Seite), 2xA.1B, A.1C, A.1D (= Vorderteil). Die Markierungen sind in den Seiten, wo Sie nur fm/Stb häkeln = 28 fm/Stb nach den Zunahmen; dann sind es 14 fm/Stb zwischen den Markierer für Rückenteil. Viel Spaß beim häkeln!
01.06.2022 - 08:16
![]() Josephine Spiteri wrote:
Josephine Spiteri wrote:
Thank you for your lovely patterns, however I would prefare if all rows were written one by one as the diagrams are too complicated for me. As of last year there were the written pattern accompanied by the diagram. Thank you.
23.04.2022 - 18:06
|
|||||||||||||
Delphine#delphinevest |
|||||||||||||
|
|
|||||||||||||
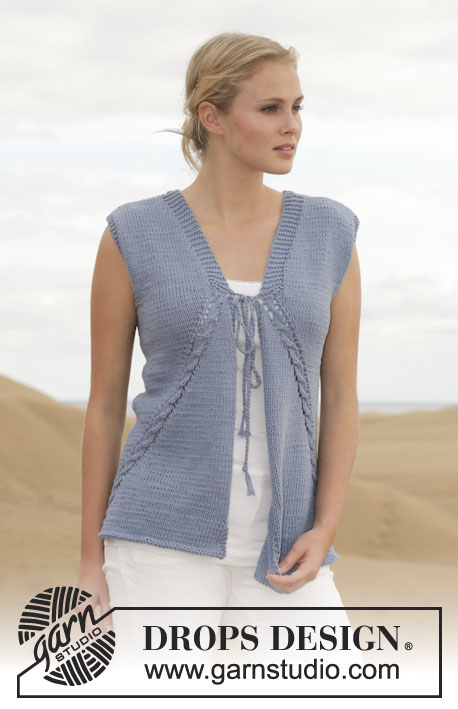
Crochet DROPS vest with fan pattern in ”Muskat”. Size: S - XXXL.
DROPS 153-27 |
|||||||||||||
|
PATTERN: See diagrams A.1 and A.2. In A.1 start to work on the row marked with 1st in the diagram. Repeat rows 2 to 5. In A.2 start to work on the row marked with 2nd in the diagram. SIDE: In the side work dc/sc as shown in diagrams A.1A and A.1D. I.e. Work sc on row 1 and 5 in diagram, work row 2, 3 and 4 with dc. Marker is in the middle of st in each side. -------------------------------------------------------- VEST: Work 155-167-183-199-227-247 LOOSE ch on hook size 4 mm / G/6 with Muskat. Turn piece. Skip 1st ch, then work 1 sc in every ch the entire row = 154-166-182-198-226-246 sc. Insert 1 marker after 39-42-46-50-57-62 sc in from each side (back piece = 76-82-90-98-112-122 sc). Then work as follows (beg on 1st row in diagram): A.1A, repeat A.1B 2-2-2-2-3-3 times, A.1C, 4-10-18-26-16-26 sc/dc in the SIDE - see explanation above -, repeat A.1B 5-5-5-5-7-7 times, A.1C, 4-10-18-26-16-26 sc/dc in the SIDE – see explanation above, repeat A.1B 2-2-2-2-3-3 times, A.1C and A.1D. Continue to work like this until piece measures approx. 15-15-16-16-17-17 cm / 6"-6"-6¼"-6¼"-6¾"-6¾". Now inc 1 sc/dc in each side on each side of each marker one time. Inc by working 2 sc/dc in 1 sc/dc on each side of each marker (= 4 sc/dc inc in total). Continue as before with 2 sc/dc more in each side. Continue like this until piece measures approx. 35-36-37-38-39-40 cm / 13¾"-14¼"-14½"-15"-15¼"-15¾", stop after one whole repetition vertically. Cut the yarn. Now divide the piece and finish each part separately. BACK PIECE: = 3-6-10-14-9-14 sc/dc in each side. Beg by working inside 2-3-7-11-6-11 sc/dc. Work 1-3-3-3-3-3 sc/dc, repeat A.1B 5-5-5-5-7-7 times, A.1C and 1-3-3-3-3-3 sc/dc (2-3-7-11-6-11 sc/dc remain on row), turn piece. Work pattern as before until 0-1-1-1-1-1 sc/dc remain, turn piece. Work pattern as before until 0-1-1-1-1-1 sc/dc remain, turn piece. Work pattern as before until 0-1-1-1-1-1 sc/dc remain, turn piece. Work pattern as before until 0-1-1-1-1-1 sc/dc remain. There are now 1 sc/dc in each side. Continue back and forth with pattern as before and 1 sc/dc in each side. When piece measures approx. 50-52-54-56-58-60 cm / 19¾"-20½"-21¼"-22"-22¾"-23⅝" (stop after whole repetition vertically), divide the piece for neck and finish each shoulder separately. RIGHT SHOULDER: Beg in the side. Work over 1 sc/dc in the side, A.1B 1-1-1-1-2-2 times, A.1C and 1 sc/dc. Continue like this until repetition has been worked vertically. Piece measures approx. 54-56-58-60-62-64 cm / 21¼"-22"-22¾"-23⅝"-24⅜"-25¼". LEFT SHOULDER: Work as right but reversed, (i.e. 2 repetitions mid back = neck). RIGHT FRONT PIECE: = 3-6-10-14-9-14 sc/dc in the side.Start mid front and work as follows: A.1A, repeat A.1B 2-2-2-2-3-3 times, A.1C and 1-3-3-3-3-3 sc/dc (2-3-7-11-6-11 sc/dc remain in the side). Turn piece. Work pattern as before. Turn piece. Work pattern as before until 0-1-1-1-1-1 sc/dc remain in the side, turn piece. Work pattern as before, turn piece. Work pattern as before until 0-1-1-1-1-1 sc/dc remain in the side, turn piece. Work pattern as before. There are now 1 sc/dc in the side. Continue back and forth with pattern as before. AT THE SAME TIME when 1 repetition has been worked vertically after piece was divided, dec for neck. Work as follows from RS: A.2 A, A.2 B, A.1B 1-1-1-1-2-2 times, A.1C, A.1D. When all bind off for armhole and neck are done, work as follows - from mid front: A.1A, A.1B 1-1-1-1-2-2 times, A.1C and A.1D. Continue like this until piece measures approx. 54-56-58-60-62-64 cm / 21¼"-22"-22¾"-23⅝"-24⅜"-25¼" (adjust according to back piece to work the no of repetitions on front piece vertically as on back piece). Fasten off. LEFT FRONT PIECE: Work as right front piece but reversed. ASSEMBLY: Sew the shoulder seams. Sew edge to edge with small stitches to avoid a chunky seam. ARMHOLE EDGE: Work an edge around the armhole as follows: ROUND 1: Beg mid under sleeve. Work ch 1, then work sc around the armhole, finish with 1 sl st in ch from beg of round. ROUND 2: Work ch 3, then work 1 dc in every sc the entire round, finish with 1 sl st in 3rd ch from beg of round. Fasten off. Work the same way around the other armhole. EDGE AROUND BODY: Work an edge around the body. Beg at the bottom of right front piece, work up along front piece, around the neck, down along left front piece and along bottom edge. Work as follows: ROUND 1: Work ch 1, then work sc around the body, finish with 1 sl st in ch from beg of round. ROUND 2: ch 1, then work 1 sc in every sc, finish with 1 sl st in ch from beg of round. ROUND 3: ch 1, then work 1 sc in first sc, * ch 3, then work 1 dc in the first of the ch 3, skip 2 sc, 1 sc in next sc *, repeat from *-* and finish with 1 sl st in ch from beg of round. Fasten off. ASSEMBLY: Sew 2 buttons on left front piece, the top button directly below neck dec and the other approx. 6 cm / 2½" from first button. Button between dc in edge on right front piece. |
|||||||||||||
Diagram explanations |
|||||||||||||
|
|||||||||||||
 |
|||||||||||||
 |
|||||||||||||
Have you finished this pattern?Tag your pictures with #dropspattern #delphinevest or submit them to the #dropsfan gallery. Do you need help with this pattern?You'll find 6 tutorial videos, a Comments/Questions area and more by visiting the pattern on garnstudio.com. © 1982-2026 DROPS Design A/S. We reserve all rights. This document, including all its sub-sections, has copyrights. Read more about what you can do with our patterns at the bottom of each pattern on our site. |
|||||||||||||


With over 40 years in knitting and crochet design, DROPS Design offers one of the most extensive collections of free patterns on the internet - translated to 17 languages. As of today we count 325 catalogs and 12298 patterns - 12288 of which are translated into English (US/in).
We work hard to bring you the best knitting and crochet have to offer, inspiration and advice as well as great quality yarns at incredible prices! Would you like to use our patterns for other than personal use? You can read what you are allowed to do in the Copyright text at the bottom of all our patterns. Happy crafting!
Post a comment to pattern DROPS 153-27
We would love to hear what you have to say about this pattern!
If you want to leave a question, please make sure you select the correct category in the form below, to speed up the answering process. Required fields are marked *.