
Popular categories
Looking for a yarn?


Comments / Questions (198)
![]() Beth Segars wrote:
Beth Segars wrote:
I am using a C hook. three rows makes 2.5 inches not 4 rows.
22.08.2019 - 19:45DROPS Design answered:
Dear Mrs Segars, Hook size is only a suggestion! If you have too many stitches on 10 cm = 4” switch to larger hook. If you have too few stitches on 10 cm = 4” switch to smaller hook. read more about tension here. Happy crocheting!
23.08.2019 - 09:05
![]() Anne-Li Richter wrote:
Anne-Li Richter wrote:
Hej igen, Min sista fråga - är det viktigt att det är En jämt antal i rutor som diagrammet visar? Jag har gjort större rutor (12x12 cm) och när jag omvandlar till strl XL blir det inte bra med jämt antal, jag hade behövt lägga till men då blir det ojämnt antal rutor? Hoppas du förstår hur jag menar :) Önskar en fin sommar.
13.07.2019 - 16:27DROPS Design answered:
Hei Ann-Li. Det er et jevnt antall ruter for å få det likt på begge sider. Om du har gjort rutene større og må bruke at ujevnt antall ruter blir det ulikt på frem og baksiden. Mvh Drops design
26.08.2019 - 11:11
![]() Anne-Li Richter wrote:
Anne-Li Richter wrote:
Hej igen, tusen tack för ert snabba svar:) Hur ser mönstret ut för ärmar, finns det någonstans? Det är storlek XL jag skall göra. Jag är lite nybörjare så kanske dumma frågor.
11.07.2019 - 15:55DROPS Design answered:
Hei Anne-Li. Det finnes ingen dumme spørsmål :) Etter at du har lagt opp ruter til for- og bakstykkene sitter du igjen med 40 ruter i størrelse L/XL - disse skal fordeles over 2 ermer. Det finnes ikke noe mønster for dette, bare forklaringen i teksten. Du har da altså 20 ruter til hver erme som fordeles slik at du har 4 ruter i bredden og 5 ruter i høyden. Du må også hekle 1 ermkile til hvert erme (som utgjør undersiden av ermene), og hekles for at ermet skal være videre øverste enn nederst. God fornøyelse
12.07.2019 - 08:28
![]() Anne-Li Richter wrote:
Anne-Li Richter wrote:
Jag skall göra koftan längre. För att jag skall räkna hur många rutor mer som skall göras. Men får inte kläm på vilket som är framsida resp baksida på koftan i diagrammet? Vh Anne-Li
10.07.2019 - 21:32DROPS Design answered:
Hei Anne-Li. Diagrammene som er i 1 helt stykke (til venstre på en pc-skjerm) er bakstykket. Diagrammet som er delt i 2 er forstykkene på jakken. God fornøyelse
11.07.2019 - 12:51
![]() Jette Fürsterling wrote:
Jette Fürsterling wrote:
Hvis man ønsker at hækle den i ensfarvet. Hvor mange nøgler garn skal man så bruge? Summer patchwork by DROPS Design Hæklet DROPS jakke i ”Alpaca” med ¾-lange ærmer og bedstemorruder. Str S - XXXL
16.06.2019 - 10:47DROPS Design answered:
Hei Jette. Det har vi dessverre ikke oversikt over. Men du kan se på andre heklede modeller i Alpaca for å få en ide om granmengde. søk på jakke og filtrer søket ditt med "hekle" og "Alpaca" så vil du få opp fler ensfargede modeller. God fornøyelse
17.06.2019 - 08:23
![]() Jette Fürsterling wrote:
Jette Fürsterling wrote:
Hvis man ønsker at hækle den i ensfarvet. Hvor mange nøgler garn skal man så bruge?
16.06.2019 - 10:16DROPS Design answered:
Hei Jette. Se svar over :)
17.06.2019 - 08:24
![]() Merche wrote:
Merche wrote:
Como se hace para reducir en el ancho de la manga? Gracias
21.05.2019 - 09:26DROPS Design answered:
Hola Merche. Para darle forma a la manga tenemos que trabajar una nesga (una pieza triangular para darle el ancho que necesita la manga). Esta pieza puede ser más ancha o más estrecha según el ancho que quieras de la manga.
25.05.2019 - 19:09
![]() Marisa Santomaso wrote:
Marisa Santomaso wrote:
Per favore mi dice come viene cucito allo scalfo il rinforzo manica nella parte divisa in due? Grazie
29.04.2019 - 21:23DROPS Design answered:
Buongiorno Marisa. Deve cucirlo allo scalfo sul davanti e allo scalfo sul dietro. Buon lavoro!
29.04.2019 - 22:04
![]() Marisa Santomaso wrote:
Marisa Santomaso wrote:
La ringrazio della risposta. Preparo i due rinforzi manica, se avrò ancora problemi mi permetto di chiedere ancora. Buona giornata
29.04.2019 - 12:19
![]() Marisa Santomaso wrote:
Marisa Santomaso wrote:
Buongiorno, non trovo molto chiare le istruzioni del rinforzo maniche, grazie se posso avere chiarimenti, per esempio quanti saranno i punti finali, partendo dai 6 iniziali. Inoltre ho confezionato la giacca in taglia M, però con manica lunga e non 3/4. Il rinforzo comincia dal polso? Grazie
29.04.2019 - 11:27DROPS Design answered:
Buongiorno Marisa. Il rinforzo per le maniche, è una parte che si lavora separatamente e che serve per allargare la manica nella parte sotto l'ascella. E' la parte lavorata in panna che si scorge nella fotografia. Dopo gli aumenti avrà 30 maglie (6 m iniziali + 24 m aumentate). Anche se le maniche sono lunghe e non a 3/4, lavora il rinforzo con le misure indicate. Buon lavoro!
29.04.2019 - 12:05
|
|
Summer Patchwork#summerpatchworkcardigan |
|
 |
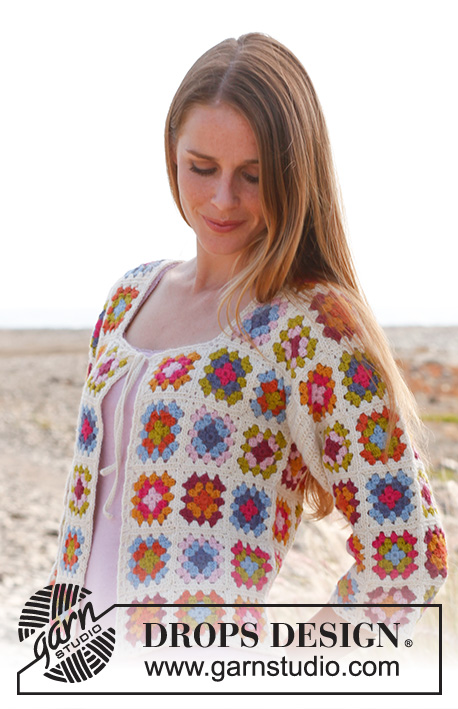 |
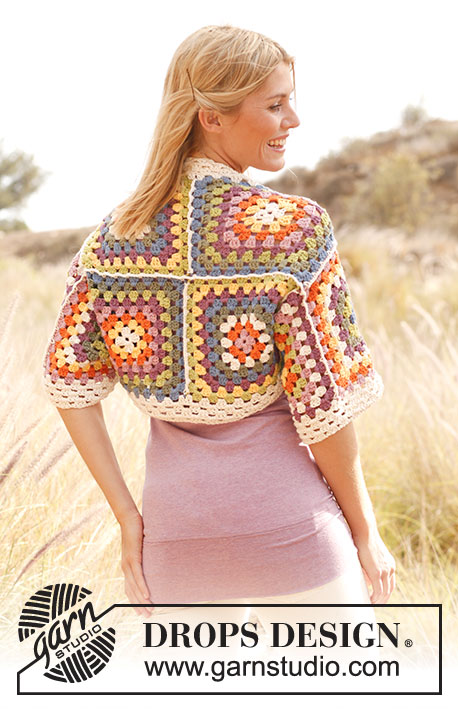
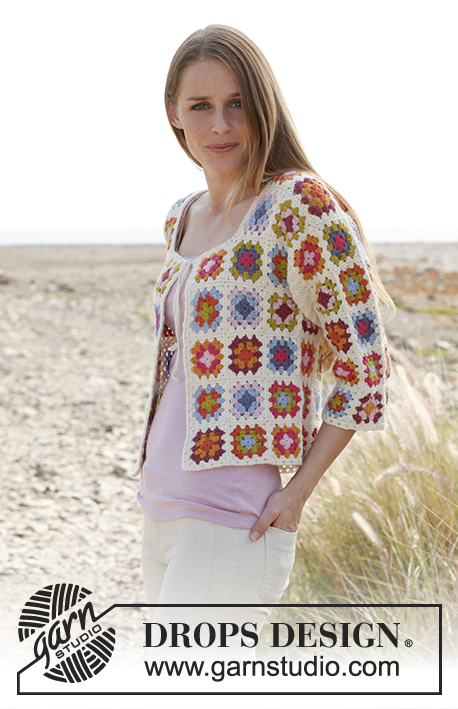
Crochet DROPS jacket with ¾ sleeves and granny squares in ”Alpaca”. Size: S - XXXL
DROPS 147-9 |
|
|
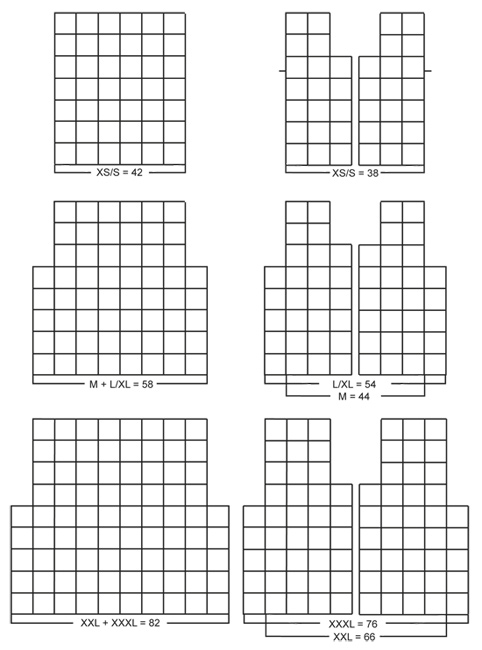
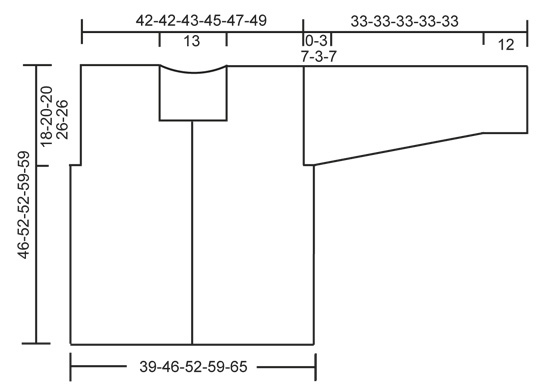
COLORS ON SQUARES: Last round (= color 4) on all squares is off white. SQUARE A: Color 1 = lime, color 2 = orange, color 3 = light blue. SQUARE B: Color 1 = goldenrod, color 2 = light pink, color 3 = dark pink. SQUARE C: Color 1 = light blue, color 2 = lime, color 3 = orange. SQUARE D: Color 1 = dark pink, color 2 = light pink, color 3 = lime. SQUARE E: Color 1 = light pink, color 2 = pink, color 3 = goldenrod. SQUARE F: Color 1 = pink, color 2 = gray purple, color 3 = light blue. SQUARE G: Color 1 = gray purple, color 2 = light blue, color 3 = light pink. SQUARE H: Color 1 = pink, color 2 = gray purple, color 3 = lime. SQUARE I: Color 1 = orange, color 2 = goldenrod, color 3 = dark pink. SQUARE J: Color 1 = light blue, color 2 = lime, color 3 = pink. GRANNY SQUARE: Ch 6 on hook size 3 mm / C with color 1 and form a ring with 1 sl st in first ch. ROUND 1 (color 1): ch3 , 2 dc in ch-ring, * ch 3, 3 dc in ch-ring *, repeat from *-* a total of 3 times and finish with 3 ch and 1 sl st in 3rd ch from beg of round. Turn piece. ROUND 2 (color 2): ch3 , 2 dc in first ch-space, ch 3, 3 dc in same ch-space, * ch 1, 3 dc in next ch-space, ch 3, 3 dc in same ch-space *, repeat from *-* a total of 3 times and finish with 1 ch and 1 sl st in 3rd ch from beg of round. Turn piece. ROUND 3 (color 3): ch3 , 2 dc in first ch-space, ch 1, * 3 dc in next ch-space, ch 3, 3 dc in same ch-space, ch 1, 3 dc in next ch-space, 1 ch *, repeat from *-* a total of 3 times, 3 dc in next ch-space, ch 3, 3 dc in same ch-space, 1 ch and finish with 1 sl st in 3rd ch from beg of round. Turn piece. ROUND 4 (color 4): ch3 , 2 dc in first ch-space, ch 1, * 3 dc in next ch-space, ch 3, 3 dc in same ch-space, ch 1, 3 dc in next ch-space, ch 1, 3 dc in next ch-space, 1 ch *, repeat from *-* a total of 3 times, 3 dc in next ch-space, ch 3, 3 dc in same ch-space, ch 1, 3 dc in next ch-space, 1 ch and finish with 1 sl st in 3rd ch from beg of round. Cut the yarn. 1 square measures approx. 6.5 x 6.5 cm / 2½" x 2½". Work 12-14-15-20-21 squares of every color combination, work in addition 0-2-2-8-8 extra squares (choose your own color combination on these squares) = 120-142-152-208-218 squares in total. SLEEVE GUSSET: Work a piece with dc shaped as a gusset to be sewn under sleeve so it is wider at the top than the at bottom. Replace first dc on every row with 3 ch. Work 7-8-8-8-8 ch on hook size 3 mm / C with off white. Turn and work 1 dc in 4th ch from hook, then work 1 dc in the remaining 3-4-4-4-4 ch = 5-6-6-6-6 dc. Continue back and forth with 1 dc in every dc until piece measures 10 cm / 4". READ ALL OF THE FOLLOWING SECTION BEFORE FINISHING! On next row inc 1 dc in each side by working 2 dc in next to last dc in each side. Repeat inc every 3-2-2-2-2 rows a total of 9-12-12-12-12 times. NOTE: In size XS/S continue with 1 dc in every dc until piece measures 33 cm / 13". In sizes M and XXL divide the piece in the middle when it measures 30 cm / 11¾", then work each side separately with 1 dc in every dc until piece measures 33 cm / 13". In sizes L/XL and XXXL divide the piece in the middle when it measures 26 cm / 10¼", then work each side separately, when inc is done, with 1 dc in every dc until piece measures 33 cm / 13". The piece is divided in the 4 largest sizes because of dec for armholes. This is not done in the smallest size. Work another sleeve gusset. Place the squares tog for back and front piece as shown on diagram – you can choose in which order you want to put the squares. Distribute the remaining 40-40-40-60-60 squares for 2 sleeves, with 20-20-20-30-30 squares on each sleeve. In the 3 smallest sizes there should be 4 x 5 squares and in the 2 largest sizes there should be 6 x 5 squares - there are 5 squares vertically in all sizes. Sew the squares tog edge to edge with off white. Sew sleeve gusset to each side of squares on sleeves and sew sleeves in body – with the widest part of gusset in the bottom of armhole. Then sew the side seams and shoulder seams the same way – NOTE: In sizes M and XXL there is 1 row with squares in the middle of each side under armhole, in sizes L/XL and XXXL there are 2 rows with squares in each side under armhole. Work around the entire jacket with off white as follows (beg mid back of neck): 1 sc in 1 ch at the edge of 1 square, ch 3 and 2 dc in same ch, * ch 1, 3 dc in next ch *, repeat from *-*. NOTE: In the corners faced inwards work as follows: 1 dc in last ch before corner, 1 dc in the corner and 1 dc in first ch after corner. In the corners faced outwards work as follows: 3 dc in ch-space in the corner on square, 3 ch and 3 more dc in the same ch-space. In every corner at the top by neck also work a tie as follows: 3 dc in ch-space in the corner on square, then work loose ch for approx. 28 cm / 11", turn and work 1 sc in every ch on the way back, then 3 dc in the same ch-space in the corner. Work the same way at bottom around the sleeves – over the section between the squares work as follows: * 1 dc in each of the first 3 dc, ch 1, skip 1 dc *, repeat from *-*. |
|
 |
|
 |
|
Have you finished this pattern?Tag your pictures with #dropspattern #summerpatchworkcardigan or submit them to the #dropsfan gallery. Do you need help with this pattern?You'll find 9 tutorial videos, a Comments/Questions area and more by visiting the pattern on garnstudio.com. © 1982-2026 DROPS Design A/S. We reserve all rights. This document, including all its sub-sections, has copyrights. Read more about what you can do with our patterns at the bottom of each pattern on our site. |
|


With over 40 years in knitting and crochet design, DROPS Design offers one of the most extensive collections of free patterns on the internet - translated to 17 languages. As of today we count 325 catalogs and 12298 patterns - 12288 of which are translated into English (US/in).
We work hard to bring you the best knitting and crochet have to offer, inspiration and advice as well as great quality yarns at incredible prices! Would you like to use our patterns for other than personal use? You can read what you are allowed to do in the Copyright text at the bottom of all our patterns. Happy crafting!
Post a comment to pattern DROPS 147-9
We would love to hear what you have to say about this pattern!
If you want to leave a question, please make sure you select the correct category in the form below, to speed up the answering process. Required fields are marked *.