
Popular categories
Looking for a yarn?


Comments / Questions (190)
![]() Dicky wrote:
Dicky wrote:
Rugpand eindigt NIET elke stokjesregel met een halve vaste in de 3e losse, maar met een stokje hierin. Je krijgt zo een rechte zijkant.Het Noorse patroon is niet juist en dus uw vertaling ook niet. Ik maak het vestje met een stokje aan het eind. gr Dicky
17.08.2014 - 00:19DROPS Design answered:
Hoi Dicky. Het patroon en vertaling is correct. Voor het achterpand staat: "Haak 1 stk in de 4e l van de haak, * 1 stk in iedere van de volgende 3 l, sla 1 l over *, herhaal van *-*, en eindig met 1 stk in iedere van de laatste 2-2-2-3 l = 58-64-70-74 stk. Haak dan 1 stk in ieder stk." Haak je toeren in de rondte (Rand), dan moet je wel eindigen met een halve vaste in de 3e l van het begin van de toer (of te wel het eerste "stokje" van de toer).
18.08.2014 - 14:12
![]() Constanze wrote:
Constanze wrote:
Ich habe es selbst rausgefunden ... :-) Jetzt hat es geklappt und sieht super aus
27.07.2014 - 11:47DROPS Design answered:
Liebe Constanze, schön, dass Ihnen der Bolero nun so gut gelungen ist, dann haben sich ja alle Fragen erübrigt. :-) Falls nicht, melden Sie sich einfach noch mal. Viel Spaß beim Tragen!
28.07.2014 - 09:41
![]() Constanze wrote:
Constanze wrote:
Häkele ich den Ärmel komplett zusammen.? Oder nur bis zu den aufgenommenen Maschen ? Wenn ich den Ärmel auf die ganze Länge zusammen häkele, ist die Schulteröffnung viel zu klein für die am Bolero... Blöde Frage, aber es ist mein erstes Häkelprojekt
27.07.2014 - 11:04DROPS Design answered:
Liebe Constanze, wir haben die Maschenzahlen des Ärmels kurz überprüft und es sollte alles korrekt sein. Bitte wenden Sie sich für Häkelhilfe (bezüglich Schliessen der Ärmelnaht etc.) an den Laden, in dem Sie die Wolle gekauft haben.
14.08.2014 - 15:43
![]() Constanze wrote:
Constanze wrote:
Ich muss sagen, der Ärmel gefällt mir gar nicht... Mittig sieht er aus wie ein Sack. Selbst bei Größe S. Muss ich den Ärmel unbedingt separat häkeln, oder kann ich auch am Armausschnitt des fertigen Bolero ansetzen ?
27.07.2014 - 10:10
![]() Constanze wrote:
Constanze wrote:
Der Bolero und der erste Ärmel sind fertig. Die Armöffnung am Bolero ist im Vergleich zum Ärmel recht groß, ist das so korrekt, oder habe ich etwas falsch gemacht ? Die Maschenanzahl stimmt allerdings. Wie befestige ich jetzt den Ärmel am Bolero ?
27.07.2014 - 10:04
![]() Oursette wrote:
Oursette wrote:
Bonjour, Merci pour ce beau modèle. J'ai une question concernant l'augmentation des 30 mailles de la bordure pour la taille S. Il est écrit d'augmenter 30 mailles à intervalles réguliers. Faut-il augmenter 2 mailles par rang? Ou bien les 30 dans le même rang? De plus, il est écrit que le total serait alors de 294. Or le précédent comptage est de 204. Comment passe-t-on de 204 à 294 en augmentant 30 mailles ? Merci pour votre aide.
26.07.2014 - 20:37DROPS Design answered:
Bonjour Oursette, on augmente 3 fois 30 m à intervalles réguliers, la 1ère fois à 5 cm puis à 10 et enfin à 15 cm, on aura donc 234 m après la 1ère augm, puis 264 et enfin 294 m quand toutes les augmentations sont faites. Bon crochet!
28.07.2014 - 09:25
![]() Jane wrote:
Jane wrote:
Jag blir lite konfyst, min ärm verkar bli bredast i mitten? På mönsterbilden verkar den bli bredare längst in men i beskrivningen ska man ju minska av den i flera varv i slutet? Ska ärmen sus fast ända dit man börjar avmaska?
09.07.2014 - 19:42DROPS Design answered:
Ja det stämmer, ärmen skall sys ända dit man börjar avmaska så den passar i ärmhålet. Lycka till!
05.09.2014 - 12:30
![]() Mara wrote:
Mara wrote:
Ho un problema con gli aumenti dopo i primi 5 cm. del bordo grande. Nella taglia S dite che partendo da 204 m.b. bisogna distribuire 30 aumenti nel corso del giro e poi scrivete "= 294 maglie" non dovrebbero essere 234? Non capisco cosa sbaglio. Grazie
01.07.2014 - 21:34DROPS Design answered:
Buonasera Mara. Le 30 m vengono aumentate 3 volte, quando il bordo misura 5, 10 e 15 cm. Quindi, in tutto aumenta 30 x 3 = 90 m arrivando così a 294 m . Ci riscriva se non è chiaro. Buon lavoro!
01.07.2014 - 21:55
![]() Elly wrote:
Elly wrote:
Ik wil dit vestje gaan maken maar dan met lange mouw. Is dit makkelijk te doen door alleen de mouwen te verlengen of raakt het patroon dan uit model ? Bestaat er dan nog een ander patroon maar dan mét lange mouw ?
10.06.2014 - 16:16DROPS Design answered:
Hoi Elly. Ja, dat denk ik wel mogelijk is, maar we hebben geen beschrijving voor een lange mouw voor dit model. Je kan de mouw verlengen en dan de meerderingen met een wat grotere afstand doen of vind een soortgelijk patroon in onze database met lange mouwen en gebruik dat patroon voor de mouwen.
11.06.2014 - 17:07
![]() Mary wrote:
Mary wrote:
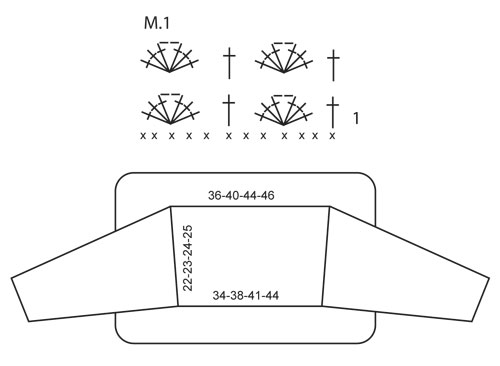
Could you please explain the M.1 diagram. I am not sure what to do
02.06.2014 - 15:01DROPS Design answered:
Dear Mary, in the diagram 1 symbol = 1 st, on row 1, you will work *1 dc in first st, skip 2 sc from previous round, in next sc work 3 dc, 2 ch, 3 dc, skip 2 sc from previous round* and repeat from *-*. On row 2, crochet 1 dc over dc, skip 3 dc and work 3 dc, 2 ch, 3 dc in ch2, skip 3 dc and 1 dc over the dc. Happy crocheting!
03.06.2014 - 10:00
|
||||||||||
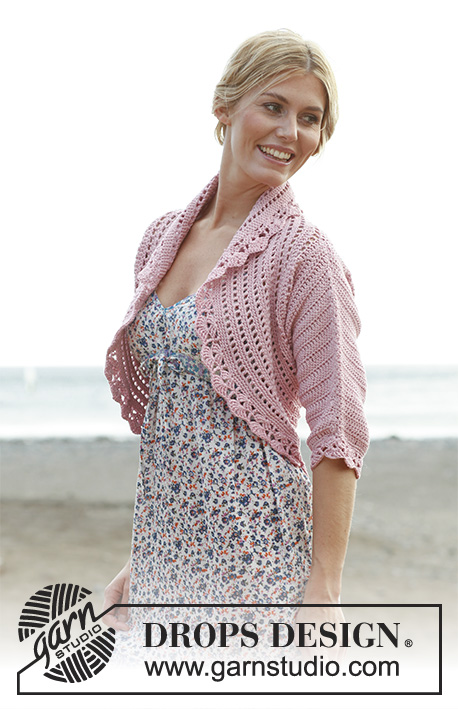
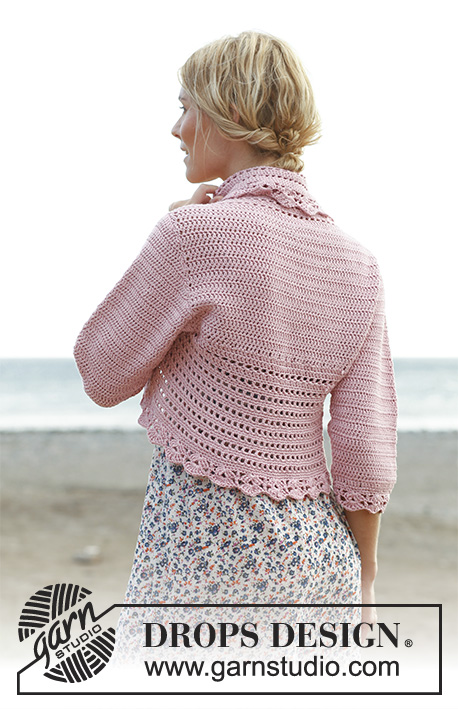
Country Rose#countryrosebolero |
||||||||||
 |
 |
|||||||||
Crochet DROPS jacket in "Cotton Light" and "Glitter". Size S-XXXL.
DROPS 138-6 |
||||||||||
|
CROCHET INFO: Replace first dc on every row with 3 ch. Replace first sc on every round with 1 ch. Finish every sc round with 1 sl st in 1st ch from beg of round. Replace first dc on every round with 3 ch. Finish every dc round with 1 sl st in 3rd ch from beg of round. INCREASE TIP: Inc by working 2 dc in first and last dc on row. DECREASE TIP: Dec at beg of row as follows: Work sl st over no of dc to be dec. Dec at end of row as follows: When no of dc to be dec remains, turn piece. -------------------------------------------------------- BACK PIECE: Ch 78-86-94-99 loosely on hook size 4 mm / G/6 with 1 strand Cotton Light and 1 strand Glitter (= 2 strands). Work 1 dc in 4th ch from hook, * 1 dc in each of the next ch 3, skip 1 ch *, repeat from *-*, and finish with 1 dc in each of the last 2-2-2-3 ch = 58-64-70-74 dc. Then work 1 dc in every dc - READ CROCHET INFO. When piece measures 7 cm / 2¾", inc 1 dc in each side – READ INCREASE TIP, repeat inc when piece measures 15 cm / 6" = 62-68-74-78 dc. Work until piece measures 22-23-24-25 cm / 8¾"-9"-9½"-9¾". EDGE PIECE: Work 1 dc in every dc on the upper side of back piece, ch 56-58-60-64, 1 dc in every dc from bottom side of back piece, ch 56-58-60-64 and finish with 1 sl st in 1st dc on upper side of back piece. Work 1 dc in every dc from back piece, in ch-spaces work 42-44-46-48 dc = 204-220-236-248 dc. Continue to work in the round as follows: ROUND 1: 1 dc in first dc, * ch 1, skip 1 dc, 1 dc in next dc *, repeat from *-* and finish with ch 1, skip 1 dc and work 1 sl st on beg of round. ROUND 2: 1 sc in every dc and 1 sc in every ch. ROUND 3: 1 sc in every sc. Repeat these 3 rounds, AT THE SAME TIME when edge measures 5, 10 and 15 cm / 2", 4" and 6" (adjust so that this is a round with sc), inc 30-30-30-32 sc evenly on round – READ INCREASE TIP = 294-310-326-344 sc. When edge measures 17-18-19-20 cm / 6¾"-7"-7½"-8" (adjust so that next round is a round with sc), work 1 sc round while AT THE SAME TIME inc 0-2-4-4 sc evenly = 294-312-330-348 sc. Then work diagram M.1. NOTE! Start to work on the row marked with 1 in the diagram. Work diagram M.1 1 time vertically, fasten off SLEEVE: Ch 67-72-72-77 loosely on hook size 4 mm / G/6 with 1 strand Cotton Light and 1 strand Glitter (= 2 strands). Work 1 dc in 4th ch from hook (= 2 dc), * skip ch 1, 1 dc in each of the next 4 ch *, repeat from *-* and finish by skipping ch1 and work 1 dc in each of the last 2 ch = 52-56-56-60 dc. Work 1 dc in every dc back and forth, AT THE SAME TIME inc 1 dc in each side on every row a total of 13-14-16-17 times, read INCREASE TIP = 78-84-88-94 dc. When piece measures 24-24-22-20 cm / 9½"-9½"-8¾"-8" (shorter measurements in the larger sizes because of wider shoulders), dec for sleeve cap in each side on every row - READ DECREASE TIP: 4 dc 1 time, then 3-3-2-2 dc in each side until piece measures 31-33-33-34 cm / 12¼"-13"-13"-13½", now dec 4 dc 1 time in each side. Fasten off. Sew under arm seam with neat little stitches. Work around the bottom of sleeve as follows: Work 1 round with 1 sc in every dc, while at the same time inc 2-4-4-0 sc evenly = 54-60-60-60 sc. Then work diagram M.1 1 time vertically. Fasten off. ASSEMBLY: Sew in sleeves. |
||||||||||
Diagram explanations |
||||||||||
|
||||||||||
 |
||||||||||
Have you finished this pattern?Tag your pictures with #dropspattern #countryrosebolero or submit them to the #dropsfan gallery. Do you need help with this pattern?You'll find 8 tutorial videos, a Comments/Questions area and more by visiting the pattern on garnstudio.com. © 1982-2026 DROPS Design A/S. We reserve all rights. This document, including all its sub-sections, has copyrights. Read more about what you can do with our patterns at the bottom of each pattern on our site. |
||||||||||


With over 40 years in knitting and crochet design, DROPS Design offers one of the most extensive collections of free patterns on the internet - translated to 17 languages. As of today we count 324 catalogs and 12267 patterns - 12257 of which are translated into English (US/in).
We work hard to bring you the best knitting and crochet have to offer, inspiration and advice as well as great quality yarns at incredible prices! Would you like to use our patterns for other than personal use? You can read what you are allowed to do in the Copyright text at the bottom of all our patterns. Happy crafting!
Post a comment to pattern DROPS 138-6
We would love to hear what you have to say about this pattern!
If you want to leave a question, please make sure you select the correct category in the form below, to speed up the answering process. Required fields are marked *.